Any work that is done with your hands has a positive effect on the development of creative abilities and motor skills. Therefore, adults and children are encouraged to spend time together doing crafts. Now we have to figure out how to make a bird with our own hands from scrap materials for a competition or just for interior decoration.
Making a bird out of paper
These are the materials you will need to create a simple paper bird craft:
- Cardboard paper.
- Scissors.
- Quilling paper or strips of colored paper.
- Paper glue.
- Markers and pencils.
- Sample.
Brief instructions on how to make a paper bird with your own hands:
- Using a pre-printed template, you can make several versions of birds at once. To do this, the drawing is transferred to cardboard and then cut out along the contour with ordinary scissors.
- Next, take quilling paper, but you can use any colored strips of 0.5 cm.
- Next, you need to glue the bird’s body itself from cardboard, as well as strips, to the base. This is done using a regular glue stick.
To make the craft look interesting, you can glue the strips (which act as wings) not completely. Then, in any draft or wind, they will move. Using a marker, details are drawn - eyes, lines for the ears, etc.
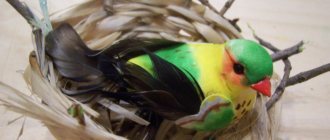
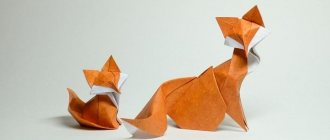
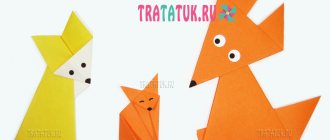
Let's make a parrot
This tropical bird is also often made using the origami technique.
There are 2 ways to do it - a simpler one, which even children studying in the lower grades of school can handle, and a more complicated one - for more experienced needleworkers.
The option for children will help them master the basics of geometry and even algebra in practice.
How to make a double-sided bird
This work option is suitable for the smallest craftsmen, since there is virtually nothing to cut out. The creative process must take place under the supervision of parents. Brief instructions:
- To begin with, the blanks are printed. To do this you need a color printer.
- One bird consists of 3 main circles, which will decrease in diameter from the larger one.
- Next, each part is glued to each other, after which it is folded in half using a ruler.
- You can glue wings made of felt or even fabric to the base of the bird.
Next, draw the eyes; you can glue the yellow beak separately. This craft takes no more than 10 minutes. You can make a whole garland from a number of such birds.
Chicken for Easter
Easter is a very bright and bright holiday that carries light and goodness. Just like a little chicken that just hatched from an egg. We bring to your attention a very interesting craft on the theme of chicken from an Easter cupcake.
To do this, we need a form in the shape of chickens, which we put in the oven with the prepared dough according to the recipe.
The second option is especially suitable for those who do not know how or do not like to bake:
- Buy a ready-made Easter cupcake, and then, like a sculptor sculpting his masterpiece from clay, make your own chicken from the cupcake.
- Decide immediately on the size of the head, leave room for the comb and beak, but if desired, you can replace them with a variety of beads.
- The main thing is not to forget about them, since these elements are not edible.
Paper applique
All children enjoy cutting and gluing appliques. Everything in this work will be as simple as possible. You need to make blanks of chopped pieces or pieces of a specific shape from paper:
- For convenience, you can draw on a piece of paper for your child the outlines of where the blanks need to be glued. Keep an eye on scissors and small parts.
- To add even more beauty, you can add tinsel, foil, colored glitter and other decorative elements.
As you can see, making an original themed craft is not difficult. You can work with any materials, but the only difference is that here you give free rein to your imagination.
Look around, take a closer look at what you have at home, what you can use in your work now, and what is better to buy in addition. Think with your child about how and what he likes to work with more; maybe he likes to cut and glue, or maybe he likes to sculpt from plasticine or dough.
Organize your workspace and get to work! We are sure you will have a fun time and dilute your leisure time interestingly.
Bird - Christmas tree toy
Some parents may still remember how many years ago there was a huge shortage. On the Christmas trees they hung sweets, fruits and products that they could make with their own hands. Today you can buy anything in a store, but toys lack that interest and sincerity.
To immerse yourself in childhood, it is recommended to make Christmas tree decorations in the form of felt birds or pine cones with the children.
What do you need:
- Several pieces of felt of different shades and colors. You can collect the bird from leftovers, as it should be small in size.
- Next, find red woolen threads.
- After this, you need to print the pattern templates using a printer.
- The details are cut out and transferred to the fabric with soap.
- After this, pruning is done.
- The parts are carefully sewn together with threads.
Such a toy can last for many years; to make it look voluminous, it is filled with padding polyester or cotton wool. Using the same technology, you can make birds from foamiran with your own hands. This foam material will withstand any load, even if it is sewn together with threads. It feels like felt itself.
What is used to create birds?
Professional handicrafts advise you to first decide on the frame of your future craft. What do they choose?
Interesting basics include:
- Salty dough;
- Eggshell. For work, they can use chicken or goose egg shells;
- Pine and fir cones;
- Plastic containers in the form of bottles;
- Corrugated paper;
- Cardboard;
- Plasticine;
- Felt;
- Polymer clay;
- Cotton wool.
Experienced professionals prefer to use compressed cotton wool. Thanks to her, the product turns out to be light. The finished craft can be used in the form of Christmas tree decoration and interior decoration.
Making a porcelain bird
If you are tired of using ordinary polymer clay, you can also plunge back into childhood and teach your descendants how to make crafts from cold porcelain. This activity is suitable for schoolchildren who are interested in creating something unusual. The recipe for porcelain at home is very simple:
- First you need to find any frying pan with a non-stick coating. It will not deteriorate during operation and can be easily washed.
- Next, you need to find 1 cup of starch, add a tablespoon of cream to the mixture, then fill everything with PVA glue (1 cup) and 1 tbsp of glycerin (available at any pharmacy).
- Place everything on low heat and stir until smooth.
Next, the mass is pulled out, you need to let it cool a little. After this, it is completely ready for modeling. It is better to work with gloves. The bird is molded as if from ordinary clay, first the body is formed, then the head and beak. After drying, you can carefully cut out the wings with a knife. This toy will look very expensive in any interior.
Alternative recipe
In many cases, craftsmen end up with a mass that quickly becomes covered with cracks. This often depends on the quality of the starch and PVA glue. There is another option that will help if the solution begins to crumble in your hands:
- You need to add another spoonful of glycerin.
- Next, add a few tablespoons of dissolved citric acid (not juice) to the total mass.
Painting porcelain afterwards is very difficult, as a special glaze is needed. However, adding a little dissolved food coloring can create some truly beautiful items.
Let's get to work
From an A4 piece of paper, make a square sheet, the side of which will be equal to 15 centimeters. On the square we mark a diagonal fold, to which the side parts of the workpiece are folded. It should look like a kite.
The upper part bends towards the midline in approximately the same way. The “Fish” figurine comes out. It closes along the long axis to hide each fold inside.
Then straighten it again, and bend the longer area upward. This will turn out to be a neck, which needs to be placed in the middle of the body using a reverse tab.
It is necessary to iron all the folds well so that the workpiece does not open during use. The head is made using the usual method - pushing the top of the neck to the inside.
Cut off the corner on the body where the tail is attached. The part that remains from the square is cut into 2 halves - wider and narrower.
Collect both into an accordion. The first is used for the tail, and the second is used for making wings. On the extreme parts of the latter, cut out patterns, similar to those made on snowflakes.
Insert the already assembled wings into the previously prepared hole. Stretch the free sides as wide as possible. The tail is glued. And now the figure is completely ready.
Now you know the patterns for folding paper birds using the origami technique. Feel free to try to assemble your own paper birds, which will be an excellent decoration for any home.
Making a bird from threads
This option is suitable for little ones, but it must be done under adult supervision. DIY thread bird step by step:
- It is best to use regular wool threads, they look more voluminous.
- You will also need a small amount of cotton wool or foam rubber.
- To work you need 3 small skeins of different colors. For example, if it is a bullfinch, then you need white, black and red.
- Next, each color is wound on a piece of cardboard. Then it is cut so that the same threads are obtained.
- They are put into a bundle and pulled together using knots.
- Foam rubber is placed in the center for volume.
This bird can even be worn as a keychain.
Egg shell craft
The question: “Which came first: the chicken or the egg” is not worthwhile in this type of creativity. Definitely, to make a souvenir you need to take an egg and only then it will turn into a chicken. Below are several master classes on how to create them.
What is necessary:
- Eggshell (whole),
- paints or corrugated yellow colored paper or thin rope,
- perhaps knitting threads,
- eyes for toys,
- red thick paper or thin colored cardboard for the beak and scallop,
- yellow colored paper for wings,
- scissors,
- PVA glue,
- plasticine,
- stick or stand,
- needle,
- plate.
Work algorithm:
- Get a raw egg.
- Carefully make holes with a needle or nail from the bottom and top.
- Blow the white and yolk through the holes onto a plate; they can be used for cooking.
- Rinse the shell well under water.
- Dry.
The next step depends on what material you have prepared for making the chicken.
Chicken painted
If you choose the simplest method, then you need to take egg-colored gouache and paint the shell.
Instead of gouache, you can use Easter sets.
Chicken wrapped
The shell can be wrapped in yellow corrugated paper, glued with PVA glue or yellow soft craft foil.
Chicken thread
The next idea is also with shells. Take thin twine or knitting threads. The shell is coated with glue. The rope is secured over the top hole with the same glue or a small piece of plasticine. Then it is wound around the shell in a spiral. Each layer is under the other, close to it.
Having reached the end, the rope is cut and the lower end is secured in the same way as the upper.
While the chicken is drying, other preparatory work needs to be done to create it.
Wings, a beak and a small scallop are cut out of thick colored paper or thin cardboard. If you have feathers, wings and a crest can be made with them.
All parts are glued to the shell, and the eyes are also glued there. If you don’t have purchased eyes for toys, you can draw dots or circles with a black marker, or make them out of paper.
If the chicken needs to be hung, make a loop of thread, attaching it to the comb. And, if you carry it with you, it’s easier to attach a stick to the bottom of the plasticine, for example, a cocktail tube or a sushi stick.
Making an origami bird
This is another option on how to make a paper bird with your own hands for children. The instructions are very simple:
- To create a beautiful dove, you only need a square sheet of paper and a black marker.
- First, the sheet is folded diagonally.
- Next, the resulting triangle is folded in half.
- Next, the upper corners are bent upward.
- Having turned everything over, the folds are repeated on the other side.
- Next, the structure unfolds as in the boat technique.
- An internal fold is formed.
- The corner bends upward again.
After this, the structure unfolds from the side, and the dove gets a wing. The head in this scheme does not look very similar to itself, however, using a marker you can fill in the eyes and make the beak more pronounced.
The bird that brings happiness
Origami bird for children is suitable for introducing Japanese arts and crafts. Even restless children enthusiastically fold and bend paper, watching how light-winged creatures emerge from a simple sheet. The most popular are swans, cranes and pigeons.
They are easy to make if you have step-by-step instructions for beginners in front of your eyes.
For the crane you will need a square that can be cut from a landscape sheet, or a special blank for origami. The main thing is that the material is dense. The sides of the square should be alternately folded twice diagonally, then in half like a book. After such manipulations, you can see lines resembling an asterisk on the unfolded sheet - these are markings.
Next, you need to make a small one from a large square. The outlined lines will help with this. One side of the square needs to be lifted and folded inward along a diagonal fold, and the same must be done on the other side.
The result was a double-sided blank. Now the right and left corners need to be tucked towards the center, turn the workpiece over and repeat the manipulations. The figure resembles two triangles with one common side. It is along it that the fold is outlined.
The top of a more elongated triangle needs to be raised and the edges tucked towards the center. A diamond should form. To do this smoothly, you should focus on the folds of the paper. On the reverse side everything is done in the same way.
Again, the corners need to be folded towards the center, turn the workpiece over and repeat. One of the vertices of this long figure should be whole, and the other should bifurcate. Holding this end towards you, you need to turn the side from left to right, like the page of a book.
Now fold the whole top onto the forked one and turn the side over from right to left. A part for making the head was formed inside the blank. You need to take it out and bend the tip at the top.
All that remains is to make the tail. To do this, unfold the edges of the workpiece from the reverse side, fold the remaining top into the center and turn the side over from left to right. So the tail was formed inside, and wings were formed at the edges. The details should be straightened out. A properly made crane can flap its wings if you pull its tail. The Japanese believe that such a bird brings happiness.
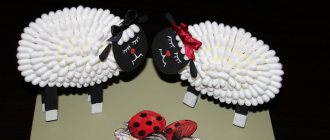
Birds made from cotton pads
This is one of the simplest options that is suitable for little ones. There is no need to print anything out; all the necessary materials are at hand. Here are simple instructions:
- To begin, draw the background in watercolor on a thick sheet of paper. The sky and a branch from the tree are added.
- After this, take two cotton pads and connect them together on a sheet with glue. Next, another disk is taken and cut into two parts - these are the wings.
- After this, you can add eyes and beak, which are also made from scrap materials.
Even a child as young as 2 years old can do this cute work. It is advisable to use a glue stick to glue the parts together.
Dove figurine
This option is suitable for those who are just taking their first steps in this craft. To create it, just a few techniques are enough.
You can create a couple of symmetrical figures that can be used to decorate a postcard for February 14th. Here are step-by-step instructions for beginners that even children can do.
Required materials and tools
Before you begin, you need to stock up on tools and materials that you will need during work:
- multi-colored sheets of cardboard;
- colored paper. It is better to choose good quality paper, otherwise it will tear and ruin the final result.
- scissors;
- a simple pencil;
- glue and brush.
And of course, free evening to work on crafts. Having prepared everything you need, you can begin.
Where crafts come in handy
The bird of happiness is a Slavic amulet, which in ancient times brought peace and prosperity to the house. But even in our times it has not lost its popularity. Here are the main areas of its use:
- as a talisman for the home;
- during popular celebrations, for example, during the apple rescue;
- during weddings in Rus', as a guarantee of strong love and great happiness.
The bird was usually hung from the ceiling in the center of the main room so that, while circling, it could inspect all the wealth, feel positive, and increase it all.
Conventions on origami diagrams
An origami diagram is a sequence of instructional drawings. To understand actions, standard notations are used:
- The main line indicates the edge of the sheet.
- “Valley” is the line along which you should make an inflection towards yourself. And an arrow indicating the direction of the fold.
- “Mountain” is the line along which you should make a bend away from you (arrow - direction of the bend).
- Simple line, fold line.
- The dotted line is an invisible line.