Hi all! I want to start today with a simple but important question! Which postcard would you be more pleased to receive: “in electronic form” or in paper version, also “made by yourself”?
I’m sure most would prefer a live postcard that you can touch and in which a piece of love, care and warmth is embedded.❤️ So today I propose to please your beloved loved ones with very beautiful and unusual gifts! As it is written in the Bible, “there is greater happiness in giving than in receiving.”
Therefore, tune in to the creative wave and catch step-by-step master classes on making postcards, as well as interesting ideas for inspiration. And as a result, experience a lot of positive emotions from the exciting process of creating your masterpieces to the excellent feeling of joy of giving...
The art of cardmaking
Cardmaking is the name given to making postcards on your own, which is based on working with everyday materials at hand and using special techniques.
To create a masterpiece in the modern world, there are all the necessary tools and decor, sold in any specialized store, with the help of which it is possible to make original and beautiful cards.
Postcards for Teacher's Day | Country of Masters
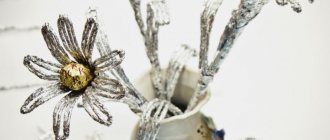
Hello! The holidays have begun... I whipped up some cards for Teacher's Day. I made them from pieces of paper left over from previous projects. I came up with the composition for one postcard, and made others in its likeness - it was much faster this way.
This is for our teachers.
It’s hard to see in the photo, but it’s brown paper with “diamond” embossed on it. I cut out the curl myself. I also drew the inscription myself in Corel. I used falling leaves as one of the attributes of September - this is a condition of the task.
In this card, the curl was made using a new edge punch. Autumn inspiration was falling leaves, and the choice of gray-green colors is not accidental - it’s dank gray rainy weather outside our window :)
And this card is for the teacher's assistant. I also drew the inscription myself.
Once again all together. I took the photo at night, so the embossing is not visible :(
This is how I designed the back of the card
With a brown postcard (photo No. 3) I want to take part in the task “It’s September” on the blog “Treasury of Ideas” https://sokrovishnica.blogspot.com/2013/08/17.html
And with a green postcard (photo No. 4) I will take part in the task - “What is autumn?” on the blog |I Love Scrap
https://blog-ilovescrap.blogspot.ru/2013/09/blog-post_4.html
stranamasterov.ru
Materials used
For beginners, it is best to use material about which you have some idea and use ordinary standard preparations. Materials and tools used:
- Paper (plain or colored);
- Textile;
- Various tapes;
- Glue;
- Brushes;
- Paints;
- Various decor.
In the process of increasing your personal skills and understanding of how to make a postcard with your own hands, you can increase the set of tools and materials used in your work. Instead of cardboard or plain paper, you can use special paper for scrapbooking and quilling.
In addition to standard decor, you can turn to various 3D stickers and chipboards. In addition, you can use gel or watercolor pencils, as well as stencils and stamps, and to give the card a special shape, use special scissors for curly cutting.
You can make part of the tool yourself, for example a stamp. To make it you need potatoes, a knife and a cookie cutter. The potato tuber is cut in half and a mold is pressed into the resulting half, and the excess potatoes are removed.
After which the finished stamp is dipped into paint and then pressed to the surface. But such a stamp has one main drawback - its fragility.
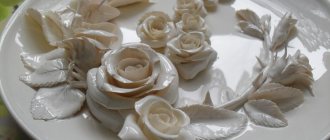
You can also use the stalk of Chinese cabbage as a stamp. To do this, you need to cut off the leaves, and use the part located closer to the root as that very stamp, after dipping the stalk into paint. The resulting image will look like a bud of a blooming rose.
Note!
- DIY gifts for February 23rd - a large selection of ideas for creating unusual gifts for Defender of the Fatherland Day
- What to give a 2-year-old boy - a list of the best options for an interesting and useful gift (120 photo ideas)
- Papier-mâché - TOP 120 photo reviews of original products. Detailed instructions for beginners on creating beautiful crafts
Making a paper umbrella
A beautiful product, to be sure. To make it you need to prepare:
- double-sided colored paper of any color you like;
- pencil;
- compass;
- scissors;
- adhesive tape or glue stick;
- a piece of thick strong wire.
Let's start making an umbrella.
- Cut out circles from colored paper. They must be the same diameter, and there must be 16 of them in total.
- Fold each circle in half twice.
- We secure each folded circle in the round part with glue.
- Take two folded circles and glue them together. They must be glued together at right angles.
- We glue the remaining folded circles in a circle, thus forming the upper part of the umbrella. The result should be a voluminous umbrella.
- We make a handle from the wire and attach it to the umbrella.
After all the effort, you should end up with such a cute work of art.
The photo below shows all the stages of making an umbrella from colored paper.
To make it even clearer, watch a video on the same topic.
Design nuances
In the process of creating a postcard from paper with your own hands, beginners should not engage in complex work, but rather make light postcards from the simplest elements and materials, but in this case, imagination will come in handy. After all, this, as well as desire and perseverance, will help you make an original product.
The design of the postcard depends on the person’s imagination and on the person to whom the postcard will be presented, his age, and gender. For example, a card for mom should be decorated with flowers, bows and beads in bright colors.
For men, you should use a restrained palette with strict decor, an example would be a postcard with a picture of a car or banknotes.
To make a postcard, you need to cut out the base of the required size, after which it is folded in half, and the fold is ironed so that the cardboard postcard does not lose its shape.
The inner surface is made lighter, since everything written on it will look more expressive. On the outer part you can draw something with pencils and paints, or make some kind of applique.
Volumetric cards made of colored paper
A very interesting version of postcards in 3D format. This craft is fun to make for both adults and children. By using your imagination and sense of taste, you can create a real masterpiece. Volumetric cards look stylish, festive, and impressive.
To make such a postcard you do not need any special skills or materials. For example, to create a holiday card with a snowman for the New Year in this style, you need to prepare:
- colored cardboard;
- white, yellow, brown, red colored paper;
- scissors;
- a simple pencil and a black felt-tip pen;
- glue.
You need to print a snowman template from the Internet or make it yourself. To do this, you need to draw a snowman from two circles, and cut off exactly the upper part of the smaller upper circle. Draw or print a top hat for the snowman.
Using the template, cut out 5 snowmen from white paper and 5 cylinders from red paper. Fold each snowman blank in half. Apply glue to one side of the folded piece and carefully glue the other piece. Using this method, glue all 5 templates together, carefully trimming the edges so that the snowman is beautiful.
Glue the cylinder in the same way. To make a broom, you need to fold brown paper into a thin tube. Cut a small strip of yellow paper, make small cuts along the wide edge in the form of a fringe, and carefully wrap it around the brown piece.
Take a sheet of cardboard, fold it in half, and glue a snowman with a broom to the very center along the fold line. Use a felt-tip pen to draw eyes, a mouth, and buttons. If desired, decorate the card with snowflakes, sparkles, draw a Christmas tree, write a congratulation...
A wide range of ways to create greeting cards with your own hands can be found on the Internet, in specialized books and magazines. You can go to master classes, watch online lessons, because there are a lot of different techniques for creating these wonderful crafts. You can use many available materials as the basis for a postcard: buttons, pompoms, knitting threads, ribbons, cotton pads and much more.
The main thing is to use your imagination, set aside time, be patient and prepare the necessary materials to create a masterpiece. A handmade postcard carries a piece of soul, care, love and is sure to please the owner!
Scrapbooking
The meaning of this technique is to stick figures on a workpiece cut out of paper or fabric. You can use this technique to decorate ready-made cards or make a completely new one. Therefore you will need:
- Three cardboard sheets (1 white and 2 colored);
- Three flowers made of paper or fabric;
- Lace;
- Tapes;
- Buttons.
A rectangular figure 16 by 20 cm is cut out of white cardboard and folded in half.
Colored cardboard is cut out according to the dimensions of pre-made drawings, after which both sheets are glued together in such a way that the smallest rectangle is located as if in a frame, onto which lace and a bow made from ribbon will subsequently be glued.
Various decorations, such as buttons and flowers, are glued to a small rectangle. All that remains is to glue this cover to the base of the postcard and paint it with a pen.
Postcard decorated with a flower using the kanzashi technique
To create an original greeting card with a flower using the kanzashi technique, you will need satin ribbons of 2 colors and different widths, tweezers, thread and needle, scissors, a lighter, beads or rhinestones for decorating the card, a silicone glue gun, cardboard for the card.
Making petals:
- The ribbons are cut into squares and folded diagonally. The resulting triangle is folded twice in the middle, using tweezers for convenience.
- The ends are sewn together, and the right angle is cut parallel to the fold line of the petal. The edges are scorched with a lighter to prevent the tape from scattering.
- Make 9 petals from a wide ribbon and 8 from a narrow one.
From the prepared petals, 2 flowers of a smaller and larger diameter are collected and sewn together. A bead or rhinestone is glued into the center of the flower. The flower in the lower left corner is attached to the prepared cardboard base of the postcard using silicone hot glue, and the remaining space is decorated with rhinestones and ribbons.
Quilling
Quilling involves forming curls of various shapes and sizes from strips of paper, from which various compositions are created.
This technique requires a person to concentrate and be careful. The manufacturing process involves folding paper strips and shaping them using finger pressure.
Note!
- Kinusaiga technique - TOP-140 photos of the best ways to create crafts using the Kinusaiga technique with your own hands + instructions for beginners
- Do-it-yourself passe-partout - a master class with step-by-step do-it-yourself schemes. Making tips + photos of the best examples
- Decoupage with napkins: TOP-150 photos of ways to decorate with napkins. Simple instructions for beginners at home
To work, use both colored and plain paper, as well as a toothpick and glue. The toothpick acts as an axis around which the paper strip is wound.
The finished spiral must be removed from the base, and the free end glued, after which the workpiece is given the required shape with your fingers.
The quilling technique is easy to learn and therefore children are delighted with it and do it with great pleasure. Moreover, all this does not require large financial expenditures; it is enough to purchase everything you need.
For all occasions
Bouquet in a vase
To create a three-dimensional postcard, you will need a package of colored cardboard and a glue stick. If this is not available, it is permissible to use ordinary PVA glue.
If you choose the latter option, then work with liquid glue very carefully, apply it little by little so that the paper does not become limp or lumpy. The highest quality products are obtained by using double-sided tape to assemble parts.
The postcard with 3D flowers with your own hands is assembled according to the following algorithm:
- Let's choose cardboard sheets for the title side of the postcard and the inside. The second one should be slightly smaller than the base, so we measure 2 cm on each side, draw a new rectangle and cut it along the resulting perimeter.
- We fold the smaller piece in half and begin drawing 7 lines from the fold side. We do this according to the following scheme. The length of the lowest line should be 2 cm. Set aside the specified size from the fold and draw with a pencil. The next line will appear a centimeter higher than the first and will be equal to 2.5 cm. Each subsequent line after it will also increase by 0.5 cm. The step distance of 1 cm is maintained for all seven levels.
Draw 7 lines on the fold side
- Cut the folded cardboard along the resulting lines. We bend the strips to one side and press the folds well. This will simplify the work later.
Bend the strips to one side
- Unbend the strips and open the cardboard sheet. The cutting turns out to be concave inward. We'll have to fix them and take them outside. Remove each strip by folding it inward at the edges and bending it outward in the middle. Close the workpiece and place it under the weight. The paper must “settle down” so that it can open and fold easily.
- Now let’s reveal the main secret of how to make a three-dimensional postcard. Let's move on to the title part. We bend it in half and glue the inner part with the cut strips. This must be done so that the folds of both pieces of cardboard meet with pinpoint precision. Take your time. Fix one half first, and then work on the second. This will reduce the risk of displacement.
Glue the cut strips onto the inside
- The main work has been done. All that remains is to fill the vase with flowers. You need to cut out stems with leaves from green paper, and several flowers from paper of a different color. Don't chase after curiosities, draw what you can. Plant two buds on the stems and leave one as is.
Cut out stems and flowers
- We are trying to put the bouquet in a vase. We glue one flower on a stem on the left side of the card, the second on the right. We coat only the lower third of the stem with glue. This will allow the element to remain movable and take a standing position when opening the postcard. The bud without a stem is glued to the top strip of the vase.
Place the bouquet in a vase
- We check the quality of work. We close the postcard. If everything is done correctly, then decorative elements will not peek out from it and its doors will open and close with ease.
There is another interesting option on how to make a 3D card with flowers.
Flower glade
To create this masterpiece, you will need green and orange cardboard, a package of colored paper and a few sheets of pure white paper.
Stages of work:
- Let's take cardboard sheets. We will leave the orange in its original form and use it for the cover, and adjust the green a little. It will need to be reduced somewhat. Let's shorten it on the sides by one and a half centimeters. Let's make the top edge wavy.
Make the top edge of the green leaf wavy
- Fold the piece of paper in half and draw 5 stripes on it, a little more than one centimeter long. The starting point should be the fold.
- We cut out the strips, bend them slightly upward, and then return them to their previous position.
Fold the stripes up
- We open the workpiece and bend the strips outward, making a bend in the middle of the cut section.
- Glue the part onto the base. The entire surface area must be coated with adhesive, leaving only the areas of the cut strips untouched.
Glue the part onto the base
- It's time to start working on the flowerbed. Let's decorate it with flowers. We will make blanks of various shapes and sizes from colored paper of different shades. Let's plant them on stems with leaves. Let's place the finished parts in the clearing. You can complement the composition with butterflies or place a wasp on a flower.
Place the finished parts in the clearing
Iris folding
This technique involves placing strips of paper and tape in a specific way to create interesting swirling images. The technology for producing such images is quite labor-intensive, which will require the creation of pre-made sketches, as well as care and diligence.
To create such an interesting postcard using this technique, you need to take cardboard of the desired color - this will be the base of the postcard, on which the diagram will be depicted.
A shape is cut out on the workpiece using a template. Next, the part is placed face down, and a template with a pre-prepared diagram is inserted into the resulting space. All decorative elements are distributed according to the pattern in a clockwise direction and glued with tape.
After all the decor has been glued, the template is removed and the blank is attached to the base. The front side of the card can also be decorated with other types of decor or simply decorated with pencils.
Accordion postcard (diagrams and templates)
Another type of voluminous postcard is the accordion postcard.
To create such a postcard you will need: thick scrap paper for the base frame, a die-cut scrap knife or stationery knife, transparent plastic for the internal parts, stamens, semi-pearls and other materials for decoration.
We take the template and make blanks for the postcard. We cut out 8 blanks for the base frame from thick scrap paper and 4 from transparent plastic.
Thick paper blank...
...and transparent plastic
We glue the plastic blanks to a paper base. To make the card fold, we make a double crease of about 2 mm on the outer folds. We connect the resulting 4 parts - glue them with glue or use 2-sided tape. Glue the remaining 4 frames on the opposite side.
Next, we connect the internal plastic parts. The easiest way to do this is to use transparent tape. We get this basis for an accordion postcard.
We connect the parts with tape
Basis for an accordion card
Now you can begin the most creative part of creating a card - decorating it! Glue fluttering butterflies and twisted greenery to the plastic. The postcard is ready!
Let's start decorating
Ready!
Original master class
See below for various templates for making the bases of such postcards:
Using your imagination, you can create all sorts of variants of such folding postcards. For example, with a predominance of children's themes. The number of components may vary.
Clock for the night owl
Asterisks for the astrologer
Birds, flowers, butterflies always look very light and airy on postcards!
Ah, France, Provence!
The Bird of Happiness
For the most beloved!
How do you like this original clock mechanism?!
Postcards with volume effect
Volumetric postcards are considered one of the most original souvenirs. All the splendor of this composition is revealed to the eye only after the postcard is opened.
This postcard is made as follows. The title side is decorated in any form, and the inner side is assembled from pre-prepared elements glued together in a special sequence.
For work you will need: a ruler, glue, pencil, knife and cardboard.
From 2 sheets of cardboard folded in half, a so-called base is made by gluing one sheet into the other, and cuts of varying depths are made on the inner sheet.
The resulting strips must be bent inward and these same strips will serve as a platform for securing the insert with decor. The front side is decorated in absolutely any way and technique you like.
Volume bouquet
This bouquet would be a great DIY birthday card idea.
Making such a bouquet involves cutting out 7 squares of the same size from sheets of paper, which will later become flowers, then these squares are folded into a triangle.
You need to bend it as many times as there are petals in the bud. Then the base of the triangle is cut off with a semicircle of the required radius.
Next, we make the petals and stems, and glue all this, including the finished buds, into the card so that when the latter is opened, a three-dimensional figure is obtained.
As a gift for mom
Butterfly card
Do you want to surprise the birthday boy? Give him an unusual folding card in the shape of a butterfly. It is guaranteed to delight the recipient, regardless of whether it is an adult or a child. It will take you about 20 minutes to do everything.
Materials you will need:
- thin cardboard;
- a piece of thin wire or string;
- several beads;
- double sided tape;
- PVA glue.
First of all, we will make stencils of a large butterfly and a slightly smaller one. Take a sheet of colored cardboard and fold it in half. We will apply the larger of the prepared stencils to the fold so that its upper part protrudes slightly beyond the edge. After cutting, you should have 2 butterflies connected at the upper wings.
After cutting you will get 2 butterflies
Cut out one more large and one small butterfly. It’s a good idea to make the first one from cardboard with a pattern. The main thing here will be to choose a color combination with the main detail.
Next, bend one of the lower wings of the double butterfly upward. The decorative part will subsequently be held on this peculiar leg.
Prepare the base of the product
Along the small butterfly, along the middle line, we will glue a narrow strip of double-sided tape and “plant” it on the back of a single multi-colored blank.
Let's repeat the operation, but with a large butterfly, just place the tape across the part. Let's attach it to the fold we made in advance on the lower wing of the double part.
Combine all elements into one whole
We will assemble antennae from string, wire and beads and attach them to the butterfly.
As an additional decoration, you can lay out a row of beads along the middle line on the back of the small part.
Attach any decoration to the central part
Let's fix the wings. All is ready!
A handmade 3D card is good for both March 8 and birthdays..
Heart of roses
Another great idea to show your love for your mom. To make a pretty greeting, you will need delicately colored paper, glue and scissors.
Fold sheet A-4 in half. The base is ready. You can move on to working on the roses.
Making buds is not as difficult as it might seem at first glance. The blank is made from a small circle of paper. It needs to be cut in a spiral, and then rolled into a roll, like a serpentine. You need to start rolling the rose from the outer edge. Lubricate the tip of the paper tape with glue and press it against the resulting bud so that it does not fall apart.
Sweet congratulations with a voluminous heart of roses
Cut out a heart from white or another color of paper that harmoniously combines with roses. We will place a composition of pink buds on it and record the result. Now it can be glued to the base. Want to add extra decorative elements and write a few kind words? Please! This will only add romance to the surprise.
Balloons
Such a card would be a good addition to a gift for a child or an adult. To do this, all you need to do is make it voluminous and then it will become very beautiful and will be pleasing to the eye.
To do this, you need to cut out balls of various sizes and colors from cardboard, after which strings are glued to each ball.
Next, checkboxes are made. Small squares are cut out of paper, which are folded in half to obtain a double shape, and from this shape the flags themselves are cut out, which should also be double. We glue the flags onto a thread so that we get a garland, having first written a congratulation on them.
Then a three-dimensional composition is made from some of the balls, for which each of the elements is glued to a paper spring, which in turn is glued to the base.
And the other part is simply glued to the same base, but without any springs. All that remains is to paste in the already prepared flags, that’s it, the postcard is ready.
Children's cards
Children of kindergarten age need to be offered something basic to make, so a do-it-yourself postcard in kindergarten should be simpler than the above cards.
It is enough to cut out a base from cardboard, in the form of a square folded in half, on the inner surface of which you can glue various figures or pictures, cut out with the help of teachers.
Children of primary school age can come up with something more complicated and, together with their parents, make original cards with their own hands for school on September 1st.
An example is a postcard with bells made using the quilling technique. To do this, the cardboard base should be folded in half and sketches of bells should be glued to the outer surface.
After that, a strip of paper is glued along the contour of the bell, and then the rest of the part is decorated with different ribbons and colors.
Pictures of the postcards can be seen below.
Christmas angel using isothread technique
Before you start making a card with a picture of a Christmas angel using the isothread technique, you must draw a picture on cardboard or use a ready-made template. On the layout, you should immediately mark an even number of points at the same distance from each other and pierce them with a needle or awl.
Each element of the angel is embroidered separately and care is taken to ensure that the thread is sufficiently tensioned and does not sag or bend the cardboard.
To embroider an angel using the isothread technique, you will need floss threads: pink for the face and nose, white for the dress, yellow for the hair and halo, red for the mouth, black for the eyes.
The face, hair and halo are embroidered using the “Circle” technique:
- Each stitch should go through 8 holes: after passing the thread through the first hole, you need to complete the stitch on the 7th hole clockwise.
- On the wrong side, a new stitch begins in the next hole counterclockwise.
- It is more convenient to embroider hair designed in the form of arcs of circles, passing the thread through every 7 holes.
The torso begins to be sewn from the uppermost middle point connecting the torso and head, the first stitch ends at the point dividing the bottom of the dress in half. Next, perform the work as described above. Finally, you need to glue the embroidery onto the title page of the postcard. To decorate the craft, cardboard is processed around the perimeter with curly scissors or a frame is made.