one of the most feminine and elegant accessories. An original decoration of this kind can significantly transform even the most boring and inexpressive elements of your wardrobe. Brooches made from satin look very attractive. But in stores, sometimes it can be quite difficult to choose from the assortment presented there an item that best suits individual preferences. In order for such an item to fully meet your expectations, it is better to make (sew) it with your own hands.
Types of tapes
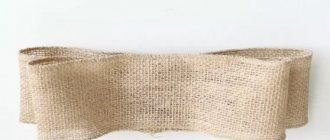
Satin ribbons
Rep ribbons
Transparent tapes
Lace ribbons
Velvet ribbons
Shiny ribbons
Brooch-tie using kanzashi technique
You will need: blue lace ribbons 4 cm and 2.5 cm wide, grosgrain blue ribbon 4 cm wide, grosgrain dark blue ribbon 2.5 cm wide, flower, scissors, ruler, glue gun, thread, needle, piece of felt, brooch clasp.
Master Class
- Prepare 4 pieces of grosgrain and lace ribbon measuring 4x13 cm.
- Connect the grosgrain and lace ribbons, then form loops and secure with glue.
- Gather 4 loops into a bow and secure with glue.
- Prepare 3 pieces of grosgrain ribbon measuring 2.5 x 24 cm, then bend each piece on both sides, connecting the ends in the center, securing with hot glue.
- Gather 3 blanks into a bow and secure with glue.
- Prepare 2 pieces of grosgrain and lace ribbon measuring 4x20 cm and assemble a bow.
- Prepare a piece of lace measuring 2.5x16 cm and gather it into a circle using a thread and needle.
- Prepare a piece of grosgrain ribbon measuring 2.5 x 14 cm, then fold the edges on both sides and meet them in the center.
- Glue the circle to the center of the folded segment.
- Glue the flower to the center of the circle.
- Glue the first piece to the second (x-shaped bow with a triple bow).
- Glue the third and fourth blanks together (x-shaped bow and blank with a flower).
- Glue 2 large pieces together and set aside.
- Prepare stripes for the tie: 2 pieces of grosgrain and lace ribbon measuring 4x13 cm and a piece of grosgrain measuring 2.5x10 cm.
- Connect the grosgrain and lace ribbons, then cut them diagonally at the bottom and sharpen a thin strip.
- Glue the 2 strips together and glue a thin strip in the center.
- Glue this blank on the back side at the bottom of the bow.
- Prepare a piece of rep and lace measuring 4x26 cm and assemble a double strip with loops at the ends.
- Glue the blank to the back of the bow.
- Glue a felt rectangle and secure the fastener in it.
The brooch-tie is ready! I recommend watching this video!
Tie brooch made of rep ribbons Master class
Materials for work
The brooch consists of several layers of grosgrain ribbon. Velvet gives the decoration luxury and high cost. But the middle plays the main role. The visual price of the product depends on it.
To make a brooch you will need grosgrain ribbon:
- 2 blue stripes – 4*21 cm;
- 2 pieces of white with silver monograms – 2.5*21 cm;
- 2 pieces of white with silver lurex – 2.5*19 cm;
- a piece of white with silver lurex – 2.5*17 cm;
- white stripe – 0.7*15 cm;
- narrow white stripe – 0.7*20 cm;
- a piece of narrow dark blue - 0.7 * 18 cm;
And also a blue velvet ribbon : 2 strips – 2*19 cm and one – 2*17 cm. To decorate the brooch you need a decoration without fastening measuring 34*60 mm and a felt base to match the base material 2.5*3.5 cm.
If you don’t have any of the above, but want to dress up the look, make a brooch from your husband’s tie. Preferably unnecessary.
Brooch made of satin ribbons
You will need: green satin ribbon 2.5 cm wide, yellow satin ribbon 0.5 cm wide, regular and curly scissors, thread with a needle, a piece of felt, a pin, beads.
Master Class
- Prepare 20 pieces of green ribbon 8 cm long and a square of felt for the base of the brooch.
- Fold a piece of ribbon in half and sew it at a diagonal angle to the felt. Thus, sew all the pieces to the felt in a circle, overlapping each other.
- Cut out a small circle of felt with curly scissors and attach it to the back of the workpiece.
- Prepare 20 pieces of yellow tape, 5 cm long.
- Cover the inner circle with yellow pieces in the same way as the outer one.
- Sew beads into the center of the brooch.
- Attach a pin on the back side.
The satin ribbon brooch is ready!
Brooch-flower
You will need: yellow, blue and pink grosgrain ribbons, scissors, lighter, glue gun, thread, brooch clasp, needle, rhinestones.
Master Class
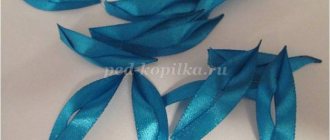
- Prepare 8 pieces of ribbon of each color: yellow – 5 cm long, blue – 6 cm, pink – 7 cm.
- Fire the edges of the ribbons.
- Prepare a thread and a needle and thread the pink, then blue and yellow ribbon.
- Form a teardrop-shaped petal by folding the pieces of ribbon one by one, as shown in the image.
- Make 7 more petals in the same way.
- Sew the first and last petal.
- Glue the rhinestone to the center of the flower.
- Attach the clasp to a piece of ribbon, then glue it to the back of the flower.
The flower brooch made from grosgrain ribbon is ready! I recommend watching this video!
Brooch made of grosgrain ribbons, Master class / Brooch of grosgrain ribbon, Tutorial
Bright brooch
You will need: red satin ribbon 5 cm wide, black satin ribbon 4 cm wide, decorative ribbon 3 cm wide, brooch base, scissors, glue gun, monofilament, needle, decorative elements - chains, beads...
Master Class
- Prepare a piece of red ribbon 20 cm long.
- Apply glue to the center of the back side and fold the edges of the tape towards the middle.
- Prepare a piece of black ribbon 20 cm long and place the red blank on it in the center.
- Apply glue to the center of the red ribbon and fold the edges of the black ribbon over.
- Repeat steps 1-4 to create another blank.
- Prepare a piece of black ribbon 16 cm long, apply glue to the center of the wrong side and fold the edges of the ribbon towards the middle.
- Prepare a piece of red decorative ribbon 16 cm long and place a black blank on it in the center.
- Apply glue to the center of the black tape and fold the edges of the decorative tape, then glue the decoration to the center of the blank.
- Glue 2 identical blanks together with an X and glue the third blank horizontally.
- Glue the base for the brooch from the wrong side in the center.
- Decorate the brooch to your taste by gluing various decorative elements.
The bright brooch made from ribbons is ready!
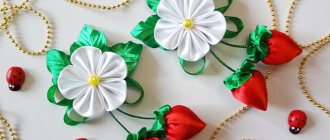
Exquisite necklace
To work you will need:
- a piece of satin and grosgrain ribbons, scarlet, golden and white;
- thin ribbons;
- special glue;
- fire from a lighter or match;
- soldering iron;
- fastenings for jewelry
Execution order:
- We cut the ribbons into squares: red - 3 pieces, size 5x5 and 8 pieces - 2.5x2.5; white - 18 pcs, 5x5; gold - 19 pcs, 2.5x2.5.
- We make large pointed petals with holes and several pieces without punctures.
- We cut out circles from ribbons: scarlet - 4 pieces, white - 4 pieces. For the base of the flower you will need three things, and the rest are needed to cover those places where the fastening will be visible.
- We take 19 small gold petals and glue them into large scarlet ones. We do the same with the white petals.
- One composition is made up of eight red pieces, while the others will consist of scarlet and white ones.
- We create a rope, it will serve as a fastening around the neck. To do this, take satin and grosgrain ribbons and tie them at the end. One strip will be longer than the other, we set it on fire with matches, and with quick actions we form a pointed edge. This end will fit more easily into the end cap that is attached to the necklace. We fix the fasteners
- We take kanzashi flowers, first red, and attach them in the middle, and the rest of the blanks on the sides. Cover the place to which the flowers were glued from the inside with round cutouts.
- We attach the remaining elements to the middle flower and decorate with beads.
The result of the work done is gorgeous; the result is a necklace in a folk style that complements both festive and everyday wear.
Brooch made of grosgrain ribbons
You will need: rep ribbons 2.5 cm and 1 cm wide, a button with a diameter of 38 cm, felt, brooch clasp, thread, needle, glue gun, scissors, iron.
Master Class
- Cut a circle of felt to fit the diameter of the button.
- Prepare a grosgrain ribbon measuring 2.5 x 70 cm and gather it onto a thread.
- Sew the gathered ribbon in a circle to the felt.
- Iron the workpiece and glue a button in the center.
- Wrap a piece of narrow tape around a pencil to create a spiral, then glue it around the button.
- Prepare a piece of ribbon measuring 2.5x10 cm, fold it in half and cut off the edges, then glue the brooches on the back side.
- Glue a piece of felt to the back of the brooch and attach the clasp.
The grosgrain ribbon brooch is ready! I recommend watching this video!
Did you like my feathers? DIY kanzashi ribbon feather brooch / satin ribbon brooch
Scheme and sketch
Making a brooch with your own hands should start with a sketch. It is better to do it immediately in full size.
It’s good if there is some kind of idea initially. You can start from available materials, or select the most suitable materials based on the sketch.
A diagram is drawn according to which the brooch will be made. Plan in advance the place where large parts will be located. They are the ones that should be transferred to the base first. Following this rule, the brooch will turn out more neat.
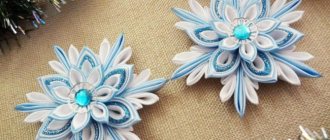
Christmas brooch
You will need: textured ribbons of different widths, scissors, lighter, thread, needle, clasp for a brooch.
Master Class
- Prepare a piece of the widest tape. It will be the base and should be larger than the other two parts.
- Fold it 3 times.
- Gather in the center and tighten with thread.
- Wrap the thread around the center, then secure it.
- In the same way, form the middle bow, it should be smaller than the previous one.
- Sew bows in the center.
- Form a small third bow and sew it to the two bows in the center.
- Prepare a thin piece of ribbon and decorate it class=”aligncenter” width=”812″ height=”578″[/img]
- Make 10 small identical pieces and twist them using scissors.
- Sew the sections together to form a curly flower, then sew into the center of the bow.
- Attach the clasp on the reverse side.
The Christmas brooch is ready! I recommend watching this video!
Brooch flower of satin ribbon/ Brooch flower of satin ribbon/ Kanzashi
Stylish bow
If you have not worked with satin ribbons before or are simply new to needlework, we recommend making a bow-shaped brooch first; it will be a very easy job, and the product will turn out very cute.
For work you will need: a pin, two satin ribbons, one and three centimeters wide, threads to match the color of the ribbons, a needle, scissors, matches.
First, take a ribbon three centimeters wide and cut six centimeters from it, and cut 1.5 centimeters from a ribbon one centimeter wide. Carefully burn the threads along the edges with a lighter, otherwise they will crumble.
Now we form a bow, this is done very simply: bend the wider ribbon in half, thus defining the middle. Now place it face down and bend the ends towards the middle, overlapping them one on top of the other. Secure the base of the bow with small stitches and secure the working thread. The bow will be more voluminous if the thread is tightened.
Now place a narrow ribbon on the seam, thereby hiding it and highlighting the middle. Carefully hide the thread on the back side of the product. Finally, attach the bow to the pin and our little brooch is ready. Such a bow can be immediately sewn to a bag, for example, thereby giving it an unusual accent, or attached to an uninteresting hairpin, it will turn out to be a very nice decoration.
Article on the topic: Overalls for a newborn, crocheted or knitted according to patterns