Home » Decor
Decor
Alena Gievskaya
57011 Views
Making a beautiful bud from ribbon with your own hands
A ribbon flower is a beautiful decoration that you can easily make with your own hands. Can be used not only to decorate a gift, but also as a gift in general. Everyone can learn, the main thing is a little patience and time. Before you make a flower yourself, prepare all the necessary materials for work and follow the suggested master classes: the result will delight you with its elegance and versatility.
Cornflower
Materials and accessories
To make a flower you need to take:
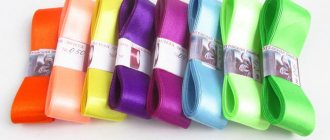
- satin ribbon of two colors, width 5 mm;
- a piece of felt to match the color of the ribbons;
- rhinestones to decorate the middle;
- lighter;
- scissors;
- glue.
Description
Cut pieces 12 cm long from dark satin ribbon.
Cut pieces 8 cm long from light ribbon. Prepare a sufficient number of pieces. We have 44 dark and 20 light blanks. To form petals, we fold the pieces of tape in pairs with their right sides facing each other, trim the corner and singe the edge. We unfold the petals to the sides. We fold them over and glue them together. In total we get 22 dark petals and 10 light ones.
Cut out the round center of the flower from felt.
Glue dark petals around the circumference. Calculate the diameter so that it accommodates an integer number of petals. Glue the second one on top of the first tier, arranging the petals in a checkerboard pattern.
We make the next tier from light ribbons, observing a checkerboard arrangement. Glue rhinestones in the middle.
Small Christmas tree for little ones
What you will need:
- straight wooden stick;
- ribbons (any kind is possible).
This easy craft is intended for the youngest members of the family. Any child can handle it without much effort. All you need to do is tie various ribbons on a stick so that their length decreases with height (following the herringbone principle). We make a rope ribbon at the top, and use it to hang our toy on the wall, or directly on the Christmas tree.
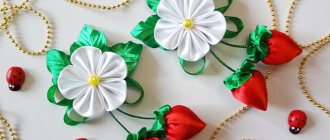
Snowdrops for the rim
Materials and accessories
To work you need to prepare:
- white satin ribbon – width 5 cm, length 2 m;
- green satin ribbon – width 2.5 cm, length 1.5 m;
- green satin ribbon – width 5-6 mm, length 2 m;
- white plastic rim – width at least 10 mm;
- ready-made yellow stamens – 3 pcs. on a flower;
- felt that matches the tone of the green satin ribbons (needed if the width of the headband is less than 10 mm) - 2 by 7 cm;
- heat gun and rods;
- lighter (can be replaced with a candle);
- needle, scissors.
Description
We cut at least 30 squares of 5 by 5 cm from white tape. We singe the edges of the cuts.
Then we sew the square with white thread using basting stitches - see photo. The thread should remain on the wrong side. Temporarily we put aside the part. We put three stamens into a bundle, which we bend in half. We twist the lower end into a spiral and fix it with hot glue.
Place the stamens in the prepared square in the center and tighten the thread. We make several turns of the thread around the base of the flower, tightening the thread tightly. To secure, make a few stitches and cut the thread. Using this technology we make several more flowers. Now let's start making leaves. From a green ribbon 25 mm wide, cut into pieces 4-5 cm long. Fold each of them in half, cut out the leaves. We process the edges with fire. We make small folds at the base of the leaves, fixing them with fire. The next step will be decorating the headband. Cut two 1 cm pieces from a narrow (5 mm) green ribbon. Glue them to the edges of the corner. Fix the tip of the tape with glue. We wrap the entire rim, making overlapping turns with the tape. You can place flowers along the length of the rim in any order, if desired. First we glue the leaf at a distance of 8 cm from the edge of the rim, then the first flower.
We hide the lower part of the flower under the leaves. To do this, glue 2 more leaves. We glue the next two flowers on the sides of the first, trying to do it as tightly as possible. This way we fill the entire area on the rim intended for flowers. If your rim width is less than 10 mm, cut out an oval (length 12 cm) from felt and glue it to the rim. Next we proceed according to the description given above.
Holiday bottles
If emerald champagne bottles spoil the entire aesthetics of the holiday, you should think about their decor.
Wrap the container with ribbon of the color you like. Place pieces of lace, beads or rhinestones on the glue. The advantage of this method: the bottle can be brought as close as possible to the theme of the holiday.
Such little things affect the atmosphere of the celebration and the sense of self of guests and hosts, so it is necessary to pay due attention to them.
Volumetric curl flower
Materials and accessories
We will need:
- satin ribbon – width 25 mm;
- satin ribbon of the same color for the base - width 4 cm;
- finished bead center (optional);
- glue gun;
- thread, needle, scissors.
Description
We prepare pieces from the tape, as shown in the photo. Place the ribbon face down. We turn the right end at a right angle. Fold the left edge in half. Fold the left edge down. We wrap the right edge into the middle and seal the edge with fire. This is how we prepare all the petals. Now you can start assembling. From a wide ribbon we cut out a circle with a diameter of 4 cm. We glue the first row of petals onto it.
Then the second row. Glue the third row on top. For the fourth row, we glue the petals separately. Once connected, glue them into the center of the flower.
You can decorate the center of the flower by gluing the finished center. The second option is to make another, fifth row of eight petals.
We roll them up. It turns out something like a slightly blossoming bud. Glue it to the center of the flower.
Gift for mom on March 8
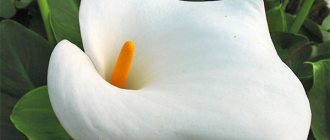
The tulip is a canonical spring flower. Gifts on March 8th are rarely complete without it, so a ribbon bud will come in handy.
The petals are rolled up from squares. To form a closed bud, 3-4 parts are enough. The blank is inserted into a green “bag” and secured with glue. Deep in the center you can plant several yellow pins with bead tips imitating stamens.
Attach the bouquet to a card or bracelet. It turns out cute and fresh.
Dahlia
Materials and accessories
To make this delicate flower you will need:
- satin ribbon – width 25 mm or 50 mm;
- a little filler for the core;
- lighter or candle;
- thread, needle, scissors.
Description
Cut out petals in three sizes:
- 2.5 by 7 cm (40 pcs.);
- 2.5 by 5.5 cm (20 pcs.);
- 2.5 by 4 cm (30 pcs.).
For the core, cut out a circle with a diameter of about 4 cm. Melt the edges of the petals. Then we make veins on them.
To do this, place the petal in a linen towel folded in several layers. We heat the knife on a gas stove to a temperature so that it does not burn through the fabric, but leaves a clear mark on it. We draw veins in this way. On the round core we sew a seam along the edge. Fill the core with filler and tighten the thread. We fold the lower group of petals inward and solder them with fire. Let's start assembling. We sew the smallest petals around the core, gathering them at the bottom. In this case, the front side of the petals should be turned outward.
The core should be voluminous. Leave 8 small petals. Now we will sew these remaining petals to the core, but with the front side inward. With the same arrangement (right side inward) we sew the middle petals. For greater naturalism, we sew small bunches from large petals. Then we distribute them at equal intervals around the circumference of the entire flower and sew them on.
DIY Christmas garlands: 60+ ideas on how to make a garland
Published: November 10, 2017
New Year is the most beloved holiday, associated with miracles and magic. Celebrating the new year is characterized by folk festivals and joyful meetings. It is impossible not to love this time of year, when everything around is transformed, and every house or storefront becomes like the scenery of a fairy tale. Everyone wants to participate in this transformation, and therefore they try to decorate their homes […]
Help us improve: if you notice an error, select a fragment and press Ctrl+Enter.
Peony
Materials and accessories
We will need:
- satin ribbons – width 50 mm;
- a small piece of felt;
- threads to match the color of the ribbons;
- ready-made stamens or beads;
- glue gun;
- needle, scissors;
- hair elastic or brooch pin.
Step-by-step master class
Let's draw a petal pattern, taking into account that we are limited to a ribbon width of 5 cm. At the widest point, the petal has the maximum possible length of 5 cm, at the narrowest - 2.5 cm.
Fold a sheet of paper in half and cut out a full petal with symmetrical sides. We trace the contours of the part on the tape and cut it out. We cut out the required number of petals - 6 pcs. To speed up the process, you can fold the tape in four layers (no longer recommended, otherwise we will get uneven edges of the parts). Please note that we cut off the top edge of the tape and leave the bottom edge for ease of assembly.
Tip: when cutting out, you should not connect the layers of ribbon with pins - they damage the surface of the satin. For fixation, it is better to use office clips.
We reduce the pattern around the perimeter by 5 mm and repeat the procedure. Then we reduce the pattern again and cut out the petals. In total we will have three tiers of petals.
Melt the edges of the petals. If you have never done such an operation before, practice on an unnecessary flap. By assessing how quickly the fabric melts and how close to the flame you need to bring the edge of the fabric, you can carefully process the edges of the petals.
Holding the edge of the fabric tightly, melt the opposite side and pull the satin in different directions. As a result, the satin will become wavy. Please note that everything needs to be done quickly, otherwise the cooled satin will become brittle. To give the petal a beautiful shape, hold it over the fire. It is convenient to do this with tweezers. When exposed to temperature, the fabric will bend, creating natural curves.
The final stage of creating a peony will be assembly. It can be performed in two ways: sequentially in a circle or alternately in a checkerboard pattern.
In both options, we sew the petals together with the seam forward with the needle.
Having finished forming the first row, we insert the stamens into the center and secure the base of the flower by sewing the petals and tails of the stamens with several stitches. We place the remaining petals in a circle, securing them at the base.
For leaves, cut 10 cm of green ribbon. Fold the corners to the center and stitch along the bottom edge. We tighten the thread.
We sew the edges of the leaf from the wrong side with a hidden seam. We cut out the base of our composition from felt. Glue leaves on it. Then glue the flower.
When the glue dries, glue a pin or elastic band onto the felt base.
Bracelets
For queries such as crafts with ribbons, master class, search engines often return bracelets and baubles.
- Braid three ribbons of different colors into a braid, securing the ends with clasps for bracelets (purchased at any craft store). You can decorate it with large beads.
- Secure the ribbon to the table with tape. Thread it through several buckles to create a kind of caterpillar. Attach a carabiner to the end. The custom decoration is ready.
- The technique for making baubles is the same for floss and thin ribbons. If you are tired of weaving with threads, there is such an alternative.
Simple ribbon flower
Materials and accessories
For production you will need:
- ribbon in two colors – width 25 mm;
- small beads, finished center;
- a small piece of felt for the base;
- glue;
- needle, scissors, thread.
Description
From the ribbon of the first color, cut pieces equal to twice the length of the petal. Fold them in half.
We prepare the same number of pieces from the ribbon of the second color. We wrap the blanks in pairs, as shown in the photo.
We glue or melt the edges, connecting them. Glue a bead onto each petal.
Cut out a small circle from felt. We place the petals in one or two tiers.
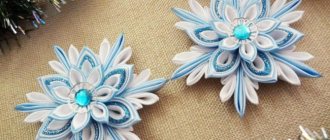
Kanzashi
Japanese technique for creating flowers and bows. Often used in the manufacture of panels, hair decorations, voluminous swans and Christmas trees.
Thanks to delicate lines and well-chosen shades, the products look lively and interesting.
apple blossom
Materials and accessories
To work you will need:
- ribbon in two colors – width 25 mm;
- ready-made stamens and core;
- glue, needle, thread;
- headband (if flowers are made for it).
Description
Cut the ribbon into pieces 7 cm long.
Fold, matching ends A and B. Sew each petal. In this case, insert the needle so that a depression is formed in the center. We string all the petals sequentially and tighten the thread slightly. We straighten all the elements so that they are pulled together evenly.
We decorate the flower by gluing the stamens and core. You can make a second tier of petals of a different color.
Good mood for creativity
Good taste, imagination and imagination simply encourage you to engage in this type of creativity. This exciting activity will require accuracy, patience and perseverance.
To work you will need fabric, scissors, a needle and thread, a glue gun, brushes and paints, and most importantly, a good mood! This exciting type of needlework will seem not like work, but like relaxation, which will relieve stress and help you forget about your current problems at least for a while.
To make flowers from fabric, you will need copper, steel or aluminum wire for the stems, fishing line or nylon thread to create decorated fragments from beads and beads, cotton wool to create unopened buds, as well as semolina or crushed coal to imitate stamens and pollen.
Wreath of satin flowers
Materials and accessories
We will need:
- ribbon in several shades - yellow, orange, golden, light brown, milky, green;
- threads to match;
- ready-made stamens or beads for decoration;
- glue;
- the finished circle is the basis for the wreath;
- lighter;
- needles, scissors.
How to make flowers from satin ribbons with your own hands
We cut out petals from the ribbon in the form of an elongated parallelogram. For each flower you need three of these parts.
We squeeze the sides along a short diagonal. This is conveniently done using plumber's pliers or round nose pliers. We assemble a flower from three parts by placing stamens in the center or simply sewing beads on. In this way we make flowers of different sizes from different colors of satin ribbon.
We cut out leaves from green ribbon and chop off one edge - see photo. Fix with glue.
Wrap the circle tightly with milky ribbon. We perform the turns with a slight overlap.
We fix the ends of the tape with glue.
We place and glue flowers and leaves on the surface of the wreath, creating a beautiful composition.
Fine Jewelry
Using miniature fabric flowers, craftswomen create hairpins and headbands, bracelets and brooches, necklaces and other jewelry that elegantly complement an outfit or serve as a worthy gift for a beloved friend.
Using thin fabric, you can repeat the ideal shape of a flower and make stylish and luxurious jewelry or accessories.
Making fabric flowers with your own hands brings a lot of pleasure and emphasizes the individuality of the craftswoman. To make original gizmos you will need a little fabric, but the result will exceed all expectations.
Bouquet of roses
Materials and accessories
For production you will need:
- satin ribbons of cream and green color: width 5-7 cm;
- felt or thick fabric;
- foam round base;
- holder;
- beads for decoration;
- needle, thread, scissors.
Description
From felt or thick fabric, cut out a circle with a diameter of 6-10 cm. Mark and cut out a sector on it - approximately 30 degrees. We connect the ends of the circle, forming a conical frame of the future flower.
We place a satin ribbon on the top of the cone, tucking its cuts inward. We sew the tape along the edge, fixing it on the cone. We begin to form the petals of the bud by wrapping the cone with ribbon. At the same time, after every quarter turn (more often), we bend the tape, as shown in the photo. We fix the lower corners with glue. For the bouquet we use a foam base in the shape of a ball and a holder.
We wrap the holder with green tape. We fix the foam base. We glue the finished buds onto the base and decorate them with beads.
Feminine look with floral decorations
Many workshops create flowers from light and airy textiles to decorate holiday outfits. Designer items are quite expensive and may not match the style and color of a certain type of clothing. You can make a fabric flower on a dress with your own hands.
An accessory made by yourself is much more pleasant to wear. A small rose will brighten up a strict black dress, and a lush chrysanthemum will make the dress feminine.
Flowers, which will add tenderness and femininity to the image, are created from very thin fabrics. Additionally decorated with rhinestones or small beads.
Daisies
Materials and accessories
To make such simple but cute daisies you will need:
- narrow tape;
- glue;
- button;
- thread, needle, scissors.
Description
Cut pieces of ribbon twice as long as the diameter of the finished flower. For one flower you need 6-8 blanks.
Apply a small amount of glue to the center of each tape. We fold the free ends to the center and glue them. We collect a lush flower from several petals. We fix them with glue or a few stitches. We decorate the center with a button. If desired, the button can be covered with a satin ribbon.
Easter eggs
Ribbon crafts for beginners are easiest to make using some kind of base. This is how fancy decor ideas are born.
Take a wooden blank in the shape of an egg (using chicken eggs is not rational, since you will have to destroy the product before the product becomes rotten). Cover it with glue, preferably in two layers.
Choose a ribbon of the color you like, wrap it around the base, starting from the top and filling the surface on all sides. The technique resembles the number eight. Secure the end with a glue gun.
You can decorate with flowers, feathers, beads or lace. As the needlewoman's imagination desires.
Popular craft making techniques
- Classic - we cut out according to templates using a brass tool or a soldering iron. Char the edges to hold the shape. The elements are assembled into a composition using a sewing needle and textile glue.
- Thermo - petals are set on fire with a lighter to achieve strength and no tears in the transparent material. The dark edging does not spoil the overall appearance of the model.
- Tape - buy ribbons with braid that do not require heat treatment. Folded and stitched according to the chosen pattern.
- Kanzashi is a technique for complex flower arrangements. Particularly interesting are the small accessories obtained, which are used to decorate albums, bags, belts, and photo frames.
Note!
- Wood burning for beginners: tips and secrets for burning pictures
- Plasticineography - interesting options for creating pictures from plasticine on cardboard for children
- DIY scrapbooking for beginners: what it is and how to do it. What you need to create a beautiful album or notebook (photo + video)
Unusual bow
Cut a small piece of kraft cardboard and insert four skewers between the layers. Throw the ribbon in a wave (one skewer will be under the satin, the second will be above it). Pass the remaining material in the same way to form a “snake”. Secure the ends with clothespins.
Move the rows closer together and tie a ribbon of a contrasting color in the middle. Unfasten the clothespins and trim off the excess. The multi-layer bow is ready. It is well suited for decorating gifts or jewelry.