Features of paper helicopters
DIY paper helicopters are made using different techniques.
- Models are made with maximum accuracy using templates. Cut out all the parts and glue them together.
- Simple versions are performed by children in creativity lessons in the form of helicopter applications, origami figures, and three-dimensional crafts.
3D cardboard helicopters can be attached to an exhibition platform.
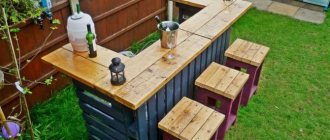
Examples of ready-made crafts made from cardboard and paper
Origami paper helicopters are often assembled by adults and made into collections. To work, print the templates on a color printer. Children up to 3rd grade love to make paper appliqués in fine arts lessons. Flat models of helicopters can be hung on a thread and attached to a chandelier in a children's room or left as is for children's games. Below are examples of finished models.
Where is it used?
Paper helicopters are used at various events. Often used:
- in children's creativity classes;
- to congratulate boys on February 23;
- for decorating premises on May 9;
- for playing at home;
- at children's parties and competitions;
- for collecting models;
- at corporate events;
- at craft exhibitions in schools.
A paper helicopter will bring a lot of joy to a child; the manufacturing process is very exciting. Creativity helps develop children's imagination and geometric thinking.
Helicopter “Mukha” for 3rd class
The following model of a three-dimensional helicopter is offered in classrooms:
Scheme of a paper “Fly” with a wooden rotator:
How to make a helicopter
Making a simple helicopter is easy; all you need is some paper, scissors, glue and imagination. It is advisable to prepare your workplace and everything you need in advance so as not to be distracted from work. Creating a craft does not take much time; even preschool children will have enough patience.
Required materials and tools
To complete this craft you will need to prepare the following items:
- colored paper;
- cardboard;
- paints;
- markers;
- scissors;
- glue;
- white sheets;
- templates for cutting.
Diagrams for helicopters are printed on a color printer; the parts do not have to be colored. This makes the work easier, but the process is quite painstaking, since the parts are small and must be carefully glued together.
To make a reliable, dense figure, it is better to use cardboard and thick paper.
Assembling a simple three-dimensional model with step-by-step photos
Technology for 3rd grade, which is often used in fine arts lessons, is called “Helicopter fly made of paper.” To work you will need a champagne or wine cork, cardboard, a cutting template, glue, scissors, a simple pencil and an awl. The model can be made from paper and cardboard. The denser the material, the longer the toy will last. The photo below shows a detailed diagram for making a helicopter.
From scrap materials
To work, you will need a cardboard egg mold, paint, cardboard, scissors and a clerical nail. Making crafts takes little time. Step-by-step instruction:
- Convex containers are cut out from the mold; they will serve as a body for the craft.
- The partitions from the mold are cut out, and the tail of the helicopter is made from them.
- The bottom of the remaining cells is cut off; in the future they will be used as a continuation of the body.
- Each cell is painted with a bright color; the windshield, windows and doors are painted in a different color.
- All other parts are painted in the color of the body.
- Use a black marker to draw the outlines of the windows.
- Make a small indentation in the cardboard cones by pressing on the top with the end of a simple pencil.
- Glue all the parts together into a complete model.
- Long strips are cut out of cardboard; two are needed for each helicopter. Glue them together crosswise.
- Use a nail to attach it to the top of the toy.
- Glue the top onto the cell.
Creating such a craft together with your child will captivate him for some time. The process of decorating and gluing the model will give children the opportunity to use their imagination. The photo below shows a step-by-step diagram of assembling the toy.
Video master class on creating a military helicopter
A military helicopter can be made from paper using a template. The model is prepared according to any scheme and painted in camouflage colors. This toy is often given to boys and even adult men on February 23rd. A military helicopter can be made using any type of equipment. Below is a video on how to make the model.
Origami with a simple diagram
A paper helicopter model can be made using the origami technique. You will need a square sheet of paper. To do this, a regular A4 sheet is folded diagonally, and the remaining rectangle on top is cut off. Step-by-step assembly of the toy:
- Fold the sheet diagonally twice and unfold it.
- The side corners are folded towards the central dotted line and unfolded.
- Turn the sheet over and do the same with the other corners.
- The corners from the bottom of the square are bent inward, then the upper ones are bent inward with an overlap.
- Fold the diamond in half.
- Straighten out the pockets of the figure on both sides.
- The upper triangle is folded down.
- Turn the side triangles to the sides.
- Turn the figure sideways, turn out a sharp triangle from the inside, straighten the edge and bend it upward.
- The corners are placed inside from the front.
- Spread the blades to the sides.
Stores sell special thick paper for scrapbooking. It makes reliable and dense toys.
The photo below shows a detailed diagram of assembling a helicopter using the origami technique.
Applications for children
An applique in the shape of a helicopter made of colored paper is made using a template. It is printed in advance on a printer. Then all the details are cut out, applied to colored material, outlined and cut out, then the picture is assembled. Ready-made applications can be inserted into a frame and placed in the children's room. This way the child will be able to admire the result of his work for a long time.
Military helicopter
The applique in the form of a military helicopter is suitable for a greeting card for May 9 and February 23. It is often done in schools and kindergartens on the eve of the holidays. Step-by-step diagram:
- Select a background sheet of blue or white color. The base of the green helicopter is glued in the center.
- White ovals and a rounded triangle are glued on top of the base of the helicopter in the form of windows.
- Brown circles are attached to the bottom. White parts are glued on top.
- Red stars decorate the cockpit and tail of the craft.
- Pinwheels for the tail and cockpit are cut out of corrugated paper.
- Circles of a different color are glued in the center and the parts are fixed on the surface.
- White clouds are glued to the background.
If you make the background sheet white, then the clouds are cut out blue. To do crafts in classes with children, templates are prepared from cardboard and given to everyone to cut out in turn. The photo below shows visual instructions for execution.
Cheerful helicopter
The applique is easy to complete, as no templates or diagrams are needed. Circles, triangles, semicircles and stripes are cut out of colored paper. Then they assemble the picture:
- Cut out two semicircles of the same size from orange and red paper and glue them in the center of the background sheet.
- A large triangle is glued to the right of it. He will be the tail.
- From four yellow and four small orange triangles, a circle is assembled on the tail of the helicopter, alternating them with each other.
- Wheels are made from the bottom from two black circles and red stripes.
- A yellow circle is glued to the left of the background sheet, and there are many yellow stripes around it, so you get the sun.
- Cut out four large yellow triangles and glue them on the top in the form of a blade.
- The place where the edges of the blade meet is covered with a small green circle.
- Using felt-tip pens, draw the eyes, nose and mouth of the sun and the helicopter. They can be made from paper.
The photo below shows a photo of the finished application. Looking at it, all stages of the painting are clear.
Reamers for assembling realistic helicopter models
AGUSTA
Amphibian
Cutting templates
Templates for creating helicopters are often used for applications and real models of equipment. They are also printed on a printer for coloring books. Young children love to color pictures as they wish. The photo below shows printable diagrams.
Paper helicopters will bring a lot of joy to children; they can play with them on the street and imagine themselves as pilots. Creating crafts with your own hands with your child will help you have a good time with your family and during creative activities. Many adults collect helicopter models. To make helicopters, templates are used, cut and glued along the lines.
Applications
We have collected several diagrams that can be printed, transferred to colored paper, cut out and made into an applique:
Some examples of applications:
Making a helicopter main rotor
We take one of the bottles and cut off the top part along the “hangers”.
We also cut off the bottom of the bottle.
From the resulting workpiece we cut 4 strips - parts of the main rotor (or, simply put, the propeller on top of the helicopter). We place the workpieces in front of us with the convex side up.
We cut off rectangles on each part out of four with a height of 1/3 of the height of the main part, leaving a narrow protrusion 0.6-0.7 mm wide.
We flatten the resulting protrusions to form a “groove”. We place toothpicks in these “grooves” and wrap them with tape.
Cut the cocktail tube into pieces 2/3 the length of a toothpick. We put short tubes on toothpicks. This will give a neat look to the propeller blades.
We make 4 holes in the bottle cap using an awl or a thick needle. The holes should be of a diameter suitable for a toothpick.
We insert toothpicks with propeller blades into the holes. The helicopter's main rotor (propeller) is ready.
YouTube Downloader - Download Youtube videos for free!
Method 1: Recommended! The fastest and easiest way to download videos and music from YouTube is to install SaveFrom.
net helper
.
INSTALL
Because of its convenience, Youtube.com is the most popular video hosting site and the third most popular website in the world. However, its functionality is limited when you try to download YouTube videos for free. You can only save a small amount of video and audio using conventional methods.
SaveFrom.net offers the fastest way to download Youtube videos in mp3, mp4, SQ, HD, Full HD and a wide range of free formats. This is the most convenient YouTube downloader you've ever tried! Save one video or song to your computer or mobile phone and see for yourself!
How to download download videos from Youtube? »
Wondering how to download music and videos from Youtube?
- Click the green "Download" button to save the video, or select the desired format (MP3, MP4, WEBM, 3GP).
- Then click the gray arrow to the right of the Download button to select your preferred format.
- Now you can enjoy videos and playlists offline! Works in Chrome, Firefox or any other browser.
How to download video from Youtube to mp4 or mp3? »
- If you want to download Youtube videos in mp3 or mp4 format, you will need Televzr Downloader.
- If you're using Ummy, the "HD via Ummy" or "MP3 via Ummy" buttons will appear below the video.
- Once you have installed Youtube downloader on Mac or PC, you will see a Download button under each video offering to save HD or mp3.
- This method works with all versions of Windows.
Method 2 Download Youtube Videos via SS
youtube.com
How to save movies without Youtube downloader add-on? »
Do you believe that downloading YouTube videos online can be done without an add-on?
- Just add “ss” to the video URL to start the process of downloading videos from Youtube.
- Will start soon
Example:
Source URL: https://youtube.com/watch?v=YOcmSsBfafg
URL with ss: https://ssyoutube.com/watch?v=YOcmSsBfafg
Method 3 Start downloading videos from Youtube by adding "sfrom.net/" or "savefrom.net/"
How to save video from any other web page? »
Do you have a video hosted on another site and want to download it?
Using SaveFrom.Net Youtube Downloader, you can save videos not only from the major video sharing websites, but also from 99% of all web pages that have videos. Simply add "sfrom.net/" or "savefrom.net/" before the website URL and press Enter. So you will see a list with direct links to all videos posted on this web resource.
Example: sfrom.net/https://www.freethechildren.com/
Method 4 Download the video using SaveFrom.
net
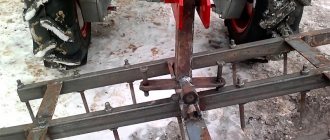
Making a propeller in the tail of a helicopter
From the remaining blank of the first plastic bottle, we cut 4 strips for the propeller in the tail of the helicopter, 1/3 the length of the strips for making the upper propeller.
Similarly, we cut out rectangles from the parts of the blades, leaving a “teeth”.
We flatten the “tooth” on each part of the blade into a groove.” Let's prepare a cross measuring 1.5 cm x 1.5 cm. (For the cross, you can purchase ready-made parts that are used when laying facing tiles or cut from a very dense material - plastic or cardboard). Cut short tubes from cocktail tubes with a length equal to the length of the “teeth” of the blade.
We put short tubes on the cross. We insert the propeller blades into the tubes. The propeller for the tail section of the helicopter is ready.
Cutting out a helicopter with a jigsaw
There are many rules for cutting, but you need to rely on the most common ones. First you should cut out the internal elements and then start cutting out the outline. There is no need to rush when cutting. The main thing is to always keep the jigsaw straight at a 90-degree angle when cutting. Saw out the parts along precisely marked lines. The movements of the jigsaw should always be smooth up and down. Also, do not forget to monitor your posture. Try to avoid bevels and unevenness. If you go off the line while cutting, don't worry. Such bevels and irregularities can later be removed using a flat file or “coarse-grained” sandpaper.
Rest
When sawing, we often get tired. Fingers and eyes, which are always tense, often get tired. When working, of course, everyone gets tired. In order to reduce the load, you need to do a couple of exercises. You can view the exercises here. Do the exercises several times during work.
Attaching the propellers and final assembly of the helicopter
We take a second plastic bottle and two caps from such bottles.
We place the covers next to each other and make a through hole with a diameter suitable for a felt-tip pen. Insert a felt-tip pen into this hole. The covers can be secured to each other using tape.
Then we cut helicopter windows on both sides of the bottle.
Between the windows we cut a hole at the top for attaching the top screw.
We fasten the upper rotor of the helicopter.
We screw the cap with a felt-tip pen (the tail part of the helicopter) to the bottle.
At the end of the felt-tip pen we attach a small screw for the tail of the helicopter using tape.
DIY world
Rating: 5 / 5
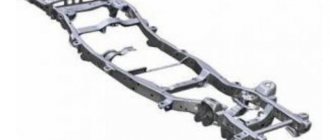
An indispensable accessory of many modern flying machines is a propeller. By creating thrust, the propeller propels forward airships, gyroplanes, helicopters, aircraft with piston and turboprop engines, and tiltrotors. With the help of a propeller, snowmobiles move at high speed through the snow, and gliders through the water.
A propeller lifts up huge machines - helicopters, allowing them to move forward, backward, sideways in the air, and, if necessary, hang motionless in one place. How does a propeller work and why does it create a traction force capable of moving and lifting into the air? flying machines weighing several tens and sometimes hundreds of tons? To understand this, let's look at a regular electric fan. A fan blade is a simplified propeller. As soon as the fan is turned on and its blades begin to rotate rapidly, we will feel a strong air flow. It will easily scatter small pieces of paper, rags and other light objects that were near the fan. This occurs because the fan blades are inclined at a certain angle to the direction of their rotation. This angle is called the angle of attack. As the blades rotate, they throw the air back, thereby creating thrust. The blades themselves tend to move forward. This is especially noticeable in fans with rubber or fabric blades: they bend forward, forming a so-called “tulip”. While rotating, the propeller develops an aerodynamic force directed along its axis. This force, called the thrust force, depends on the speed of rotation of the propeller, its diameter and pitch. The thrust force of a fan can be greater or less than its weight. It depends on the power of the fan. If the thrust force is less than the weight, then the fan will drive air through itself, but it will remain motionless. If the thrust force is greater than the weight of the fan, then the fan will be able to fly around the room like a helicopter. But this is not required from the fan, so its thrust force is small.
The toys described in this article will help you practice making various propellers, adjusting them, and launching them.
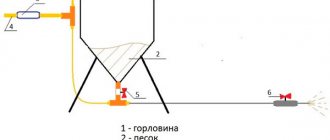
“FLY” The simplest flying toy, the main part of which is a propeller, is the “fly” indoor helicopter (Fig. 1). This toy is called “fly”, probably because when it flies, it makes a sound reminiscent of the buzzing of a large fly. The “fly” consists of only two parts: an air screw A and a stick B, which is used to spin the screw and to give the “fly” » stability in flight.
The size of the toy may vary depending on the materials at hand. The ratio of the sizes (in millimeters) of the screw and the stick is shown in the table.
| SCREW, mm | STICK, mm | ||||
| No. | length | thickness | width | length | thickness |
| 1 | 140 | 7 | 15 | 200 | 4 |
| 2 | 140 | 8 | 20 | 220 | 4-5 |
| 3 | 160 | 10 | 20 | 240 | 5 |
Screw templates for these sizes are shown in Fig. 2. To make a screw, cut a block of the required size from linden or other soft wood. In the center of it you need to drill or pierce a hole with a diameter of about 1 mm with an awl and apply a screw template to it (Fig. 3). Then use a sharp knife or chisel to plan the block along the contour of the template.
After processing, the workpiece should look like in Fig. 4.
Now plan out the propeller blades. The finished screw should be light. The lighter the propeller, the better the fly will fly. How to make the blades thin and give them the correct slope and the correct cross-sectional shape is shown in Fig. 5. First you need to perform rough processing of both blades alternately with a knife (Fig. 5a). The upper surface of the blade should be blindly convex, the lower surface should be completely flat. Then, using a rasp or a bastard file, you need to give the blades the exact shape, as in Fig. 5th century Finally, clean the blades with sandpaper and glass. When finishing the propeller, it is necessary to check whether the blades have the same weight. To do this, put the screw on a thin needle or wire and place it horizontally, pressing one end of the wire to the edge of the table. After this, the screw is slightly unscrewed. When it stops rotating, the heavier blade will be at the bottom. It must be marked with a pencil, and then the excess wood must be removed from it. The balanced screw should be in a horizontal position after unwinding. Paint the screw with some bright, quick-drying paint. After that, insert the stick into place and start starting. The stick should fit tightly into the screw hole, but it should not be driven in with a hammer. This may cause the screw to crack or the wand to break. Its length is chosen so that the “fly” is comfortable to hold in your hands. A stick that is too long, increasing the weight of the “fly”, makes its flights short and rough. If the stick is too short, the “fly” loses stability in flight and falls on its side even before the propeller stops rotating. The “fly” is launched as follows: holding the stick between your palms in a vertical position, quickly move one palm over the other, spinning the stick counterclockwise arrows. Then you need to unclench your palms. The released “fly”, under the influence of the lifting force generated on the propeller, will rapidly fly up. The flight of the “fly” can be directed. If, at launch, its axis is not positioned vertically, but slightly tilted forward (Fig. 1), the “fly” will fly, gaining altitude, along an inclined curve. You can make the “fly” fly in the desired direction at a distance of 8-10 m. These flights will confirm that the thrust force is always directed towards the axis of rotation of the propeller.
A well-flying “fly” is an interesting toy. With the same “flies” you can arrange various competitions: for the height and distance of flight, or whose “fly” will fall into the center of a circle drawn on the ground, whose will fall into the basket of the basketball backboard, etc.
SPIRALIFERAnother flying toy similar to a “fly”, the flying propeller spiralifer (Fig. 6). To unwind the screw, there is a special drum - a wooden spool of thread, on which a thin cord about 50 cm long is wound. By pulling the cord, you can quickly rotate the drum along with the screw mounted on it. The spiralizer propeller can rise to a height of up to 25 m and, with a tailwind, fly a considerable distance. This article describes a propeller with a safety rim made of steel wire (Fig. 7). A propeller without a rim is poorly visible in flight and, in addition, can injure spectators or the launcher during launch. The spiralizer propeller is three-bladed. Tin cans are suitable for making it. The central part of the screw - the hub - should be made heavier by soldering the pad shown in the figure to it. After this, holes must be made in the lining for the driving pins of the drum. When making a propeller, it is very important to achieve the same bending of all blades (Fig. 8). The finished screw must be balanced. How to do this is described above. Then sand the propeller and paint. The ends of the propeller blades must be soldered with tin or riveted with thin rivets with a safety rim. The spiralizer drum is a spool of thread. It is advisable to choose a large-sized reel - it has stronger sides, which will more securely hold the drive pins made of nails of suitable thickness.
The handle for the drum can be made from a piece of hard wood. Dimensions are given in Fig. 6. You can use a ready-made handle from a file or chisel and glue a wooden or metal rod of appropriate thickness into it. This design will be more beautiful.
Start the spiralizer like this. After winding the lace around the drum, place the screw on the drive pins. Holding the handle with your left hand and slightly tilting it forward, you need to vigorously pull the cord.
The starting cord must be wound around the drum in such a way that when it is untwisted, the screw rotates counterclockwise. Therefore, before pulling, check which direction the screw will rotate.
FUSELAGE MODEL OF A HELICOPTER Polish aircraft modellers, having attached a light fuselage to the main rotor of a spiralizer, received a toy that looks like a real helicopter. The model flies well indoors and outdoors, reaching a height of 20-25 m with successful launches. This model is also launched from a cord using a drum. Only for the spiralizer, when starting, the lace is wound onto the drum manually, and for the helicopter model - automatically, under the action of a twisting bundle of rubber bands (Fig. 11). A drawing of the model in three projections is shown in Fig. 10. Fuselage 1 is made of foam, corn core, balsa, cork or some other lightweight material. You can make a fuselage from a dry linden block by hollowing it out from the inside. The thickness of the walls should be no more than 1.5-2 mm. The fuselage is made of two halves with divisions along the vertical axis. After the final adjustment and preparation of the socket for installing the main rotor, the halves are glued together. A hole 2 passes through the fuselage along the vertical axis to accommodate the main rotor shaft with a ratchet 3. The upper part of this hole has a diameter of 2.5-3 mm, depending on the thickness of the rotor shaft . The lower part needs to be drilled to a depth of 20-22 mm with a diameter of 10-12 mm. The main rotor shaft ratchet will be placed here. The inclined plate 4 installed on the rear fuselage prevents the model from rotating during flight. It is made of celluloid or plywood 1 mm thick. The plate must be glued into the cut of the tail boom as shown in the figure. The diameter of the plate is 25 mm. The wheels of chassis 5 are best made from ordinary student rubber. Landing gear 11 is made of steel wire or duralumin plate. During final assembly of the fuselage, it is necessary to balance the nose and tail sections. To do this, hang the model on a thread tied to the end of the main rotor shaft inserted into the fuselage. From the heavier part, excess material is cut off with a knife or removed with a file. You can also glue a piece of lead onto the lighter part with BF-2 glue. The finished fuselage is painted. The main rotor blades 7 are made of plywood or tin in the same way as for a spiralizer. A tin propeller is easier to make, but with it the model will fly somewhat worse. A main rotor made of plywood is made in the following sequence: first you need to cut out three separate blades using a jigsaw according to a template made of good aircraft plywood 2-2.5 mm thick (Fig. 12). Then the blades are processed with a file so that in cross section they have the shape shown in Fig. 10 and 12. Before final processing, the blades must be made equal in weight. Then clean it with fine sandpaper and connect it together using a hub (Fig. 13). The hub consists of three plywood circles with a diameter of 16 mm. The upper and lower circles have a thickness of 2 mm, the middle (inner) - 3 mm. Three cuts are made in the middle circle, into which a screw is glued. The circles, glued together, form a strong hub. The rim of the supporting screw can be a plywood or celluloid strip 2 mm thick and 5 mm wide. The ends of the blades should be cut into the rim, as shown in Fig. 10, and secure the joints with a cloth strip sticker. For a rotor made of tin, it is best to make the rim from steel wire with a thickness of 1 mm. In this case, the ends of the blades are simply soldered to the rim. The main rotor shaft (Fig. 9) can be machined together with a ratchet or soldered from two parts: the upper one, which is a metal rod 35-40 mm long and 2.7-3 mm thick with thread and two nuts, and the bottom - a tube of the same diameter as the rod. The ratchet grooves are cut on this tube. The trigger handle is shown in Fig. 11. Bend it from an iron or duralumin strip 18 mm wide and 1.5 mm thick. The drum is made from a wooden spool of thread, into which a metal rod is glued, connected to the spool with a through cotter pin. An eyelet is made at the lower end of the rod for attaching rubber. At the other end, a hole with a diameter of 1.5 mm is drilled into which a transverse pin is pressed into engagement with the ratchet.
The trigger mechanism is assembled in the following sequence: after riveting the handle, holes are drilled in the center of it for the drum shaft and a hole for the trigger cord. Then a coil is inserted inside the frame, and a metal rod - the drum roller - is glued into it with BF-2 glue. Between the coil and the frame it is necessary to place washers made of tin or celluloid at the top and bottom. Then the coil together with the roller is drilled through with a 1.5 mm drill and a thin cotter pin or nail-rivet is inserted into this hole. Four rubber bands with a cross section of 1×4 mm are pulled between the base of the handle and the eye of the roller.
To prepare the assembled trigger mechanism for action, the coil should be twisted 25-30 turns counterclockwise. Then pass a launch cord about 600 mm long through the hole with a ball or button attached to its end. I'm tying the cord! to the cotter pin passed through the reel. If you then release the coil, it, under the influence of a twisted bundle of carved ribbons, will begin to rotate and wind the starting cord around itself. Pulling the cord, we twist the rubber again and force it to wind the cord onto the reel again. Thus, the trigger mechanism will always be ready for action, and there is no need to wind the cord onto the reel by hand. To start, the finished balanced model is placed on the roller of the finished mechanism so that the pin fits into the slots of the ratchet. The trigger mechanism must be held in your left hand, and the cord must be pulled strongly with your right hand. The model will take off. The direction of the model's flight will depend on its position at the start (just as it happened when launching the spiralizer).
The model should be launched in open areas or in large spacious rooms (gymnastics hall, etc.).
mir-samodelok.ru
Folding the helicopter body
- take a sheet of paper (A4 size);
- bend one corner so that you get a square as large as possible (as in the picture);
- the remaining part of the sheet of paper must be cut off and put aside for now, we will soon need it - we will use it to make blades for our helicopter with our own hands;
- as soon as the square is ready, you need to draw four lines on it, as in the picture;
- along these lines we will make bends;
- Next, you need to bend a sheet of paper in the marked places so that the result is a blank for a helicopter, as in the picture;
- all lines must be ironed thoroughly - the origami technique requires accuracy;
- now we see two pocket triangles in front of us, and we will work with each of them in turn;
- We take one of the triangles and bend the corners of its base into the center, as a result we get a rhombus;
- make sure that this diamond is even;
- after that we bend the corners of the diamond, as in the picture;
- to fold a helicopter with your own hands, you need to ensure that each line is even, all bends using the origami technique should be done very clearly;
- now we look at the upper small triangle, which was formed after we took the previous step;
- this triangle must be bent down, as in the picture;
- after that, we will insert into each other the two corners that we worked with in the last two stages - the result of this operation should look like in the figure;
- bends should be made in the same way on the other half of the rhombus and on the second triangle;
- after you have completed all these operations, you will have a paper blank for a helicopter, as in the picture, it doesn’t look much like a helicopter yet, but there’s still work to be done;
- Your workpiece must have a hole at the bottom - and now we will use an interesting technique that is not so often found in the origami technique;
through the hole you need to inflate the entire workpiece to get a three-dimensional figure, shaped like a cube;- on one of the faces of the cube, a fold line should appear in the middle - it is along this line that the cube obtained from paper should be folded;
- the upper lines of the just bent cube should be connected and carefully ironed with your hands, they should hold well;
- As a result, after this operation we will get a helicopter fuselage made of paper.
Homemade HELICOPTERS | KULIBIN.net
Aug 19 2008
There is another open project that allows you to create a small spy helicopter.
It is in English, made on a slightly different element base, but the principle is similar. Helicopters of this type have appeared recently, it has become possible Read more »
Aug 18 2008
You don't have to be very smart to make a reconnaissance drone. You can use an open source project. Good German guys made such a helicopter and offer it to everyone who wants to replicate it. Moreover, all components can be purchased from them in the online store. Read completely "
Feb 11 2008
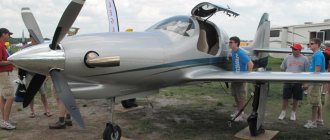
SkyLark translated into Russian means heavenly prankster.
The development is very thoughtful and professional; pilots are amazed by the stability and at the same time high maneuverability of the device.
SkyLark Advantages
Helicopter vertical takeoff and landing, flight in any direction, hovering. Read completely "
Feb 11 2008
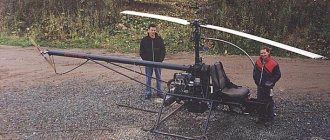
The G1 homemade helicopter is one of the smallest and easiest to build homemade helicopters. It has the most simplified design, designed for one person, takes off and lands vertically, flies forward, backward, sideways and hangs. It can be stored anywhere, in the garage, at the dacha, in the apartment. Read completely "
Feb 05 2008
The Adams-Wilson helicopter is without a doubt one of the best single-seat micro-helicopters, the most popular among homebuilders.
This development has been repeated many times by home-made people.
Read completely "
Feb 04 2008
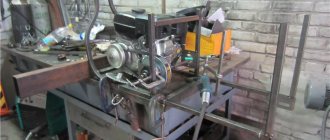
The helicopter does not have a swashplate. It is built according to a coaxial design without cyclic pitch control.
Control is achieved by changing the center of gravity, engine speed and a small rudder for heading control. In my opinion, it is possible to build such a helicopter using gears from the final drive of a Ural motorcycle and a suitable two-stroke engine with a power of about 15 hp. However, if the rotor diameter is increased, the power required can be reduced.
Feb 01 2008
The world's smallest helicopter
Making blades
Now we return to the strip of paper cut at the very beginning. Our helicopter needs blades, and now we will make them with our own hands, of course, also using the origami technique.
The remaining strip of paper must be folded into an accordion, as shown in the picture below. Making blades is not that difficult, as you can see. We unfold the accordion and see that it has turned into the part we are missing.
The final touch remains to finish making the helicopter using the origami technique: we need to insert our paper blades into the cut that is located at the top of the fuselage. And finally, our helicopter is ready with our own hands.
You will learn how to make more complex helicopter models by watching this video:
Homemade helicopter with your own hands | DIY helicopter
| ||||||||||||||||||
How to make a flying helicopter out of paper
| Paper helicopter |
| Master class in one photo: how to make a paper helicopter |
| Easy to do, fun to play |