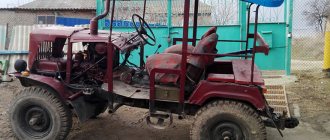
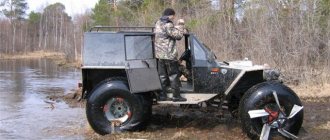
In terms of functionality, tractors have no equal. Reliable, versatile and wear-resistant, they take on any task related to field work. They have only one drawback - the high cost, which grows from year to year. But this problem can be easily circumvented by making a tractor from scrap materials with your own hands.
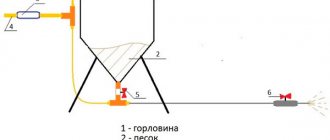
A tractor is a mechanism with a wheel or track drive, characterized by the coordinated interaction of its working units. Today, “Kulibins” have learned to make homemade tractors from almost anything that runs on a powerful engine. Among them is the once popular car “Niva”, also known as “Lada” or “VAZ” 2121, which will be used in our homemade product.
The process of recreating a tractor from Niva 2121 looks like this:
- Frame assembly;
- Installation of motor and transmission;
- Hanging the steering column, hydraulics and wheels;
- Adjusting the brake system;
- Refinement of comfort elements - driver's seat and body.
Let's look at each of them in more detail.
Advantages of homemade products
A homemade tractor from Niva has a number of advantages:
- Possibility of manufacturing a vehicle with a 4x4 wheel arrangement. It will be mobile and passable, which will allow you to plow the soil on an uneven surface.
- Simplicity of design and low cost of parts. Homemade products are mainly equipped with inexpensive elements from nearby stores. The main thing is that they must be in good working order and free of rust stains. In the future, if desired, they can be replaced with better ones.
- Fuel saving. Niva-based agricultural machinery consumes 1.5 times less gasoline when compared with special machines made at the factory.
- Large selection of modifications. If the unit is equipped with new hydraulics, it will be possible to install, for example, a small plow on it.
Another advantage of homemade equipment is performing repairs yourself.
The design is as simple as possible, which allows you to replace broken parts without the help of specialists.
This is interesting: Hyundai petrol and electric cultivators: device, technical characteristics, photos and videos
Features of operating a homemade tractor
Experts recommend that owners of homemade equipment adhere to the following rules:
- Change the oil every 3 days of operation, and if you use the machine constantly, every 2 days.
- Use gasoline intended for Niva, because the engine will not be able to operate on any other type of fuel.
- Carry out wheel alignment frequently (at least once every 3 months).
- Before each trip, check the tire pressure. Due to the design features, rubber will quickly become unusable if the indicator is low.
- Constantly check the elements located under the bottom of the vehicle for rust.
- Do not use large attachments because the motor will not cope with the heavy weight and will overheat.
If you follow these tips, your Niva tractor will last a long time and will break down less often.
Making a homemade frame
The frame is the “skeleton” of any traction device, be it a passenger car or a tractor. The body, transmission, engine, suspensions, etc. will be attached to it.
The frame for a homemade tractor from Niva can be:
- all-welded - classic design. Characterized by:
- ease of manufacture;
- low maneuverability, especially when cornering and when driving on bumpy roads with a loaded trailer;
- break frame - often called a 4x4 frame, which consists of 2 parts. Is different:
- labor-intensive assembly;
- excellent cross-country ability, making it popular among craftsmen;
- reliability under significant loads, allowing you to maintain balance on any underlying surface;
- a minimum turning radius, allowing the tractor to turn around its axis literally on the spot.
Because of this, we will focus on the last group, a detailed drawing of which is presented below.
The 4x4 frame is spar.
This means that it will be composed of:
- cross members - stiffeners;
- longitudinal spars - externally it is a metal box;
- fasteners and brackets that will keep the body from moving.
Procedure:
- We weld 2 half-frames using channel No. 8 with dimensions of 90 x 36 cm (front) and 60 x 36 (rear).
- We supplement the front half-frame with 2 sections of square pipes on which the engine will be supported;
- We mount a stand made of thick-walled metal (1.2 cm) to the rear half-frame, which we reinforce with an equilateral corner;
- We weld a rectangle at the back of the stand - it will serve as a rear hitch onto which auxiliary adapters will be hung - a harrow, a plow, a milling cutter for a tractor;
- In the upper part of the front half-frame we adapt a platform for the tractor driver’s seat, for which we weld it with a metal sheet;
- We weld steel forks to the center of the half-frames;
- We take a trunnion and support bearings (for example, from an old KAMAZ);
- Using 2 steel forks and a hinge, we connect the half-frames to each other;
- We retrofit the front part of the supporting structure with a hub from the front car wheel - this will give it the ability to move in 2 planes. The displacement range can be adjusted using a gear wheel and limit stops.
Niva, if we take it, what needs to be improved and modernized? | Topic author: Valery
Niva VAZ Anatoly, if we take what needs to be improved and modernized? if, considering that the car is in good condition, and it is as if it was “factory” without any modifications, if you drive it on relatively average off-road conditions, otherwise I heard that modifications would not hurt it, such as strengthening the transfer case mount, etc. in general, enlighten anyone who is familiar with the field especially
Gennady Don't listen to anyone, the Niva is a great off-road car. Start with a suspension lift, replace tires and disks, install locks in the axles, “untie” the front gearbox from the block, strengthen the attachment points of the transfer case and panhard rod. It also wouldn’t hurt to install a winch, power bumpers and a snorkel. Now you can storm almost everything.
Ivan 99% of the parts need to be finished with a sledgehammer and a file. Well, the nameplates can also be painted.
Denis Try to choose a better shniva... It is more convenient for modifications than the TAZ.
PS Perversion - this is an off-road vehicle with no frame construction, like the Shniva and the Niva... On the off-road, both are killed... And how do you know that the condition is good?
George has nothing to add to Konstantin’s words! and don’t think about plastic ugliness, what’s it called, Cheviniva?!
Artyom Why even buy a semi-finished product that immediately needs to be modified and modernized? Do you respect yourself as a buyer or do you think that any bullshit can be sold to you?
Eduard If the car is in good condition, there is no need to modify anything... Everything that Konstantin listed should only be done if the car is more than 10 years old, because at that time the details were different. and now newer ones have appeared, so they will be better... + In addition, “replacing tires and wheels” is only needed when the old ones do not contribute to a good quality ride. Power bumpers are not necessary at all. So decide for yourself, good luck anyway!)
Vladislav There used to be a field.. -what was done. During one wonderful trip along the Russian Roads, Vasily and a friend sanded the NivaShka so that when they drove, they tore off the transfer case sockets.. then we suffered for a very long time with this matter.. I climbed onto some site.. I don’t even remember which one.. in general, smart the person advised to attach the transfer case with a channel!!) then the strength and reliability will be higher, and you will also have a feeling of confidence!) and so they did! further .. we bent all the rods on the rear axle Nikolay did the same thing .. another guy advised to weld either a seam or a small reinforcement to these tygs. Vladislav also did it in short) and it also helped!) .. then they lifted the eyelid a little. but the wheel size was not changed. and that’s all)) and, yes, the most important thing.. the ignition system was sealed!! this is a thing, especially when there is aShnorKel!) I advise!)) that's all. Good luck!! this is enough to be a tank and not break!)
Aleksey Niva may be an “okushka” among all-terrain vehicles, but this is a real all-terrain vehicle. I drove the usual, European version, without any bells and whistles, where I wanted and how I wanted, in short, wherever I look, I go, snowdrift or holes, puddles, mud, field , I don’t give a damn, you always eat confidently and don’t think about anything. As for the “lousy field”, you can only go fishing with it on a paid pond, with asphalt roads, in a glamorous suit, with glamorous luck.
Application area
Homemade mini tractors, videos of which can be found on the Internet for free, have similar technical data, as well as performance indicators, as store-bought options, such as mini tractors made in Russia, China, and Belarus.
Of course, they will differ in the power of the engine used, but the very specifics of the work they perform will be similar. In principle, the idea of assembling a home-made unit was to carry out the list of agricultural works characteristic of a mini tractor.
Probably its main purpose is direct work “in the field”. We are talking about plowing land holdings, removing weeds so that the treated soil is suitable for subsequent planting of potatoes and other vegetable and grain crops.
This is a primary task for any mini tractor Uralets, Kubota, Bulat 120, Uralets 160, Uralets 220, Yanmar, Belarus 132n, no matter whether purchased in a store or made with your own hands.
In addition, a homemade mini tractor can be used for the following purposes:
- transportation of various goods;
- cleaning up construction and household waste;
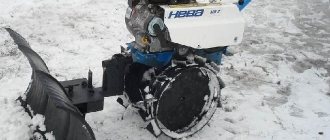
- cleaning local areas from snow masses;
- for cutting grass for the purpose of subsequent harvesting of hay for livestock.
It is clear that such work will be impossible without the use of additional mounted and trailed equipment, which is aggregated with the mini tractor. Such devices can be purchased directly from a specialized store, or you can construct them yourself.
Fortunately, there are plenty of all kinds of drawings on the Internet indicating the exact dimensions and parameters, which is quite enough for any rural craftsman.
In general, homemade products are used mainly at the household level, which is understandable, because large farms and agro-industrial complexes are able to purchase more than one mini tractor, so they do not need to resort to self-assembly of these units.
But this does not mean that homemade mini tractors will be very inferior in performance to purchased options. If this is still the case, then this lag is not critical, and at the everyday level it is not noticeable at all.
Best models
A homemade mini tractor from a walk-behind tractor is a fairly common way to make a mini tractor at home. In general, good units come from the following brands of walk-behind tractors:
- Centaur.
- Bison
- Neva.
- MTZ.
Centaur 2090D
For example, let’s take the Centaur 2090D walk-behind tractor, from which you can easily make a future mini tractor. The entire list of work boils down to the fact that you need to make a frame structure from a metal profile, as well as supplement the device with a seat and a second wheel pair.
- type of engine used – 4-stroke, diesel;
- maximum power – 9 hp;
- fuel tank capacity – 5.5 l;
- rotation speed – 3 thousand revolutions per minute;
- cooling type – air;
- engine capacity – 418 cm3.
The cost will be based on the price of the walk-behind tractor itself and the cost of the materials needed for the work. Considering that the average price for such a walk-behind tractor is about 40 thousand rubles, the final assembly price will be about 45-48 thousand rubles.
Bison NT-135
You can also achieve good results by converting the Zubr NT-135 walk-behind tractor, which has similar characteristics to the previous version.
- type of engine used – 4-stroke, diesel;
- maximum power – 9 hp;
- fuel tank capacity – 5.5 l;
- rotation speed – 3600 rpm;
- cooling type – air;
- engine capacity – 406 cm3.
The cost of the walk-behind tractor itself will be about 54 thousand rubles. At the same time, the final price for a finished homemade mini tractor will be determined based on the cost of the necessary materials. In particular, we are talking about the following components:
- Hydraulic system. In principle, you can take it from old agricultural machinery.
- The wheelset is taken from old domestic cars.
- Steering wheel and brake system.
I add up all the costs, the total cost of a homemade mini tractor will reach 60 thousand rubles.
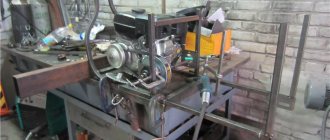
Power unit and transmission for tractor from Niva
The basis of the future homemade product will be the engine removed from the old VAZ.
To do this it:
- We remove the engine from the car and place it on a subframe. We give it a low landing, so that the front axle is between the engine and the gearbox;
- Fix with ties;
- We calculate the gear ratio, which should not exceed 2 thousand rpm for operation in 2nd gear - the main one used for plowing;
- To divide the torque between the axles, we limit ourselves to the transfer case from the Niva. It is needed in order to: increase the tractor’s cross-country ability on country roads; the drive wheels were subjected to greater rolling; the tractor moved confidently and stably regardless of the mode and power.
- We also take the clutch and gearbox from Niva;
- We connect the crankshaft to the PTO, which is best purchased ready-made;
- We connect the gearbox secondary shaft hub to the gearbox, which will transfer torque forward. The revolutions to the rear half-frame will be supplied through the fracture joints and the driveshaft.
Wheelbase and steering wheel for a tractor from Niva
- For a homemade tractor, 12-14 inch wheels from an old car (Niva, Oka), which are equipped with tires with a rough tread pattern, are suitable;
- The steering column is taken from the VAZ and placed on a plate welded into the front half-frame. It is important to correctly determine the height of the steering wheel: its smooth movement should not be interfered with by the tractor driver’s knees;
- We change the worm gear, for which we make a gap in the bearing adjusting nut and in the oil tank cap;
- It is almost impossible to assemble a full-fledged hydraulic unit with your own hands. Therefore, it is easier to buy it or take it from an old tractor;
- We fit the hydraulic pump and lubricant reservoir next to the engine, making a hydraulic outlet in front and rear for multi-position installation of attachments;
- We install a power cylinder that will control the adapters.
Device
Such home-made products in the countryside, such as a mini-tractor, are distinguished by a rather simple design structure, which provides certain advantages to the person who will carry out the assembly process. For a skilled owner, it will not be difficult to assemble a homemade tractor with your own hands at home.
Due to the fact that homemade units are made in the image and likeness of their store-bought “brothers,” their design will be largely similar.
Conventionally, you can divide a homemade mini tractor into several working units:
- Frame design. This is perhaps the most important part of the mini tractor design, because the stability and performance of the entire unit will depend on the strength of the frame.
- Transmission. This device can be taken from old Soviet cars, which are quite suitable for these purposes.
- Gearbox.
- Wheelbase. For this purpose, you can use wheels from old equipment - the same domestic cars.
- Power unit. In a homemade mini tractor, you can use a walk-behind tractor as the main driving force. Consequently, the same engine will be used as on the walk-behind tractor, but this is not a strict recommendation (see how to make a tractor from a walk-behind tractor with your own hands).
- For these purposes, you can use another engine, preferably running on a diesel engine, with decent power (at least 9 hp).
- Steering.
- Other components. This includes the clutch, driver's seat, etc.
As we can see, most of the components will be borrowed from old, out-of-date equipment, so manufacturing costs are minimal. The only thing is that you will have to work a little with welding the frame and setting up the controls, but for a rural craftsman this is a common thing and does not cause any special problems.
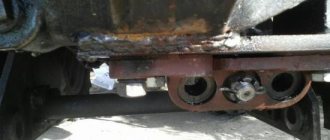
Front and rear axles
These units are created from individual spare parts and units removed from cars or even trucks or other agricultural equipment. However, you will have to do some details, as well as the assembly itself, yourself.
To make a front axle, you will need:
- cross beam;
- bushings for supporting rotary axles;
- axle bushings;
- the axles of the wheels;
- bearings (ball and roller);
- bolted connections.
A piece of profiled pipe or metal corner will do the job perfectly as a cross beam. For the manufacture of axle shaft bushings, structural steel 45 is suitable. The rotating support bushings are made of profiled pipe, modified for the installation of bearings, and are closed with steel covers made of steel grade St3. The front axle assembly, consisting of a cylindrical race and roller bearings, is welded in the center of the cross member. Using large bolts, the bridge must be secured to the bushings in the cross member of the frame.
The tightening force of bolt connections is responsible for the amount of play of the front axle relative to the design of the mini tractor. Too tight, as well as too loose fastening has a negative impact on driving comfort, so the play must be optimal.
Tuning the suspension of Niva 2121
Since the Niva is an all-wheel drive SUV, when tuning it is necessary to pay attention to the suspension. The first step is the Niva lift - increasing the ground clearance. This will create an impressive reserve for overcoming various obstacles. The concept of tuning the Niva 2121 chassis, as well as a suspension lift, includes:
- Installation of spacers between suspension elements. You can make them yourself or buy them in stores.
- Installation of shock absorbers "Rancho"
- Installation of springs VAZ 2104
- Strengthening the front and rear axles using steel boxes
Converting a walk-behind tractor into a mini tractor: main points
Unlike amateur equipment, professional and semi-professional equipment has a greater service life and power. For example, from a walk-behind tractor with a 9 hp diesel engine. you can make a pretty decent mini-tractor for plowing and cultivating. Ultimately, it all depends on the goals that the owner of the modified equipment intends to achieve.
Designing and assembling a homemade mini tractor is not an easy task, but it is doable. And to solve it successfully, you need to focus on two points:
- Development of a body and frame, as well as a diagram of their connection with the base of a mini-tractor - a walk-behind tractor.
- Development of a kinematic scheme.
The frame and body of a homemade mini-tractor are made of metal corners or profiled pipes. When calculating the structure, it is necessary to take into account the ratio of its weight to the power of the motor, as well as the resistance that the machine will overcome when performing various types of work.
If you choose a powerful walk-behind tractor as the basis for a homemade mini tractor, this allows you to use ready-made car or motorcycle trailers. Moreover, leading manufacturers of walk-behind tractors have long provided for the design possibility of connecting such trailers to their manufactured equipment.
The kinematic diagram of a homemade mini-tractor is a set of design solutions that ensure the transmission of torque from the walk-behind tractor engine to the drive (mainly rear) wheels. When calculating, it is necessary to distribute the load on the drive axle evenly - both reliability and durability, as well as functionality, that is, the possibility of using the equipment, directly depend on this.
DIY tuning of Niva 2121 for off-road
Initially, the Niva 2121 was created as a universal all-terrain vehicle that feels comfortable off-road and in the city. Therefore, it is logical that off-road tuning of the Niva 2121 is especially popular.
This is due to its relative simplicity. To create, or rather, enhance the image of an SUV, you need to install on your car:
- Larger diameter wheels with tires designed for extreme off-road use. It should be recalled that low-profile tires are not relevant in this case. It is also necessary to take into account that installing large-diameter disks requires impressive torque figures. Ignoring this rule will lead to premature wear of the power unit
- Installing arch extensions on a Niva will solve several problems at once: get rid of splashes of dirt on the wings and doors, expand the possibilities in terms of choosing the diameter of the disks, and complement the tuning composition
- Power kit. It consists of a powerful kenguryatnik. It is easy to make it yourself from pipes. A structure is installed on the rear door, onto which the spare tire is attached. It will also perform a protection function. A winch must be installed. It will help off-road and give the car an aggressive, masculine look.
This is all that is needed to create a car designed for participation in sports competitions or outdoor activities. This external tuning of the Niva 2121 combines aesthetic and practical functions. Therefore, the efforts and resources invested in it will quickly pay off.
You can do an easy tuning of the Niva 2121 - install new wheels and tires and apply stylish airbrushing with a 3D effect. To carry out the last operation, it is necessary to attract specialists.
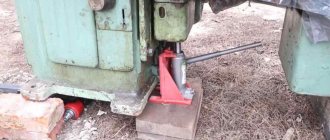
Shortening a UAZ axle for a mini tractor (photo)
A short photo report: how to shorten a bridge from a UAZ vehicle to build a mini tractor.
When making homemade mini tractors, it is necessary to shorten standard axles from cars to fit the track, usually a VAZ classic, Moskvich, or UAZ. We suggest you look at a photo of shortening bridges from an UAZ, perhaps this will be useful to you when building a homemade mini tractor.
Track without brake drums.
Shortened bridges can now be used to build a homemade mini tractor.
Popular homemade products from this section
How to make a tractor
Frame upgrade
The frame requires only one addition: instead of the cut off rear part, a small (about 10 cm) piece of channel is welded, and the rear axle will be attached to it by welding. A towbar must also be welded to the rear of the frame in order to be able to pull the cart. After some minor modifications, the engine will be bolted to the front of the frame and the front axle will be attached.
Engine improvement
- frame;
- brake cylinder;
- cardan;
- steering;
- rear axle
To make a tractor body:
- sheet iron with a thickness of 5 mm.
Mounts:
- bolts and nuts;
- rubber couplings.
Tools:
- welding machine;
- Bulgarian;
- gearbox from an electric car;
- lathe;
- keys and screwdrivers.
Mini tractor frame
The chassis is the basis of a mini tractor. Its main quality should be reliability, but you need to carefully monitor the total weight of the structure in order to ensure normal adhesion of the wheelbase to the soil when performing work and at the same time not to overload the engine.
To make the frame of a homemade mini tractor of medium power, a lightweight channel, profiled pipe or metal corner is suitable. The dimensions of the structure, the assembly of which is carried out by welding, must correspond to the dimensions of the machine. It is necessary to make holes along the contour of the frame for hanging and securing the structural elements of the mini tractor.
The ratio of the weight of the frame and its strength must be optimal. You should not overload the structure with additional stiffening ribs, nor should you skimp on metal, sacrificing overall reliability indicators.
Before you begin assembling the frame, you need to decide what trailers and attachments you are going to use when working with it. And in order not to lose your thoughts during the design process, before starting work you should make drawings of the future machine and its main components with the main dimensions. To do this, you can use ready-made documentation, which needs to be adapted to the specific parameters of your mini tractor.
Tuning the trunk of Niva 2121
The Niva's extensive luggage compartment is an advantage only at first glance. The large volume provides absolutely no functionality, and the rib at the bottom of the trunk is a completely unnecessary element that interferes with loading. On later modifications it is missing. Also in the way is the folding shelf, which divides the trunk into two parts in the transverse plane.
It is best to remove these disturbing elements and install a box with pockets, drawers, compartments, which will allow you to organize the loaded items. It can be made from wood and metal. Corners or tubes should be used as a frame; it is subsequently sheathed with plywood or other material and trimmed with fabric. Before installing the box, it would not hurt to install noise and thermal insulation on the body.
You can also go the standard route and install a speaker system, LCD monitor or other fashionable gadget in the trunk. The latter option is impractical if the car is being tuned for difficult off-road conditions.
An expeditionary trunk for the Niva wouldn't hurt. It will allow you to take a lot of things and save internal space. It will also be a harmonious addition to off-road style. An alternative would be to install an arc with headlights. This will increase the driver's visibility. It is a useful element when driving in bad weather conditions.
Parts and tools
Here are only the main parts that will be required to make a working model of the tractor; choose everything else: wheel fenders, seat, method of attaching headlights at your discretion.
To make a tractor with your own hands you will need
- frame;
- brake cylinder;
- cardan;
- steering;
- rear axle
To make a tractor body:
- sheet iron with a thickness of 5 mm.
Mounts:
- bolts and nuts;
- rubber couplings.
Tools:
- welding machine;
- Bulgarian;
- gearbox from an electric car;
- lathe;
- keys and screwdrivers.
Wheelbase and kinematic diagram
The choice of wheels for a homemade mini tractor deserves special attention. It is quite possible to use wheels from a passenger car, but the dimensions must be observed here. The optimal dimensions of wheel rims for the front axle are 12-14 inches. When choosing a smaller diameter, there is a risk that the machine will bury its nose into the ground during operation. On the other hand, if the front wheels are too large, the operator will have to exert considerable effort to perform maneuvers. However, to facilitate the process of driving a car, you can always use the power steering from a passenger car or other agricultural equipment.
Mini tractor wheel tires must have developed lugs. This will increase the maneuverability of the machine, reduce the load on the chassis and facilitate the control process.
As for the kinematic scheme, it is better to use ready-made options, the search for which currently will not take much effort. The diagram must be adapted to the parameters of the components that you are going to use to create a mini tractor. It would be useful to consider the possibility of connecting attachments, which will greatly increase the functionality of a homemade machine.
Available tuning options for the installed engine
If we consider the Niva in relation to the new years, then we should take into account that engine tuning comes in two options:
- Chip tuning.
- Mechanical modification.
Recently, chip tuning has become very popular, which allows you to significantly increase the power indicator in the shortest possible time. However, this tuning method should be treated with some caution, which we will discuss in more detail later.
Control system and operator seat
After manufacturing and installing the chassis, you can begin to implement the kinematic diagram and install the control system. The most important thing in this matter is to place the operator's seat correctly. The front seat of a passenger car, which is easy to find at car services and in workshops that dismantle vehicles, will do an excellent job of this role.
The steering wheel should be set at the optimal height for the operator. The steering wheel should not interfere with the free placement of the knees - it must be mounted so that working with it in a sitting position does not cause discomfort.
All the necessary parts for pedal, manual and lever control of the machine and its functional units can be found in the same place as the seat and all other spare parts - in workshops or on the market.
Engine installation and body arrangement
After assembling the chassis, implementing the kinematic diagram and installing the operator's seat with the control system, you can begin installing the main unit of the minitractor - the engine. To securely fix it on the frame, you should use a special plate with grooves - it will also give the chassis additional rigidity. Next, you need to lay out the electrical and mechanical circuits of the control system, connect the instrument panel and configure the operation of the control system.
The body trim is carried out at the user's request, however, it is still better to cover some components and structural elements. This will prevent their contamination and failure in case of contact with foreign objects and soil.
At this point, the assembly of the mini tractor can be considered complete. Next, all that remains is to check the quality of your creation in work.
What is a breaking frame
A fracture (articulated) frame is nothing more than 2 large half-frames. They are connected using a swivel joint. The equipment has a high degree of maneuverability. Advantages of homemade breakable all-wheel drive mini-tractors:
- a significant reduction in the turning radius (the unit is capable of turning a full 360 degrees while staying in one place);
- the tractor has good maneuverability in heavily swampy areas with variable terrain;
- the moving frame changes the balance pattern of the machine, which makes it possible to ensure reliable, good traction with the soil;
- This tractor distributes the load evenly, so it produces maximum power.
In terms of its characteristics, equipment with a breaking frame is significantly superior to light gardening equipment and is in no way inferior to heavy factory tractors. Typically this device has 4 wheel drive (all wheel drive). This increases the maneuverability and stability of tractors.
Mini tractor with tipping frame
Engine
Native to LuAZ, the V-shaped four MeMZ with a power of 30 or 40 hp. is not suitable primarily due to its fragility, so it is replaced with other engines: for example, special Chinese type Lifan (15–25 hp), from the MT “Dnepr” motorcycle (32–36 hp), from an obsolete , but reliable “Moskvich-408” (50 hp), etc.
Today there is a wide selection of ready-made power units for mini-farm equipment, both gasoline and diesel, on sale.