I’ll share my version of an acoustic shelf and my experience of placing a subwoofer for a 22-year-old Camry...
When the question arose - to make a shelf (since I simply didn’t have my own, like most of the interior when I bought the car), I started thinking - where to place the sub? There were two subwoofers in stock and both were cabinet ones, but I really didn’t want to spoil the bounty of the trunk of my Kamryukha with this large wooden chest... And the quality of the subwoofer in the sedan - riding in the trunk - did not impress me at all (from experience in the driving cars)
I decided to pull the sub out of its nest and install it in the rear parcel shelf. In this version, it will play on the volume of the trunk, since I have not yet begun to assemble the body to the shelf. I noticed that on many Korean cars the sub is installed this way! I’ll try this option for now - if it doesn’t suit me, I’ll strain all my Kulibin brains and make a box. I didn’t make the box, not so much out of laziness, but because of space. The width - which the rear parcel shelf allowed to be cut - will force the box to be of the required volume, quite narrow, and therefore - almost or even to the very bottom of the luggage compartment - and I really wouldn’t want this.
Why didn’t you place the sub in the trunk in the fender well? Yes, firstly: he will start playing in the trunk, and not in the cabin, and therefore he cannot avoid what he so wanted to avoid; and secondly: the width of the trunk allows me to carry a snowboard across it, and for me this is extremely valuable, since I drive it three to four times a week.
In general, not finding other options, I settled on making a shelf out of plywood, which would kill two birds with one stone - the first, of course, is installing the sound, the second, I’ll make a shelf, since I simply don’t have one.
I took a piece of plywood of the required size (with a small margin)
After lengthy measurements, I cut it according to the preliminary shape.
Acoustic shelf in the trunk
The VAZ 2109 acoustic shelf can be easily and easily made on your own. This will be discussed in our article. An acoustic shelf on a VAZ 2109 is installed for a number of reasons, the main one of which is to create a clear and pure sound from the speaker system.
Lada 2114 Turtle › Logbook › DIY rear shelf.
To begin with, I walked around and looked around the shops.
The shelves start at 1500 and go up. It won't work. The plywood turned up. There is a jigsaw. There is a warm garage. All conditions. This is what you need to take off with.
To begin with, I started dismantling the original shelf and sides. But in the photo they are nothing. They look.
I unscrewed the screws, the sides are in no hurry to fall off. I thought. The sidewall will still go to waste. I solved the problem with a jigsaw.
Machine without shelf. Nothing too.
I left the sides alone for a while. Shelf for long-term storage.
I decided to make the shelf in two parts of different widths. To make it easier to open. Cut it out and screwed the hinges on.
What has happened so far.
Further refinement with a file. Things slowly came to a close.
To begin with, I “carpeted” the turtle.
The most difficult part is the sides. I tightened it and screwed the speaker on.
Upholstered and installed a shelf. What happened in the end?
I think it's good. All that remains is to carefully stick the register in the trunk and buy some adhesive tape to secure the shelf. She already fits well, but that’s for sure.
I threw in the wiring, soldered it, connected it, listened. The rear does not outplay the front, but only complements it. This makes me happy. But we need to change our heads.
What surprised me: the rear license plate began to rattle. With the trunk closed, you can only hear it when standing behind you, but with it open... it almost shouts over the music. Or is the ShVI bad or are the speakers good? You'll need to put something under it.
Source
Rear acoustic shelf for cars
Today we’ll look at how the author of this article made an acoustic shelf for a Muscovite.
You will need:
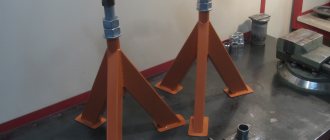
Two sheets of chipboard (one sheet with dimensions 39x108x2 cm, the second 26.5x108x2 cm), Putty approximately 1.5 kg. About one and a half cans of mounting foam. Two furniture hangers, nails or screws, wood varnish, and covering material.
The author took chipboard from an old cabinet as a basis. The sheets need to be cut into two pieces, one part will rise, and the speakers will be mounted in the second. The chipboard needs to be treated with varnish so that it is not exposed to moisture in the future. Since the author of the chipboard from the cabinet had irregularities and holes on it, we removed everything using putty. Each car has its own individual dimensions, the author describes the approximate dimensions. On the second piece, I cut off the extension on the sides.
The same holes need to be cut on the shelf itself.
For podiums you need 4 pcs holders. The author made them from leftover chipboard. You can choose any angle at your discretion; the author has it at 45 degrees. We connect the holders and podiums with self-tapping screws, having previously coated them with some kind of glue for reliability, and screw them to the shelf.
The shelf is sheathed only on the outside. The speakers are connected from below, in the hole. After complete covering, you can screw on the black hinges, but the author painted them separately (the usual color of the metal does not fit in at all.)
Here are the final photos of the shelf that the author has already installed in the car.
Source
Salon
The Gazelle's interior is, to put it mildly, archaic. Only the most undemanding drivers are satisfied with it in its original form. Hard plastic, uncomfortable seats, dull gray color - all this urgently needs to be replaced with more modern and aesthetic analogues.
If you are afraid of the cost of completely replacing the interior, you can purchase individual elements gradually, perhaps combining colors and materials. Start with the main things - the steering wheel, seats, power windows, because these are the ones you have to come into contact with every day. Next, you can install a central console from Gazelle-Business and an armrest with various useful drawers, which will turn it into a mini-office. Music lovers will be able to choose door cards with additional podiums for speakers.
It is also useful to read: Basics of tuning the interior of a production car
There is a wide selection of accessories available for sale for Gazelle salon decor:
How to make a shelf in a car with your own hands
I’ll share my version of an acoustic shelf and my experience of placing a subwoofer for a 22-year-old Camry...
When the question arose - to make a shelf (since I simply didn’t have my own, like most of the interior when I bought the car), I started thinking - where to place the sub? There were two subwoofers in stock and both were cabinet ones, but I really didn’t want to spoil the bounty of the trunk of my Kamryukha with this large wooden chest... And the quality of the subwoofer in the sedan - riding in the trunk - did not impress me at all (from experience in the driving cars)
I decided to pull the sub out of its nest and install it in the rear parcel shelf. In this version, it will play on the volume of the trunk, since I have not yet begun to assemble the body to the shelf. I noticed that on many Korean cars the sub is installed this way! I’ll try this option for now - if it doesn’t suit me, I’ll strain all my Kulibin brains and make a box. I didn’t make the box, not so much out of laziness, but because of space. The width - which the rear parcel shelf allowed to be cut - will force the box to be of the required volume, quite narrow, and therefore - almost or even to the very bottom of the luggage compartment - and I really wouldn’t want this.
Why didn’t you place the sub in the trunk in the fender well? Yes, firstly: he will start playing in the trunk, and not in the cabin, and therefore he cannot avoid what he so wanted to avoid; and secondly: the width of the trunk allows me to carry a snowboard across it, and for me this is extremely valuable, since I drive it three to four times a week.
In general, not finding other options, I settled on making a shelf out of plywood, which would kill two birds with one stone - the first, of course, is installing the sound, the second, I’ll make a shelf, since I simply don’t have one.
I took a piece of plywood of the required size (with a small margin)
After lengthy measurements, I cut it according to the preliminary shape.
Acoustic shelf in the trunk
The VAZ 2109 acoustic shelf can be easily and easily made on your own. This will be discussed in our article. An acoustic shelf on a VAZ 2109 is installed for a number of reasons, the main one of which is to create a clear and pure sound from the speaker system.
House on wheels
Factory-built motorhomes are very expensive, so lovers of nomadic life with little financial resources are forced to look for an alternative. The first thing that comes to mind is to convert a minibus into a motorhome. As a base, domestic Gazelles are the cheapest.
Of course, you can’t make a full-fledged motorhome from a small minibus - there’s too little space. But if you take a truck and place a living container in its back, you will get a very original vehicle that combines sufficient “living space” and a low price. And this is not the limit of modernization.
You can install an imported, economical engine on the Gazelle and increase its cross-country ability by using large-diameter wheels. Transforming the Gazelle into an all-wheel drive version will require serious modifications, but there are enthusiasts ready for this. The result is an all-terrain motorhome on which you can travel to the most remote corners of the country.
When creating a mobile home, you need to pay enough attention to the living unit. It can be made stationary or removable. The onboard Gazelle is perfect for installing a removable living unit. This block looks like a container, only with windows. It can be installed on a platform or removed when not needed, turning the car into a regular truck.
A house based on an onboard Gazelle allows you to live in it, but when traveling, being in a residential unit is not allowed by the rules. The cabin seats only three people (driver and two passengers). Accordingly, it makes no sense to count on a residential block for more than three.
It is advisable to make the residential block on a metal frame. It can be an aluminum or steel structure. Most often, preference is given to steel profiles, which are connected by welding. From the outside, the frame is sheathed with corrugated sheeting or other suitable material, for example, plastic. The interior lining is made of plywood or OSB (oriented strand board).
Insulation must be placed between the skins. It is better to use mineral wool slabs, as they not only retain heat well, but are also an excellent sound insulator, and in addition, they do not burn. Polystyrene foam is inferior in all respects to mineral wool, and therefore in this case cannot be considered the best solution.
Advantages of an acoustic shelf
VAZ 2109 acoustic shelf
Today you can purchase an acoustic shelf in specialized stores. Its cost is not that high, although it is still recommended to do it yourself. In any case, whether the shelf is purchased or made with your own hands, it will provide advantages:
Acoustic shelf VAZ 2109
Note. To hide budget types of speakers or for some other reason, the panels are covered with special materials that do not distort the sound. In addition, when choosing or manufacturing shelves, special attention is paid to options for different sound directions. On the shelves it is possible to build so-called scenes. In this case, the sound can come from different angles in different directions: to the rear window, into the passenger compartment or trunk.
Disadvantages of ovals or “pancakes”
What are the disadvantages of “pancakes”, which is why they are not used in good systems? The first drawback worth mentioning is the location, since these speakers are designed for shelf installation, they are always placed at the back. And the sound should come from the front. This is not an immutable rule, but music is always better perceived if it is heard from the front rather than from behind.
Because of this, by the way, it is impossible to listen to music normally if you have passengers sitting in the back. Because as soon as you turn up the volume control a little, they start complaining. This is not surprising, since the speakers are screaming right into their ears.
Also, “ovals” have all the disadvantages of coaxial acoustics. If a woofer, midrange, and tweeter are combined in one device, they will sound worse than component speakers due to design features, as well as the design and quality of the crossover.
What can a shelf be made from?
MDF shelf drawing
A common material for an acoustic shelf is MDF or multi-layer plywood. Be sure to cover the surface of these materials with carpet or other acoustic material to ensure compliance with the overall design of the interior. As for the area for installing speakers, they must be made so firmly that they completely eliminate rattling and vibration.
What can the Oka be converted into?
The car in question can be upgraded in a variety of ways. The most common modernization methods are:
- Creation of an SUV. Even though the car has a low ground clearance, it can be converted into an SUV.
- Roadster. This name refers to a two-seater car with increased comfort.
- Cabriolet. If desired, you can use Oka to create convertibles: two doors, quite a spacious interior for two seats. However, it is worth remembering that there will be no room for a roof.
- Rally car.
The easiest way is to make an SUV, since it is enough to change the suspension and some body elements, and install large-diameter wheels. But other modernizations, for example the creation of a convertible, require serious interventions.
Making a shelf with your own hands
Acoustic shelf for VAZ 2109
So, if we decide to make a shelf with our own hands, then go ahead. A ready-made acoustic shelf costs about 1,000 rubles in a store. Why waste extra money if you can make everything yourself, spending some of your time and receiving inexpressible pleasure from the process. A homemade shelf has advantages over a purchased one, and it’s simply impossible not to notice.
Start
To make a shelf for a VAZ 2109, you will need to prepare.
Materials
Tools
Note. As mentioned above, the ready-made standard shelf of the VAZ 2109 is used as a model. Therefore, it will need to be removed. A simple screwdriver, a little patience and time - the shelf is dismantled.
How to mark an acoustic shelf
Main stage of work
Acoustic shelf for VAZ 2109
This includes the manufacture of acoustic podiums, the construction of a box for seat belts, pasting and much more.
Podiums
Note. The podiums, as mentioned above, are made on a separate piece of chipboard.
DIY shelf
How to make an acoustic shelf for a VAZ 2109
Making a box for belts
Note. When making a box, the following point must be taken into account: the belts must enter the box from the side.
Covering with carpet
Note. After these operations, the boxes are assembled and screwed in place.
The final stage of work
Ten commandments of the "gadget"
TEN COMMANDMENTS OF THE “OKOVODA”
Exactly sixty days have passed since then
when we saw two Okas in the store. And bought them
and checked, and received their sight.
GUARANTEE IS A GOOD GIVEN FROM ABOVE. The main mistake of a beginning “gadget” can be refusal to comply with the warranty rules. This happens when the happy owner of a new car, due to forgetfulness or wisdom, does not show up at the required interval (from 2 to 3 thousand km) for the first scheduled maintenance. And the guarantee on Oka is a useful thing! It's rare that you come across a car whose owner has nothing to fix within the allotted time frame. Our experimental subjects, having traveled 7 thousand km each, visited the guarantee twice. On the Kamaz car (green) we replaced the left tie rod end, adjusted the exhaust system, tightened the camshaft gear mounting bolt (!), bent the spare tire mounting bracket so that the latter did not rub against the brake pipes of the main brake cylinder, and using the old-fashioned method we eliminated the rattling of the muffler - placed above it is a used air filter, which after a thousand kilometers half melted and fell onto the road. On the Serpukhov car, they tightened the left wheel hub, the oil pump cover on the engine, adjusted the brakes, welded an extra hole in the trunk (see ZR, 2000, No. 4), adjusted the exhaust and repaired the rear window washer motor. So a lot has accumulated even in small things.
PULL YOUR “EYE” WHILE IT STRETCHES. “Have you already handed it over?” - guessed the servicemen at the Serpukhov service station. By performing this procedure a little earlier, we made sure that the chassis on both cars stretched well. Including the most important nuts: the U-shaped clamp for fastening the steering rack and fastening the lower arms of the front suspension. The VAZ power unit also suffers from poor traction - for “foreign” cars, Tolyatti residents seem to try less. So, on the Kamaz engine the camshaft gear bolt was loose, on the Serpukhov engine the oil pump cover was loose, which is why the engine lost about a liter of oil.
HAVE A SPARE COIL. It only took a couple of months for two small cars to change the classic ideas about the car. It turns out that consumables can be not only oils or filters, but also ignition coils. In such a short period of time, the machines ate two (!) spools each. This product is located on the Oka in such a way that getting water or snow on it sometimes seems like a cunning plan of the designers. The Oka engine tries to operate on one cylinder. The malfunction occurs both when driving in rainy weather and when condensation occurs in the morning. In the first case, the driver feels a “failure” and the car rapidly loses speed. In the second, it “sneezes”, but does not start.
Experienced Volgarians (the ZMZ-406 engine has the same coils) recommend the products of Zond JSC (Mari-El Republic) and Sever Production Association (Novosibirsk).
PREFER A HEAD REST TO A FLY SWATTER, FOR LIFE IS MORE PRECIOUS. Passive safety for a small car is a more than relevant issue. Russian manufacturers often take care of it only as much as is necessary to certify their products. Sometimes even less. The arguments are weighty: the price will increase, people won’t buy the car. Let's try to dispel this myth.
Let's take a minimum set of three items - inertia belts, front seat headrests (our cars didn't have them) and a pair of rear-view mirrors. Installing normal belts will require the factory to spend an extra 50–70 rubles per pair - such is the price difference between inertial belts and the straps that are installed on cars today. Right rear view mirror - 40–50 rubles. Finally, the headrests. Firstly, the plant has no right to produce cars without them. Secondly, a pair of these products in stores costs about 300–400 rubles, and for the factory it is even cheaper. It turns out that the total savings are a little more than 500 rubles. And now we inform those who don’t know: an Oka car in the luxury configuration with fabric seat upholstery and, by the way, headrests costs about 2.5–3 thousand rubles more than the minimum configuration. With the difference you can buy not only beautiful seat covers, but also a bunch of other useful little things: rubber mats, a trunk shelf, a tool kit, a tow rope, a fire extinguisher, a first aid kit, a warning triangle, and finally, a couple of spare ignition coils.
Shelf reupholstery
Upholstery material
Reupholstering the acoustic shelf on a VAZ 2109 can be the most problematic part of the job. That is why we devoted a separate chapter to it in our publication. Every owner of a VAZ 2109 dreams of making the interior of their “nine” more comfortable and attractive. An acoustic shelf is not only an element that serves a practical purpose, but also a separate component of the entire interior. For this reason, she needs to be able to give a style that is beautiful and consistent with the overall design. The material most often used is carpet. On the other hand, if the interior itself is covered with leather or a substitute, or maybe Alcantara, covering the shelf with the same material will come in very handy.
Carpet reupholstery
Re-upholstering the shelf with carpet
Experts recommend paying special attention to working with carpet. The following points need to be taken into account:
So let's get started:
Note. Nairit holds firmly, but takes a long time to dry. It is recommended not to lay the carpet right away, but to wait until the glue dries a little and its adhesive functions increase.
Advice. It is recommended to work with gloves. This will make your work easier and your hands will remain clean. In addition, if you do not have the skill to do this kind of work, it is recommended to pull the shelf in parts: first one half, then the next.
Finished rear acoustic shelf
That's all. If the instructions are complicated and doubts arise, then it is better to entrust the work to specialists. On the other hand, you can learn everything with your own hands, so it’s worth the risk. During the work process, it is highly recommended to watch the video and study photo materials. Thus, the price for purchasing and installing an acoustic shelf in a VAZ 2109 will be significantly reduced, because you will only need to spend money on consumables.
Popular publications
latest comments
A couple of years ago I decided to install good speakers in my “Six”, which was passed down to me from my dad. Before that, there were home-made plywood speakers, the sound quality of which was the same as the cheapest plastic Genius ones. Naturally this did not suit me. I picked up some good JBL GTO-938 ovals. But there was nowhere to put them.
There were no holes for them in the factory shelf, and I didn’t want to damage the metal.
I decided to buy podiums. After shopping around, I couldn't find anything suitable. And the prices were, frankly speaking, abnormal; the cheapest and most obscene shit, obviously collected by prisoners or Tajiks, cost 1000 rubles.
I decided to make a shelf with podiums myself.
There are no photos of the detailed process, since at that time I didn’t set a goal to post anywhere. I'll post what I found on my phone. I took photos to show my friends that I made it myself and didn’t buy it.
I decided to make it from chipboard. Since my old broken-down crib was lying in the garage, I was provided with free material 17 mm thick.
Having removed the original hardboard rear shelf, I outlined the outline, taking into account the fact that the chipboard is thicker and therefore should be smaller, since the cabin is becoming narrower. I used a jigsaw to cut out the shelf and all the blanks for the podiums.
To give a slight angle I placed a block
I fastened the entire structure with self-tapping screws. The edges were processed with a rasp and coarse sandpaper.
The cavities were filled with foam
We cut off the excess and sand it. We impregnate it in two layers with epoxy glue for strength.
we prime it in a dark color so that it does not show through later and ultraviolet radiation does not destroy the foam
We cover it with acoustic carpet and install ovals. By the way, the carpet is very difficult to pierce and drill. It is better to burn holes with a soldering iron, a hot nail or a cigarette..) Insert the ovals, pull the ends of the wires into the pre-prepared holes
Let's put it together. We solder terminal strips to the ends of the wires
We attach the shelf to the car using furniture bolts and paint the caps to match the color of the carpet. To prevent anything from rattling between the shelf with podiums and the metal shelf, we lay a layer of the same remaining carpet.
By the way, the speakers (JBL GTO-938) are very bassy, you can google the characteristics. The role of the bass reflex is played by the original holes for small speakers in the metal shelf of the body. And the trunk acts as a kind of subwoofer. In the end, the overall sound turned out great!
Nothing farts or rattles, turn it over.
Below are just photos of the installed shelf from different angles. It wasn’t really possible to take a photo from the street, I caught a lot of glare
We calculate the amount spent at prices from 2 years ago (I don’t think they have changed much). Carpet
200r Epoxy glue
70r Titanium glue (for gluing carpets)
60r Polyurethane foam
100r Everything else was free in the garage
The total came out to a little over 500 rubles
Did you like our site? Join or subscribe (you will receive notifications about new topics by email) to our channel in MirTesen!
Source
Do-it-yourself rear parcel shelf for a car
I started with a shopping trip. The cheapest is 1500 rubles. This does not fit. Plywood with a jigsaw was available. Yes, and there is a warm garage too. Working conditions are acceptable.
Let's get started!
First of all, I removed the old shelf and side panel.
After unscrewing the screws, the shelf remained in place. I had to think a little. In any case, the sidewall will not be needed. The jigsaw went to work.
The sidewall won't be needed yet. The shelf will be stored for a longer time.
Although the sidewall will be needed to create a template for the new sidewall. I also didn’t forget about the dynamics. Now is the time to start cutting.
There were 4 parts in total (two according to the template and two a couple of centimeters wider). I used self-tapping screws for twisting. Part of the rear shelf also came in handy. Here I used a corner as a fastening element. Then it was time to screw the corners for fastening to the body.
After completing the above work, I made a fitting. I decided to make the shelf not monoblock, but consisting of two parts. Moreover, the parts will be of different widths. This will make it easier to open. I made a cutout and screwed on the hinges. The result was finalized with a file.
So I got to the tight fitting.
Upholstering the sidewalls was not as easy as expected, but the work was done. The speaker took its place.
I also put the sidewalls in place.
The shelf was also upholstered and installed.
The result turned out well.
At the final stage, you need to connect the wiring and fix the shelf. To secure it I used adhesive tape. Although to a greater extent this was done for reasons of greater reliability, since the shelf held up well even without it.
Next, I pulled the wiring and soldered it. By ear I determined that the rear speakers do not shout over the front ones. Quite good news. But there was a need to replace the head.
After connecting all the wires, a slight rattling sound appeared in the rear license plate area. When the trunk is open, the noise is simply unreal. When closed, the noise is much less. Looks like my speakers are great. Or the seams are not very good. The issue was resolved with an ordinary lining that absorbs vibration.
Source
Rear shelf of VAZ 2115 - do-it-yourself acoustic shelf
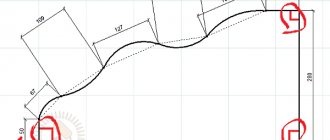
Recently I came up with an obsessive idea to make a wooden acoustic shelf in my spot. For this purpose, a varnished door from an old wardrobe was cockroached from the trash can closest to the house (fortunately there is plenty of this stuff in the trash cans)))) They also used 6 mm plywood that was lying on the balcony. All the cutting and assembly took place there on the balcony)) To begin with, I found on the Internet a common diagram with the dimensions of the shelf
Then we work according to the presented scheme, using a marker and a jigsaw.
After that, I went to the car 5 times (from the 7th floor), adjusted everything in place)))
After this operation, I also had to go to the car and adjust it. The saddest thing was adjusting the angle of fastening the plywood on the glass side. It's sad, because I didn't have a sanding machine, I had to use an electric plane)))
Naturally, there were some trips to the car and adjustments to the location.
The next step was cutting out the holes for the speakers
Then another idea came - to get rid of the sub in the trunk and embed it in the shelf too
I decided to try on the music
The next stage was covering it with carpet. I had never done this before, so I didn’t even know where to look for it. Thank heavens, the search did not last long. I bought 1 linear meter of carpet (1 m by 1.45 m) and spray adhesive. It turned out something like this
A place for the amplifier was found on the bottom of the shelf. I collected all the wires in one place. Now there is nothing in the trunk and space is freed up.
The sound in the car became richer, I even had to turn down the settings a little)))
All my expenses are the purchase of 1 linear meter of carpet and glue. It cost me 690 rubles. Both glue and carpet cost about the same. Since the carpet is a meter wide, and only half a meter was spent on the shelf, there is still room for some little things in the car, such as racks.
Acoustic shelf repair
VAZ 2115 acoustic shelf and its repair
Repair work usually does not take much time. Removal and installation takes place in a matter of minutes:
Note: you can choose a more convenient way to attach the acoustic shelf. It can also be installed using self-tapping screws. Moreover, this option will be more reliable and effective.
Acoustic shelf VAZ 2115 classic
In some cases, repairing the acoustic shelf itself is impossible. If it is broken, a characteristic creaking sound will be heard in the car. This is mainly why they change it, because the sounds produced are almost unbearable. If the cause of this creaking is just a small crack, then this problem can be eliminated, and even quite easily: you can simply glue it together.
Note: you need to choose high-quality glue. The best option would be to use epoxy glue.
In addition, many people just want to replace the standard rear shelf, even if it is not broken. After all, most often it is made of rubberized plastic, which is why the sound of the speakers is quite unclear.
Acoustic shelf for VAZ 2115 and its dismantling
Some tips
Note: you should not take a thinner piece of plywood, since the resulting acoustic shelf will be practically no different from the standard one.
Note: As a rule, its price is not much higher than the cost of the materials used for its manufacture.
Making a shelf with your own hands
A do-it-yourself acoustic shelf for a VAZ 2115 can be beautifully covered with carpet
You can make a rear shelf yourself quite quickly, as it has a simple design. Work on its manufacture occurs in the following order:
Note: these can be leftover parts from an old shelf.
Note: You can choose different speakers. In addition, instead of two large ones, you can install three smaller speakers.
Thus, making an acoustic shelf with your own hands will not be difficult. Moreover, a homemade shelf will turn out to be much better than the standard one.
And its price will be lower. Of course, before you start work, you should familiarize yourself with photos and videos on this topic. There are a huge number of them on the Internet. Our instructions may also come in handy.
Content
Today, compact cars are quite popular. They are ideal for urban environments, as they are compact and economical. The class under consideration includes the VAZ 1111, which is also called “Oka”. The car began production in 1987, production was closed in 2008. The model is a prominent representative of the budget class, which determines the accessibility of the car. The fact that its production was established more than ten years ago is determined by outdated technical equipment. That is why many people decided to do the tuning of the VAZ 1111 with their own hands.
Why would you need to replace an acoustic shelf?
If the sound quality of the speakers initially satisfied you, then the need to make an acoustic shelf with your own hands may arise for the following reasons:
Drivers often encounter breakage of shelf fasteners, which occurs while driving on a rough road. Most often, this malfunction is encountered by drivers who do not slow down in front of potholes or on rural rough roads.
However, the vast majority of VAZ-2115 owners replace the acoustic shelf in order to improve the sound quality of music inside the car.
In this case, the shelf should be made of plywood with your own hands or to order. This material will help make the speakers sound clearer.
Installation
Installing your own armrest in the Gazelle is not difficult. You can simply install an armrest between the seats, but while driving it can move out of its place and cause considerable discomfort while driving. Therefore, it needs to be installed stably.
Mounted armrest for Gazelle
Drill three holes. Insert slightly trimmed pins into them. A metal plate is placed and everything is secured. Cut a rectangle from plywood that will form the basis of the armrest. Tubes are installed into this plywood, and holes are made in the armrest itself at these places so that the pipes can go there. At this point, the process of assembling and installing the armrest can be considered complete.
For convenience on long journeys and better practicality, we suggest you modify the interior of your Gazelle car. In order to make a bar, you need to find old furniture such as a wardrobe, cabinet, chest of drawers. You will also need furniture screws and glue for gluing the seams. Externally, the bar and armrest can be covered with carpet or leatherette. Using the drawing, make patterns from cardboard, glue them together with tape and try them on in the car.
Preparing to make a shelf
First of all, you will need to prepare the materials and tools that will be required to complete the work.
The tools that will be useful to you are a jigsaw, a drill or screwdriver, and a grinder. Please note that the plywood must be at least a centimeter thick, otherwise the shelf will be no more effective than the standard one.
Many people are interested in how to take the dimensions of a shelf correctly, so as not to make mistakes during manufacturing. To do this, experienced craftsmen recommend removing the standard shelf and using it for a pattern. In any case, you will have to dismantle it; it is better to do this before cutting the material. This way you definitely won’t go wrong with the size.
Removing the stock shelf is not that difficult. To do this you will need:
After dismantling, parts of the old panel can be used as a pattern. In this case, a drawing will not be needed. To do this, first draw them on cardboard, and then transfer them to plywood. You have to prepare the following parts of the structure: main, decorative and adjacent. Next, prepare the side supports and grates.
On the side of the seats, on the main part of the panel, there is no need to make cutouts in the corners, since attaching a homemade shelf can be done differently than a stock one. From the old shelf, cut out the part that fits the rear glass and attach it to the new panel. You can also not take the side walls from the design of the old acoustic panel, but cut them diagonally yourself. By stitching, adjust them to the main part. Assemble the structure with screws. It is enough to screw in only a couple so that in case of a mismatch in size, dismantling can be done easily.
In the main part of the stock panel, two holes are usually pre-made for speakers. If necessary, you can make additional holes, for example, so that the shelf can accommodate several different speakers. In the decorative part, each of the holes should be several millimeters larger. Measure them against the speakers you plan to install. The heads must fit freely into the place prepared for them.
Tuning and modification of Oka engines
Tuning the Oka engine does not make practical sense under normal operating conditions. Increasing power and torque when flashing ECM units can give an increase of up to 10% horsepower, which is about 30 hp. will not be particularly practical.
As a garage modification, Oka engine tuning is performed by installing an injector from a VAZ 21083i, but the cost of modification can be comparable to installing a Chinese liter TJ376QE FAW engine (Daihatsu), which was mounted on a Serpukhov-made SeAZ Oka 11116-02 car in 2007-08.