How to make a tulip out of paper with your own hands: step-by-step diagram
A homemade paper tulip can be a wonderful souvenir or addition to a gift for any holiday. Mom or grandmother will be very pleased to receive such a cute gift for March 8th or birthday. Try making a bouquet of paper tulips.
Such activities with paper will not only help you make a beautiful gift for a loved one, but also develop children’s fine motor skills, as well as perseverance and attentiveness. They can work with paper from an early age, because in order to make a paper tulip you do not need scissors or glue. But in any case, you can help your child cope with this.
How to fold a paper tulip: diagram
To create a paper tulip, double-sided colored paper is perfect. You can make a huge bouquet of tulips of different colors and collect them into a bouquet that will serve as an excellent decoration for the room.
Modular origami: Dutch tulip
The Netherlands is rightfully considered the country of tulips. Here they are presented in an unlimited variety of colors and varietal varieties. If you are going to make a tulip out of paper in the image of a classic Dutch flower, make it from colored, or even corrugated, paper of any shade (except green, so that the bud does not merge with the stem). The natural colors of Dutch tulips come in hundreds of variations, so you definitely can’t go wrong with the color.
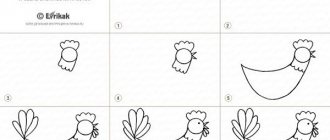
Fold the paper bud according to the diagram
- Fold the square sheet inward one at a time, and then along the second diagonal, following diagram 1. Then make another fold line for the sheet - in half. Unfold the workpiece;
- Along the intended folds, fold the sheet into a regular triangle, tucking it inside the plane on both sides (see how to do it in Fig. 1);
- Bend the free corners of the workpiece to the top of the triangle (to a right angle) on both sides. The assembly diagram will help you deal with this without error;
- Soon the paper flower will open in its splendor, but for now, unfold the workpiece into a second plane, closing the folds on both sides. You will get an even square both from below and from the “face”;
- How to finish an origami tulip? Elementary: fold the diagonally opposite corners of the workpiece towards each other, making the base of the flower an acute angle. It is necessary to overlap one corner over the other, and then tuck one bend into the pocket of the other.
We promised you that this would be a tulip made from modules - more complex than simple paper crafts. Let's plant the prepared buds on a curly peduncle. We can make it from a green leaf of a suitable size:
Carefully make a stem, connect it to the bud and get a paper tulip from modules!
- Press the square sheet along the diagonals. Bend 2 edges to one of them, bringing them together in the center. One corner of the workpiece will be sharp;
- Now bend the lower sides of the workpiece to the center (arbitrarily, sloppily - the proportions are not particularly important);
- Re-tuck the lower parts of the workpiece inward, turn the package over and fold it in half crosswise;
- Now fold the bundle lengthwise away from you. Turn the top petal of the craft outward and squeeze it, then straighten the flower pedestal and place the bud on the stem with the spectacular petal. A tulip from modules is assembled together - a gift for mom for March 8 is ready. (All that remains is to make a postcard yourself and put it in a homemade paper envelope)
The paper tulip is ready!
How to make a tulip out of paper with your own hands step by step
You will need a sheet of A4 paper.
Make a square out of it: fold the sheet diagonally, bend the excess and tear off.
Next, the square must be unfolded and bent along another diagonal.
Unfold the sheet again and fold it in half.
You should have 8 triangles.
Draw along the fold lines well so that clear lines remain.
Turn the product over with the transverse fold facing up. Fold the side triangles inward. You need to focus on the fold line. You will get a two-layer triangle.
Fold the edges to the top point. You will get a diamond with parts cut in the center.
Unfold the paper craft with the uncut part. We turn the corners so that they cover two-thirds of the figure and create an overlap along the center line. To do this, you need to step back from the top by 0.3-0.5 mm.
We pass the corner and the pocket of the other corner. Do this on both sides.
Straighten your workpiece. Blow into the folded hole to straighten it. The figure turns out to be voluminous.
Bend the tulip petals out of the paper.
Make a stem by twisting a long tube. Insert it into the bottom of the tulip.
Just by trying once to make a tulip out of paper with your own hands, even a child will figure out how to make a second flower and so on. You will not notice how you will receive a huge bouquet of paper tulips as a gift.
Step-by-step instructions: how to make a tulip from paper
For those who understand more of a visual explanation, you can look at another description of how to make a tulip from paper with photographs.
Necessary materials:
- paper
- scissors
- pencil
1. Make a triangle out of paper.
We cut off the excess strip, and it will be useful later for creating a stem. But you can also make it from a green sheet of paper to make it more natural.
How to fold a paper tulip
Unfold the resulting triangle and fold it the same way, but in the other direction.
We get such a square with diagonal lines
Turn the resulting workpiece center up
Fold the sheet in half. Fold the corner to the fold line.
We get a new triangle. Let's do the same with the second corner.
Connecting the sides of the tulip
Turn the workpiece base up
Fold the wings of a sheet of paper so that they meet at the corners
Turn the workpiece over and do the same on the other side.
Turn the wing of the paper to the right on both sides
One wing must be hidden in the other
Do the same on the reverse side. Don't forget to iron the folds well.
You will see how to make a three-dimensional tulip from paper. Hold the wings with your index finger and press down with your thumb
The last point that will help you make a voluminous tulip from your blank.
There is a hole at the base into which you need to blow or hit it sharply to fill the tulip with air.
Bend back the tulip leaves
All that remains is to make a stem from a strip of paper
An easy and quick way to make a tulip from colored paper
Here's another great type of souvenir. Anyone can do the job, the difficulties are minimal. You will need green and red or yellow paper. First we will make the stem, and then the bud itself. It’s also better to do not a single version, but a massive one, it looks much more impressive.
Manufacturing process:
- Stem
- Take a green piece of paper and cut out a 21 by 21 square. Fold the bottom sides towards the middle.
- Next, fold the top sides towards the middle.
- Now fold the bottom sides towards the middle again.
- Bend the resulting workpiece in half horizontally, then vertically.
- Pull out the stem.
- Flower
- Take red paper and cut out two 10 by 10 squares.
- Fold one of the squares diagonally and fold the bottom corners up. The result is a bud.
- Make a flower from the second square in the same way.
- Assembly
- Glue one flower on this side of the stem, and the second on the other side.
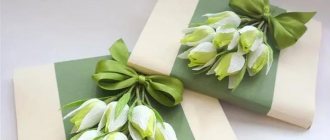
- Make several tulips to make a real bouquet and tie with a satin ribbon.
I didn’t even think that you could create something like this out of plain paper!!
DIY Tulip postcard
This card will be a wonderful original gift for example on Teacher's Day.
Necessary materials:
- paper
- scissors
- pencil
- wire
- glue
- stationery knife
- ribbon
- tulip pattern
First you need to print or draw a paper tulip template
Transfer the template onto colored paper
Fold the template along the dotted lines
You can write a congratulation inside the flower. Apply glue to the back of the tulip and glue the wire pre-wrapped with colored paper.
We cut out the petals from the remaining paper and glue them together so that the stem runs through the middle.
Make holes on the top of the tulip that will open.
Thread a ribbon through them to tie it.
A schoolchild can do this simple craft even without the help of adults, but the result is very interesting and not expensive.
You learned how to make a tulip from colored paper, but there are also many options for appliquing tulips from colored paper.
Templates:
Then it's just up to your imagination. Cut out templates from colored paper and glue them onto beautiful sheets of postcards. There are no rules in creating tulip appliqués from colored paper, only creative skills and the desire to make a bright and beautiful craft.
Volumetric tulips in a vase
This craft looks quite cute and playful. Such a craft, made by a child’s hands, can decorate a parent’s desk and will be pleasing to the eye.
You will need:
- Colored paper
- Thin ribbons
- Glue
- Tubes, preferably paper ones with drawings
- Vase, glass, mug (at your discretion)
- Scissors
Let's start creating the craft:
- Draw a tulip (flower only) or print a sample
- Cut out a flower in any quantity at your discretion
- Do the same with the petals.
- Flowers can be cut out in any color, the more varied, the more beautiful the tulip craft will look
- Fold the flower like an accordion and glue it onto the tube
- Add petals to the flower
- Make little bows from the flyers and glue them to the tulips
- Place the finished flowers in a container convenient for you.
Beaded brooch Tulip: weaving master class
If you love tulips so much that seeing them in a vase is not enough for you, then you can make a beautiful and original brooch from Tulip beads with your own hands.
This is not just a manifestation of your love for flowers, it is a very interesting accessory. Brooches are not difficult to make, but you will need dexterity and patience.
For a beautiful brooch you will need beads of different shapes, but you should only buy high-quality beads. After all, it must be calibrated, identical in shape and size.
Necessary materials:
- small beads with a good hole
- glossy or matte beads
- bugles
- some medium or large size beads
- half beads
- rhinestones
- decorative beads will also be used
You will also need additional material:
- felt
- thick fabric
- threads
- bead line
- needles
- tweezers
- hot glue
The principle of creating a beaded brooch consists of several stages:
- 1. Make a template out of paper with all the lines of the flower drawn.
- 2. Transfer the template to felt or thick fabric.
- 3. Place the beads on the felt in such a way as to create a beautiful composition.
- 4. Sew on one bead at a time.
- 5. When the entire flower is embroidered, you need to make a clasp.
- 6. Cut a base from leather or other dense fabric in the shape of your tulip.
- 7. Glue the resulting tulip onto the base using a hot gun and do not forget to attach the clasp.
Beaded tulip: weaving pattern with step-by-step description
For those who have already gotten the hang of it and are comfortable working with beads, you can try making a voluminous tulip from beads with your own hands. In this regard, the tulip belongs to the simpler crafts made from beads.
The tulip is easy to assemble and does not require a lot of beads.
Necessary materials:
- Thin rigid wire 0.3 mm in two colors: pink, green
- Wire 0.8-1 mm
- large bead for the middle
- Flower beads: pink or other color
- Beads for green leaves
- Wire 1.8-2 mm for the stem
- Green thread for embroidery
- Glue
If you don’t find the wire of the required color, then silver or copper will do.
Our beaded tulip consists of two petals and a center.
For this you will need 12 cm green wire and 65 cm pink wire.
For the base, collect 10 beads.
Tip: bend the end of the wire so that the beads do not fly off
You can string beads onto the working wire gradually or all at once. Secure the end of the wire to the base with turns. Create a half-arc petal of 6 pairs using the French weaving technique.
Attach each bow to the base at an angle so that the tips are hundredths.
The working wire should overlap the base wire.
Using your thumb, create a convex shape as you weave. Having finished, bend the upper part of the base wire, leaving an edge of 2-3 mm, cut it off.
Make 2 petals this way.
Attach the large center bead to a 25 cm long wire.
Make 6-8 curls for strength.
Attach the wire with this bead to the base of the petal, secure the thread, and then attach the second petal. The thread must be attached firmly at the base; you can use glue to strengthen it.
Hold the bottom of your beaded flower with your index finger and thumb. With your other hand, rotate the top, pressing down. This will create volume.
Thread the wire into the paste, you can take a thick wire for the stem and secure the thread.
To make a leaf, you will need about 16-18 cm of wire for the base and 85 cm of working wire.
We string 12 beads onto the base, securing the working wire, make 12 pairs of arcs using the same technique as before.
We put one bead on the base at the top and bottom, and make another series of arcs.
Again, add one bead at a time, and again. We will get 6 rows, but do not add a bead in the seventh row.
Tip: if you add more than one bead at a time, you will get longer petals.
The wire can be wrapped with floral ribbon or green thread.
Wrap it at a distance of 2 cm from the flower, going higher and then down 6-8 cm.
Attach the leaf, and then go lower to the end of the stem, wrapping it carefully.
You can secure the tape with glue at the beginning and at the end.
Varieties of artificial tulips
Schemes for making tulips with your own hands vary depending on what material is supposed to be used. Artificial flowers in needlework can be created from:
- paper (from regular sheet to corrugated);
- fabrics (including tapes and foamiran);
- plastic;
- beads
The last two types of materials are somewhat more expensive in terms of spending time and money on purchasing the necessary components.
In addition, to make a tulip using such techniques, you will first need to “train your hand” by creating smaller products.
How to make felt tulips with your own hands
Felt is a very pleasant material and very simple and easy to work with.
To make felt tulips with your own hands, you will need:
- felt in bright colors for flowers
- green felt
- filler
- a thread
- ribbon
- wooden sticks
For this you will also need a template
Felt tulips: patterns
Cut out templates from felt using patterns.
We sew each flower in two parts, and sew the long stems by folding them in half.
We stuff the tulips with filler and insert wooden sticks into the stems.
Insert the stem with the stick into the base of the flower and tighten it tightly.
Attach a leaf around the stem
“Independent” construction from kraft cardboard
Yes Yes. This structure is completely “independent”, that is, it will stand on its own, not leaning or glued to anything.
We outline the outline of only the pot and cut it out too.
And now the most important and difficult thing. Divide the pot in half lengthwise and draw a line with a pencil without pressing too hard (you will have to erase it later), and mark the middle of the line. We also divide the pot under the flower and also mark the middle.
Cut along the line to the marked center:
- a pot without a flower from top to bottom to the middle,
- pot with a flower from bottom to top along the line to the middle.
We slightly increase the slots to the width of the cardboard. We insert both parts of the flower pot into each other and get an “independent” flower
DIY tulips from plastic spoons
Plastic is a more durable material than paper.
Therefore, you can make a bouquet of tulips from plastic disposable spoons. After all, they are almost shaped like tulip petals.
What else will you need to make tulips:
- Plastic spoons
- thick wire for the stem
- glue
- dye
Paint the spoons different colors
Cut out rectangles about 4*11 cm from yellow felt or paper. Make cuts on one edge
Roll the pieces into a roll and secure with tape
Glue the blank to the spoon
Fold the tulips and wrap them with thread
You need to cut out leaves from green paper. Secure it with tape around the leg.
Make some flowers
You can arrange them in a vase or make a beautiful bouquet, decorating them with a bow.
Flower folding patterns using origami technique for children
Finally, I have prepared for you diagrams of folding tulips and templates for cutting out appliques. Therefore, print out and make cards, they will be very convenient to work with.
- Classic tulip
- Interesting open flower
- Flowers in a vase
- Tulip with stem
- And again the traditional folding pattern
- The option we did above
- Well, a couple of templates for cutting
I’m calling it a day for today, but I promise to continue the flower theme. So come in, don't get lost. I wish everyone a spring mood, radiant sun and gifts!!
Foamiran tulips: master class for beginners
Using foamiran you can make beautiful tulips.
Foamiran tulip: pattern
Cut out a blank from colored material according to a paper pattern
Using an iron you can make wavy edges of the flower.
Don't forget to make a hole in the center of the workpiece.
You can also paint it, making smooth color transitions.
For each flower you will need three blanks. Place them on the stem offset from each other.
Otherwise, you can make a tulip from foamiran like a felt tulip.
Opened origami tulip
- just like when folding a closed flower, we get a square from an A4 sheet and fold the second diagonal,
- unfold the sheet and fold it in half, repeat the steps and get two fold lines,
- unfold again and connect the corners in pairs diagonally, we get a small square,
- place the corner with closed folds towards you and fold the lower right side of the rhombus towards the middle,
- repeat with the left side,
- turn the workpiece over and repeat the steps,
- bend the top corner towards itself towards the folded sides,
- turn over and repeat the action,
- Gently pulling the bent corners, unfold the workpiece,
- bend the remaining two corners and get an open tulip.
The finished flower can be mounted on a stick of folded paper, or folded into a piece of paper.
DIY tulips made from satin ribbons: master class
In recent years, Kanzashi tulips have become a popular item for making jewelry and hairpins.
What could be nicer than flowers made with your own hands? On the eve of the holidays, it is especially important to take care of some souvenirs.
In this case, a tulip made of satin ribbons would be ideal.
Necessary materials:
- satin ribbon 2.5 cm: green, yellow, pink
- narrow red ribbon
- silicone glue
- stamens
- felt
- tweezers
- scissors
- cotton buds
- lighter
To make a bud of one flower, you need to cut the ribbon into 8 pieces of 4-4.5 cm.
Make semicircles on one side
Use a lighter to finish the edges
Make a tuck on the other edge of the piece of tape and secure it over the fire.
Attach several stamens, previously painted black, to a cotton swab
We attach the petals in rows: in the first 3, in the second 8.
To make tulip leaves from satin ribbon, cut several 5cm pieces of green ribbon.
Fold in half and cut out into a leaf shape. Finish edges over fire
Fold the pieces in half and, holding them with tweezers, bring them to the fire to form a midrib.
For each flower you will need three leaves. glue them to the base of the bud, or to the stem.
Knitted tulip
To knit one tulip you will need to prepare the following:
- Dark green yarn;
- Raspberry yarn;
- Wire if the stem requires stability;
- Scissors;
- Hook.
Step-by-step pattern for knitting one petal (total number is six):
- Cast on three chain stitches of raspberry yarn;
- Knit two rows of regular single crochets;
- In subsequent rows, the pattern is repeated, between each column another one is knitted, that is, an increase is made;
- As a result, there will be exactly nine single crochets in the fourth row;
- For the next three rows you need to keep exactly this number of loops;
- Knit the remaining four rows, focusing on points 2-3 in reverse order. It is also worth noting that instead of increases in the last two rows, you need to make decreases.
Now all that remains is to complete the work.
• Place the finished tulip petals together to form a bud.
• Connect with green threads along the bottom edges.
• From them, knit a tulip stem.
Corrugated paper tulips with candies
A homemade gift can also be quite tasty if you use candy to make it.
Necessary materials:
- Corrugated paper
- candies
- ribbon
- scotch
- wire
- pliers
It’s not difficult to make tulips from corrugated paper with your own hands.
To do this, take paper and cut into strips 20*2 cm.
Twist the strips in the middle once and fold in half.
Attach the candy to the wire using tape.
The petals from the base of the bud can be attached with tape. We wind up one part of the strips, folding them one on top, and then do the same with the second part of the strips.
This will create a tulip with 3 petals.
Next, wrap the remaining petals as well.
The base of the flower and the stem must be wrapped with tape.
Green paper is needed to cut out the leaves, which are also attached to the stem using tape.
Making a tulip from corrugated paper will not take much time, so you can make large lush bouquets, as long as you have enough sweets).
Collect tulips from corrugated paper into a bouquet, wrapping them with tape.
You will get a wonderful and bright bouquet of sweets with your own hands.
Paper card with tulips for mom on March 8
You can design it all as a postcard, it also looks very good. And beautiful, and rich, and bright at the same time. I love cute crafts like this.
Materials:
- Thick cardboard for postcards
- Colored or double-sided paper
- PVA glue or gun, scissors
1. Cut out a template from cardboard in the shape of a droplet, transfer it to paper; for one flower you need three things.
2. Glue one, and then the second, positioning it as in the photo, so as not to cover the main petal. And then there's a third one on the side. That is, we glue 2 pieces on the sides.
3. This is what we should get in the end. You can make 3-5-7 of these blanks, or more, and we make them in different colors. Or all the same color. You can use cardboard, it is denser.
4. Cut out and glue the stem, and so on to all flower blanks.
5. We bend the cardboard in half, white or colored. Or special designer paper. And glue the flowers, place them at an angle to make a beautiful bouquet.
6. Also, cut out and glue the leaves and a ribbon bow, and you're done.
You can draw stripes inside and sign them by writing a wish or a poem. Also, write who this beauty is from.
How to make a tulip from a plastic bottle
Another material for the production of tulips, which can be found in any home if you don’t have time to throw it away.
If you take care of this in advance and stock up on colorful bottles, you will get a wonderful bright bouquet.
Flat origami tulip
- fold the square of paper for the bud diagonally,
- put the wide side of the triangle towards you, mentally divide this side in half,
- bend the right corner from the middle of the base of the triangle, going to the left side to its middle, smooth the fold,
- repeat the steps with the left corner, we get a flower with three toothed petals and a sharp base,
- bend the base corner and hide it under the workpiece,
- fold the square of green paper diagonally, unfold it and place it at the corner facing you,
- bend the upper right side to the diagonal fold,
- repeat the action with the left side and get an irregular rhombus, similar in shape to a kite,
- fold along a diagonal fold, we get a triangle with an acute angle,
- fold the bottom corner up, unfolding it - this is a tulip leaf,
- We connect the bud and stem with the leaf.
Plasticine tulip: children's crafts step by step
You can also involve young children in the production of tulips, who from a very young age love to work with plasticine.
To do this, you just need a set of colored plasticine and a stack.
Start with a green plasticine stem (1) and the base of a bud (2).
We make the petals from red or yellow plasticine. To do this, roll a piece of plasticine into a ball (3).
Divide into 4 approximately equal parts and make layers of oval cakes (4).
Attach the first plasticine tulip petal to the base of the flower, and then place the rest as well (5).
Make leaves from green plasticine. Press two large pieces of plasticine along their length to get long and wide leaves (6).
Make smooth bends on each leaf and attach it to the stem (7).
Such a beautiful plasticine tulip can be planted in a small pot and given to your mother or grandmother for the holiday.
Fabric tulips
Fabric tulips differ from paper tulips in durability, and, when choosing high-quality material, also in naturalness. The variety of cutting techniques allows you to create incredible products, subject to careful processing of the material.
To create such petals you need:
- cut the tape into pieces of equal length;
- Make one edge of the resulting shreds narrower (for attaching to the stem);
- Using a special nozzle on a soldering iron, carefully burn the edge of the petal so that the threads cannot come apart.
Instead of a soldering iron, you can use a lighter, but this technique is fraught with a lot of waste.
How to make a tulip from cardboard with your own hands
To make a beautiful bouquet for the spring holiday, you don’t have to have a lot of money in your wallet. All you have to do is take the stationery out of the table.
Necessary materials
- colored cardboard
- colored paper
- glue
- clip
- acrylic paint or tape
- wooden skewer
Create a template on paper so that all parts of the tulip are the same.
Transfer the workpiece onto colored cardboard/paper.
We fold each piece in half, but first glue both parts of the tulip bud.
Cut out long leaves from green cardboard. You can make them double by gluing two identical parts with glue or double-sided tape. Double-sided cardboard is ideal.
Make a tulip stem from a wooden skewer. This way it will hold the bud well.
Pre-wrap it with tape or you can paint it.
When the stem is ready, glue the bud to it by inserting a skewer into the buds.
Glue the leaves on top of the skewer.
Cardboard tulips will keep their shape well. They can be placed in a vase or pot.
Tulips according to pattern
Volumetric fabric tulips are popular. They are created by stitching together cut pieces. The process looks like:
- Markings are made on green fabric for a long stem 5 mm thick (the width of the pattern will be 1.5 cm);
- on the red fabric two identical parts of the bud are marked (two ovals with pointed ends);
- after cutting out the necessary components, the parts of the bud are sewn together, with the exception of the junction with the stem;
- through the remaining hole the bud is stuffed with filler (cotton wool, foam rubber, etc.);
- the material for the stem is sewn into a tube, then a rigid base (rod) is inserted into it;
- the rod is inserted into the bud, bending its edges inward;
- the product is stitched along the border of the connection of two parts.
Making tulips yourself will not only be a great way to spend leisure time, but also a way to decorate your home with original decorative elements.
Materials for roses
You can use spoons to make almost any flower. For example, a rose. True, for this you need to work with fire. Therefore, this method is not suitable for small children. But for everyone else it's easy.
To make a beautiful rose - a craft from disposable spoons, stock up on the following tools and materials.
- 13 plastic spoons in your desired pink color. You can take the white ones and color them, but only at the end when the rose is formed.
- Pliers or wide-nose pliers.
- Scissors.
- Candle or lighter.
- Glue gun.
What else to read: Educational and methodological manual “Talking cubes” educational and methodological material on the development of speech on the topic