New Year 2022 is the year of the Red (Fire) Rooster, and the most popular gift will be its figurine or image. The needlewomen of Krestik have a good tradition: to prepare thoroughly for the New Year holiday. And this year will be no exception. Many of us will make or are already making a rooster with our own hands, or even not one, but several at once! After all, you must definitely please your family and friends with a handmade symbol of the year, and yourself with the fascinating process of creating this very symbol using various handmade techniques.
Creating a kind of GUIDE TO MASTER CLASSES from the Internet is also a tradition of our handicraft site, which was born a year ago. For you, dear craftswomen, we have selected only the best master classes online. Admire, look closely, discuss and choose the most colorful rooster! And then sew/knit/draw/blind/weave it. So, what technology can you use on the eve of the New Year holiday?
- Cockerels made of paper and on paper
- Crochet cockerels
- Felt roosters
- Fabric rooster: patterns, ideas, recommendations
- Rooster made of plasticine or polymer clay
- Rooster using Decoupage technique
- Roosters felted from wool
- Roosters embroidered with cross stitch, beads and ribbons
- We weave cockerels from beads
- Russian gingerbread "Cockerel", decorated with glaze
- Foamiran rooster
If you don’t have time to work, it doesn’t matter. The article contains links to craftswomen who sell finished works.
Cockerels made of paper and on paper
Making cards with the kids
If you are not a professional cardmaker, then before you start creating cards, be sure to read our article “Learning to make New Year cards with your own hands using the Scrapbooking technique.” In it you will not only find many ideas, but also get acquainted with the basic rules for creating postcards.
Any cockerel drawn by your child can be placed on a postcard. If it’s difficult for your child to figure out how to draw a rooster with his own hands, then show him this step-by-step instructions:
And then, it’s a matter of technology. Cut out the cockerel and make it the centerpiece of the composition. For example, your card can be this simple but cute. In your work, use New Year's paper and a bright red ribbon, add snowflakes, twigs and other holiday paraphernalia. Once you have a basic idea, the process of creating a card becomes much easier!
Photo from the site https://itsapatchworklife.blogspot.ru
If your child likes to color black and white pictures, give him this opportunity. Print the card template with a cockerel on thick cardboard and let your child get to work. Next, by cutting out a ball blank, you can add voluminous snowflakes to the card, glue half-beads imitating New Year's balls, etc., etc. Give free rein to your and your baby's imagination))
YOU WILL NEED IT
You will find 8 more templates for coloring, as well as 2 step-by-step instructions for drawing more realistic roosters in the archive, which you can download quickly and for free!
Take note of the idea with a cockerel on a stick, like on Elena Yurchenko’s postcard. Her cockerels are cut out of felt, or you can cut them out of paper.
Roosters made of colored paper
An applique made of colored paper can also be placed on a greeting card. But such an application can itself act as a postcard. To draw and carefully cut out all the details, children will need the help of their parents, but they can glue them themselves.
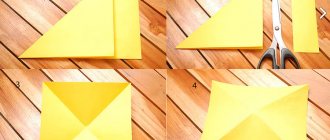
Olga-15 suggests making funny cockerels out of paper in her master class.
The Rooster blank is a rectangular sheet of flexible paper or thin cardboard, folded in half lengthwise. Its size is 13.5x10 cm. We make 7–10 inclined slits along the fold line (approximately every 1 cm). Their angle of inclination is 50–70 degrees, and their depth is ¾ of the height of the folded sheet.
The author clarifies that the right edge of the workpiece (tail) must be bent inward and connected to the opposite edge of the workpiece (breast).
Ekaterina Ivanova in her video tutorial shows how to make a red rooster using the Origami technique:
Roosters using Quilling technique
A very interesting idea is to lay out only a luxurious rooster tail from quilling paper. It's not as hassle as laying out a whole rooster, and it can turn out very impressive! Here is a rooster without a tail as a basis (see the photo below for how it looked in the original).
Print it on a color printer, and then fantasize about the tail. As an example, here is one such work (although the tail here is modest, but you will try, right?))
And if you are not afraid to make a whole rooster using the Quilling technique, then you can use this ready-made postcard as a basis:
Or this template:
A cheat sheet on the basic elements of Quilling to help you:
Button applique
And here are absolutely stunning handsome roosters, made of multi-colored buttons, half-beads, rhinestones and beads! You can take the contours of the cockerels from our archive as a basis (link just above).
DIY cockerel
To make such a charming children's craft, you will need a special template, which is attached below.
Print the blank on thick paper. Carefully cut it along the contour. Now, armed with colored pencils or markers, decorate the Cockerel blank. Fold along the line marked with a dotted line.
Crochet cockerels
Many needlewomen are familiar with the crochet hook and will be happy to knit a cockerel from multi-colored threads. And Krestik will help you decide on a model and offer several master classes on this type of needlework.
Even a beginner can knit a toy using Tatyana’s master class Dreamfall2702.
This colorful symbol of 2022 is knitted according to the master class on the “Women’s School” website:
Anastasia Kononenko offers her version of the Cockerel - small but remote - on a plastic Kinder Surprise egg. We knit from Iris threads.
Master Elena_Lencho has prepared a master class on tying a rooster named Gordey and is ready to sell it to anyone interested.
Elegant polka dotted cockerels will decorate any interior!
Photo from Stip&HAAK website
The same cockerels, but with different eyes, look different. A craftswoman from Moscow, Ekaterina Cherkova (Nikuska), will be happy to knit an exclusive symbol of the year for you (email [email protected] ). Here are her polka dotted roosters:
Want to try your hand at it? You can knit an amigurumi rooster using this master class from AmigurushkaRU:
Craftswoman Svetlana Zabelina crochets bookmarks in the shape of cockerels. Also a great gift for those who love to read. The master class can be purchased here.
You can also buy knitted cockerels from Svetlana.
DIY rooster
This cute soft toy will be a great decoration for a child's room. You can fill it with cotton wool, padding polyester, rags, foam balls, dried aromatic herbs or cereals.
Felt roosters
The fastest and easiest options for creating a symbol of 2022 are felt roosters. The material is easy to process, holds the shape of the toy well, and does not require processing of seams. On the contrary, hand stitches along the face of the product give it a special flavor and charm.
Photo from the site https://madeheart.com
Author - Kanaeva Anastasia
Photo from the site https://ktototam.ru/
A rooster figurine carefully cut out of thick felt will be both a Christmas tree decoration and a pendant.
Photo from the site https://ktototam.ru
And if you decorate the felt cockerels with embroidery, flowers and other decorative elements, it will turn out incredibly beautiful!
Photo from the site https://mmmcrafts.blogspot.ru
On the “Decorate Your World” website we found for you several more felt cockerels, but with patterns.
Daria Dar prepared in advance a video master class on sewing the symbol of 2022 from felt:
Jute lamp
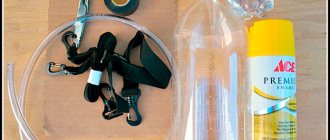
For the master class you will need:
- Jute threads.
- PVA glue.
- File.
- Pins.
- Paper.
- Pencil.
First you need to draw the silhouette of a rooster. Place the resulting drawing in a file. Moisten the jute thread in glue and lay it along the lines of the drawing. Make another similar pattern in the same way. Thus, you will get two cockerels. To make the base, wrap threads around a plastic jar. When the glue dries, remove the jar. The jute tube is ready.
Fabric rooster: patterns, ideas, recommendations
If you have the talent of a seamstress, you can sew a symbol of the coming year from any fabric. Depending on it and the pattern, the rooster will turn out to be in the Tilda style, fantasy, funny, fairy-tale, cartoonish, natural, even anti-stress!
We have collected several patterns for sewing roosters from fabric in an archive that you can quickly and freely)
A bright fabric toy can be purchased here.
Author - Baranova Elena
Roosters in Tilda style
Well, how can we manage now in our lives without the tilde-Rooster? On the ToySew website there is a master class on sewing this popular toy.
Master Vetic on her blog posted patterns for the Rooster and Chicken Peas based on the tilde pattern. An interesting couple will turn out if you put in the effort and patience!
And for inspiration:
Cockerel Yurik from Orange Toys
Maria Fedorova made a funny video about her tilda roosters (the link to the patterns is in the description of the video!):
Coffee cock toys
Aromatic, or coffee, toys compete with tildes in popularity. There are roosters using this technique.
A coffee cockerel can be like this:
Photo from the site https://zabavochka.com
You can easily sew it yourself using one of the patterns suggested above. “Cross” talked about all the intricacies of creating coffee toys in this master class.
If you think that you cannot cope with such work yourself, contact a specialist. Yulia Charikova made enough branded toys with the smell of coffee and put them up for sale at this address.
Fur interior toys
Oksana Svyatkovskaya will show her vision of a rooster and show how to sew it correctly using ready-made patterns. Her Rooster is made of faux fur, but who’s to say that it doesn’t happen or that it’s not good?)
Cockerel Mr. Twister by Yulia Sokolova is also made of faux fur. It can be ordered here.
Another cockerel made of fur (this time natural):
Author - Kraevaya Irina (Fur Paws)
Rooster pillows are a first-class New Year's gift with the symbol of the year!
Interior items with the image of a rooster
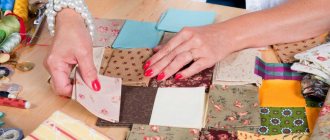
Another type of non-standard appliqué is a way to effectively decorate the wall of any room with a panel of buttons depicting the symbol of the New Year.
For such a creative craft that will effectively complement your home interior, all you need to do is prepare:
- multi-colored buttons of different sizes;
- beads;
- sheet of cardboard;
- silicone glue;
- frame.
An image of a rooster for a future panel can also be found on Internet resources. Taking into account such an important nuance as the diversity of the rooster’s plumage, it is necessary to select buttons that would harmonize next to each other and convey all the richness of the rooster’s coloring.
It is recommended to fill any free space between buttons with plain beads or seed beads.
At the first stage of work, it is recommended to apply the outline of a rooster figure to the cardboard base.
Certain areas of cardboard should be filled with glue, onto which buttons and smaller decorative elements are attached.
If you want the craft to acquire a more solid appearance and impress with its creativity, it can be framed in a frame whose format corresponds to the format of a cardboard sheet.
In addition to wall panels, a successful New Year's gift that can effectively complement the interior of a living room, for example, a living room, bedroom or children's room, will be a sofa cushion decorated with an applique with the image of a rooster.
For this kind of gift, you can use a ready-made pillow and sew a pillowcase for it with an applique made of fabric or felt.
Using the selected image patterns, you need to cut out the necessary elements from textiles. The composition will be perfectly complemented by plant elements and insects.
Fragments of the appliqué are usually sewn to the base using a zig-zag seam.
A colorful pillow full of positivity will undoubtedly please its owner.
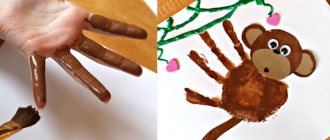
Rooster made of plasticine or polymer clay
Entertaining toys in the shape of a rooster are made from plasticine, cold porcelain, polymer clay or salt dough. You can involve children in the work. They sculpt with pleasure and paint with imagination.
With your help, the child will make a cockerel, following these step-by-step instructions:
The Risovandiya channel has prepared a video tutorial on how to sculpt a cockerel figurine from salt dough for children aged 4-6 years:
The polka dot cockerel is sculpted as follows:
Variations on the same theme, but with humor)
From salt dough, as well as from plastic, you can sculpt flat figures:
Photo from the site https://www.fler.cz
Admire the real Fire Rooster (author - Svetlana Belova)
In her video, Ekaterina Zabolotskaya shows how to make a magnet with the symbol of 2022:
Plaster mold
To make a rooster from plaster, you need to prepare the following materials:
- Gypsum.
- Paints.
- Water.
- Spoon.
- Mold.
- Plastic jar.
To begin, dilute the gouache. To completely dissolve the paint, pour a little water into the jar and shake. Pour gouache into the container and add gypsum. Stir the solution until it becomes liquid sour cream. Next, pour the plaster into the mold and let it dry. The rooster is ready.
There are a lot of ways to make crafts, so choosing the right option for yourself and making a charming cockerel will not be difficult.
Originally posted 2018-03-03 07:25:44.
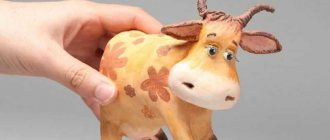
Rooster using decoupage technique
Roosters made using the Decoupage technique are also worthy! They will decorate the New Year tree and become a cute souvenir for loved ones. Directly Decoupage or painting on wood - it's up to you to decide. And we will tell you where you can buy blanks.
Wooden blank Rocking Rooster (manufacturer: Rukodelium)
In the workshop Everything for creativity (dljatvorchestva) there are a lot of blanks for painting and decoupage. Choose and create!
This is the beauty you can get:
Author - decoration & gifts Irina Chizhova (Decor-Gifts)
Author - Vasilisa
If you don’t want to make a souvenir in the shape of a rooster, then you can decorate any wooden surface with an image of a rooster. The scope for creativity here is simply limitless!!! Here are just a few examples for inspiration:
Decoupage of a cutting board (author - Marnush (Marina Nushtaeva)
Kitchen set “Cockerels” (author - Cozy things)
Clock "Peter the Cockerel" (author - Leonova Oksana)
Safety regulations
Since making appliqué designs requires the use of scissors, you must first study the rules for safe work:
- Do not use scissors that are too sharp. It is better to choose a model with rounded ends.
- Select a specific location for the tool on the work surface. Remember, scissors should be placed with their sharp ends facing away from you.
- Do not use the tool while moving.
- While working, you should monitor the movement and position of the cutting blades.
- Do not use blunt scissors or scissors with visible defects.
- When working, do not point the tool with the blades towards you.
Any creativity requires care and accuracy, otherwise the final result of the work may be disappointing.
Roosters felted from wool
Some craftswomen make wool toys that look like real ones! Let's admire and be inspired! And if you really want to buy one of these beauties, then look for them at the Masters Fair (the link is on each photo).
Author - Tatyana Kononova
Author - Zhanna Bugrova
Author - Galina Rotar
Author - Natashakun
Elenia collected in one place many different Roosters felted from wool and suggested to MK how to create one of them. It turns out very cute!
Goals and objectives of the application
A creative process such as creating appliqués is not just a way to have fun. By doing this type of needlework, children:
- get acquainted with different color combinations;
- learn to distinguish details by their shape, location and tone;
- develop a sense of form, rhythm and color, as well as their imagination;
- cultivate perseverance.
Roosters embroidered with cross stitch, beads and ribbons
Perhaps you love embroidery more than other types of needlework. Then you can place the symbol of the year on a pillowcase, decorate it in the form of a panel, a picture in a frame or a brooch. The main thing is that the image of the Rooster warms your soul. And if you give away your work, find out the preferences of the recipient.
You will find more than 50 different patterns for embroidering roosters and cockerels in a special album for our VK group. There are miniatures and large colorful patterns for cross stitch, there are roosters using the Blackwork technique and several patterns for bead embroidery.
You can embroider with ribbons either on white fabric, having previously transferred the image of a rooster onto it, or on a special fabric for embroidering with ribbons with an already printed image. Such works look more impressive due to the beautiful background. Here is an example of one such print on gabardine (sold here):
And several finished works embroidered with ribbons:
Postcard with a cockerel
It’s always nice to congratulate family and friends, but giving something else and a handmade craft is much nicer. For example, it could be a postcard with a rooster - the symbol of the New Year. For this you will need very little.
You will need:
- Colored paper.
- PVA glue, but a glue stick will also work.
- Scotch tape, preferably double-sided.
- Scissors.
Add a little of your imagination.
Layouts with the image of a cockerel can be found in a very large number on the Internet. But if you can draw, then you can draw the image of this symbol yourself. If this is a New Year's gift, then a blue background will do. You can draw snowflakes on it.
You will need two more cockerel figures. You can do more - the postcard will turn out more voluminous. Place double-sided tape on the back of each postcard and stick it to the center of the postcard. Under the picture, write an inscription with a congratulation, For example, “Congratulations,” “Happy New Year,” or “Merry Christmas.”
Open the card and write your wish beautifully inside. Or choose a wish on the Internet, print it, cut it out and stick the wish on double-sided tape. Such a voluminous postcard with a rooster will definitely delight your family and friends. You can prepare such a congratulation together with your child.
We weave cockerels from beads
Miniature beaded cockerels can be turned into a keychain or phone pendant.
To weave a flat rooster according to the pattern below, prepare round beads of black, yellow, light blue or dark blue, as well as white and red; brass wire (80 cm for the wings and 120 cm for the body).
Start weaving with the comb. After weaving the next 2 top rows, make the cockerel's beak. After the 4th row, weave a thread 20 cm long into this row. In the next row, thread the thread that you just added (this way you will make a thickening under the rooster’s beak). Then weave the remaining body and legs.
Weave the wing separately. Attach to the body as follows: thread the threads of the last row, which contains 5 beads, into the last 2 white beads of the row (marked with asterisks in the diagram). Tie the threads. If desired, the colors of the beads can be changed.
And 2 more patterns for weaving cockerels, this time voluminous:
And real masters of beadwork create masterpieces like these:
Button panel
To create a craft you need:
- Sheet of cardboard.
- Frame.
- Fabric (plain or with small patterns).
- Approximately 100 buttons of different sizes and colors.
- Glue.
- Pencil.
It is important to choose the shades of buttons to avoid sharp transitions. For example, the paws and comb will be made of red buttons, the head will be yellow, and the neck will be orange. For the tail, it is better to use several colors: blue, purple, lilac. To decorate the body, you need to mix buttons of all these shades.
Cover the cardboard with fabric and draw the silhouette of a rooster. Then start filling the outline. Before gluing the buttons, they need to be arranged according to size. Fill empty spaces with beads.
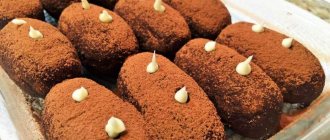
Russian gingerbread "Cockerel", decorated with glaze
Why not try baking a gingerbread in the shape of a fairy-tale Cockerel? We offer a simple recipe and method of decoration. Sweets are always welcome for the New Year's table!
Recipe
For 3 cups of flour you will need 200 g of sugar, 2-3 tablespoons of honey, 100 g of butter or margarine, 3 eggs, ½ teaspoon of soda and any spices - cardamom, cinnamon, ginger, nutmeg, cloves.
Before preparing gingerbread, be sure to sift the flour and enrich it with air - this will make your gingerbread more airy.
Place the butter and honey in a saucepan and melt over low heat, without bringing to a boil, with constant stirring. Add spices and soda. Add eggs, beaten with sugar, to the warm honey-cream mixture. Now you can add flour and knead into a soft dough, similar in consistency to plasticine. Using a rolling pin, roll out into a layer 0.5-0.8 cm thick. Cut out gingerbread cookies in the shape of cockerels or hens.
It’s easier to use a stamped die in the form of a rooster figurine. The moe-pechenie workshop sells cuttings that can be used to work with edible dough, such as gingerbread. But you can also fantasize, sculpt it yourself, imagine your Rooster.
Next, place the gingerbread cookies on a baking sheet lined with parchment paper and bake at 180 degrees until golden brown. This is about 20–25 minutes.
Glaze
Decorate the cooled gingerbreads with protein glaze, for the preparation of which we use 1 egg white, 200 g of powdered sugar and 5-6 drops of lemon juice. Mix everything carefully with a fork, adding powder in small parts. Then we put the finished glaze into a culinary syringe or a pound stick (they can be replaced with a plastic bag with a small cut at the end) and apply the design to the gingerbread.
Author – StudyaAnna
Modeling as a way to create crafts Rooster
Together with children, especially young children, you can make crafts not only from paper, but also from plasticine. The multi-colored plastic mass will appeal to children in their creative activities.
The process of sculpting a bright cockerel consists of several stages:
- three balls of different sizes are formed from yellow plasticine, which in the future will become the head, neck and body of the bird;
- elements are connected to each other, carefully smoothing the boundaries between them;
- on each side of the body it is necessary to make a couple of cuts, where the cock’s wings should be inserted in the future;
- a crest, beak and eyes are sculpted from small fragments of plasticine of appropriate colors;
- to form a tail, sausages are rolled out of plasticine of different shades, which are slightly flattened and attached in a fan shape to the back of the body;
- a pair of drop-shaped elements are formed from red plasticine, on which feather cuts are made with a knife; the wings are attached in places designated for them on the body of the rooster;
- They place the finished cockerel on fragments of cocktail tubes, which are completed with three-toed legs made of yellow plasticine.
Sawing out parts of the Cockerel
The main thing in the process of creating a craft is, of course, cutting. First you need to cut out the internal grooves of the parts. Insert a nail file into the drilled hole and secure it to the top of the jigsaw, do not forget the direction of the saw teeth should be directed downward.
Try sawing a couple of centimeters, then look at the cutout, what is it like, is it crooked? If yes, then it is better to change the nail file. Saw out the details slowly. Always hold the jigsaw firmly in your hand and do not put your fingers under the file. The left hand serves as holding the workpiece, and the right hand cuts out. If you are left-handed, then the opposite is true. Always hold the jigsaw straight in your hand. Watch your posture and don't slouch. Avoid any unevenness or large bevels. That is why you need to hold the jigsaw straight and its movements should be smooth, strictly up and down. If you go off the line while cutting, don't worry. After cutting, try to correct any unevenness with a flat file.
Rest
You've probably noticed that you often get tired when working. What can I say, everyone gets tired when working. Most often, your eyes strain and the hand you cut with gets tired. In order to reduce the load, you need to do a couple of exercises. You can view the exercises here. Do the exercises several times during work.
Cleaning the parts
After sawing out, there were small chips on the back of the parts that needed to be cleaned with sandpaper. At the very beginning, you already sanded the plywood, but now you have to do a little sanding. Using medium-grain sandpaper, sand the edges of the parts and the back of the plywood. “Fine-grained” sandpaper is considered the final stage of cleaning parts. It is better to clean the front part of the parts with fine sandpaper. When processing plywood, take your time. You can also use a rounded file, which is convenient for cleaning the inside of the holes. Try to ensure that the parts are free of burrs, irregularities and pleasant to the touch.
Final stage
Once the sanding process is complete, you can proceed to the next step:
Burning out crafts
If you wish, you can give our rooster a little beauty by adding burning elements to it using an electric burner. It can be very difficult to burn a pattern beautifully. To burn patterns, you must first draw the pattern with a pencil. I used burning only internal elements along the contour. You can read how to work with an electric burner and add patterns to it in the section on working with an electric burner.
Varnishing crafts or painting
Since next year is the year of the red Rooster, I used a mahogany wood stain to give the jigsawed Rooster more grace. If you plan to use stain, then choose a stain other than a water-based one, as it “raises the pile” and the product again requires additional sanding. The Rooster was then coated with varnish to give it a glossy finish, although to my taste the matte varnish makes it look more noble. Read how to best varnish a craft. Try to choose a quality varnish. Varnishing is carried out using a special brush “For glue”. Take your time. Try not to leave visible marks or scratches on the craft. Also, in addition to varnish, the craft can be coated with paint. If you want to transform a craft with paint, it is better to use spray paint. I would choose light brown paint. Spray paint on the rooster on paper or a simple newspaper so as not to stain your desktop. Let the craft dry, and then you can proudly put it on your shelf, table, or give a gift to people dear to you.
All photos from the article
Sawing out plywood crafts is an interesting and useful pastime. Any plywood product can be loaded with functionality, and then you get what is called two in one - a beautiful and useful craft. This instruction will tell you how to turn a boring sheet of plywood into something useful or simply unusual.
Volume applique
Three-dimensional images are obtained using the trimming method. Even a five-year-old child can make such a craft.
The following materials are required:- a printed drawing of a bird;
- paper glue;
- colored napkins.
Operating procedure:
Tear the napkins into small pieces and make voluminous balls out of them. Decorate the tail feathers of the cockerel with the resulting elements.
What is plumbing work- How to make decorative candles with your own hands at home
- How to make an office organizer with your own hands at home
You can make both individual parts of the image and the entire drawing voluminous. It all depends on your desire.
Cockerel is the most commonly used theme for appliques. This is due to the fact that he is a popular hero in many children's fairy tales. In addition, few representatives of the animal world can compare with it in the beauty of colors.
When making an applique with your child, tell him a few funny poems and proverbs related to the rooster, and also tell him riddles about this bird. Your child will definitely enjoy this pastime.
Preparing for sawing
To get started you will need the following tools and accessories:
Preparation of the workplace
Prepare your desk. First of all, we choose a place for your workplace. When creating a table, it is necessary to take into account such factors as: lighting, humidity, comfort. It is ideal if you choose a warm balcony for this, which is well lit and ventilated. If you already have your own table on which you cut, then that’s great! There is no need to be afraid when creating a workplace. I wrote a couple of tips for you in a separate article, which describes everything down to the smallest detail. After you have completed the process of creating a workplace, begin making your future craft.
We choose quality material
In order for your craft to turn out to be of high quality and beautiful to look at, you need to cut it out very carefully and clean it thoroughly. But not everything depends on us. When cutting parts, the back part of the part often delaminates and sometimes cracks. Just imagine, you have already cut out half of the parts, when suddenly the plywood delaminates and all the work turns out to be a waste. So, choose only high-quality plywood, sparing no expense or time for its processing. Surely you have encountered such a problem; you came to the store and cannot choose plywood, or rather, choose high-quality plywood that will not crack during work. There are many ways to select plywood to cut. Read the following article, which tells everything about plywood and its difficult choice. Don't forget that we need 3-4 mm plywood. After choosing plywood, start processing it.
Stripping plywood
You've probably noticed that the surface of the plywood is rough and has chips and cracks. The plywood also has knots in the form of dark circles. To remove all small defects you will need “Medium” and “Fine” sandpaper. Each sandpaper has a certain coating; if the sandpaper has large teeth, then it is “Coarse”, and if it has small teeth, it is “Fine”. But there are also medium-spray skins, neither large nor small, they are more in demand at work. In general, plywood is sanded in order to clean it from small irregularities and chips that can cause you minor harm, for example, you can add a burr. The plywood is sanded against the grain to give the panel a smoother surface. A well-polished surface should be flat, completely smooth, glossy in the light and silky to the touch. How best to prepare plywood for sawing and which sandpaper is best to choose, read here. After stripping, check the plywood for burrs and small irregularities. If there are no visible defects, then you can proceed to the process of translating the drawing.
Translation of the drawing
On my own behalf, I will say that translation of details is considered an important part in the work process. Your future craft will depend on the markings made. Think for yourself, you translated the drawing poorly, cut out all the parts, cleaned them up, and then, bam, the grooves don’t meet, and you’ll have to adjust the parts to the required size. I don't think anyone wants that. It’s better to do it conscientiously, translate each line smoothly and, most importantly, take your time.
Before moving on to the next part: Preparing for cutting, a little step-by-step detailing of the process of creating a drawing.
First, the main axes are marked and future dimensions are determined.
Then everything is drawn in more detail and finally scanned to be converted into electronic format.
Automatic contour drawing does not give very good results, so everything is done manually.
Drilling holes in the parts
Looking at the photo of the finished craft, you probably noticed that the craft has shaped slots that need to be cut out inside the parts. The craftsmen already know how to quickly drill holes, but I will tell you everything in detail. Such slots must be drilled with a drill, no matter manual or electric, or holes must be made the old fashioned way with an awl. It is important to always make holes with a drill number 3, because... It is more convenient for them to work and will not cause harm to the craft in the form of chips on the back of the plywood. If your hand is full, then it is better to place the drill almost on the edge of the slot and drill. If you are new to sawing, then it is better to place a drill or an awl in the middle of the slot and make a hole.
To avoid damaging your work table when drilling holes, you need to place a backing board under the workpiece. Also, to reduce the likelihood of chips appearing on the back side of the workpiece, it should be pressed as tightly as possible to the substrate; for this it is recommended to use a clamp. It is always difficult to drill holes alone, so ask a friend to help you in your task.