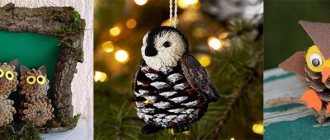
Christmas tree made of pine cones
. A good idea to celebrate the New Year with a new colorful craft. Here you will learn how to make a Christmas tree from cones with your own hands; with the onset of winter this is the most relevant topic. There are many ways, 30 of them are presented in this article.
If you are interested in the classic version, look at examples of how to make Christmas trees from cones on cones. If you want a small souvenir, make a small Christmas tree from one cone , an excellent gift and a good activity for children. For New Year's decor mini Christmas trees made from scales from pine cones are suitable. They look simply incomparable on a holiday table or mantelpiece. All this is easy to do with your own hands, master classes with step-by-step photos are at your disposal.
Craft for beginners, mini Christmas tree video
I also offer lightweight versions of this green beauty for beginners and small children.
The video details the process of making a Christmas tree from just one piece.
A similar process is shown in this step-by-step photo.
And also some more interesting ideas for you.
I also like this option. It is very original in that the cone “stands” on a cut tree.
Such mini crafts can be an excellent gift for the New Year if they are made with soul.
And also a very laconic version of the craft. Simple, but you can feel the style and taste.
Candlesticks
Fire and well-dried buds are a dangerous combination.
To prevent anything bad from happening, you can use artificial candles, or you can make safe candlesticks. For example, like this one. It seems that the candle is standing in a bump. However, no. First, carefully use pliers to disassemble the cone into plates. Cut a circle out of cardboard twice as large as the base of the glass. Secure the scales along the edge of the circle with hot glue. When you attach the next row, arrange the plates so as to close the gaps formed in the previous one (in a checkerboard pattern). Finish at glass height. Let the craft dry thoroughly and insert the glass inside. Place a candle in it and enjoy the view.
You can simply cover a glass with scales.
Or this option.
Here we will remove the top with pliers so that we get a flat platform.
Using PVA, decorate the pine cone and candle with sparkles.
Apply hot glue to the base of the candle.
Let's attach it to the bump.
Our candle is ready.
If the candle is artificial, then simply place it on the prepared base.
Large cones are often unstable and tend to fall to one side. This is unacceptable for a candlestick. It can be strengthened with air dry polymer clay. Take a small piece, soften it with water and knead it thoroughly.
Apply to the base of the cones, spread with kneading movements.
Turn the craft over and check how it stands. If necessary, repeat the procedure several times until the candle base stands confidently.
Another option for a simple and safe candlestick. For it you will need whole long cones, decorative twine, a glass container, and a candle.
All you need to do is use twine to secure the cones around the perimeter of the container.
All that remains is to place the candle inside.
Candlesticks in the form of a wreath look very beautiful. First you need to cut out the base - a circle of thick cardboard or a thin slice of wood.
We attach the cones and spruce branches in a circle with a glue gun.
Add decor, insert a candle and admire the result.
Another option for an absolutely safe candlestick is a glass jar, stylishly decorated. It's very easy to make. Using PVA glue, attach the lace to the neck of the jar. Screw self-tapping screws with rings into the cones (see the “Garlands” section). String the pieces onto a piece of twine and wrap it around the neck of the jar. Place the cones as you like, add decorative elements (optional). Pour salt into the bottom of the jar and place a candle on it. It will turn out stylish, simple and tasteful.
How to make a craft with acorns for the New Year
A very beautiful Christmas tree is obtained if acorns are added to the main material. They have a smooth surface and look beautiful after painting. Usually no one can guess what is added to the pine cones the first time.
Let's take:
- cone,
- acorns,
- cones,
- thermo gun,
- paint.
Let's make a cardboard base in advance, as described above. We will not make the bottom or put it in a pot.
Now let's start decorating. We will place all the elements on hot glue.
It turns out to be such a preparation.
If you silver or gild the acorns, it will not be noticeable at all that they are there. It will give the impression that these are Christmas tree decorations.
Preparation rules
Very often, cones falling from spruce and pine trees turn out to be closed and only open after a while, thereby changing the original appearance in which this cone was delivered to your home. This can somewhat overshadow the craft, so before you start making a Christmas tree from spruce or pine cones, you can familiarize yourself with some of the intricacies of preparing cones for the craft.
- If you want to leave the cones closed, after collecting them you need to put them in a container with wood glue for literally 20-30 seconds, this will not allow them to open.
- If you have collected closed buds and want them to open as soon as possible, there are several ways to achieve this:
- you can let them cook for half an hour and then dry them on the radiator;
- send the cones to the oven, preheated to 250 degrees, for 2-2.5 hours.
- Plus, heat treatment will kill microbes and small insects living in the buds and make them safe.
There is also a way to adjust the shape of the cone: you just need to soak it in water for 5-10 minutes, tie it with thread and dry it on a radiator. To bleach the cones, they need to be soaked for 5-6 hours in water with diluted bleach (1:1), then rinsed thoroughly and dried.
Article on the topic: Master class on a bouquet of vegetables with your own hands step by step with photos
Christmas tree made of pine cones and balls
Now let's look at what else you can do to diversify your cones. Of course, Christmas balls. To do this, you need to take slightly smaller balls than cones. It looks more elegant this way. The sizes should be chosen miniature so that they do not spoil the overall shape of the tree.
And we do everything as usual. Look at the instructions.
Balls can be glued to a cone or placed on branches.
Look at how the decor was placed on the base in an original way.
You can also play with shapes.
Select the balls to match the overall tone of the craft. Bright ones look more elegant, but pastel ones are more stylish.
Balls go well with garland and other New Year elements - gifts, inscriptions.
Christmas tree made of pine cones and tinsel for school
A very simple version of crafts made from pine cones and tinsel. It can be done in an hour, and if you get the hang of it, it will take even less time. Even a small schoolboy can handle it. It is important to buy tinsel in combined shades in advance: blue, green, silver, etc.
So let's take:
- tinsel,
- cones,
- Styrofoam,
- heat gun,
- acrylic paint,
- paper cone.
First, we divide the foam into particles, they will imitate snow. And glue them onto the pine cone. Didn't find the foam? Then skip this moment.
Glue the cones onto the cone in a spiral.
Glue tinsel between them, also in a spiral. You can take one fluffy one or several multi-colored ones, it depends on your desire.
Now we take the most beautiful cone in your opinion and paint it with white acrylic paint.
Glue it to the very top.
DIY sisal Christmas tree for kindergarten
Sisal decor is very simple and beautiful to make. This fiber is now sold in decorative and craft stores. And it comes in completely different shades. Balls are made from it very simply - rolled by hand. Therefore, such a craft can be made with a child and taken to kindergarten.
Let's take:
- paper cone,
- several types of sisal,
- hot gun,
- bumps.
We separate small pieces of fiber from sisal with our hands and roll them into balls.
We try to make them the same.
Then we attach the cones to the cone in different places, leaving room for the sisal balls. We glue our balls into this space.
You can decorate with beads, ribbon bows, Christmas tree beads, decorative berries, etc.
Ideas for Christmas trees made from pine cones and oranges (dried citrus fruits)
Nowadays everything eco-friendly is in fashion. What can we build on this trend? dried fruits - candied fruits, shells, pods and sprigs of spices (cinnamon, vanilla, star anise, cloves).
But it is also very easy to make candied citrus fruits in winter. Moreover, this is just the orange-tangerine time.
Pieces of lime, tangerine or orange don’t even need to be dried, just slightly dried. This is necessary so that the juice dries and does not flow down the tree. But what kind of aroma comes from it.
It looks very elegant and expressive!
Let's get started
For work we will need:
- Cones. Their number depends on how large a decorative Christmas tree you want. The more cones, the larger and more magnificent the Christmas tree made from pine cones. Cones for crafts need to be chosen that are good, without defects;
- Glue gun;
- Spray paint cans. The color depends only on your imagination;
- Garland;
- There are two ways to make such a Christmas tree: by gluing the cones onto a pre-prepared cardboard cone or onto a fiberboard base. In our master class, production will be carried out using the second method, with a base made of fiberboard (instead of fiberboard, you can take a sheet of chipboard or any other dense material that can be easily cut).
New Year's craft "Christmas tree" made of pine cones and walnuts
Walnut shells are very often used in crafts. It has a pleasant relief and is also small in size. But I suggest using the entire nut, because we will be making the Christmas tree without a base cone.
Let's take:
- walnuts,
- cones,
- thermal gun with glue sticks.
We will not use a cone, but will simply start gluing the pine cones to each other, forming a circle. The biggest fruits go to the bottom.
Starting from the second row, we slightly reduce the number of cones and also alternate them with nuts.
And we do it row by row, keeping the cone shape.
Attach a pine cone to the top. Don't skimp on glue. The structure should hold up well. More glue may be needed for nuts.
If desired, the Christmas tree can be painted with enamel from a can or decorative elements can be added.