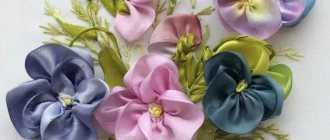
Embroidered work in the Rococo style will fit perfectly into almost any interior. The article provides a master class on the basic stitches used in this style of embroidery. Several completed works are also presented. Enjoy reading!
208 0
Welcome everyone to my master class! Rococo means "curl" in French. It is assumed that the embroidery will be done with twisted twisted seams. Sometimes there is a mention of Brazilian technology. The Rococo embroidery style is used mainly for floral and plant motifs.
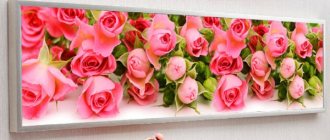
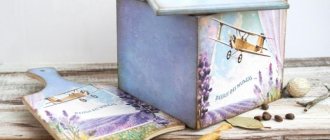
It can often be found on knitted fabric, for example, blouses, mittens, scarves. Decorative interior details such as napkins or tulle are decorated. A miniature embroidered picture on linen gift bags produces an impressive effect. A pincushion with Rococo embroidery will be an original gift. Unlike classic biscornu, you can zone the surface with three-dimensional patterns separately for pins and needles.
Features of the Rococo style
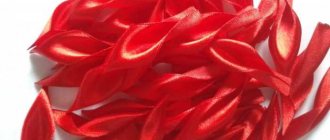
A special feature of the Rococo technique is the seam, which is made using turns on a needle . They give volume. Threads and ribbons are suitable for this type of embroidery. The needle must be selected carefully. The thickening in the eye area will not allow the formation of an even seam, so for thin threads it is better to use a bead needle that does not have thickenings. If you embroider with woolen thread or floss in several layers, any needle will do.
Rococo is best suited for embroidering plant motifs - double flowers, petals - since the stitches are voluminous and rounded, which is not relevant for an ornament with its clear patterns.
Are you planning embroidery on
a painting or clothing
Embroidery ideas
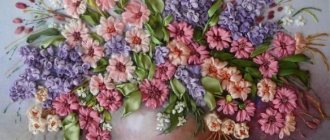
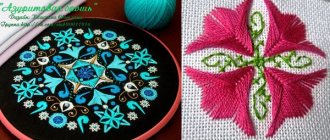
Using the Rococo technique, you can create three-dimensional patterns. The main elements are realistic and beautiful flowers. The pattern is complemented by leaves, berries, twigs, and knots.
Rococo patterns look very interesting on knitwear. Using this technique, floral motifs are most often embroidered on sweaters, jumpers and dresses.
Rococo embroidery for beginners on a knitted item will allow you to quickly master this technique. The work is done with fine wool yarn.
There are many ideas for embroidery in the Rococo style:
- voluminous ornament on the bodice of an evening dress;
- a wall panel with a pattern in the form of a wreath of roses or a sakura branch;
- a bouquet of wildflowers on a tablecloth and napkins;
- women's and children's items decorated with curls;
- embroidered personalized monogram;
- flower basket;
- tree;
- cobweb;
- landscape or thematic painting combined with beadwork or cross stitch and other options.
Stitching technique
The Rococo technique uses several stitches that appear differently in the painting: loops, spirals, stitches and knots .
Stitch
The rococo stitch is done like this:
- Mark two points on the fabric , the distance between which will be equal to the length of the stitch.
- Pierce the first point from the wrong side and bring the needle to the front side.
- Pierce the fabric at the second point and bring the needle to the face at the first pointwithout threading the needle all the way through the fabric.
- Do so much threads on the needle, how much is needed for a stitch of this length.
- Pull the needle through the turns, holding with your fingers, lay the stitch and secure it with a puncture on the wrong side.
- It can be done very long wavy stitch. To do this, first a straight line is performed - the puncture is made from the first to the second point, and then fixed at several points with additional microstitches to give it a waviness.
Nodule
A knot is a rococo stitch with two or three turns .
The technique is the same as for the stitch. When making a knot, it is important to make the punctures side by side so that the knot does not look like a stitch. Knots are used to embroider unopened buds and stamens. If you do them side by side, you will get a convex middle of the flower .
Spiral
A spiral is a circular interlacing of rococo stitches . It is performed according to the following scheme:
Editorial Voice
Matryona
Fan of embroidery and sewing
Ask a Question
It is important to maintain the same number of turns, and also to start each next stitch behind the previous one and end in front of the next one. The result will be a twisted seam .
Loop
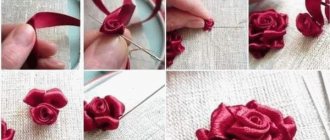
The loop is made in the same way as a stitch, only the distance between the first and second points is almost imperceptible - 1 or 2 mm - then the loop will be high. The loop can be both wide and high, but then it is necessary to make more turns. Such loops are used for embroidering roses .
The loop can be laid on the fabric and secured at the top point with a hidden stitch . A stitched loop is made in satin stitch embroidery in a similar way.
The buttonhole can be made using one or two additional needles without threads to make the pattern more voluminous . The turns with this method are also made differently. The loops are cast on as with knitting needles:
Then the additional needles are removed and a volumetric loop is formed. At the end, another puncture is made for fixation.
A few secrets
Your work will delight not only you, but also your loved ones, if you “learn” some of the subtleties that the embroidery master class recommends.
- Thread separation (as well as flattened stitch) can be caused by clockwise winding;
- The stitch is too tight if you wind it counterclockwise;
- To prevent the wound coils from unwinding, it is recommended to hold them as tightly as possible;
- When fixing the stitch and pulling through the turns of thread, it is recommended to carefully ensure that they do not unravel;
- Your embroidery will be much more uniform and voluminous if each strand is laid in maximum density to the previous one;
- Work done using woolen threads looks more impressive.
Rococo on knitwear
The rococo embroidery technique looks good on knitted items because it stands out against the background of woolen threads.
Even if the knitting is patterned, the motifs will be visible due to the large number of weaves. It is best to perform embroidery on plain items knitted with stockinette stitch. In this way you can decorate both new and old things.
of threads and colors is of great importance . Multi-color embroidery can be used on a single-color product. For multi-colored knitting, you need to select threads of the same color or use fewer combinations so that the embroidery does not look tasteless.
You need to think about what is more suitable - ribbons or floss threads . If the knitting threads have a glossy sheen, satin ribbons will look good. Regular threads look better on matte wool items.
Editorial Voice
Matryona
Fan of embroidery and sewing
Ask a Question
There are cotton, silk and wool floss. Silk and cotton interact better with the needle and do not get stuck or cling to their own fibers, as happens with wool.
For thick threads, a thick needle is needed, but it is desirable that its thickness be the same along the entire length . The thickening in the eye area will create inconvenience when removing the turns. You will have to twist the needle to release the tension. This slows things down. Some craftsmen use cross stitch needles with a blunt tip for rococo.
Before embroidery, the newly knitted product must be washed so that it takes on its final shape. In this case, the embroidered pattern is not deformed.
If you combine rococo with satin stitch embroidery, you can create a more interesting pattern . It will not be too convex; the necessary details will stand out favorably.
Important nuances in work
And finally, a few words about the final stage, which concludes our master class. Let's tell you some little secrets.
When making turns from the left side to the right, the thread unwinds, which leads to its delamination.
In order to get a voluminous and dense pattern, it is necessary to make a seam as close as possible to the previous one. And to get a good seam, you need to wind it counterclockwise.
When fixing the seam and further pushing it through the turns, make sure that they do not diverge in different directions.
If you embroider bright and voluminous flowers, they will become an integral part of your interior. And they will decorate various things with dignity. And woolen works look much better.
Rococo embroidery patterns
Let's get started
First of all, you should take the fabric and stretch it onto the hoop. Working with the hoop is always identical: a ring of a smaller diameter is placed on the wrong side of the fabric, the second is applied on the front. The rings are connected and narrowed using a special wheel. The fabric is stretched, you can start working.
First, select the sketch that you want to create in the Rococo style. Embroidery always begins with defining the future image. It is usually applied to the fabric with a pencil. Experienced craftswomen prefer to work by eye.
A double thread is threaded through the needle. The needle is threaded from the front side. The thread is then wrapped around the point several times. The needle is threaded through the resulting rings and the loop is tightened. The result is a voluminous strip. You can do the second strip in the same way. The basis of Rococo is embroidery with similar stripes. They can be used to embroider flowers, trees, and much more. The embroidery style and technique allow you to “revive” any painting in volume.