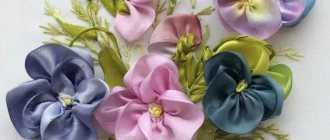
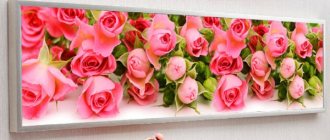
Ribbon embroidery tulips are a wonderful creation of human hands. These spring flowers have always been associated with the awakening of nature. Any beginning craftswoman can embroider them, because this is a very exciting activity, and you can involve both grandmothers and daughters in it. Every housewife strives to create comfort and coziness in her own home, but sometimes even the most expensive furniture does not bring the expected effect. It is important to note that nondescript accents play a big role and can completely transform the appearance of a room, adding a bright touch to it. Now we are talking about handmade paintings of floral motifs, which look very good on the walls, regardless of the style of renovation.
Necessary materials for needlework
To begin the important embroidery, be sure to prepare all the tools, such as:
- Fabric in a hoop
- Satin ribbons
- Needles
- Threads
- Beads, beads, sequins and bows
- Scissors
- Lighter
- PVA
- Vanishing Marker
If you have a hoop, be sure to use it, they make the job much easier. If not, you can make them yourself. To do this, we take a wooden frame and cover it with fabric in the corners, and then fasten it around the entire perimeter with pushpins. We wrap it on the front part and voila, the hoop is ready. For beginners, a good tip would be to use canvas. It has a wide weave and can be easily worked with satin.
To start embroidering, you need to prepare 15 mm ribbons of yellow, red or purple color, with which you will embroider tulips. Of course, you choose the color yourself; it can be different or the same for each flower. You also need a wide 24 mm green or olive color - these will be embroidered leaves.
The needle is selected depending on the density of the fabric. You will also need threads, glue, a thick needle, a lighter for burning the tips, as well as additional accessories to decorate the finished panel. You can use improvised means such as beads, beads, sequins and bows.
Headband
To make such beauty we need to have:
- two satin ribbons two and a half wide;
- a piece of ribbon six millimeters wide;
- a piece of felt material;
- hair strip or headband;
- lighter or candle;
- cotton buds;
- acrylic paints;
- scissors.
We cut the tape that we will use for the buds into small strips four centimeters long. We will make each flower from twelve petals. This means that for five buds you will need sixty segments.
The green ribbon is cut into twelve centimeters. We will use it to form the petals of our bouquet. Eight pieces are enough for this craft.
We round off the raw edge of the future petal, cutting off the sharp corners.
Next we carefully singe the rounded edge of the petal. Thanks to this, the petal will curl up a little and take on a “living” shape. In addition, a slightly singed edge will prevent the threads from shedding. Just don’t overdo it, the black edge of the segment will not add beauty to the flower.
Even in such simple work, you should not forget about safety precautions. To avoid getting burned, use a metal clamp or tweezers.
We clamp the second end of the part in the middle with a small fold and subject it to the same processing.
This is what we got. Now the remaining sections of the tape need to be brought into the same form.
It's time to work on the leaves. Fold the green ribbon in half with the glossy side facing out.
Now we cut the part so that we get a triangle, without one sharp corner.
Carefully set the free edges on fire with a candle and glue them together so that a small hole appears at the bottom.
When all the petals and leaves are ready, move on to the next stage.
Our tulip needs a center that will act as a pistil. To do this, we will paint one side of the cotton swab green.
We begin to form our flower. Using a gun or glue, attach three finished parts from red ribbon to a cotton swab in a circle.
Glue the next four petals overlapping. The last five are on the same principle. We should get a tulip like this:
Apply a little glue to the base of the bud and put a leaf on a cotton swab.
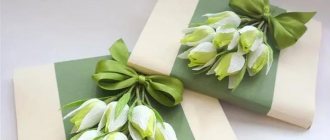
We shorten the cotton swab and our flower is ready. To attach our bouquet to the hair strip, let's prepare the base.
We cut out a small rectangle from felt material, as shown in the photo.
We glue one tulip at a time onto this base, forming a bouquet. Additionally, you can add some loose leaves to the edge.
We make a bow from a narrow ribbon and attach it to the base of the bouquet. Also, if you wish, you can decorate the composition with rhinestones, beads, decorative buttons and other elements that you like.
The final stage: sew the felt base to our hair strip.
Our ribbon tulip is ready. An original decoration will become a bright detail in your wardrobe.
Principles of embroidering tulip buds
Initially, you need to apply it with a marker. Flowers, as a rule, are placed on the fabric in a fan-shape, with buds no less than 4 cm, and their stems no shorter than 8 centimeters. Try not to leave large gaps between flowers, as eventually you will need to supplement the composition with other plant elements.
The ribbon is pulled through the eye of the needle and stops approximately 5 centimeters from the edge. The size of the eye in the needle corresponds to its width; if the eye is smaller, it will wrinkle. Next, in the same place they pierce and pull it along the entire length. This way it will secure itself and even with a jerk it will hold securely with the needle.
The second end also needs to be secured so that it does not stick out. To do this, create a regular knot and burn it with a lighter. During the embroidery process, this knot is left behind from the wrong side.
Pull the ribbon right side through the fabric so that it is at the top of the bud. Make a straight stitch (hereinafter referred to as PS) , bringing the needle to the wrong side at the bottom of the flower. Having retreated 3 mm from the previous stitch, it is pulled out again, but this time at the base of the bud, and a direct overlap is made.
In this way we continue to embroider the remaining buds. It is important to ensure that the edges of the ribbons do not curl and the fabric is not over-tightened.
You can decorate your painting with closed flower buds, which are done in one stitch or in two if you mean a half-open bud. If you are worried that they will look flattened, you can give them volume first by making a few French knots, and then sew straight overlapping stitches on top of them.
Don’t despair if something goes wrong and one of the colors in your painting turns out higher than the rest, this will only make the embroidery more realistic. In nature it is very difficult to find two identical tulips; each plant is special in its own way.
Ribbon painting
Recently, sewing with ribbons on fabric has become popular. The flowers turn out voluminous, bright and shiny, and the picture is spring-like and joyful.
Let's take a closer look at the step-by-step instructions on how to make such flowers. You will need satin ribbons. Choose ones that are not too wide, about 1.5 to 2.5 cm. For leaves and stems, you will need wider green ribbons, and for flowers, choose natural shades of natural petals.
Embroidery of leaves and stems in a bouquet
It may seem that embroidering leaves is very difficult for beginner needlewomen, but in fact, everything is not as difficult as it seems.
To make leaves, you need to take a wide, green one, cut one end of it diagonally, and the other should be even. The length of the segment is approximately 15 centimeters. Take a tapestry needle, it should be thick and approximately 6-7 centimeters long. Dip it in PVA glue and do the same with a flat end. Then it is applied to the tape and the lower part of the segment is wound evenly, in total the length of the stem will be approximately 10 cm. Wait 3 minutes and gently pull out until the glue sets. This way you get a real tulip leaf, such leaves should be along the entire length in the picture.
We attach the upper part of the leaf with a regular seam. If you want to add leaves to the bouquet in the middle of the composition, you can simply do it with a ribbon stitch with a central puncture. In this case, the tips of the leaf also form the stem, which is very convenient, since you don’t have to sew it in separately.
The product is completed with several PS at the base of the stems to create a binding. The color of the binding is whatever you want, you can also use bows and rhinestones.
Master class by Irina Zhukova
To work you will need:
- Fabric for base 25×30 cm (crepe-satin, dress linen, silk);
- A sharp needle with a large eye (the so-called chenille needle);
- Silk ribbons 13 mm wide (12 mm satin are also suitable): lilac or any other for embroidering tulips and green for embroidering leaves;
- PVA glue;
- Bead, doll and regular needles;
- Sewing threads to match the fabric;
- Disappearing marker or pencil;
- Hoop;
- Pins.
An alternative method for embroidering leaves and stems
The stems are made using a twisted stitch. A green ribbon with a width of no more than 0.6 cm is pulled onto the front and scrolled until a certain spring is formed. Next, we insert it at the base of the bud on the wrong side.
This way, a thin stem is obtained; if it does not hold well and moves along the canvas, it can be secured in the middle with ordinary thread.
As for the leaves, they are made with long leaves of the same diameter. Of course, this option will look much simpler, but for beginning craftsmen this is the most optimal way to create plant elements.
Design of finished embroidery
An embroidered picture must be framed. To do this, you first need to stretch the finished composition onto cardboard. Before stretching, the finished product must be ironed exclusively from the inside out. The embroidery is laid out on the table and a rectangular sheet is placed in the center of it; its dimensions correspond to the dimensions of the future painting. After this, using ordinary threads, the opposite sides of the canvas are sewn together so that it is inside. Cardboard is again placed on top to hide the threads, but first it is coated with glue so that it sets.
That's all, all that remains is to put it in the frame of your choice and hang it on the wall. It is best to cover the front part with glass, because dust will begin to settle on it over time, and some types of tapes are prone to shedding when washed.
A great activity that can turn into a favorite hobby, but also an economical way to decorate your interior. Handmade things have always been highly valued, because the soul of the master is put into them. Now you have the opportunity to create your own unique masterpiece. Many online resources will help you, and in specialized stores you will find ready-made kits with selected materials and accessories. You don’t have to bother at all, the main thing is to want to learn something and, of course, be patient and time.
How to learn to embroider beautifully with ribbons: tips and reviews
Marina : As a child, I was interested in many types of needlework. My parents didn’t interfere, but they didn’t take me seriously either. Ribbon embroidery was my favorite hobby. After graduating from school, to the surprise of my parents, I entered an art university, and not a law university, as they wanted.
Today I create canvases in mixed media, but always including my favorite ribbons. There are customers from everywhere. I also teach young craftswomen who are just as hungry for creativity as I once was. After several classes, mothers and aunts often come with them to master such a charming art.
Dear women, we are the keepers of the hearth, and without creativity we turn into angry, sarcastic and always dissatisfied people. Do what you like, make yourself and your world happier!
Embroidery ribbons
Victoria: being left without work, she fell into depression and, in order to somehow shake herself up, decided to dismantle the attic in the country house that we had recently bought. To my surprise, in one of the huge suitcases there were ribbons, so colorful, in bright and pastel colors.
I remembered the labor lessons that I loved at school, and sat down with the hoop in the evening. A year has passed since then, my daughters and I have become much closer, embroidering pictures, tablecloths and napkins in the evenings.
My girlfriends simply love to receive gifts, things in the Provence style are especially popular with us. For beginners, I can recommend such convenient video tutorials on the Internet, although I knew how to embroider, I learned a lot of new things from the lessons.
Embroidery ribbons