Decorating is one of the many areas in which it is very necessary to apply the rule of the “golden ratio”. What is the "golden ratio"? This term is inherent in proportional division.
Interior decoration is the final stage of design. How well-chosen jewelry is appreciated. What visiting guests do is praise the tastefully designed space, and are motivated to create something similar.
The most important thing is to take into account the small details. It would seem that who cares about a flower on the windowsill or figurines with spices on an open shelf. It will be a hundred times better if the owner pays attention to the little things.
It is the consideration of small details that is the purpose of the article. Having looked through creative sites, I just want to talk about ways to decorate little things. Decoupage for your attention!
Previously, decoupage was used exclusively to add zest to furniture. In this way, an absolutely budget-friendly and spectacular interior was created. If earlier the tools were limited, then at the moment the situation is exactly different.
In the modern world, thanks to the latest materials, it is possible to decorate with absolutely any surface. The final product can become an original decoration in the apartment or an unusual gift for a loved one.
Varieties of decoupage
The ancient technique of decorative design of objects today has several popular directions.
Different ideas: what happens
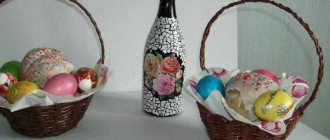
For such a craft, as a rule, you take a bottle of an unusual shape. Most often these are containers of expensive branded alcohol. It is interesting in itself, and after decoration it turns out to be a real masterpiece, but only if the decoupage is done well.
There are many ways to give a bottle a new look. Having appeared at the end of the seventeenth century, this technique of decorating objects has been improved. Today, these types of decoupage are widely represented in needlework.
- Volumetric (creating 3D images from scrap materials).
- Classic (applying a picture directly to an object).
- Artistic (creating a single full-fledged canvas using different effects).
- Reverse (decorating glass from the reverse side).
- Decopatch (work using patchwork style).
Today there are several ways to decorate a bottle with your own hands. This means decorating with toilet paper, tights, napkins, semolina, and various types of paper.
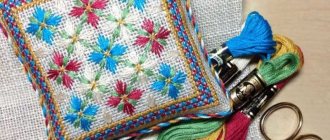
Decopatch
The technique is essentially similar to creating a patchwork quilt. The design consists of individual small elements that are united by a common theme or similar color scheme.
Selecting details for decoration requires a competent and thoughtful approach. To make the task easier, purchasing a ready-made kit designed to work specifically with this technique will help.
Technological nuances
For the kitchen, jars are decorated from various materials:
- tin cans, they make excellent lightweight jars for cutlery and herbs;
- iron containers for tea or cookies, they are convenient because they close tightly with lids;
- plastic, they are distinguished by a variety of shapes, volumes, and are well equipped;
- glass, they come in a wide variety of shapes, with and without lids (metal or plastic screw-on);
- cylindrical cardboard chips, they are convenient for storing small items that are rarely used (pastry syringe, cookie cutters, muffin tins);
- For jars with lids, before painting, the edge where the lid goes is covered with masking tape for ease of use.
Classic (direct) decoupage
It is the simplest technique with which it is recommended to begin acquaintance with this decorative art.
The creative process consists of gluing paper elements onto a previously prepared surface. Creating decor requires care, otherwise unsightly bubbles and folds will appear on the surface of the bottle being processed.
There are several basic methods of working in the direct decoupage technique:
- using a file;
- brushes;
- ironing.
For beginners, it is recommended to master bottle decoupage using classical techniques.
Reverse technique
Reverse decoupage of bottles will require a product made of transparent glass, since the placement of decorative elements occurs on the inner surface of the product. The technique involves a slightly different order of actions.
Note!
- DIY gifts for February 23rd - a large selection of ideas for creating unusual gifts for Defender of the Fatherland Day
- What to give a 2-year-old boy - a list of the best options for an interesting and useful gift (120 photo ideas)
- Papier-mâché - TOP 120 photo reviews of original products. Detailed instructions for beginners on creating beautiful crafts
Volumetric decoupage
This is a relatively young decorative technique that is rapidly gaining popularity. The decor allows the use of shells and molded parts to create three-dimensional decorations on the glass surface.
Experienced craftsmen often use a special plastic paste as a base.
An important advantage of the decoupage technique is the absence of strict frameworks that limit the creative imagination of the master.
You can use any techniques, decorative details and artistic design methods to create unique designer items. You can admire the creations of experienced craftsmen by studying pictures of bottle decoupage.
How to Preserve Bottles of Unusual Shapes and Sizes
After the next spring cleaning, a lot of useless items accumulate in the pantry or on the balcony that are a pity to throw away. But there is no point in storing them for a long time, so home craftsmen are looking for ways to use them in the household, for crafts and interior decoration.
This is also true for bottles with intricate and elegant shapes, which can become real decorations for any room in the house. They can be used to store all kinds of liquids, as practical vases for fresh flowers or dry compositions, or as absolutely decorative decorations.
Tools
The list of necessary devices is small. Usually these tools are found in any home. Therefore, a new hobby will not require serious financial investments.
You will need:
- brushes of different sizes;
- containers for water and various materials;
- soft fabric;
- stationery knife;
- foam sponges;
- sandpaper;
- sharp small scissors.
Materials
In addition to the original shaped bottles themselves, you need to prepare:
- PVA glue;
- acrylic paints;
- varnish of various types (including craquelure if necessary);
- primer;
- masking tape;
- decorative elements (napkins, postcards, photographs, etc.);
- degreaser (dishwashing detergent, alcohol, solvent);
- additional details (ribbons, braid, beads, beads).
Varnish for decoupage is used differently depending on its functional purpose.
The final protective coating requires a varnish that is resistant to abrasion and changes in air humidity.
Note!
- Kinusaiga technique - TOP-140 photos of the best ways to create crafts using the Kinusaiga technique with your own hands + instructions for beginners
- Do-it-yourself passe-partout - a master class with step-by-step do-it-yourself schemes. Making tips + photos of the best examples
Decoupage with napkins: TOP-150 photos of ways to decorate with napkins. Simple instructions for beginners at home
Experienced professionals advise:
- acrylic, polyurethane and alkyd varnishes for a high-quality protective layer;
- decorative varnishes with different effects for decoration.
As an adhesive, you can use inexpensive PVA glue or special decoupage mixtures.
Features of decorating jars
The jar is decorated along with the lid. The relief pattern looks original. For example, antennae are added to a grapevine, and leaves are added to a flower. For relief, use white acrylic paint mixed 1:1 with PVA glue. The relief is shaded with dark paint: it is applied with a brush and then wiped over with a cloth. The paint slides to the base of the relief, creating a clear outline.
When decorating the jars with classic black and white pictures in the style of the 18th century, the lids are decorated with twine: it is wound with glue. The main background of the napkins is changed with decoctions of green tea, hibiscus, rooibos, and cafe solution.
The paper is moistened, allowed to dry, and smoothed with an iron. It is better to pluck the design with your fingers, then the edge will not be noticeable when varnishing. Windows are made in transparent jars for bulk products: they are sealed with masking tape, then tape is glued along the edge.
Preparation
Work always begins with preparing the glass surface. A prerequisite for obtaining a quality product is the complete removal of stickers and labels from the surface of the selected bottle.
Then it is thoroughly washed with dishwashing detergent and dried. Experts use alcohol solutions or solvents to effectively degrease glass surfaces.
The glass is carefully sanded with sandpaper and degreased again.
Preparing paper elements
A variety of paper blanks are acceptable for artistic decoration.
- When using special napkins, the elements are simply cut out and removed from the base.
- Magazine illustrations and postcards require pre-soaking in warm water so that they can be easily removed from excess layers of paper. The parts are cut out with sharp scissors.
- Using regular napkins will require cutting out the intended patterns.
To learn more about the process of preparing various paper parts, watch the video tutorials.
Scenery
Often people, as soon as they hear the word “landscape”, give up on the idea. However, you shouldn’t immediately think that landscape is complicated. In fact, everything is much simpler than it seems.
We take as a basis toilet paper glued to the container with random folds. Then, after drying, we sketch the drawing with a simple pencil.
The design can be anything - a tree, birds, animals, fish, fruits. It may be just one tree, but believe me, this decor will look more than decent.
We twist flagella of different thicknesses and glue them to the sketch of the drawing. If this is a tree trunk, the flagella will be thicker, the branches will be of medium thickness, grass and bushes may be made of thin and long strands.
Would you like a rowan branch? Roll small balls with wet hands and form a bunch of them. Don't forget to cover the workpieces with glue.
After drying, all that remains is to color the resulting drawing. By the way, it’s better to paint the landscape with your finger - this way you can avoid clear boundaries between colors.
Gluing parts
The most exciting step in the creative process is gluing paper elements onto the glass surface.
The work will require accuracy, attention and concentration.
- The parts are carefully coated with an adhesive; in addition, it is easy to apply it to glass.
- The blanks are placed on the glass and their surface is very carefully smoothed, expelling air bubbles and excess glue.
Master class on decoupage of glass jars for Christmas: festive lantern
There's still a lot of time until Christmas, but it's worth thinking about appropriate decorations now. Moreover, today's offer is quite universal, because it is simply winter. Such a festive lantern, made by decoupage on a jar, has a huge advantage. This decor works both day and night, illuminating the room with its bright and, above all, warm light.
Materials:
- any glass jar;
- paint that gives an icing effect;
- snow paste;
- decoupage glue;
- colorless gel paste (with an applicator, that is, a tip);
- silver lip pencil;
- red liquid balls;
- glossy gel;
- sponges;
- tassels;
- napkins with any winter/holiday theme;
- something to decorate the top of the jar, such as jute twine, faux hawthorn, etc.;
- hot glue.
Christmas lantern - decoupage from a jar: how to make it step by step
- The first step is to apply a white paint glaze effect to the can using a sponge. You do this by touching the sponge to the can. You should wait until the paint dries (about half an hour if you place the lantern near a warm radiator).
- Then cut out the motif you want to have on the lantern, using only one layer, since the napkin consists of three. Apply glue and brush. Be careful not to ruin the thin napkin.
- When the glue dries, use a sponge to apply paint with a glaze effect, which will give the effect of frozen ice.
- Now it's time for the gel paste. Immediately after application it is white, but after drying it becomes completely transparent. This gives a cool 3D effect.
- The next steps are to paint the branches with a silver liner and the fruits with red beads. Finally, once everything is dry, you can apply the snow paste. But don’t overdo it, because once the candle is lit, it doesn’t let in any light.
- The lantern is also worth decorating to cover the thread of the jar. Use jute twine and artificial hawthorn, which you can buy at a flower shop. Glue it all together with hot glue.
Decoupage on glass is not a job that you will do in an instant. Each layer needs to dry well, which is really important if you want the whole thing to not only look beautiful, but also be as durable as possible.
Applying varnish
The final step in the work is applying a varnish coating to the surface of the product.
This is necessary to protect the bottle from aggressive environmental influences, abrasion, and scratches.
The varnish is applied to a thoroughly dried surface. For better protection, experts recommend applying several layers of varnish. Any master class includes the final varnish coating stage. It is important to thoroughly dry the previous layer before applying a new coat.
What materials are needed for the creative process?
Based on the features and stages of decoupage, appropriate consumables are selected at the stage of preparation for work. The duration of the process remains quite short, but implementing the technique will require some time and careful attention to detail:
- preparation for processing the decorated surface of the bottle;
- choice of pattern and image applied to the surface;
- applying decor and covering it with adhesive;
- fixing the image with a varnish coating;
- decorating and beautifying free space.
In the process of work, a home craftsman will need not only materials, but also inexpensive tools that can be purchased in special stores. It is also necessary to select an interesting idea and decor that will be required for its full implementation and preparation of the finished product for further use.
Degreasing and priming
Before applying a drawing or picture to a selected area of the bottle surface, it is necessary to prepare the product itself. For these purposes, alcohol is used, which helps to degrease the glass and the image will be smooth and free of foreign inclusions after the work is completed.
It is better to prime the surface with special products for smooth and glass surfaces; matte and quick-drying coatings of different colors and acrylic paint are used.
Drawings and images for decoupage
Thematic decoration is selected in accordance with the overall interior composition or the intended use of the future item. Most often, bottles are decoupaged with napkins, for which multilayer products with original drawings or images are chosen.
You can choose decor from special, thematic cards for decoupage or print your favorite drawings and even color photos of people, landscapes or other compositions on thin newsprint paper.
Which glue is best to choose
It is customary to fix the design on the treated surface using high-quality adhesives, such as PVA glue. After complete drying, although not quickly, the glue becomes completely transparent, without affecting the quality of the drawings, and experts recommend not using quick drying methods with a hairdryer.
Despite all the advantages of glue, if it is exposed to high humidity or any liquid, it can lose its properties, so the next step is to fix it.
Varnish coating for decoupage
You can securely and firmly fix the future composition using a transparent acrylic-based varnish. To give the picture an unusual look, varnish coatings with a craquelure effect are used; as a result of applying this composition, the finished product will have the appearance of an antique piece of art.
Having finished applying the varnish and protective coating, you can begin decorating the undecorated areas of the bottle, neck and other free areas to complete the project.
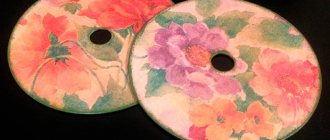
Applications of rice paper
Simple decoupage of a wine bottle can be done using rice paper, which is used for baking.
The best option would be paper with a floral pattern.
Operating procedure.
- The surface of the washed bottle must be dried and degreased.
- It is recommended to tear the paper to obtain an original effect.
- It is easy to glue the elements onto the glass using glue. Another way involves placing damp paper on the bottle and drying it with a hairdryer.
- At the final stage, the bottle is coated with transparent varnish.
Method 1: toilet paper
A common way of decorating is to decoupage a bottle with toilet paper. The master class offers step-by-step instructions for making such a craft.
You will need toilet paper, paints, paste, brush, and pencil for decoration.
At the first stage we make the base. To do this, apply glue to the bottle and glue the paper, forming small random folds.
At the second stage, when the base is dry, we make a drawing (for example, a tree). It's better to start with simple sketches with large details. Once this technique has been mastered, you can then move on to more complex compositions.
We continue to decoupage the bottle with toilet paper. The master class offers the third stage of work. Now we glue the paper according to the drawing, forming individual parts of the tree. This is done like this: tear off a piece of paper, twist it into a flagellum, dip it in glue and apply it to the drawing. The trunk and branches of the tree are made of flagella of different thicknesses. You can also make stones, water, grass. Upon completion of the work, it must be thoroughly dried.
At the last stage, we move on to coloring the workpiece. This is done with paints and a brush. Apply paint in a thick layer to add volume. Your imagination will tell you how best to decoupage a bottle with toilet paper; we reviewed a master class on how to make it.
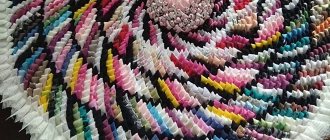
Decoupage with tights
An original option for voluminous design is the use of tights for voluminous decoupage.
The advantage of this method is that it is easy to shape the tights into any shape and create a beautiful drapery on the surface of the bottle.
Using this method, it is easy to perform original decoupage of a bottle of champagne.
Operating procedure.
- The first step is to prepare the surface of the bottle.
- The tights must be soaked in the adhesive composition, having first cut off their upper part.
- Then the tights are pulled over the bottle, gathering them into folds.
- The dried workpiece is painted with acrylic paint.
- Additional design involves the use of paper parts, beads, and decorative varnish to give the bottle an impressive look.
- At the end of the work, it is necessary to apply a varnish coating.
The original design involves the use of beads or coins for additional stylish decor of the gift bottle.
Options
Many novice craftsmen are interested in the question of what this type of decoration can be made from. For these purposes, multi-layer napkins are useful. Choose those products that depict interesting, colorful designs.
At first glance, the process may seem complicated to you, but it is not. An alternative is decoupage cards. As you can see in the photo of decoupage cans, this is paper prepared in a special way, on which interesting patterns are applied.
Often this kind of card is used to decorate sets and boxes. They are used to complement gift wraps that will surely make you stand out from the rest.
To enhance the effect, gilding or blackening is often used when decoupaging a glass jar. A technique of artificial “aging” that is quite popular today.
Note! The use of the technique of decoupaging jars with your own hands is gaining more and more popularity. Using this method of decorating objects allows you to create unusual, truly original things, unlike other things.
It is not necessary to use exclusively images that can be transferred to another surface. After all, there are other equally acceptable solutions. This is the use of volumetric decoupage technique. For these purposes, special modeling masses are used. The use of eggshells is relevant.
Decoupage bottles for a wedding or anniversary
Wedding decorations are usually kept in the same style. This affects the decor of flower bouquets, celebration halls, and festive glasses. It’s easy to complement the style with original decoupage bottles.
You can use paper napkins, original wedding cards, or even photographs of the newlyweds as decorative details.
Additionally, it is easy to decorate such bottles using lace, beads or beads.
An original bottle of champagne with the image of the hero of the day will be a memorable and pleasant birthday gift.
As additional decorative elements, it is easy to use thematic drawings or spectacular craquelure varnish to create a unique product.
How to create three-dimensional drawings on a glass bottle
Decoupage bottles using toilet paper makes it possible to create attractive and unusual volumetric decorative elements. Thus, using toilet paper you can easily create floral decorations (flowers, leaves, twigs, vines), convex geometric patterns and other decorative elements of simple shapes.
To create a three-dimensional pattern on a glass bottle, you need to select a suitable image and print it on a printer.
The basis for creating decor is paper flagella. In order to create a three-dimensional element, you need to soak your hands in PVA diluted with water (in a ratio of one to one or one to two) and, without waiting for the glue to dry, tightly twist the paper rope. Afterwards, the desired element is laid out with a tourniquet and additionally coated with glue. After drying, the bulge is painted in the desired color.
In this way, you can make snowdrifts, clouds, or imitate stonework: the paper for these elements is simply crumpled and painted accordingly.
New Year's decoupage
Celebrating the New Year also involves a non-standard approach to decorating the festive table or arranging New Year's gifts.
Decoupage of a New Year's bottle involves the use of a white background or openwork lace as decoration. New Year themed designs are easy to cut out from greeting cards.
An excellent design option would be beautiful snowflakes, which are easy to cut out of ordinary paper napkins, towels or toilet paper.
You can get ideas for decorating bottles by looking at a photo of a decoupaged bottle. A creative approach will allow you to create an original interior element or customize a gift.
conclusions
There are a lot of interesting options. They are united by attractive appearance, originality, and unusualness.
This DIY jar will definitely find application and fit into any stylistic direction.