With the arrival of the new school year, children begin to make various homemade exhibits for exhibitions, competitions, and decorate school halls and classrooms with them. Crafts created by children's hands contribute to the development of their creative abilities, turning the making process into an exciting activity.
Homemade products are especially popular for themed holidays: Mother’s Day, New Year, Teacher’s Day, March 8th. Our article contains ideas for crafts for schoolchildren made from various materials.
Indian
You will need: colored paper - red, orange and yellow, a simple pencil, scissors, a toilet paper roll, glue, 2 buttons, paws from an old toy.
Master Class
- Glue buttons onto the sleeve as eyes.
- Cut out a beak from orange paper, then glue it on.
- Cut out a small curly strip of red paper and glue it under the beak.
- Trace the palm onto construction paper, then cut it out.
- Make 6-9 of these palms.
- Glue the palms as feathers.
- Glue the paws.
The bright Indian is ready! I recommend watching this interesting video!
TOP 5 COOL BULLET IDEAS BEST OF THE BEST DIY
Origami technique
Paper toys, animals, plants, vehicles, birds, and various objects made using the Japanese origami technique will delight anyone to whom they are presented - parents, close friends.
Origami differs from appliqués, cutting out silhouettes and many other types of art in that it is the art of the whole. There is no need to cut or glue anything, you just need to use one whole sheet of paper. It is possible to add expressiveness to the craft and individuality by adding some details. For example, eyes, animal faces, patterns on the body, clothes.
Recently popular modular origami, which is more difficult for children, consists of several pieces of paper.
Animals using origami technique
Origami trees
Origami steamer
Origami girl
Origami pelican
Origami bee
Origami ice cream
And various other ideas that can be found in the origami for kids section.
Animals from caps
You will need: lids, colored cardboard and paper, button eyes, glue, marker.
Master Class
- Decide what animal you want to make.
- Cut a square of colored cardboard and glue on the lid.
- Draw a smile with a marker, highlight the color if it is a bee or ladybug.
- Cut out the paws, ears, tail, antennae, then glue them in place.
- Glue on the button eyes.
The cap animals are ready! I recommend watching this video!
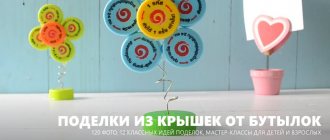
Crafts from Plastic Bottles: How to Make Funny Frogs from Plastic Bottle Caps
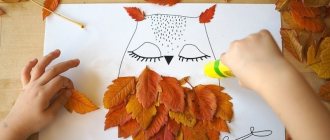
Magic leaves
Another of the most common materials for crafts in labor lessons is autumn leaves. If you make a wide bezel out of thick paper and stick long narrow leaves on it vertically, you will get an autumn crown for a girl.
It is easy to make many applications on paper from leaves. You can cut out a wide variety of patterns and even entire artistic compositions on the sheets. The main thing is to use imagination and a little perseverance.
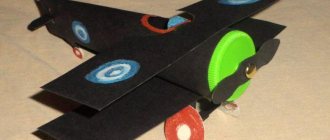
Airplane
You will need: 4 small and 2 large ice cream sticks, a button, a clothespin, paints and a brush, glue.
Master Class
- Paint the button and clothespin red, then wait until completely dry.
- Paint the popsicle sticks blue, then wait until completely dry.
- Glue popsicle sticks for the airplane's wings and tail, then glue on a button.
The creative plane is ready! I recommend watching the video master class!
Airplane made from clothespins.
Original toy
You will need: white cardboard, pencils or markers, scissors, a simple pencil, glue, clothespin.
Master Class
- Draw a small fish.
- Color it.
- Cut into two parts.
- Glue the fish parts to clothespins.
- Wait until completely dry.
- Using the same principle, you can make a chicken in an egg.
The original toy is ready! I recommend watching the video master class!
Clothespin toy.
Lamb made from cotton swabs
You will need: cotton swabs, white cardboard, glue, scissors, a simple pencil, 2 ice cream sticks, felt-tip pens.
Master Class
- Draw the sheep's body and head on white cardstock, then cut out.
- Cut up the cotton swabs.
- Glue the sticks to the sheep's body as wool.
- Glue cotton swabs to the head and draw a muzzle.
- Break the popsicle sticks in half and glue them on the back to serve as foot stands.
- Decorate the sheep to your liking.
The sheep made from cotton swabs is ready! I recommend watching the video master class!
Lamb made from cotton swabs || We are preparing gifts for the NEW YEAR!
Assembling the firing structure
To bring the pistol into combat condition, it is necessary to correctly complete the assembly of the structure:
- make a couple of thin yellow tubes;
- bend one of them in the form of a horseshoe and insert one end into the trigger tube, and the other into the tube underneath, cut off the excess. Get the trigger;
- Make a release from the second tube by inserting one edge of it into the handle tube second from the top, and fasten the second edge to the bottom of the barrel;
- make a pink tube, give it the shape of a ribbon and cover the handle with it, leaving an open hole at the back;
- remove the trigger hook from the upper tube of the handle and install the spring in the hole so that it rests against the tube at the back of the handle, and insert the trigger back;
- make another yellow tube, secure the shape with tape and cut it evenly along the edges;
- make a small hook from one edge, hook an elastic band to it and glue;
- insert the prepared tube with an elastic band into the lower barrel and push the elastic band forward, securing it between the tubes;
- make paper bullets of the appropriate diameter, load the gun and shoot.
A detailed master class will help you understand the creation of a pistol in more detail.
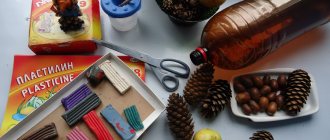
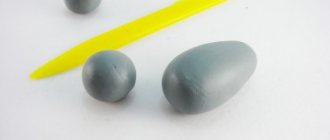
Raven made of plasticine
You will need: plasticine, toothpick, stack.
Master Class
- Roll a small ball of dark gray plasticine.
- Roll a smaller ball of light gray plasticine.
- Flatten the light gray ball into a flat cake.
- Make cuts in a circle.
- Cut off pieces of plasticine to make a star.
- Connect the ball with the star.
- Using a round stack, press 2 holes on the ball.
- Make an oval-shaped bird's body from dark gray plasticine.
- Make the wings of the bird in the shape of flattened drops of dark gray plasticine.
- Make a wavy outline on the wings using a stack.
- Attach the wings to the body.
- Make the crow's paws and attach them.
- Make 3 thin little sausages and attach them to the top of the bird's head.
- Make the eyes of a crow from black and white plasticine.
- Draw the eyebrows of the crow in a stack.
- Attach a small tail to the crow.
- Make a toothpick pattern on the raven's neck.
The plasticine raven is ready!
Crafts for children: Top 200 ideas step by step
For successful work, use the following tips:
- Study the list of materials required for making crafts so that before you start work, prepare everything you need;
- Be careful with sharp objects. It is important to use only children's scissors with rounded tips. If holes need to be made, blunt punches should be used and always under adult supervision.
- Care is important when working with materials. Paints and plasticine can stain the surface, and hard objects can scratch it. Therefore, you need to protect the work surface, cover it with oilcloth or put special plastic or wooden planks;
- When using paints, you should change the water often, and then wash your hands and hands thoroughly. To prevent the paint from drying out, the jar must be closed tightly, just like a box of paints.
- After working with clay and plasticine, they are stored wrapped to prevent them from drying out. It is better to wrap the clay in a piece of damp cloth, and the plasticine in plain paper.
- Pencils should always be well sharpened. You cannot use a knife or blade for this. Sharpening should be done with a special sharpener.
- Felt-tip pens need to be capped so that they are always ready for further work.
Sisters made of colored paper
You will need: paper of two colors, 2 wooden sticks, buttons for eyes, elastic bands or strings for hands, pencil, glue.
Master Class
- Take a square of colored paper.
- Fold it like an accordion.
- Tie it to a wooden stick, forming handles.
- Cut out a circle for the face.
- Glue on the face and eyes.
- Draw a smile.
- Make the second girl in the same way.
The paper girls are ready!
Applications for 2nd grade
As the baby grows, his needs in terms of understanding the world around him grow. Teachers need to make appliqué classes more complex; they should be more creative and beautiful. Practical skills and developing experience are important for 2nd grade students. In the 2nd grade, children are already accustomed to school, they begin to understand that it is important to develop their abilities independently, try to read and memorize more, and write down important points in notes.
Original roses
You will need: red colored paper, a simple pencil, scissors, a round object.
Master Class
- Trace a round object on colored paper.
- Draw a spiral in a circle.
- Cut out the circle.
- Cut the spiral in such a way that you get a “spring”
- Twist the rosette and make the required number of rosettes in the same way.
The original colored paper roses are ready! I recommend watching the video master class!
SIMPLE PAPER ROSES WITH YOUR OWN HANDS
Salt dough pendant
You will need: salt dough, a glass, acrylic paints, glitter, a brush, a ribbon for hanging, a cocktail tube, a dog's paw for imprinting on the dough or your fingers, clear glue, a rolling pin.
Master Class
- Roll out the dough using a rolling pin.
- Cut out circles using a glass.
- Place your paw print on the circles or make them with your fingers.
- Make a hole for hanging a cocktail straw.
- Dry the circles.
- Paint the circle with white paint and the foot with pink. Wait until completely dry.
- Lubricate the circle with transparent glue, sprinkle with glitter and wait for the craft to dry.
- Attach ribbon for hanging.
The salt dough pendant is ready!
Choose exactly the craft that your child liked the most - because that’s when he will diligently and with interest create with his own hands!
high school
When schoolchildren move to a new level of education, the requirements for them increase significantly. Children at this age must be disciplined and understand the meaning of the word “must”.
Also, by this moment, probably, everyone has already been able to decide on their area of interest and go to sections that will contribute to the development of their talents. Some choose sports, some music, and some creativity.
Nevertheless, even at this age, students do not forget about participating in craft competitions.
Only in high school the main theme is often the seasons. They are made from scrap materials so that the guys can feel the limitations and expand their comfort zone.