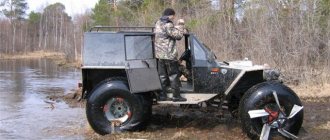
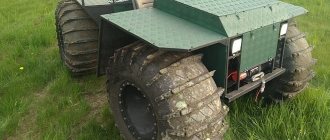
Homemade 4x4 all-terrain vehicle, equipped with a motorcycle or car? engine or a motor from agricultural machinery, is able to overcome deep snow and swampy areas of the forest. The articulated connection of the frame sections provides increased maneuverability and maneuverability on soft soils. The design uses parts from cars, which further reduces the cost of building an all-terrain vehicle.
What is needed to make an all-terrain vehicle
When planning to make an all-terrain vehicle with your own hands, you need to make sure in advance that you have the materials, drawings, and the appropriate tools. For most connections, especially frames, it is recommended to use a welding machine to ensure long service life and high structural strength.
Materials
It can be convenient to use a walk-behind tractor as the basis for an all-terrain vehicle on low-pressure tires, which will significantly reduce costs and simplify the self-assembly process. You will need to find several elements at once, without which the construction of a karakat will be impossible:
- frame of suitable shape and size;
- rear axle, which will be used to mount the rear wheels;
- a seat for the driver, as well as means of protecting him from dirt and precipitation;
- lighting devices that will be required for driving at night.
This type of device is single-seater, but if desired, additional seats can be installed.
All-terrain vehicle from UAZ
You should also make sure that the engine power of the walk-behind tractor used as the basis for the vehicle is sufficient for the selected design. Universal options include walk-behind tractors Neva, MTZ, Ugra, as well as other domestic products with motor power greater than 10 hp.
It is also worth taking care of the cooling system in advance, since when driving at low speed the wind will not be able to lower the engine temperature to acceptable values.
Blueprints
Having studied the drawings of all-terrain vehicles on low-pressure tires, the master can make his own changes to the design of the future product, which will allow him to adapt it to solve specific problems or improve technical characteristics. An example would be a gearbox, which will improve torque performance.
Manufacturing procedure
When planning to assemble a homemade swamp vehicle, it is advisable to make sure that you have everything you need, and then follow the following instructions:
- Weld the frame using a metal profile of square/rectangular section.
- If desired, you can make a breakable frame, which will be the best option for traveling in areas with difficult terrain. To do this, you will need to use a kingpin, as well as independent suspension for the front and rear axles.
- Assemble the rear axle, for which you can use a similar part from an old car, for example Moskvich.
- Implement suspension using shock absorbers, connect the bridge to the frame using bolts.
- Install the walk-behind tractor on the frame.
- Place the seat.
- Attach frame protection made of metal or plastic.
- Install wheels, lighting fixtures.
Also, the design of the model may assume the presence of a braking system, which is important for vehicles moving at high speed. In this case, it will be most convenient to use an old motorcycle and install the brakes at the wheel installation stage.
Caracat frame
Required Tools
In the instructions for assembling all-terrain vehicles, manufacturers provide recommendations for working on the installation of the product, detailed drawings, and the sequence of operations. They include a list of tools that can be used to make homemade vehicles:
- Set of auto tools.
- Mechanical gripper for small parts.
- Set of chisels.
- Mini portable flexible LED lamp.
- Screwdriver.
- Drill.
- Bulgarian.
- Gas soldering iron.
- Household welding machine.
- Compressor.
- Spray gun, etc.
Snowmobile based on a walk-behind tractor, skis and bicycle parts
PVC boat trailer: how to make it yourself, drawings, dimensions
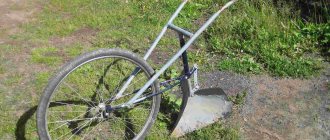
Agricultural work is carried out in the summer season. In winter, the engine of an idle walk-behind tractor is suitable as the power plant of an all-terrain vehicle for driving through snowdrifts, which you can assemble yourself. With the arrival of spring, he returns to his place.
Snowmobile diagram
A three-wheeled layout is offered. In front, instead of a skating rink, a double ski is installed. There is no cabin, the car is intended for short trips.
What you need
The following components are used:
- Bicycle frame.
- Cameras from a truck, for example KamAZ.
- Plastic skis (2 pcs.).
- Gearbox from an old Honda DIO scooter.
- Motoblock engine.
- Chains for transmitting torque.
- Sprockets (2 pcs.).
- Gas tank.
- A pair of wheels from a wheelchair.
- Metal barrel with a volume of 200 l.
- Steel shaft with bearings.
- Fire hose or strip of tarp.
A welding machine, grinder and plumbing tools are used. Bolts and nuts are used to secure some components.
Assembly algorithm
The construction of a snowmobile is carried out in the following order:
- The engine from the walk-behind tractor is screwed to the front of the frame.
- Place the seat in its place.
- Sprockets are welded to the gearbox shaft. Then the mechanism is attached under the seat.
- Put chains on the sprockets.
- The shaft is inserted into the rear bushing. A large asterisk is fixed on it. It is needed to increase traction force.
- Rollers are made by attaching rims cut from a barrel to the wheels of a wheelchair. Their diameters are the same.
- The rollers are mounted on the shaft and secured with bolts.
- They put truck tires on them and tie them with a fire hose.
- A bicycle handlebar with a fork is installed, and a double ski is attached to it. The controls must be positioned at an angle to the ground or the snowmobile will not turn.
- Install the gas tank.
The car overcomes deep snow and easily climbs steep slopes. By replacing the skis with a pontoon, you can turn it into an amphibious all-terrain vehicle.
How to make a caterpillar with your own hands
Homemade tracked mini-all-terrain vehicles: how to make, drawings and dimensions, reviews of the best homemade products
To manufacture a caterpillar track, you need to prepare the following components and tools:
- conveyor belt;
- metal profile of rectangular section;
- fasteners;
- welder;
- equipment for cutting parts (for example, a grinder);
- electric drill;
- spanners;
- hammer;
- a device for installing metal elements into a rubber band.
General algorithm for manufacturing a propulsion device:
- Cut the metal profile into sections corresponding to the width of the future mover.
- Deform the elements on the mandrel, achieving the formation of hooks at the ends.
- Weld inclined stops on the jig to prevent the track from coming off when moving from the road wheels.
- Attach a piece of reinforcement to the outside by welding to increase maneuverability on unstable ground.
- Cut the elastic fabric into symmetrical strips; the width of the cut is determined at the design stage.
- Drill or punch holes in the rubber sheet through which metal parts are attached.
- Drill holes in the links for fixation to the rubber base.
- Attach the links with bolts, providing for the installation of a metal spacer.
- Connect the ends of the resulting propulsion unit with steel plates and screws with nuts, and then install the structure on the all-terrain vehicle.
- Adjust the position of the tension roller and check the operation of the machine. If damage is detected, carry out modifications and strengthen the structure.
Blueprints
Before making a propulsion unit, it is necessary to develop drawings of the future design. The diagram takes into account the installation points of the road wheels and drive wheel. It is necessary to make a tensioner with an additional roller, which allows you to compensate for the stretching of the rubber or composite belt during operation. If you plan to use a drive wheel with a pinion gear, then the configuration of triangular protrusions that will contact the corresponding windows in the track is being worked out.
How to make a homemade wheeled all-terrain vehicle
How to make a subwoofer in a car with your own hands: drawings, photos, videos
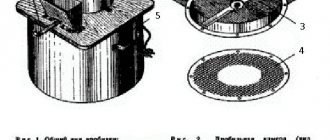
An example of a drawing of an all-terrain vehicle on low-pressure tires
It makes sense to equip the basic unit with a reduction gearbox. The reason is that gasoline and diesel engines have the best torque performance at a crankshaft speed of approximately 75-85% of the maximum.
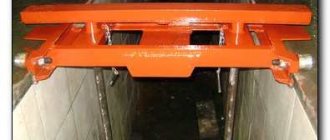
All-terrain vehicle frame
An example of a frame-fracture drawing
A frame is created between the front and rear axles. It is better to use profile pipes of rectangular or square cross-section as the basis. They provide greater rigidity than rolled angles, channels and I-beams of the same mass.
The joining of the frame elements of a wheeled all-terrain vehicle can be rigid, then it will be formed in a single-volume format. When using heavy Neva or MTZ walk-behind tractors, this option will be preferable.
As an option, a breakable frame (fracture) is made; this option is used for areas with a complex profile. Here the articulation is performed through the kingpin. The front and rear axles have independent suspension from each other. Craftsmen create such all-terrain vehicles based on the Neva and Ugra walk-behind tractors.
Rear axle and suspension of a homemade all-terrain vehicle
To simplify the design, some DIYers use a ready-made rear axle from a passenger car. For example, from the Moskvich-412 car: its low weight allows installation on a light all-terrain vehicle. The suspension is performed on shock absorbers for a smooth ride and reduced vibration.
Other craftsmen make independent suspension on each rear wheel. This approach is implemented on the Ant scooter. When driving, a slight rocking is felt, at the same time the wheels experience less resistance on uneven surfaces, and fuel consumption is noticeably reduced.
The rear axle is connected to the frame with long, hardened bolts. For elastic joints, rubber inserts are used, for example, silent blocks. This improves the performance characteristics of an all-terrain vehicle based on a walk-behind tractor.
Wheels (low pressure chambers)
To move on wet and unstable ground, you can use lugs. They provide high grip. Large-diameter low-pressure chambers perform even better. Pneumatics have minimal ground pressure, and the presence of air contained in the all-terrain vehicle’s chambers will make it possible to create a floating all-terrain vehicle.
For installation on the rear axle, homemade or special wheels for all-terrain vehicles, swamp vehicles and snowmobiles are used. They can be purchased assembled or as separate elements: tire, tube, disc. The wheel is easy to assemble.
- Homemade discs for pneumatics are made by welding ordinary discs and mounting plates using metal tubes. This expansion is necessary in order to adjust the small diameter of the car rim to large cameras and better fix them.
- A large camera is placed on a specially expanded disk - either a proprietary one or from other units (GAZ 53, Ural, Kamaz or another truck, an aviation camera, etc.).
- An air valve is installed in the hole of the disk.
- The wheel is inflated with air.
- The resulting tires are installed on a homemade all-terrain vehicle.
You can increase the cross-country ability of regular wheels on low-pressure chambers by creating an additional tread. For example, additionally secure the cameras with chains, conveyor belts, homemade tracks or another method.
Another option is to cut a patch lug from the tire. The depth of the structure’s hook reaches more than 20-25 mm. Rolling resistance increases, while at the same time the slip coefficient decreases sharply.
Assembling a homemade all-terrain vehicle from a walk-behind tractor
When all the tools, spare parts and components are prepared, you can begin assembly. This is a rough plan for how to assemble a homemade all-terrain vehicle, it all depends on the chosen design.
- A walk-behind tractor is installed on a welded or finished frame.
- The rear axle and, if necessary, the front axle are mounted.
- The seat is placed on the frame.
- If provided in the drawing and diagram, the steering control is installed.
- The protection is attached to the frame; it is made of plastic or metal sheet.
- The future driver should try out the comfort of the seat; if necessary, provide auxiliary devices for adjusting the seat.
- The functionality of the brakes is checked.
- Electrical circuits and lighting fixtures are installed.
After completing the bench tests, they begin the field tests. You need to know how the car behaves in difficult conditions.
Homemade all-terrain vehicle from a ready-made walk-behind tractor
This unit is available in many households. The universal mechanism is used to solve a number of tasks depending on what replacement equipment is installed: a blade for clearing roads of snow, a cultivator, a plow, a mulcher, etc. By making small changes to the design, you can turn an agricultural device into an off-road vehicle.
Required Items
Anyone who wants to make a karakat from a walk-behind tractor with their own hands will need:
- Corner.
- Round and profiled pipe.
- Cameras from a truck, for example GAZ-53.
- Wheel rims from a VAZ passenger car.
- Steering column.
- Hubs.
- Bolts with nuts, self-tapping screws.
- Reinforcing bars, steel wire.
In addition to plumbing tools, you will need a welding machine, an angle grinder and a drill.
Each kit is accompanied by a specification, which simplifies the preparation of materials and the assessment of financial costs.
Creating a Frame Frame
The rectangular frame is assembled from a profiled pipe and reinforced with a corner. The workpieces are connected by welding. The dimensions indicated in the drawings must be accurately maintained so that there are no distortions in the design.
If the frame is made of 2 parts with a steering knuckle between them, then the rear crossbars are reduced to the fracture site in the form of a triangle. This will increase the rotation angle.
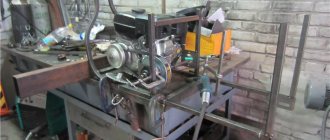
Engine block
A thick steel plate with pre-drilled holes is welded to the frame. The power unit from the walk-behind tractor is screwed to it.
A generator and battery are placed next to the engine.
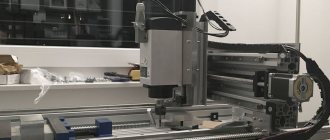
Chassis assembly
To install tires from the GAZ-53, wheels of increased diameter are required.
They are made in the following sequence:
- 6-8 sections of profiled pipe, laid transversely (parallel to the axis), are welded to the disks from a VAZ car evenly around the entire circumference.
- Reinforcement in the form of a ring is wound around the ends of the rods and secured by welding.
- Several concentric rings made of wire are placed in the inner space of the circles. All of them are combined into a single structure using spokes oriented from the center of the wheel to the edge. The intersection points of the round and radial parts are boiled.
Truck tires are put on the resulting rollers.
Follow these steps:
- They attach the Zhiguli transmission to the frame.
- The rear axle and steering gear are assembled.
- A brake drum from a Voskhod motorcycle is being installed.
- The wheels are attached.
Tire pressure is selected experimentally.
Final stage
At the end of the procedure, the metal frame of the SUV is sanded, primed and painted. A headlight is screwed onto the front for driving at night.
Karakat “breaking point” with your own hands
The peculiarity of this design is that it is equipped with bases in the form of steel frames connected by a hinge. The turning point provides the all-terrain vehicle with the ability to maneuver while driving. Homemade units of this type rarely use tiltable wheels and standard steering.
The “fracture” can be done independently. To do this, you will need drawings with the desired model of the all-terrain vehicle, which you can create yourself or use those that have been developed by other people, as well as the place where the installation work will be carried out. It is worth noting that during assembly it may be necessary to modify the resulting design, since the drawing can rarely take into account all the possible features of the components and parts used. The instructions below describe the steps for constructing a “fracture” with your own hands.
Make a frame
In order to make a frame, it is necessary to use a steel profile, the pieces of which are held together by welding. The dimensions of the engine and transmission need to be taken into account in this process. When manufacturing the frame, you will also need to establish the points at which the units will be attached. The frame must withstand the weight of all equipment installed on it, as well as the weight of additional loads, for example, when the all-terrain vehicle moves through swampy or snowy areas.
The frame must have end plates in which there are holes in order to secure the movable fist - the driveshaft is carried inside it. This reduces the risk of damaging the drive while driving. The half-frames must be provided with points in order to install reinforced bridges. The last stage of working with the frame is cleaning it from signs of corrosion and covering it with acid primer - it will protect the frame from its further appearance.
Install the box and bridges
The box must be attached to the power unit or a separate installation must be performed. The transfer shaft and gearbox require that they be installed on pads with rubber inserts - this will reduce vibration levels. Bridges should be placed on brackets and then secured with nuts and stepladders. Do not weld parts, as this can lead to bending and damage to the axle shaft. As for the cardan shafts, they should be trimmed, and then the pipe and hinges should be connected using resistance welding.
Color
Paint with impact-resistant paint intended for metal structures. All parts that are not to be painted must first be covered with tape. External body panels can be painted with automotive paint: some use aluminum sheets that are not subject to rotting when exposed to natural elements.
Install the power unit
The power unit must be located at the front of the structure. If the building uses liquid cooling, then there must be a place to install a radiator. After attaching it to the frame, it is necessary to install a fuel tank - it must be connected to both the mechanical pump and the lines.
Install wheels
The all-terrain vehicle must be equipped with four wheels with low-pressure tires - they must be processed using an abrasive tool. The steel cord must first be removed from the tire - this will reduce weight and increase elasticity. The tube with the nipple should be brought out to the side of the disk, and then covered with a removable steel shield. After the assembly work is completed, the all-terrain vehicle will need to be checked and the design modified if necessary.
Equipment and prices
Despite the fact that the design of the all-terrain vehicle itself is quite simple, it does not have a lot of complex or expensive parts, it costs a lot - about $100,000. This is the price of a good apartment in the suburbs of Moscow or a good cottage in a village there. Therefore, it is not available to everyone. Many say that this is precisely the purpose of the high price - so that only a select few would own it and be able to show it off to others.
There are two models of this all-terrain vehicle - Sherpa and Sherpa-pickup.
For an all-terrain vehicle, you can buy a car trailer on which it can be easily transported by attaching it to the towbar of a car, a transportable trailer for the all-terrain vehicle itself, a drag that can serve as both a boat and a trailer, various spare parts kits and many other things. Sherpa differs from Sherpa-pickup in that the first has a monolithic body, the second has a removable rear part of the cabin. As a result, it can be used to transport oversized cargo that does not fit into the cabin through the door.
How to assemble a swamp vehicle
Parts of a motor vehicle, car, or other homemade structure can be used as a frame. The suspension can be installed ready-made or made independently; in the latter case, the vehicle will meet the necessary requirements for comfort and maneuverability.
Engine
When choosing an engine, it is important to consider its power and design size. Lifan engines are distinguished by their quality and versatility; all-terrain vehicles are often assembled on their basis
To assemble the machine, you can use the following types of motors:
- From a motorcycle. Suitable for a small vehicle. Such an engine requires good cooling and may not cope with a heavy load.
- Automotive. ZAZ car engines are often used for assembly. They are characterized by high power, traction capabilities, and can withstand loads even in extreme conditions. Engines from other car brands are also suitable, but their use may be difficult due to the lack of air cooling.
- From a tractor or walk-behind tractor. These models meet the necessary requirements for installation on a swamp vehicle.
Before installing the engine, you need to make sure that the device has undergone a major overhaul. It is also necessary to take care of the electrical wiring, transmission system, and exhaust gas removal. It is possible to install a manual or automatic transmission.
Blueprints
Drawing up drawings in various projections is the first and important stage in the manufacture of a structure. Any inaccuracy will make the work in vain. If you lack experience in developing a design document, it is recommended to entrust this process to a professional.
Chassis
The quality of workmanship will affect the comfort of movement and the maneuverability of the machine. During assembly, metal pipes and sheets, corners are used
It is important to take into account the quality of the metal, which affects the service life of the all-terrain vehicle.
Coupled or articulated structures can be installed. A breakable frame is more difficult to implement, but increases cross-country ability.
Track or tires
More often, tires are installed on homemade swamp vehicles, this is due to easy installation and availability of parts. Factors influencing the choice:
- Tracks are a more complex type of design, but have more advantages when moving in hard-to-reach places. The disadvantages include the high fuel consumption of tracked vehicles. All parts will have to be assembled manually, because... factories practically never produce such running gears.
- Swamp vehicles on low-pressure tires are a more realistic and feasible option. Less time and money is spent on assembly, such a chassis is technically simpler, and there are no problems with purchasing spare parts.
The choice between tires and gooseneck depends on the purpose of the vehicle and personal preferences.
How to make wheels for a swamp vehicle with your own hands
We need to prepare tires from trucks. They should be washed and dried. Further actions:
- Make a cut and pull out the wire cord using pliers. Use a white marker to draw a design (herringbone pattern).
- Use a construction knife to make cuts around the perimeter of the design. Remove loose rubber using a winch.
- Sand the surface of the resulting chamber.
- To create a tire frame, weld the wheels with the plates and grind them. Place the camera on the frame and pump it up.
To increase cross-country ability, the wheels can be equipped with chains.
How to make a trailer
Making a trailer will allow you to move cargo. A simple design is suitable for this purpose. It can be assembled from a metal corner; elements from a walk-behind tractor will also work. For fixation, a through pin with a bottom lock is used.
Sherpa modifications
The self-propelled vehicle is available in several modifications:
- Sherp Pro - has a lightweight aluminum body, painted khaki or black and orange, with a sunroof. The model has improved engine ventilation and a galvanized frame.
- Sherp Pickup - This version has a "Pickup" body design.
- Sherp Max - version available only on special order. It has a body increased by 20 cm and a 6-speed manual transmission.
The manufacturer recommends buying 2 common versions of the machine.
Standard assembly
The standard version of the model includes:
- fabric awning;
- 3 batteries;
- halogen optics;
- locker boxes;
- insulated and noise-proof engine compartment.
As standard, the body has a high-quality polymer coating.
Kung
For an additional fee, the equipment can be supplemented with a hard shell, which protects the soft interior and provides good thermal insulation.
DIY making
With all the variety of all-terrain vehicles manufactured in factories, quite a few people are not satisfied with them. The solution is to make homemade devices. It is quite possible to focus on the Ulan-3 design, prepared by one of the Russian enthusiasts - Alexander Ulanov. For work, only domestic parts will be needed, with one exception - the all-terrain vehicle is assembled with a Lifan engine. Optimal drive power is 22 hp. With.
The tracks are prepared from a rubber conveyor belt. To make the tracks, steel angles are used, and the parts of the track are connected using a metal loop. The gearbox is taken from Ural. It is recommended to use a planetary brake with a gear number of 4. The total weight of the structure reaches approximately 650 kg. You can also focus on this drawing of an all-terrain vehicle, in which:
- the width of the tracks is 26 cm;
- the distance between the tracks is 80 cm;
- height is 159 cm.
It is quite possible to build a tracked all-terrain vehicle even from the Ant. They begin work by removing everything unnecessary. The frame can be built simply from scrap materials. The paws are positioned as carefully as possible to avoid unwanted effects.
Particular attention should be paid to the variator, because its use causes certain problems for lovers of home-made transport; sometimes it is recommended to completely replace this device with an “asterisk”
But in order to do everything clearly, you always need a competent assembly diagram. You can take it ready-made if you plan to use someone else’s design, or create it yourself - but you can’t do without it. The design of the Parma all-terrain vehicle should be taken as a basis. Its linear dimensions are 250x175 cm. Turning is done using a differential with a rear axle.
The engine is a gasoline one, with 2 cylinders, with a cylinder size of 690 mm3. A belt variator and a 5-speed gearbox are used. The rear classic axle is taken from the Zhiguli. The wheels are replaced with sprockets, which act as drive wheels for the caterpillar. It is quite possible to take a used beam. It is checked for straightness, the excess is cut off and cleaned. Cleaning is carried out using petal circles. It is advisable to use factory-made axle shafts, however, it is better to replace the bearings
When choosing a tape, it is very important to focus on its strength
Another possible option goes like this:
- length 2.9 m;
- width 1.5 m;
- engine and gearbox from VAZ 2108;
- stern bridge from classic Zhiguli;
- tracks based on a metal channel.
In addition to sheet metal and a profile pipe, assembly will require a channel and a conveyor belt. The normal thickness of this tape used for tracks is 13 mm. The frame (frame) is made according to the “boat” type. The drive sprockets are obtained by remaking the wheel rims. Metal profiles can bend and must be reinforced.
Some fans of homemade designs prefer to take housings from the ZAZ-968. In this case, the gearbox, drive and axles are usually taken from VAZ cars of different models. It is recommended to use automatic reduction gearboxes. In budget class models, you can get by with brakes that act on only one side. The hubs are most often taken from the VAZ 2108. A particularly simple tracked all-terrain vehicle is made even without any drawings at all. Of course, this requires some experience. The frame is made from square pipes. The body is scalded with sheet metal.
In the next video you will see a presentation of Riptide tracked all-terrain vehicles.
Specifications
This section and further presents the best home-made cars. Model names can be used to search for additional information on the Internet. The authors of inventions publish drawings and tips on assembling individual components.
The following list shows the technical characteristics of the wheeled all-terrain vehicle DIF, created by St. Petersburg engineer A. Gargashyan:
- dimensions (length, width and height), cm - 340x250x230;
- diesel engine - Kubota V1505-t (Japan);
- number of cylinders - 4;
- power, l. s - 44;
- working volume, cubic cm - 1498;
- speed (maximum/on water/with trailer), km/h - 45/6/33;
- angle of climb, degrees - up to 35;
- load capacity, kg - 1000;
- ground clearance, mm - 600;
- dry (maximum permissible) weight, kg - 1300 (2450).
Based on the design documentation, in agreement with the author, the production of the serial model “Sherp” was mastered.
Types of homemade all-terrain vehicles
Lightweight all-terrain vehicles, also called carakatas with low-pressure tires, are in high demand as they are excellent for off-road driving. They compare favorably with standard SUVs because they are able to move in the complete absence of road surfaces and in rough terrain. Such products are distinguished by their simple design and wide functionality, which makes them an ideal vehicle for use in hard-to-reach areas of the country. There are several varieties of this kind of product, which allows everyone to choose the best option for themselves. Among them it is worth mentioning:
- boat-type pneumatic passages, which are distinguished by their affordable cost and simplest design. They are equipped with a suspended power unit, which allows them to move around small bodies of water;
- tracked products, excellent for moving through swamps and reservoirs with a lot of vegetation. It is much more difficult to manufacture such a structure, since this will require selecting a suitable tracked drive;
- swamp vehicles on low-pressure tires are the easiest to manufacture and the most promising type, which can be created from scrap materials at minimal cost.
All-terrain vehicles are popular for driving in wetlands
Since the latter type is the easiest to assemble, it is advisable to familiarize yourself with it in more detail. Similar all-terrain vehicles operate on the same principle, which involves the use of large wheels for off-road movement. There are several subspecies of caracats of this variety. Among them it should be noted:
- all-wheel drive models that involve the use of a gearbox and chassis from a car. It is distinguished by the presence of all-wheel drive, as well as a sealed hull made on the basis of a boat;
- tricycles - products with 3 wheels, assembled on the basis of an unnecessary motorcycle, most often domestically produced;
- all-terrain vehicle made from a motorized stroller - involves placing the power unit under the seat, using a motorized stroller as the basis, as well as car parts;
- models where the basis is passenger vehicles or ATVs.
Before manufacturing, it is extremely important to decide on the type of all-terrain vehicle, its model, and also to obtain suitable drawings, which will allow you to avoid mistakes during the self-assembly process
All-terrain vehicle characteristics
The actual characteristics of an all-terrain vehicle on low-pressure tires directly depend on the components and elements used, as well as the type of device. It is strongly recommended to use power units of sufficient power, which will allow you to overcome even difficult obstacles without any problems.
What are homemade products?
At the preparation stage, it is necessary to decide whether the equipment will be used on public roads.
In this case, it is necessary to obtain registration documents and state license plates from the traffic police according to the standard procedure.
The vehicle must comply with current safety standards, which is confirmed by the results of certification tests.
Self-assembled all-terrain vehicles for off-road travel can be registered with Gostekhnadzor according to the following scheme:
- develop technical specifications;
- collect documents confirming rights to the power unit and other functional units;
- undergo the certification procedure at a specialized enterprise.
The collected documents are submitted for registration of a self-propelled vehicle passport. Failure to register is punishable by a fine of 1,500 to 2,000 rubles. for individuals.
If you do not take into account the official requirements of safety standards, the manufacturer of the homemade product has the right to use any design solutions:
- install 10 wheels or choose the classic 4x4 formula;
- Instead of a manual transmission, install a comfortable automatic transmission.
All-terrain vehicles equipped with auger-rotor propulsors have high cross-country ability.
However, in practice, 2 SUV schemes are most often used:
- on tracks;
- on pneumatic tires with low pressure.
To reduce the cost of the project and ease of maintenance, the homemade product is equipped with a manual gearbox and simple control devices. When creating drawings, it is recommended to objectively evaluate your own knowledge and skills in order to eliminate errors along with excessive difficulties during the assembly process.
On caterpillar tracks
Vehicles in this category differ:
- good maneuverability;
- limited speed characteristics;
- increased fuel consumption;
- complexity of manufacturing.
The tracks are suitable for equipping a heavy all-terrain vehicle with a large load capacity.
On low pressure tires
A typical wheeled snow and swamp-going vehicle is a lightweight design that is easy to assemble yourself if you have metalworking skills. For the basis of the design, you can take the frame and engine of a road motorcycle. The standard plug is extended. In the absence of a cabin and other complex additions, the construction of such a vehicle will be completed in several months at minimal cost.
Selecting the type of swamp vehicle
The main purpose of the machine is to overcome marshy areas and shallow waters, as well as to perform technological operations in difficult conditions. There are several types of swamp vehicles, differing in design features.
Swamp vehicle on low pressure tires
Cars of this type are distinguished by high engine power and versatile suspension systems. Low-pressure wheels are flexible and provide shock absorption, which reduces the likelihood of punctures.
This is the best option for moving on sticky soil, sand, rocky surfaces, and water. There are options with different drives, for example 4x4 or 4x2.
Swamp boat
You cannot do without such a vehicle when fishing or hunting in water bodies. The design of the boat is designed to overcome wetlands, vegetation, and underwater obstacles (algae, mud, silt, snags, rocky shallows).
The main feature is a powerful traction engine mounted on a free suspension (for self-assembly, installing a deadwood of the appropriate length plays an important role). The body of such models is strong and durable.