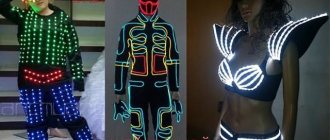
The device, which reproduces a continuous light flux in a pulsed lightning-like mode, is used in various fields - from ignition system indication to lighting of discos and signaling devices of special vehicles.
Let's consider how to make a strobe light using LEDs with your own hands, what its circuit and printed circuit board look like, what necessary tools and components are needed for this, what stages the electronics assembly consists of, as well as what other additional procedures will be needed to bring the device into working condition.
Required Tools
To make a strobe light based on LEDs with your own hands, you will need the following set of tools and accessories:
- Measuring device.
- Screwdriver Set.
- Pliers.
- Soldering station or soldering iron with necessary components.
- Drill or screwdriver.
- Wood knife.
- Felt pen.
- Sandpaper.
Important! When introducing very powerful LEDs into a strobe circuit, the resulting flashes of light can adversely affect vision. Therefore, during operation of the device, it is necessary to exclude direct visual contact with such a light source, for example, by installing a matte diffuser.
How to assemble a strobe light
Assembly begins with the manufacture of the control board. Those who are familiar with home technology can design and etch the board themselves. For others, it’s easier to assemble the circuit on a piece of a breadboard. A solderless board cannot be used - shaking and jolts, which inevitably accompany driving a car, will lead to broken contacts and failure of the circuit.
An example of mounting on a breadboard.
For key transistors, it is necessary to install small radiators or provide the possibility of attaching an external heat sink. To do this, the key elements must be placed on the edge of the board with the heat-dissipating surfaces facing outward. After assembly, you need to determine where to install the board. Most likely, it will be mounted in the engine compartment. Then you need to select or make a casing that protects from dust, dirt and moisture. At the same time, it is necessary to ensure effective heat removal from the transistors, so shrinking the board into heat shrink is not the best idea . Then you need to choose a place to install a control toggle switch or button, find a backup fuse or mount an additional one (it is convenient to use fusible elements that can be installed in a wire break). After this, you need to lay the conductors and make the connection according to the electrical diagram.
Schematic and PCB
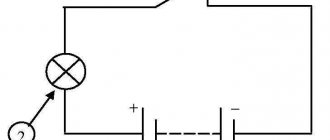
You can make a strobe using LEDs using several schemes. One of the simplest and most accessible is the following:
This circuit is based on a timer such as the LM555 timer, or its foreign analog NE555. It produces pulses, the parameters of which are determined by a potentiometer or resistor. A special feature of this model is that the board can include 3, 10, or any other number of diodes. The main advantage of this scheme is the stability of the pulses and their independence from the battery potential.
Settings
The disco strobe light can be set using the LM555 timer, using the knob to adjust the flash frequency. The brightness of the rays depends on the lamps installed in the device. If the device is programmed to flicker, then heat sinks are not installed on it.
To set the ignition timing (IOT) using a strobe, the car must be started and left to idle. It is necessary to take into account that the flashes must hit all the right places and illuminate them. For example, a mark on the crankshaft is taken as point P (moving), and point H (fixed) is taken on the engine.
The stroboscope terminals are connected to the engine, and the device emits “microlightning” when a spark occurs in the cylinder spark plug. To ensure that the flasher does not malfunction and shows the correct data, it must be turned off periodically, the duration of such breaks should be equal to the time during which the device was working.
Required Components
For the LED strobe circuit discussed above, you will need the following main components with the corresponding characteristics:
| C1 | 1uF 50V |
| C2 | 1000uF 16V |
| D1 | 1N4148 |
| IC1 | LM555N |
| Q1 | IRFZ44N |
| R1 | 100k |
| R2 | 10k |
| R3 | 56 |
| R4 | 5.6 2W |
| RV1 | 1M (variable resistor or potentiometer) |
| LED1-LED60 | 5mm white water clear ultra bright LED |
Strobes with sound response 2022
Strobe with sound response Stage strobe “Voice-R50” (built-in microphone, sound response)
RUB 3,500
LED strobe MAGIC GALAXY LED Strobe for home, cafe, bar, club, with 64 LED RGBW + 11 modes Sound response
4990rub 3490rub
Electronics assembly
The assembly of the strobe circuit is carried out exactly in accordance with the circuit discussed above. Ice elements are soldered according to the principle - a cathode to an adjacent anode, etc. The extreme contacts are soldered to the conductors with a connector. The switch is connected to the battery holder. This will allow the lamps of the device to work even if it is turned off - with the DC adapter plugged into the connector, as shown in the figure.
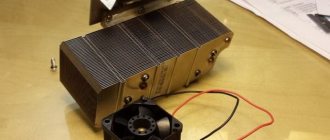
When choosing high-power LEDs, the inevitable result of their operation will be the production of heat. The metal case can serve in this case as a radiator.
Levitation of water drops
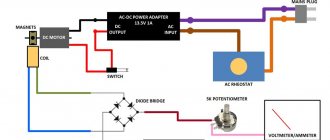
To better observe the levitation of water droplets, I assembled a setup based on an aquarium membrane pump, since the electromagnetic pump from a coffee machine is not designed for long-term operation and gets very hot. Unlike a conventional pump with an impeller, a diaphragm pump pumps water in separate portions, which is exactly what is needed to realize the effect of levitation of water droplets. Below in the video I talked in detail about how to assemble such an installation:
Below is an updated diagram of a strobe for observing the effect of levitation of water drops, with the ability to adjust the pump speed:
Firmware Diaphragm pump Updated printed circuit board in Sprint Layout 6 format
Preparing the body
When the LEDs, transistor and other electronic components are assembled into one circuit, it is necessary to prepare the body of the future strobe. First of all, you need to make mounting holes and connectors:
- To secure the diffuser, board and housing, three-millimeter holes are made for installing holders and tightening screws.
- 10 mm holders are installed between the LED board and the plastic plate, and 22 mm holders are installed to fasten all the parts.
Strobes for disco 2022
Strobe light for home discos Strobe light STROBELIGHT PRO (stereo set) 2 pcs.!
RUR 2,990
Powerful strobe 1500W. + 2 lamps Strobe for the club, with built-in ready-made lamp and 2 pcs. to replace.
RUB 15,900
Completion of work
When the entire LED strobe circuit is assembled, it can be connected to power and tested for functionality. The considered example allows the use of various power sources:
- Power supply from 6 to 12 volts - creates different levels of luminescence and brightness depending on the required task in different rooms.
- 9 volt battery. It fits directly inside the housing and makes it possible to use the strobe in autonomous mode outdoors.
When using high-quality branded components, the strobe will work for a long time and will not require repairs in the coming decades.
Recommendation! In order for the strobe to emit different colors, instead of conventional LEDs, you need to introduce RGB elements with a controller into the circuit. Alternatively, you can stick a colored film onto the diffuser.
DIY strobe diagram
To obtain short flashes of light, you need a pulse generator; I developed it based on the PIC12F675 microcontroller. The program is written in assembler, you can download it at the end of the article. Below is a diagram of a do-it-yourself strobe:
The circuit has two variable resistors R2, R3, to adjust the frequency and duration of the pulses, respectively. Field effect transistor VT2 switches the LED matrix. The frequency is adjustable from 28 to 100 Hz, the duration is from 50 to 500 μs, these limits are sufficient to observe stroboscopic effects. As the pulse duration increases, the overall picture of the effect becomes blurred, due to the fact that the object moves significantly during the flash. For high-quality observation of effects, it is necessary to reduce the duration of the pulses, but at the same time the illumination will decrease.
The generator is assembled on a single-sided printed circuit board, all elements of the strobe are mounted on a textolite plate. The LED is attached to a rectangular aluminum plate that acts as a heatsink. The power released on the matrix during operation of the strobe is small, since the pulses have a short duration. To power the strobe, I used a 12V and 2A power supply, the maximum current consumption was 0.4A.
You can also use a ready-made module as a generator, which can be purchased in China (link at the end of the article). The module has an LCD display that displays signal parameters and buttons that can be used to adjust the pulse frequency and duty cycle percentage. For a frequency of 50 Hz, the minimum pulse duration will be 200 μs (fill factor 1%), for 100 Hz, respectively, 100 μs (fill factor 1%), which in principle is sufficient to observe stroboscopic effects.
Using a strobe light I assembled with my own hands, I observed the effect of the fan blades stopping, as I wrote about above. In addition, you can hold a sign with an inscription in the drill chuck and also observe its stop or slow rotation.
Another interesting stroboscopic effect is the levitation of water. To observe it, I additionally purchased a high-pressure electromagnetic pump from a coffee machine in China with a power of 56 W (link at the end of the article). The pump is powered by 220V alternating voltage. The main feature of the pump is that it pumps water in separate portions with a network frequency of 50 Hz. If you direct the light of a strobe light at a falling stream of water from a pump, you can see drops of water hanging in the air, just an incredible sight. By adjusting the frequency of flashes, you can achieve a smooth movement of drops down or up, while the drops return back to the pump, as if moving back in time.
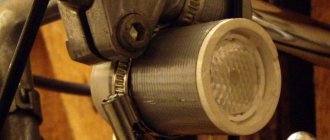
Also, using a strobe, you can see the vibrations of the dynamic head diffuser. To do this, I took a 35gdn-1-8 low-frequency speaker and applied 7V alternating voltage to it from a conventional step-down transformer. In this case, the diffuser oscillates at a network frequency of 50 Hz.
Assembling a strobe light with your own hands is not difficult; the circuit is quite simple. All the strobe effects that I repeated can be seen in the video below:
Components for assembling the strobe: Boost module 150 W LED matrix 100 W Electromagnetic pump 56 W Electromagnetic pump 16 W PWM generator module
Printed circuit board in Sprint Layout 6 format Firmware and source
Main conclusions
To make your own strobe light based on single-color or RGB LEDs, you need the following tools and components:
- Ruler, screwdrivers, pliers, sandpaper.
- Drill or screwdriver, screws, holders.
- Soldering iron with a set of accessories.
- Housing, LEDs, electronic components, wires, plexiglass.
The assembled strobe circuit using simple LEDs can be powered by a nine-volt battery placed in its body, and from a mains power supply with a rating of 6 to 12 volts, producing different brightness of the light flux.
If you know another, simple or complex LED strobe circuit for a specific application, be sure to share this information in the comments.
LED strobes for discotheques
Lighting equipment for bar LED strobes 3 pcs Spotlights 3 pcs, Rotating headRUB 28,900
Lighting equipment for cafes LED spotlights 4 pcs laser projector + smoke machineRUR 18,900
Lighting equipment for restaurants LED strobes 4 pcs Rotating heads 4 pcs + 2 laser projectorsRUB 55,100
Color music with strobe function for discos
Color music-strobe for discos with a smoke machine, stroboscopic effects for a club, restaurant, bar and cafe for 100 sq.m.
RUB 16,392
Color music strobe for discos DMX Strobe for cafes, bars and clubs Storm ST8-RGL
RUB 15,865
Strobe 3 in 1 , Strobe-color music and laser for discotheques
16 DMX Channels, 8 Gobos, 6 Show Programs.
8 x 3W RGBW LED + 8 x 1W RGBA LED + Red & Green Lasers, GOBO, DMX RUB
29,999
Disco ball-strobe for discotheques LED effects 6 in 1, Power 90W
RUB 24,999
| Gifts, promotions from the store | |
| We for free We give you a DJ remote control for controlling equipment and strobes for discotheques when you order RUR 30,000. | |
| ALL ORDERS ARE INSURED . We replace the product free of charge within 1 day. You are completely protected! 1 YEAR WARRANTY |
Types of MOSFETs
This circuit is designed around a Q2 logic-level MOSFET, which has a gate threshold voltage of about 2.5 V. Standard non-logic-level MOSFETs with higher gate threshold voltages cannot turn on enough to provide 700 mA current. for LED. Although the LED will light up and may appear very bright, it will not operate at the desired 700mA current.
The circuit was tested with STP36NF06L, STP20NF06L and NTD5867NL. The NTD5867NL comes in IPAK-369D through-hole and DPAK smd packages, so it is not suitable for this PCB layout.
The principle of creating the device
A strobe light for ignition adjustment is especially necessary for those who have a car with a carburetor. This is due to the peculiarities of the settings, since it is difficult to imagine correctly even in the mind, not to mention in reality, the ignition timing, which is present on contact distributors and all contactless distributors. It is simply impossible to cope in such a situation without a strobe light. Moreover, by using the services of this most precise device, you can adjust the ignition with extreme precision in just 7–8 minutes. This indicator, like other important elements of the car, must be given due attention, since without it the normal functioning of any vehicle is impossible. The need for such a product, the high cost of the factory version in the store and the availability of the necessary parts simply push a person to create his own strobe light.
Rotating heads with strobe function for discotheques
All rotating strobe heads include a free smoke machine for developing rays (pictured) + liquid for smoke machines 5 liters!
For all LED stroboscopes, the kit includes a free smoke machine for developing the rays (pictured) + liquid for smoke machines 5 liters!
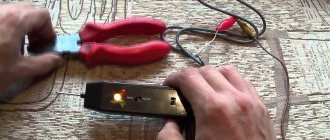
The operation of a strobe to set the ignition from a flashlight or flashlight
According to the diagram, after connecting the power wires to the battery, capacitor C1 begins to quickly charge through resistor R3. Upon reaching a certain degree of charge, the voltage through resistor R4 and the LEDs begins to flow to the base of the opening transistor. At this moment, relay P1 should operate. By closing, the relay contact prepares a circuit that consists of a thyristor, relay contact P1, LEDs and capacitor C1. Through dividers R1 and R2, the control electrode of the thyristor receives a pulse from contact X1.
The thyristor opens, resulting in a rapid discharge of the capacitor through the LEDs. A bright flash of a flashlight is observed.
By means of resistor R4 and a thyristor, the base of the transistor is connected to the common wire, which causes the transistor to close and the relay to turn off. At the same time, the glow period of the LEDs increases by several milliseconds due to the fact that the contact does not open immediately - due to the slight inertia and residual magnetization of the relay armature. After the contact opens, the thyristor is de-energized. The electrical circuit returns to its original state until a new impulse passes. By changing the capacitance of the capacitor used, you can change the glow time of the LEDs: more capacitance means they glow longer and brighter, but the trail from the mark on the flywheel is more noticeable.
How to make a device yourself?
Changing the ignition switch on a VAZ-2114 with your own hands
Today, there are many different options for making a strobe light. We recommend that you familiarize yourself with one of the simplest and least costly manufacturing methods.
To implement it you will need the following components:
- transistor device KT315;
- thyristor element KU112A, as well as resistor components rated at 0.125 W;
- diode light bulbs or a flashlight with LEDs, which will be used as a housing, and the number of diode elements must be at least 6 pieces;
- capacitor devices C1;
- V2 in the diagram is the low frequency diode component;
- you will also need a relay, its index should be RWH-SH-112D;
- power cable, its length must be at least one meter;
- clamps;
- You will also need a piece of copper wire approximately 10 cm long.
All these components can be purchased at any themed store or radio market.
How to build such a device yourself:
- To begin with, you should drill a hole on the back side of the prepared case, through which you will lay the power cable.
- Then the prepared clamps must be soldered to the ends of the prepared cords. It is advisable to mark on them in advance which will be positive and which will be negative; it will be better if the colors of the clamps are different.
- The sensor itself is mounted on the left or right of the housing. One more hole needs to be made on the side of the case; it will be used to lay the cord to pin X1.
- Then a prepared piece of copper wire should be soldered to the main cable core. This wire is considered one of the main ones, since it will be used as a device sensor.
- All that remains is to insulate the connections with electrical tape or heat pipes.
Average price of a factory product and its disadvantages
The factory version of the device has some disadvantages that significantly reduce the usefulness of such an acquisition.
It is always more convenient to set the ignition on carburetors with a strobe light
Firstly, the cost of factory stroboscopes is quite considerable. So the digital model Multitronics C2 will cost the buyer about 900-1000 rubles. The more functional AstroL5 strobe will cost 1,300 rubles. Focus F1 - a model suitable for servicing both gasoline and diesel engines - will require 1,700 rubles, its more “advanced” brother Focus F10 - 5,600 rubles.
Secondly, manufacturers often use an expensive gas-discharge lamp in the design of their products. It has a limited resource and may require replacement after a short time, which will not only hurt your pocket, but will be tantamount to buying a new strobe light.