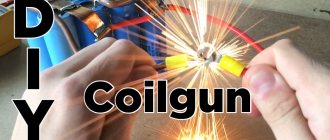
I'm building a model that simulates a real mini jet engine, even if my version is electric. In fact, everything is simple and anyone can build a jet engine with their own hands at home.
The way I designed and built a homemade jet engine is not the best way to do it. I can imagine a million ways and schemes to create a better model, more realistic, more reliable and easier to manufacture. But now I've put together one.
Main parts of model jet engine:
- The DC motor is strong enough and at least 12 volts
- A DC source of at least 12 volts (depending on what kind of DC motor you have).
- A rheostat, the same one sold for adjusting the brightness of light bulbs.
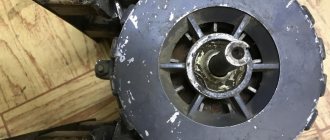
- A gearbox with a flywheel is found in many car toys. It's best if the gear housing is made of metal because plastic can melt at such high speeds.
- A sheet of metal that can be cut to make fan blades.
- Ammeter or voltmeter.
- Potentiometer at approximately 50K.
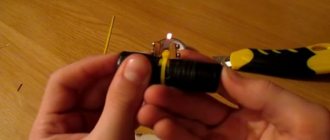
- Electromagnet coil from a solenoid or any other source.
- 4 diodes.
- 2 or 4 permanent magnets.
- Cardboard to assemble a body similar to a jet engine body.
- Filler for car bodies, to create an exterior.
- Rigid wire to support everything. I usually use wires from cheap hangers. They are strong enough and flexible enough to be molded into the desired shape.
- Glue. I prefer hot glue for most parts, but pretty much any glue will do for now.
- White, silver and black paint.
How to make a simple internal combustion engine?
The design of internal combustion engines is studied at school by high school students. Therefore, even a teenager can make a simple internal combustion engine with his own hands. To make it you need to take:
- Wire.
- Sheet of cardboard.
- Glue.
- Motor.
- Several gears.
- 9V battery.
Manufacturing procedure:
- First, cut out a circle from cardboard that will act as a crankshaft.
- Next, you need to cut a 15x8 cm rectangle out of cardboard to make a connecting rod, fold it in half and then another 90˚. Holes are made at its ends.
- Next, a piston with holes for the piston pins is made from a cardboard sheet.
- The size of the piston pins must match the size of the bore in the piston.
- The piston is secured with a pin on the connecting rod, and it must be attached to the crankshaft with a wire.
- In accordance with the size of the piston, you should roll a cylinder out of cardboard, and in accordance with the size of the crankshaft, a box for the crankshaft itself.
- Next, you should take the gears and the motor and assemble the crankshaft rotation mechanism so that the motor can rotate the crankshaft with the piston and connecting rod.
- The rotation mechanism is attached to the crankshaft, and it is placed in a manufactured box. In this case, the rotating mechanism should be attached to the wall of the box.
- Next, a piston is placed in the cylinder and the cylinder is glued to the box.
- Now, using two wires (+ and -), the motor is connected to the battery, as a result of which the piston begins to move.
How to make a small internal combustion engine from scrap materials?
From the following example, you will learn how you can make an internal combustion engine in a home workshop, without using machines and complex equipment.
- To create this device, you should take a plunger pair, which can be removed from the tractor fuel pump.
- To make the cylinder, the thickened part of the loop was cut off from the plunger bushing using a machine. Next, you need to cut holes for the exhaust and bypass windows, and solder 2 M6 nuts for the spark plugs on top. The piston is cut out from the plunger.
- Tin is used to make the crankcase. You also need to solder bearings to it. To create additional strength, you should take a cloth, soak it in epoxy resin and cover the crankcase with it.
- The crankshaft is assembled from a thick washer with two holes. One hole into which the shaft must be pressed is made in the center of the washer. A pin with a connecting rod attached to it is pressed into the second hole, located on the edge.
- The ignition coil is assembled according to the following diagram:
- You can also use a coil from a car or motorcycle. Its connection diagram looks like this:
- You can also make a spark plug yourself by making a through hole in the M6 bolt. To make an insulator, you can use a glass tube from a thermometer and glue it with epoxy resin. The tube is also wrapped in paper impregnated with epoxy resin.
The parts on the engine are located according to the following drawing:
Intake valve diagram:
Carburetor diagram:
Schematic view of the carburetor itself:
You can see how this internal combustion engine works in the following video:
Stirling motor from a tin can
To make it, you will need available materials: a can of canned food, a small piece of foam rubber, a CD, two bolts and paper clips.
Foam rubber is one of the most common materials used in the manufacture of Stirling motors. The engine displacer is made from it. We cut out a circle from a piece of our foam rubber, make its diameter two millimeters less than the inner diameter of the can, and its height a little more than half of it.
We drill a hole in the center of the cover into which we will then insert the connecting rod. To ensure smooth movement of the connecting rod, we make a spiral from a paper clip and solder it to the cover.
We pierce the foam circle of foam rubber in the middle with a screw and secure it with a washer at the top and at the bottom with a washer and nut. After this, we attach a piece of paper clip by soldering, having first straightened it.
Now we stick the displacer into the hole made in advance in the lid and hermetically solder the lid and the jar together. We make a small loop at the end of the paperclip, and drill another hole in the lid, but a little larger than the first.
We make a cylinder from tin using soldering.
We attach the finished cylinder to the can using a soldering iron, so that there are no gaps left at the soldering site.
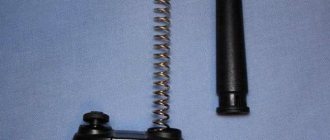
We make a crankshaft from a paper clip. The knee spacing should be 90 degrees. The knee that will be above the cylinder in height is 1-2 mm larger than the other.
We make the connecting rod that will need to be attached to the membrane from a paper clip and insert it into a piece of rubber. The length of the connecting rod must be made such that at the bottom dead center of the shaft the membrane is pulled inside the cylinder, and at the highest, on the contrary, it is extended. We set up the second connecting rod in the same way.
We glue the connecting rod with rubber to the membrane, and attach the other one to the displacer.
We use a soldering iron to attach the paper clip legs to the can and attach the flywheel to the crank. For example, you can use an CD.
Stirling engine made at home. Now all that remains is to bring heat under the jar - light a candle. And after a few seconds give a push to the flywheel.
What is the engine mileage before major overhaul?
The mileage life of an average car is considered to be about 200 thousand km, after which its characteristics decrease and it’s time to invest in some capital. There are cars with a lifespan of 1 million km (million-dollar engines are called), although now there are rumors that the lifespan of new expensive cars, which used to be million-dollar, now have a much shorter lifespan. The more often a car is repaired, the more financially profitable it is for auto manufacturers and auto parts stores, but this spoils the reputation of a brand or a specific car model.
In some cases, with severe wear of the internal combustion engine or severe breakdowns, it is more advisable to do an engine swap.
The manufacturer AvtoVAZ has set the average mileage for VAZ 2114 cars = 150 thousand km. On average, all Russian cars have the same indicators. But, if various problems are corrected in a timely manner, the engine life can easily withstand 250 thousand km. The service life of foreign car engines is, on average, 200,000 - 300,000 km before overhaul.
Making a model airplane
Building schematic models of an airplane is the next step on the aircraft modeler's path to mastery. This model is more difficult to build than a glider model, but it has great capabilities, just as an airplane has incomparably greater capabilities than a glider.
The schematic model of an airplane (Fig. 120, 121) is more complex in design than the schematic model of a glider (see - HOW TO MAKE A GLIDER MODEL ). For information on how to make other airplane models with a rubber engine, see here - OTHER AIRCRAFT MODELS .
RD device
Turbojet engines (TREs) operate by expanding heated gas. These are the most efficient engines for aviation, even mini ones running on carbon fuel. Since the emergence of the idea of creating an airplane without a propeller, the idea of a turbine began to develop throughout the entire community of engineers and designers. The turbojet engine consists of the following components:
- Shaft;
- Diffuser;
- Turbine wheel;
- The combustion chamber;
- Compressor;
- Stator;
- Nozzle cone;
- Guide apparatus;
- Bearings;
- Air intake nozzle;
- Fuel pipe and much more.
What is a major overhaul and why is it needed?
Overhauling a VAZ engine is quite a labor-intensive job that requires knowledge of the structure and operating principle of the unit.
This process will take a lot of time. You will have to remove the engine from the car and completely disassemble it. All removed spare parts are checked for suitability for further use and, if necessary, replaced with new ones. Particular attention is paid to the crankshaft: it is restored and brought into perfect condition. The existing systems are also checked: cooling, lubrication, fuel supply, and the crank mechanism is repaired.
During repair work, internal combustion engine parts and components are brought to perfect condition. After assembling the unit, its condition and performance should be identical to a new engine just released from the assembly line. Capital is needed if the engine has fully or partially exhausted its service life, and corresponding signs have appeared indicating this. It is impossible not to pay attention to them. With further use of the car, the engine may completely fail and cannot be restored. There is only one option left - purchasing a new part. Naturally, purchasing spare parts is more expensive than repairing them.
The service life of the engine before overhaul can be extended if you follow simple rules when operating the machine.
- Monitor the oil level and change it regularly.
- Monitor the coolant level to prevent the machine from overheating.
- Fill with high-quality fuel recommended by the manufacturer.
- Operate the machine wisely and avoid overloading.
- Limit the vehicle's idling time to a minimum.
- Avoid extreme driving that requires high speeds. Do not allow the tachometer needle to enter the red zone.
Learning to create an electric motor for a boat
To do this, it is allowed to use an electric motor from a broken product. But taking into account the fact that a store-bought analogue of a real boat motor is very expensive. In any case, more than a gas mower or a screwdriver.
Therefore, you can buy brand new products and borrow an engine from there. This option is the least expensive and easy to implement. Especially suitable for those for whom the financial side is very important. In another case, it is more profitable to purchase a floating device with a motor and appropriate devices for successful fishing.
We assume that there is an inflatable boat without a motor. Let's consider the stages of manufacturing an engine for this budget and ergonomic floating device for amateur fishing:
- We purchase or use an old screwdriver, an electric motor based on batteries.
- If the battery power is too small for long and fast movement across a body of water. Then you should pay attention to the car analogue with 12 V. But the device must correspond to this operating voltage.
- In order to optimally load the boat with cargo and caught fish and not worry about the ability to move, it is better to rely on an electric drive with a power of 300 W.
- Care must be taken to reduce the torque of the electric motor. To do this, a gearbox is installed; without it, you can’t use an electric drill.
- A propeller is added to this combination, but the use of a drive shaft is allowed.
Thanks to the electric motor, you can move silently.
If the assembly seems too complicated, you can rely on a video of making a boat motor based on a clear example. The product is much more economical to repair and costs less than its store-bought counterpart.
Do-it-yourself rubber-powered airplane
The first place that novice pilots—children, that is, those who are thinking about it, but are still not sure for sure, and at that age are not yet capable of it—start their flights, with toy airplanes. The simplest option would be a paper plane, you can simply fold it and launch it, it will float in the air like a glider. We discussed this option in the article “How to fold a paper airplane.” More advanced versions are capable of slightly assisting themselves in flight. So, for example, an airplane is on a rubber tire, where the potential energy of a twisted rubber band is capable of turning the propeller, which pulls the airplane forward. This option is already known to many adults who, as children, assembled such an airplane with their parents. Now it’s your time to pass on the experience to the children, showing them how it is done and on what principle the aircraft operates on a rubber tire. And in order to make it easier for you to navigate and not really rack your brains over what to use for production, we suggest that you read our article - a cheat sheet.
Car maintenance after major repairs
After overhauling the engine with your own hands, the car must be operated carefully. During the break-in, the basic rules must be followed; the ride must be calm. During this period, frequent oil changes are required: every 500 km. When the mileage reaches 2000 km, the oil is changed unscheduled for the last time. Next, it needs to be changed like in any car after 10-15 thousand.
After overhauling the engine yourself, with proper operation, the car will delight the owner for many years. The main thing is to change consumables on time and use high-quality, proven products.
You can see how the overhaul of a VAZ engine takes place in the video.