To carry out drilling work on miniature workpieces, engraving machines, the so-called “dremels,” are usually used. The name comes from the name of the most popular manufacturer. This is a convenient hand tool, but its cost is usually high (especially for high-quality branded products).
The most common area of application is amateur modeling and production of printed circuit boards. As a rule, an industrial design is redundant for such work: some of its capabilities are not in demand. Therefore, home craftsmen often create instruments with their own hands.
Mini drill attachments
A cutter made from a wheel from a lighter. Ordinary drills may not be enough if you are not a radio amateur, but are engaged in model making or other types of creativity that require the use of a mini drill or drill. Some attachments are easy to make yourself:
- Milling cutter. You can use a spinning drum from a lighter. Place it on a suitable size bolt and secure with a nut.
- Grinding head. A small nail will do. Place a cork champagne cork on it or wrap a cylinder of electrical tape around it. Cut a rectangle out of sandpaper of the required grit and glue it around the circumference of the head cylinder. To process different materials, you will need several of these heads.
- A circular saw. The upper or lower part of a C-size battery – the so-called “barrel” – is suitable for manufacturing. The battery material is strong enough to make a compass disk. To mark, use a compass to mark the hole in the center. The oblique teeth must be the same size to avoid runout during operation. To fix it in the drill chuck, use a bolt and secure the disc to it with nuts. As you can see, it’s not difficult to make a mini drill with your own hands from a motor if you are full of enthusiasm. Many scrap materials that you most often throw away will work. The only thing you will have to spend money on is a collet: making it yourself is extremely difficult.
Which cutters, attachments, cutters are suitable for a beginner
Working accessories used to work with an engraver are characterized by their wide variety. To make the right choice when selecting nozzles, you need to consider several factors:
- features of the processed material;
- technological tasks.
Diamond and abrasive burs
Most often, engraving machines are equipped with diamond burs. The main feature of this tool is that the main part of the body is made of tool steel, and its working surface is covered with a layer of diamond powder. Another name for this tool is a cutter. Diamond burs are necessary for processing hard surfaces.
Most often, engraving machines are equipped with diamond burs
Most often they are used when working with the following materials:
- glass;
- steel;
- ceramics;
- stones.
A more budget-friendly option are roller cutters with a working surface made of rubber and abrasive material. They are used for metal work. You need to use abrasive cutters for boring holes and grinding. The capabilities of these tools are optimal only for beginners.
Other attachments
Milling cutters for beginners should be selected in small sizes.
With their help, the engraving will have a neater appearance. Most often, for beginners, sets of cutters are offered, consisting of 4-6 elements of various shapes: cylindrical, end, worm, conical, end. Large kits should only be purchased by experienced craftsmen.
You will also need a drill during the work process.
This tool is necessary for cutting through the design. Most often it is used to make the outline of a picture and the main elements of the background.
For many, a drill is the embodiment of childhood horrors associated with visiting a dental office, and the sound it makes is one of the most unpleasant in the world. Meanwhile, if we consider it as a unique tool used in various fields, including the one that we have already mentioned, then, perhaps, it will not be found equal to it in a number of properties.
The drill got its name from the name of the tool most often used to work with it - a drill. The most common uses for drills in a home workshop are the following:
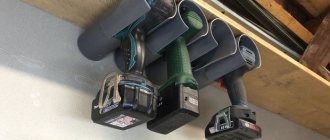
This is a Chinese Dremel drill with an average cost of 12 - 13 thousand rubles, one of the options for a dental drill machine with approximately the same price and a more expensive (by about a third) direct grinder.
No one can definitely answer what is better and what is worse. It depends on what types of work the tool will be primarily used for. The most universal, according to many, is the Dremel. The abundance of its equipment allows you to perform the widest range of operations for processing most materials: metal, wood, plastic, bone, without additional hassle of re-equipment. The most reliable version is similar to the Makita straight grinder.
Drills differ mainly by:
- power;
- number of revolutions per minute;
- a device for fastening a bur or other working tool;
- the presence or absence of a flexible shaft.
And they select a specific type of drill, mainly to perform a certain type of work. And here, for carving wood or bone, the ideal option is to have an 80 - 150 Watt motor at 8 - 12 thousand rpm.
If the drill acts mainly as a microdrill with the functions of stripping and grinding, then it is quite possible to get by with 3000 rpm. Based on this…
Complete analogue of the factory “Dremel”
Drill example
The original housing is also made independently in such a way that the engine is tightly fixed inside, while leaving a gap or an open part in the heating area.
The body of the mini-drill can be any plastic tube.
There are models that used a tube of sealant, a syringe, a plastic tube of toothpaste or children's candy.
A piece of plumbing plastic pipe cut to the required length will also work, but in this case the open ends will need to be sealed with some kind of movable “plug”, for example, acrylic or cut out of plastic.
You can make a mini-drill chuck or clamp yourself, for example, from a regular connecting terminal, or buy it on the market or in a store. For collets, you can contact engraving workshops, as well as modeling departments or sections of components for household power tools.
The resulting tool is a universal option; Depending on the type of repair, various attachments are fixed with such a clamping chuck: drills, cutters, discs with a cutting edge or screwdriver heads.
Recommendations for selection
A set of attachments for the engraver is produced under various brands. As previously noted, when frequently processing workpieces with the tool in question, a fairly large set of attachments is required. The following factors may influence your choice:
- What specific technological tasks will have to be performed. As previously noted, a drill can be used to carry out simply a huge number of technological tasks: engraving, surface grinding, cutting, drilling and others. The choice is made in accordance with what kind of work will be carried out. There are universal sets available for sale, represented by a combination of nozzles of various types.
- Characteristics, geometric features of the workpiece and the type of material used in manufacturing.
- Estimated dimensions of workpieces. A tool that is too small is not convenient for processing larger workpieces. However, achieving your goals may take much longer.
The set of cutters and other attachments can be minimal or include several dozen units. In this case, the choice depends on the budget allocated for the purchase of equipment and how often the work will be carried out.
When choosing, attention is also paid to the classification according to the purpose of the sets:
- Professional level. The high cost of such a proposal is primarily due to its long service life and exceptional performance. In addition, the cutting part retains its shape over a long period, which ensures precision processing. It is advisable to choose such equipment only when the relevant work is carried out frequently.
- Budget proposals. This group can be divided into simply a huge number of categories. The most affordable tool will be an offer from Chinese manufacturers, but it will not last long and often does not meet the stated characteristics. Some well-known manufacturers also produce instruments of this class, but at the same time they maintain a fairly high level of quality. That is why, when work is carried out infrequently, attention should be paid to such a proposal.
Types of attachments for engravers
When purchasing a tool, you can inspect it. There should be no obvious mechanical defects on the surface. In addition, a lot of attention is paid to symmetry, which is quite difficult to check without special equipment.
Method number 3 – Antiperspirant idea
Well, the last version of a homemade mini drill, which we would like to provide to the readers of Sam Electric - using a cassette motor and an antiperspirant container. The advantage of this model is that it is controlled by a separate on/off button and has a convenient housing. Such a homemade product will be powered by a conventional power supply, which must be selected based on the characteristics of the motor.
So, first you will need to prepare the following materials:
- motor from a tape recorder;
- suitable collet with drill;
- used antiperspirant;
- RCA socket for connecting power and a mating part for it;
- power unit;
- switch from an old carrier.
The first step is to make a mini drill according to the instructions provided at the very beginning: place the collet on the shaft and secure it with bolts. Next, the motor housing is installed in the antiperspirant. As you can see from the photo, the dimensions are ideal for installing the part. If the motor has free movement inside the housing, secure it with electrical tape and hot glue.
After this, you need to drill a hole in the top cover for the exit of the collet or the drill itself. At the same time, you need to make a hole in the bottom for the power connector. Using a utility knife, you also need to cut out a window for the switch, then solder all the elements of the circuit in series and install them in a place convenient for you.
The advantage of this version of a homemade mini drill is its convenient operation, small size and stylish appearance. We recommend doing this particular option at home, because it is the most convenient, safe and at the same time affordable.
Review of various creation ideas
Examples for inspiration
Above we have provided the 3 most popular options for a homemade micro drill for drilling printed circuit boards. On the forums we found a few more original ideas that may inspire you to make your own, unique homemade product.
So, here is a photo of spare parts ideas for creating a mini drill with your own hands at home:
- Glue gun handle for easy operation. The motor was taken from an old Canon printer. Power is supplied from a conventional charger.
- Second life for a hairdryer. According to the inventor, this homemade product is assembled on the basis of a motor from an ordinary household hair dryer, which means it does not require special power supplies and has high power. However, do not forget about the danger of mains voltage, so a reliable housing and insulation of all connections are necessary. In a similar way, you can make a device from an old blender, leaving the handle untouched.
- Toothbrush for drilling circuit boards. The next idea is to use a toothbrush as a mini drill. There are already batteries and a motor; you just need to cut off the top part and install the collet attachment.
- A plastic bottle can also be successfully used as a housing for a homemade drill, and the collet chuck is perfectly replaced by a special bushing, an analogue of which is found in terminal blocks for wires.
- Another option with a toggle switch for convenient control. In this case, to drill holes on the signets, you will not need to constantly connect the power plug to the outlet. In addition, a comfortable handle will make the drilling process more comfortable.
That's all I wanted to tell you about how to make a mini drill from a motor with your own hands. As you can see, there is nothing complicated, and there are a limitless number of ideas for assembly. We hope that our photo examples and video instructions were useful and interesting for you. In addition, you can assemble a micro drill yourself using an old DVD drive, a screwdriver, an electric razor, and even a motor from a washing machine!
Related materials:
- How to charge a battery at home
- How to become a real electrician
- How to make an electrode boiler with your own hands
Toothbrush device
All parts of the brush need to be cut off, leaving only the body. Then you need to connect the shaft of the miniature motor with the drill using a collet mount. The collet clamp is purchased separately, taking into account the diameter of the engine shaft.
The chuck is suitable for shafts with a diameter of 2 mm. The brush motor has a smaller diameter. It is first necessary to grind each fastener to a cone-shaped shape. This will allow you to adjust the diameter of the engine shaft to the size of the cartridge mount.
The drilling machine can be made from a blender, electric manicure tool and other devices.
A mini-drill is sometimes equipped with a speed controller and other options.
The video shows how to make the equipment.
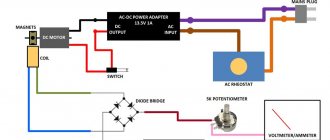
Nutrition
Since the voltage range is quite wide, I tried several options available. The power supply from the television antenna (12 volts, 100 mA) and from the telephone (5 volts, 800 mA) predictably did not start the motor. Also, the 9-volt transformer TP-30-2 from the VEGA radio (0.7 A) did not work. But the computer power supply with its 16-20 amperes turns the motor with a bang. Lines tested at 3.3 volts, as well as 5 and 12 volts. Using these three outputs as needed, I resolved the issue regarding speed control, although I was thinking about more elegant solutions using special boards.
Drill with fishing reel
This do-it-yourself manual micro-drill can be called the simplest and most effective. If you do it, then you won't have any problems making a hole. A do-it-yourself drill of this type can easily be called the best; if something goes wrong, you can easily fix it.
What do we need:
- The reel is inertialess.
- A collet or an old drill chuck.
- Hot melt adhesive.
- Small drill.
The process of assembling a homemade drill from a coil can be divided into two main stages?
- First of all, we must dismantle the spool with fishing line, and cut off the axis that we do not need. This is what it looks like in the photo.
- Glue the cartridge or scurvy onto the remaining rod. You can use hot glue, but it will be more effective to do everything using cold welding.
When everything dries, we check how our mini drill works with our own hands. We found this video for you on the Internet, here each stage is described in more detail.
DIY mini drill examples and videos
Method No. 2 – Use the reel!
Another original way to make a mini drill at home is using a fishing rod reel. In this case, the assembly technology is quite simple, but the principle of operation itself will be based on mechanical rotation, you will get a mini-hand drill
To make a device with your own hands you will need:
- spinning reel;
- a chuck from an old drill or a collet clamp of a suitable size;
- hot glue or cold welding;
- drill.
The assembly process is quite simple and consists of only two steps. The first step is to dismantle the spool with fishing line and cut off the remaining extra axis.
After this, the cartridge is glued to the remaining rod. You can do without a chuck and install a collet instead. When the glue has hardened, you can check the finished mini drill. You can see all the assembly details in this video example:
How to make your own micro drill from a coil
Complete analogue of the factory “Dremel”
To make it, you will need a motor with a 5V or 12V power supply, which can be removed from a broken children's toy, a miniature fan, a printer, a tape recorder, or simply bought on Aliexpress. If you plan to use the drill for more than just drilling printed circuit boards, you can make a convenient housing from a polypropylene water pipe. We select the diameter so that the motor holds tightly to the walls. Ventilation usually runs along the shaft. You can use an empty tube of construction sealant.
End caps can be cut from any material: for example, PVC or acrylic. If the engine is powerful enough, a charger from an old mobile phone will not work. You need a current reserve of at least 3A (for 5 volts). A good option is an old computer power supply (you can buy it for pennies on the radio market).
The collet chuck can be purchased in the store: the department of components for engravers and Dremels. If there is a need to adjust the speed, you can make the circuit yourself, or purchase a ready-made unit.
The illustration shows a Chinese regulator and a power supply from an Internet router (12V, 1.2A).
With this homemade “Dremel” you can not only drill miniature holes. By installing the appropriate attachment, you can work with a milling cutter, cutter, or cutting disc.
How to make a drill for circuit boards:
Now it has become much easier to make a drill for drilling printed circuit boards. It is enough to find or buy for pennies a used inkjet printer with a power supply, as well as buy a special collet chuck for 0.7 - 1.5 mm drills, which is widely sold in all sorts of online auctions and online stores. These collet chucks can be sold in all kinds of construction and tool stores, auto markets, and hardware markets. The price is approximately 2 USD per piece (maybe cheaper).
What’s interesting is that these collet chucks come in two different shaft diameters: 2.3 mm and 3.2 mm. It is precisely these two types of motors that are used in printers. That is, when making this mini drill, you first need to decide on the motor and measure the diameter of its shaft. The motor from the printer itself is a 24-volt DC motor (the servo motor for the cross-feed of the printer carriage). They are the same type in almost all printers. It is necessary to disassemble the carriage drive, pull out the motor, remove the standard gear from the shaft and put on the collet chuck. It is fixed on the shaft with mounting screws.
In my case, the motor was removed from some old printer, it seems to be a Hewlett Packard Deskjet 640.
Drill start button - of any design, for the corresponding motor current. I used a button - a contactor from a Soviet reel-to-reel tape recorder.
It is also desirable that the donor printer have a switching power supply. It is compact, lightweight and very easy to use. Early models of inkjet printers had a transformer power supply - a very bulky device, weighing about a kilogram. In terms of operation, it is not very convenient, although this option is also possible. In general, a 24-volt power supply is connected to a 24-volt motor through a button secured to the motor body with electrical tape.
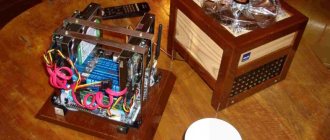
To store a mini drill, it is very convenient to use a bag - a wallet for laser computer disks, after carefully cutting out inserts for the disks themselves.
Me and Diode. yaidiod.ru.
Design
Inside any mini drill there is a grinding machine, that is, a device for direct grinding. All of the above functions are performed thanks to attachments and cutting tools installed in the chuck.
A significant difference between the design and a standard size drill is the rotation speed of the spindle sleeve. Popular models of mini hand drills maintain speeds from 10 to 30 thousand per minute. Due to the high speeds, there is no need to secure the workpiece being processed, because it will not be pulled out of your hands. This feature is very convenient when working with engraving and grinding.
Interestingly, the Hammer mini drill is equipped with a flexible shaft, which allows you to use attachments in the most difficult to reach places without unnecessary discomfort. It is very convenient to use a flexible shaft when you do not need to hold the drill in your hand. To do this, the electrical appliance is suspended on a special stand. This approach will free your hands, reduce vibration and overall noise levels.
Engraver attachments
There are simply a huge number of different tools on sale that can be used for machining parts. An example would be an engraver.
In many ways, this tool is similar in principle to a drill or grinder, but is designed for working with small-sized workpieces. By purchasing and installing various attachments for the engraver, you can carry out grinding, milling or engraving, as well as drilling.
It is important to choose the most suitable versions of nozzles, since they are characterized by different performance qualities and areas of application.
Engraver attachments
Features of nozzles
Attachments for wood drills can be classified according to a fairly large number of different characteristics. There is a wide variety on the market. Almost all equipment for an engraver is characterized by the presence of two structural elements:
- The shank is a part of the engraver attachment, due to which it is mounted in the chuck of the equipment used.
- The working part is responsible for directly removing the metal layer at the time of processing.
Examples of attachments
Metal engraving paste is used to significantly increase the efficiency of the processing, especially if the engraving tool is intended for surface grinding. Descriptions of attachments may be provided by manufacturers, since the cutting edge of some versions may have complex geometry.
Types of attachments for engravers
Equipment for an engraver can have simply a huge number of distinctive features. Drill burs and other types of equipment can be classified according to the following criteria:
- Type of material being processed.
- Purpose of the drill and the engraver attachment used.
- Areas of use.
Method number 3 – Antiperspirant idea
Well, the last version of a homemade mini drill, which we would like to provide to the readers of Sam Electric - using a cassette motor and an antiperspirant container. The advantage of this model is that it is controlled by a separate on/off button and has a convenient housing. Such a homemade product will be powered by a conventional power supply, which must be selected based on the characteristics of the motor.
So, first you will need to prepare the following materials:
- motor from a tape recorder;
- suitable collet with drill;
- used antiperspirant;
- RCA socket for connecting power and a mating part for it;
- power unit;
- switch from an old carrier.
The first step is to make a mini drill according to the instructions provided at the very beginning: place the collet on the shaft and secure it with bolts. Next, the motor housing is installed in the antiperspirant. As you can see from the photo, the dimensions are ideal for installing the part. If the motor has free movement inside the housing, secure it with electrical tape and hot glue.
After this, you need to drill a hole in the top cover for the exit of the collet or the drill itself. At the same time, you need to make a hole in the bottom for the power connector. Using a utility knife, you also need to cut out a window for the switch, then solder all the elements of the circuit in series and install them in a place convenient for you.
The advantage of this version of a homemade mini drill is its convenient operation, small size and stylish appearance. We recommend doing this particular option at home, because it is the most convenient, safe and at the same time affordable.
Review of various creation ideas
Engine from a car radio: assembly
After the materials are collected, you need to get hold of a soldering iron, solder, rosin and wires. This is necessary to connect the drill. It is also recommended to find or purchase glue for more reliable fixation of the drill elements.
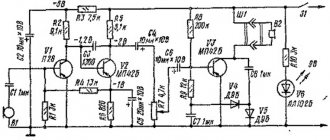
Mini drill diagram.
The next step is to insert a drill into the collet and fix it. This is especially true if replacing the drill in the collet after installation on the motor shaft will be difficult or impossible. Typically, car radio motors have a shaft diameter of 1.5 to 2.5 mm, so the mounting hole in the collet should be within these limits. If there is play during fastening, the drill will vibrate during operation, which can cause the drill to shift and, as a result, a hole in the wrong place. Eliminating vibration during operation will be quite difficult.
Next, the finished structure should be installed in the selected housing and secured there. To ensure reliable fastening, you can use glue, and it is recommended to apply the glue pointwise on the surface of the housing or engine.
Important point. During the installation process, it is necessary to provide for a change in polarity at the motor inputs. This can be done either by wires when connecting to the power supply, or by unrolling the battery itself (if batteries are used). The second option is most convenient and quick to implement if the drill body is a flashlight body. Changing the polarity is necessary to reverse the motor; this may be necessary to remove the drill.
If vibrations appear during operation, they should be eliminated. To do this, you can use improvised materials, which are used as a gasket between the electric motor and the housing. They should be installed with glue to avoid them moving or falling out. To securely fix the engine in the housing, it is recommended to use fiberglass. The easiest way is to get pieces of fiberglass from the box under the disc (the one that is transparent), and you should carefully cut out the pieces of the required size.
As can be seen from the above description, the technology for making a homemade low-power drill is quite simple and can be done quickly if all the necessary elements are available. The main disadvantage of such a drill will be the use of thin drills, which can break or get stuck in the surface being drilled.
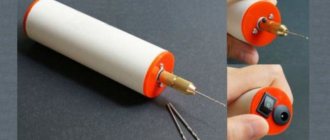
From a ballpoint pen
To make a drilling device from a ballpoint pen, no electrical elements are needed, and no skills in working with power tools are required.
You will need a ballpoint pen with an automatic mechanism, hot-melt adhesive, a stick with jumpers at the end that rotates the drill, and a drill of the required size. The main load falls on the body, so you need to choose samples made of metal or thick plastic.
Build process
The ballpoint pen is completely disassembled. A drill is inserted into the lower part of the body, from which the rod usually comes out. The shank is fixed into the hole on the stick. To ensure that the entire working structure of the tool becomes a single mechanism, the parts are fixed to the inner walls of the body with hot-melt adhesive. The drilling process will be performed through mechanical action on the stick, which serves as the handle of the device.
Power and Controls
It’s good if you have a power supply with a power supply regulator - this will allow you to change the speed of the drill during operation. If you are using a regular power supply, for greater convenience it is recommended to install a power button on the case. You can use either a two-position switch or a breaker button - it all depends on your preferences. It is also a good idea to equip the case with a connector suitable for the power supply.
Enthusiasts who are familiar with electronics can use the USB port, with which the mini drill can be powered from a computer or laptop.
Homemade collet coupling of the simplest design
The simplest collet, operating on the principle of a coupling, can be made of steel wire with a diameter of 1 mm. It should be borne in mind that the collet of the proposed design is not a universal clamping device and can only be used for drills of the same diameter
It is important that the transverse size of the drills used corresponds as closely as possible to the diameter of the output shaft of the drive motor. In addition, it is important to consider that such a collet can only be used when drilling materials with low viscosity
Homemade wire clamp
To manufacture a collet coupling of the proposed design, the following consumables, fixtures and tools will be required:
- a cylindrical metal blank, the diameter of which corresponds to the diameters of the output shaft of the electric motor and drill;
- steel wire;
- electric soldering iron;
- soldering flux.
Assembly and performance tests
The entire assembly consisted of unsoldering the button, connecting the cord and installing the connectors. And from the inside, the motor in the housing was slightly fixed with hot-melt adhesive nozzles so that when drilling it would not go inside.
For hanging storage (it has now taken pride of place next to my work desk), I attached a bracket made of 2.5 mm hard copper wire to the Dremel through the ventilation holes, which, if necessary, can be easily detached from the case.
The car turned out to be very compact, but powerful.
Additional photos
I tried to process a piece of thermoplastic polypropylene pipe. The machine performed excellently on this viscous material. Manipulations with metal and wood are no problem at all.
Additional photos
Manufacturing process
When you have prepared the body and core, you can begin directly assembling the drill with your own hands:
- Place the cartridge with the motor connected to each other in the jar. This must be done so that the wires that stick out from the socket are then placed in the lid of the jar.
- When the cartridge fits completely into the jar, lock it. To do this, fill the voids on the sides with hot glue and wait until it sets completely.
- Attach the switch to the cover and connect the power wires to it. It can also be placed on glue.
- We connect all the wires to the switch; the connection diagram is standard. You can use an ammeter for accuracy.
- After connecting the wires, they need to be insulated using electrical tape or hot melt adhesive.
- Screw the lid onto the jar and attach the drill to the other side.
The good thing about a ready-made mini-drill is that it can run on both batteries and electric power. We considered the option of assembling a universal model.
Naturally, without having the skills to work with electricity, it will be extremely difficult to assemble such a drill with your own hands. Below we suggest you consider options for assembling simpler drills for small household needs.
How to assemble a drill with your own hands based on the handle body
To make it you will need the following materials: ballpoint pen; drill with the required diameter; hot glue; a durable stick with handles at the end that can be used to rotate it.
Pay special attention to the choice of handle for the manufacture of a future drill, and specifically to its body, since during operation the main load will fall on the body. The requirements for the handle body are:
The requirements for the handle body are:
- it must be as strong as possible to withstand loads;
- the best option is a body made of high-quality metals;
- If there is no pen with a metal body, choose a pen with a thick plastic base.
The build process looks like this:
- Disassemble the handle until only one body remains.
- The lower part of the body, where the writing rod usually sticks out, needs to be unscrewed.
- Instead of this part, insert a drill into the body in such a way that its working part sticks out from under the lower part, and the second part is inserted into the hole that is in the stick.
- The stick is inserted into the body at the same time as the drill.
- To ensure that the structure of the drill is complete, it is fixed to the wall of the housing using hot-melt adhesive.
- When you twist the mechanism using the special handles, the drill will rotate, providing the desired work by pressing the handle body.
https://youtube.com/watch?v=kKLL_tvTc94
Engine from a car radio: collecting materials
Since the main necessary part is the electric motor, the sections will be standardized based on what and where the engine is obtained. This section discusses the option of making a drill from a car radio motor. For these purposes, both a relatively new CD radio and an old cassette tape recorder are suitable.
Due to the fact that radio tape recorders have DC motors, they require a power supply or an autonomous energy source (such as batteries). Therefore, to make a power supply you must have the following materials:
Mini drill assembly diagram.
- Step-down voltage transformer (220/(3-25) Volts).
- 4 diodes for the diode bridge (selected according to the engine power).
- Voltage regulator.
- 2 capacitors of 100 µF.
- 2 resistors, one of which is variable resistance.
Finding a diagram of a primitive power supply in specialized literature will not be difficult, so it is not worth dwelling on it in detail. In this case, you should select the voltage with the regulator so that the rated voltage is supplied to the engine. Despite the fact that a DC motor from an old player, CD player or radio can operate at almost three times the voltage, this is not recommended.
Another important point is the selection of material for the body. It could be anything: a metal cylindrical body from a flashlight, an empty deodorant container, it is possible to use pipes with a small nominal bore (selected based on the diameter of the engine) or any other available materials. At the same time, the housing from the flashlight is considered the most successful for the drill, since it already houses a compartment with power supplies (batteries), and to operate you just need to connect the motor to the output points.
The next important part that you need to get is a collet (clamp) for drills. It can be removed from watch screwdrivers or purchased in a store
The latter is much simpler, but you should remember that they are less durable and you will have to change it periodically. One more point - regardless of where the collet is taken, it is necessary to think about its attachment to the drill. Since it must rotate freely on the mechanism, securing it will not be an easy task. Here, a purchased collet will have some advantage over one cut from a tool, since it has a pre-made fastening system. However, the latter is unsuccessful on most models.
After collecting all the materials, you can begin making the drill.
Second option - Self-assembly + (2 videos)
If the task is to make a miniature instrument with your own hands, then you must initially select an electric drive. A motor from various devices - a printer, an old cassette recorder, or from an ordinary children's electrified toy - can be used as an electric drive.
Depending on the power of the electric motor, you can build a mini grinder in two directions. The first direction is to use a network power source. For example, from an old mobile phone. The second direction provides for a completely autonomous model consisting of a motor that will be powered by batteries or accumulators.
The difference between the two directions is in the design of the case. In the first case, space will only be required for the electric motor, and in the second, a battery compartment will need to be installed.
It is very convenient to use a piece of PVC pipe for the body. If its diameter is slightly larger than the diameter of the electric motor, then electrical tape can be wound onto the motor. You can secure the engine using a glue gun.
As plugs, you can use plugs that are placed on PVC pipes during transportation and storage. It is necessary to make a hole in the front plug for the motor shaft, and in the rear plug for the power wire. The power connector and switch must be secured to the housing.
The ideal option would be to attach some kind of collet clamp to the shaft. This will allow you to use standard burs, drills and non-standard mini cutters and discs. If installing a collet clamp does not work, you can connect the shaft and cutting tool using a double contact from an electrical block.
In a similar way, you can make a case for a mini angle grinder with autonomous power supply. Only after installing the engine in it, it is necessary to install the battery pack. The battery wires will be connected through a switch mounted on the case.
In both cases, on mini grinders you can use both homemade tools and standard industrial ones - burs and drills.
https://www.youtube.com/watch?v=8wihkqVEz1k
Homemade cutting wheels
Now let's look at how to make the most common homemade attachment for an engraver.
To begin, take a cutting wheel for an angle grinder, a regular compass, but better with two needles at the ends, an awl and unnecessary scissors or metal scissors.
Using a compass, draw small circles (slightly larger than the standard size of the cutting wheel on the engraver attachment), then cut the circle into pieces from which it will be easier to cut out your circles and, in fact, cut.
Right in the center of the cut out circles, you need to make a hole with an awl using rotational movements. The diameter of the hole should be equal to the diameter of the screw from the engraver on which the nozzle is attached.
Finally, sharpen the homemade wheels on an unnecessary sharpening stone, putting them on the engraver itself.
Such cutting wheels are cheaper than purchased ones, and they last longer than non-reinforced ones.
Homemade cutting wheels for the engraver are ready.
Source mozgochiny.ru
Simple mini drills
Many people who do not want to shell out a significant amount of money for a ready-made tool often ask how to make a mini drill with their own hands.
You can make your own small mechanical drill using an old fishing rod reel.
To do this, you need to remove the spool from the reel (the core in the form of a cylinder on which the fishing line is wound) and cut the protruding metal axle to the desired size. Then you need to glue an old cartridge from a conventional drill or collet to the protruding rod.
Video:
A collet is a device for clamping round-shaped parts in a small chuck; in this case, you will need to clamp a drill.
You can attach the collet to the spool axis using cold welding or hot glue. After the glue or weld has dried, you can insert a small drill into the collet and get to work.
By twisting the reel handle, the mechanism rotates the collet with the drill, thereby creating holes in the desired material.
It is necessary to take into account that the resulting mini-drill must be held strictly perpendicular to the surface being drilled, otherwise there is a risk of breaking the drill. It is also not recommended to press hard on the instrument.
You can also make a mini drill with your own hands using an old motor from a CD player.
To start the engine, you need either a suitable power supply or a battery (or several smaller ones). The collet must be attached to the motor shaft using cold welding or glue.
It should be noted that the diameter of the motor shaft is usually 1.5 millimeters. Sometimes there are motors with a shaft diameter of 2.3 millimeters.
This size must be taken into account when choosing a collet, since the shaft must fit into the hole tightly, without gaps. Otherwise, there will be vibrations during drilling, which will sooner or later damage the mechanism.
After the collet is placed on the shaft, you need to attach the wires to the motor that will go to the voltage source. It is best to solder the wires, which will improve the strength of the fastening.
Then you can insert the drill into the collet and start working. The motor may start to spin in the opposite direction (not the one needed), in this case it is necessary to swap the wires, otherwise there will be no drilling.
Using the same principle, you can assemble a mini-drill with your own hands, using motors from other electrical appliances.
When using a motor from a small washing machine, the mini-drill will be more powerful, and drills of larger diameter can be inserted into it.
Another good option would be a motor from an electric razor, faulty screwdriver, printer or fan.
You can leave the mini-drill as is, and it will cope with its functions, or you can place the motor and collet in a plastic case, this way it will be much more convenient to hold the tool.
Cable + connector
Based on the 12-volt Proxxon Micromot 50/EF drill, I came up with the idea of installing a “spiral” power cable, which is less in the way and is more flexible. I found one like this on the farm - from an old Philips electric razor. I didn’t make it removable, I soldered it directly to the engine, although for greater ergonomics it was possible to move the button a little to the side and attach a “female” type socket to the end.
I chose the connectors based on reliability, but they also fit well into the green color ensemble. I recommend. They are neat and practical, the contact is tight. I bought it in real life, but there are also such products on Ali, they are inexpensive - as an option: aliexpress.com/item/10-Pcs-CCTV-Cameras-2-1mm-x-5-5mm-Male-DC-Power-Plug- Adapter-DC-Power/32598414355.html (1.7 USD for 10 pieces).
Scope of application
The mini drill is widely used to perform various tasks.
- Creating holes in plastic, circuit boards and other objects. Of course, the device will not be able to drill through thick iron, but it will be strong enough to make a hole in a sheet up to one millimeter thick.
- Screwing and unscrewing small head and thread screws. Such fasteners are found mainly on automatic machines (switches), electrical wiring panels, office equipment, as well as in small, low-power electric motors.
- Equipped with special attachments, it can be used as an engraver or grinder; for this purpose, spherical attachments with a rough working surface are placed in its cartridge. During rotation, the nozzle processes the part or applies the required pattern.
These are the main areas where a mini-drill is used, but, in addition to them, it has found extensive use in everyday life, for example, for processing (cleaning) two objects made of plastic or glass that are being glued together. When preparing the joints, both products are cleaned, after which the surfaces are adjusted so that the pieces are closely adjacent to each other.
From an old tape recorder
Another basis for a mini-drill can be the electric motor of a well-worn player or tape recorder that rotates a CD disc. The standard motor of such devices runs on 6V voltage, so you may need to additionally purchase a portable power supply or build a mount for a battery or battery.
Using two soldered wires, the power unit (via a switch button or without it) is attached to the motor and fixed with tape or glue in a homemade tube-shaped housing. After this, the same collet chuck is attached to the shaft, which holds the drill.
Clamping mechanism
The next important component of the device is the chuck used to hold the drill. To make a clamping device, you must purchase a collet chuck in advance
. It is a clamping device capable of firmly holding cylindrical objects. Having secured the drill in the collet chuck and firmly clamped it on the motor axis, you just need to connect the power supply or batteries to the motor.
This simplified version of a mini-drill is already capable of drilling holes.
However, holding the “naked” motor in your hands is uncomfortable, and the mini-drill looks unattractive. To bring what you started to the finish line, you will need a shell and separate control components.
What to make it from
On the Internet you can find a lot of video materials on making homemade models of mini devices. The most popular designs of mini drills are represented by the following list:
- MD from an electric cartridge.
- A complete analogue of the factory “Dremel”.
- Drill made from a toothbrush.
- MD from the printer drive.
- Economical option without housing.
- Second life for an old tape recorder.
- Antiperspirant idea.
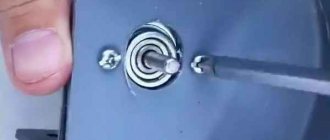
MD from an electric cartridge
Every home has an electric light bulb socket. The body can be made from it. There are standard sockets and housings for minion bulbs. Both of them are suitable for homemade products. It all depends on the outer diameter of the electric motor.
Manufacturing proceeds as follows:
- The core of the fittings is removed.
- Unscrew the back cover.
- A motor is inserted inside the housing, the side surface of which is covered with hot glue or cold welding.
- Adjust the shaft thickness to the size of the collet clamp hole.
- A polymer lid from a plastic container is glued to the front of the case. A hole is first cut in the cover to allow the motor rod to pass through.
- The cartridge is secured to the shaft with a transverse locking screw.
- The motor wires are threaded through a hole in the screwed cover, which are then connected to the output terminals of the rectifier.
- If you can place a microswitch in the back cover of the electric chuck, then using the drill will be convenient.
Note! The rectifier regulator changes the current and voltage, thereby increasing or decreasing the rotation speed of the functional attachment. At the same time, we must not forget that if the permissible current is exceeded, there is a risk of “burning” the motor
Complete analogue of the factory “Dremel”
A mini drill is often called a Dremel by name - the leading manufacturer of this type of power tool. It is almost impossible to make a homemade product completely similar to the Dremel model.
It all depends on the master in terms of selecting spare parts. Making homemade products in a home workshop can never compare with professional MD production. Although, with some effort, you can achieve some success in this direction.
Advice. There is no need to blindly copy an industrial production model. It is better to purchase a ready-made tool.
Drill made from a toothbrush
Those who have used electric toothbrushes know how quickly the cleaning heads become unusable, and new brushes are impossible to find on sale. If you have one lying around the household, then this is a suitable option to make a mini drill.
The difficulty of manufacturing is to remove the vibrator and install the cartridge on the engine shaft. The device is powered by a battery or an 18650 battery. Such a device will not have a large number of motor shaft revolutions. But the MD will serve well as an engraving tool.
Dynamo from printer drive
An old printer is an excellent “supplier” of parts for making a mini drill. The electric motor and power supply are removed from the device. If the electric motor shaft is too thick, it is ground on a grinder. The engine is turned on and brought to the abrasive. Regularly measuring the diameter, the turned rod is adjusted to fit the opening of the collet chuck. After completing all the work on installing the housing, attaching the cartridge, and installing the limit switch, the device is connected to the power supply. After this, all that remains is to install the desired functional attachment and get to work.
Engine from an old printer
Economical option without housing
In order not to search for a suitable product for the drill body, the motor is wrapped in 2 layers of shrink film. The heated coating tightly covers the side surface of the motor, thereby creating reliable insulation of the power tool.
Mini drill without housing
Second life for an old tape recorder
A thrifty owner can find an old tape recorder or player. If the sound reproducing device is made in a stationary form, then use a power supply, as in the previous case.
The engine from the player is also adapted to rotate the cartridge with the nozzle. The device will be mobile, since powerful AA batteries are placed in the power supply instead of batteries.
Electric motor from a tape recorder
Antiperspirant idea
The body of a used roll-on deodorant is quite suitable for making a mini drill. The advantage of this option is the shape of the plastic bottle. It is made so that it is comfortable and firmly held in your hand.
Roll-on deodorant body
Additional Information. When manufacturing the MD case, you should try to install the power button within the reach of the worker’s thumb. This will create an additional comfortable option for controlling the device.
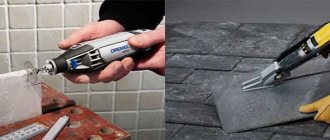
We make a simple drill, practically from rubbish
A drill or engraver is a great help in “desktop” work. In fact, there are many different attachments and their sets on the market that allow you to cut various materials, clean, grind, engrave, again drill, all sorts of little things, often in very hard-to-reach places. The drill can be successfully used in jewelry, amateur radio practice, model making, small plumbing and carpentry work, and when working with glass. This is a truly universal tool that greatly contributes to the integrity of the fingers and for small work, it would be nice to always have it ready, at hand.
There are engravers for “wide consumption” - reminiscent of a reduced electric drill, 3-4 cm thick. The commutator motor allows you to get high speeds without much fuss, the collet clamp with a set of several collets is light and simple. Despite only a few hundred watts of power, the machine in this form is not particularly convenient to work with, so kits often include a flexible shaft and a bracket for hanging the machine.
A textbook corded mini-drill - engraver, set.
Despite the additives that increase convenience, the preferred design of the drill seems to be a jewelry version, originally intended for hanging and working with a flexible shaft.
Jewelry drill.
Turning on and regulating the speed of such a machine is carried out by a pedal, which also seems very convenient.
So. Here we consider the manufacture of a homemade drill similar to a jewelry one, from ready-made components, mainly from broken equipment. One might say - from accumulated rubbish. Specially purchased, only a flexible shaft - on your favorite and native Chinese site. The reason was the failure of the factory engraver - a mini-drill. Its kit did not include a flexible shaft, and it was not possible to purchase the appropriate one. I had to wield the “carcass” - it wasn’t particularly convenient, but there was no way out. Nevertheless, the benefits of the machine were undeniable, and for some jobs, the tool was simply irreplaceable. The engraver inherited a sizable set of tools.
What was required for the job:
Tools:
- A regular set of small plumbing tools;
- set of tools for electrical installation;
- Angle grinder.
Materials:
- Flexible shaft;
- a broken blender came in handy;
- pedal from the electric drive of the sewing machine;
- fasteners;
- duct tape.
From a failed kit for electrifying a sewing machine, all that remains is a power pedal with wires and connectors. The pedal, after examination, was found to be of satisfactory performance - a ceramic switch - a regulator inside, a metal case that is not scary to step on, wires and connectors of sufficient power, even a mating connector was found.
The main character of the design is, of course, the motor. Here, a “manual” blender is used practically unchanged - its metal attached shaft with knives is jammed in a plastic sleeve. The non-repairable design did not allow the unit to be restored, and the kitchen contraption had to be scrapped. The blender motor, however, remained like Vladimir Illich - the most lively, and quite suitable for our application - a high-speed collector, 300 W, operating very quietly for its type.
I cut off the upper part of the attached plastic “leg” (long arrow), so that the handle of the existing flexible shaft passes through its narrow part. A small arrow shows a jammed unit.
An essential task when manufacturing a machine is to attach a flexible shaft to the motor - the speed is high, good alignment and no eccentricity are required. You can purchase couplings of any required diameter; here, however, I decided to make do with standard parts.
On the motor axis, there is a transitional bushing made of durable viscous plastic for attaching a standard blender knife. It was not possible to remove it using simple means; it was decided to leave it and apply it. The inner diameter of the bushing turned out to be slightly smaller than the connecting diameter of the flexible shaft. It was decided to sharpen its tail somewhat to fit it tightly into the bushing. I ground off the excess on the rotating shaft, turning it on in reverse - twisting the side with the handle, holding the reverse side in my hands. As a drive, I used a drilling machine set to 3000 rpm.
The lower part of the handle should be fixed, otherwise it will wobble a lot - even damaging the collet. In the drilling machine, fixing the handle turned out to be quite simple - I passed it through the central hole in the supporting surface; its diameter turned out to be close. An abrasive disc holder was installed in the flexible shaft collet, its protruding part was installed and clamped into a drill chuck.
I had to grind down about 1 mm. Doing this with a rotating shaft on a stationary abrasive stone turned out to be unproductive; I had to remember the turning of rotating pieces of an angle grinder. It happened like this - next to the drilling machine, I placed a small “grinder” more comfortably, so that I could hold it with one hand. I tried it on, turned on the drilling machine, turned on the grinder, and with the rotating shaft, made sort of sliding movements along the edge of the abrasive disk. The use of headphones and a protective eye shield is mandatory. Try on more often!
After adjusting the diameter of the shaft, I seated it very tightly in the bushing - the surface after grinder turning turned out to be rough and there was enough friction for normal operation, and it worked like that for some time. To install the pin, I carefully drilled the sleeve together with the shaft with a ø0.5mm drill and hammered a thin nail into the hole. It fit tight, the protruding edge was bent onto the bushing with pliers.
I tried the motor with the pinned bushing in the housing and made sure that nothing was catching anywhere. You can try turning it on. Yes, before assembling the case, I short-circuited the standard button - here a plastic pusher on the case presses a flexible bronze strip to the protruding “jumper” on the surge protector board. I tinned them and soldered them to death - our car will be turned on externally - by a pedal.
After assembling the body, you need to fix the stationary end of the flexible shaft, otherwise it shakes violently when the motor is running. Here, I used a standard blender part - a piece of an attached leg with knives.
Tight coaxial fixation was ensured by the favorite material of home-made people of all times (although they probably used adhesive tape). There was even a blue color - a classic. I compacted it like this - I made the winding a little more than necessary - the cone did not “sit” in place, then I unwinded it one layer at a time until the plastic part was tightly seated. I started from the bottom. It turned out amazingly well. No vibration.
I decided to attach the fork from the motor part of the drill from below, to the work table, so I supplemented it with a textolite base - fortunately, the fork had mounting holes, and M3 screws fit well.
-Where is your bed? - asked Masha. “That’s just the point,” the Bat laughed, “that I can do without any crib.” Oh, what wonderful dreams I have! All you have to do is climb right up to the ceiling, grab that nail with your paws and hang there upside down. Everything is dreamed upside down. Well, why are you standing there? Climb up to me, I’ll give you my favorite carnation!
Galina Lebedeva - How Masha quarreled with a pillow.
I had a lot of trouble hanging the engine - I made and cut several options from homemade tin clamps - I didn’t like it. A simple and cheap option made of metal is a clamp with a worm screw clamp. You can solder a wire loop on the sides of it. It would be nice to put something elastic under the clamp - a sheet of elastic band or wrap material from all times and peoples.
I couldn’t find a clamp of the appropriate diameter at hand to prevent the machine from lying around, so I made a temporary fastening out of strings, but it turned out to be so simple and successful that I left it for good. In fact, it is a rope ring, on opposite sides of which two self-tightening loops are formed. For hanging, a self-tapping screw with a wide head for sheet materials is screwed to the wooden post of the work table-rack. An enlarged M6 “body” washer is placed under the cap.
It turned out to be something like an eyelet for hanging, sort of like a bookshelf on the “reverse”. The weight of the machine holds the carabiner in the desired position; if necessary, remove the motor from the nail, you need to lift it, and unfasten the carabiner with the washer in the manner of buttons in a coat - you get additional insurance against jumping off. The rope allows the motor to move freely, following the flexible shaft.
I cut off the power plug of the blender, cut the end of the wire to connect to the plug - formed a loop on a 3 mm drill, soldered it, crimped it with pliers, removed the remaining flux, but what?
The connector for connecting the pedal was screwed under the table, so as not to kick it with your knee, on the right side - so that the pedal was under the right foot, it seemed more convenient to me.
It turned out very well - the tail of the drill in the “transport position” hangs freely, not reaching the floor; by stretching out your hand, you can easily reach the handle, feel the pedal under the table with your foot, it’s also simple. By connecting the drill to the network before work, you can use it at any time, while it is at hand, but does not take up any useful space.
Babay Mazay, December 2022
Tools and materials
Required:
- electric cartridge,
- engine,
- plastic container for soap bubbles,
- sharp knife,
- hot glue,
- insulating tape,
- soldering device,
- toggle switch
Preparatory work
To make a housing in the lid of a jar of soap bubbles, use a heated soldering iron to make a hole with a diameter slightly larger than the diameter of the base of the drill. The bottom of the container must be removed. The core of the tool is made from a motor and a cartridge. An engine of suitable power can be taken from old equipment. Before attaching the engine and cartridge, they are degreased with acetone. Fastened by cold welding or hot glue.
Large diameter petal circle
The principle of collecting is the same as the previous one, but with some details.
You still need to take scraps of plywood and cut out circles, but larger ones.
Then fasten them and make eight cuts with a metal saw. Pieces of sandpaper are still inserted into these cuts, but then they are compressed with an elastic band and impregnated with glue or epoxy resin.
Let it sit and dry, then start testing a homemade large-diameter flap wheel for an engraver.
Source mozgochiny.ru