General characteristics of finished products
Most types of furniture for soldering have a metal pipe frame as a base, onto which sheet metal sides are attached.
The table top is a thick sheet of plywood covered with textolite. This is very convenient for soldering. The surface edging is made of a cast aluminum strip, which manufacturers, in a foreign manner, call molding. The dimensions of the tabletop allow you to solder a variety of parts without any problems.
At the rear edge of the table there is a firmly fixed superstructure with shelves and small cabinets, the volume of which allows you to place many accessories.
Almost all models of assembly tables for soldering are equipped with a fluorescent lamp, which allows you to work enthusiastically at any time of the day.
The package usually includes a socket block. No need to look for additional points to connect. You can safely work with a soldering iron without harassing others.
Ready-made mounting tables for permanent soldering have a protective screen with channels for forced ventilation. Models with hoods are usually purchased for industrial facilities.
It is inconvenient to use them at home. The visor with ventilation, which is a continuation of the rear wall, creates the impression of a bulky structure. This model of furniture for soldering costs much more than conventional assembly tables.
Soldering tables with rotating capabilities attract special attention from soldering workers. They cost more, but if it is necessary to carry out work involving turning any element, this furniture is extremely useful.
We do it ourselves
Many craftsmen assemble tables themselves from scrap materials. Everyone chooses available raw materials in specific conditions. Some craftsmen, working in the garage, use doors from old refrigerators as countertops.
Other lovers, located in apartments, choose more aesthetic options. Many solders like PCB as the basis of a working surface. It is a little expensive, but very convenient to use.
Sometimes they take thick glass and make a tabletop out of it. You need to work on it very carefully. Impact-resistant glass is expensive, and regular types are easy to break if you are careless. It’s scary to imagine the picture of a soldering table falling apart in working condition.
Stainless steel is very reliable. You can use a very small plate, the size of a landscape sheet, placing it on a wooden or plywood base. This is enough for home soldering.
It is recommended to weld a piece of pipe to a steel table, which will serve as a holder for a soldering iron. You can attach metal legs to the sheet or place it on a workbench.
Stainless steel heating table
If desired, it is easy to provide ventilation to the table and provide lighting. A little effort, minimal costs and a certain amount of time will allow the soldering worker to equip a decent workplace.
The main thing you need to remember is safety. All parts of the table must be secured so that no falling tools can damage it.
Source
Characteristics of the heating table
For specialists involved in soldering printed circuit boards, special compact devices are available for sale. They are called thermal tables. This is a small piece of equipment with a constantly warm surface.
The heating table has a heating element, above which a heat-dissipating plate is fixed. The soldering system is equipped with ventilation and ensures uniform heating of the working surface. The device is grounded; static electricity is excluded.
The cord is encased in a heat-resistant silicone sheath. The control unit is located in a convenient position and is easy for the user to understand. The heat table provides heating of circuit boards and metal elements during soldering.
Radio amateur's desk
The desktop of a radio amateur is the face of an electronics engineer, show me your desktop and I will tell you who you are. So what should it be? What should be on it first? My desktop looks like this:
So, more details. On the left we see a computer mouse, which by some miracle ended up in the frame. I think you understand that a real self-respecting electronics engineer cannot do without a computer with Internet access.
1) A smoke eliminator is a device that catches smoke during soldering and passes it through a carbon sponge, thereby protecting our eyes and lungs from harmful rosin and other smoke. When soldering, a lot of harmful substances are released, so this is a very important thing. If possible, try to work with the window open.
2) Multimeter . With the help of a multimeter (as I affectionately call a multimeter), we make various measurements of electrical quantities.
3) Power supply . It has two displays. On one of them it shows voltage, on the other - current. In a word, a very useful thing. As we can see in the photo on the display on the right, the voltage is 4.0 V and the current is 0 because I did not connect any load.
4) USB microscope . I think you are already familiar with him from the previous article. We need it to look at small parts, printed tracks on the board, as well as to view the quality of soldering and just for pampering
.
On the right of the power supply there is liquid alcohol rosin , and in a white container there is flux-off . They randomly entered the frame. You can read about them in the article Chemistry for electronics engineers
5) Soldering station AOYUE INT 768. And the most important thing on the desk of every electronics engineer is a soldering iron ! In my case, this is a soldering station. It is a hair dryer and soldering iron two in one. a hair dryer in order to desolder and solder SMD elements. We will discuss what this is in another article.
6) Oscilloscope . We need it in order to find out the shape of the voltage signal, the frequency of the signal, and also the period. Well, in short, an oscilloscope is needed for particularly advanced electronics engineers, but this device is not required, and for dummies it is practically not needed.
Also, I think you recognized the lamp , because soldering in the dark is a complete ass. Small yews are a very convenient thing when you need to hold or press something. “third hand” device is familiar to you from previous articles, and the soldering iron , which is part of the soldering station. We will consider all devices in more detail as we write articles. OK it's all over Now! I wish that every radio amateur had a table many times richer than mine.
KIA Ceed SW Snezhka › Logbook › Tile-table for mass soldering of SMD elements.
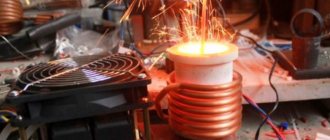
According to the requests of workers, here is the design of a table for soldering, in particular LEDs 5050. Heating the board with a halogen spotlight has a couple of disadvantages, the first is uneven heating, the heating is hotter along the lamp, less towards the edges, and second, it creates a blinding oiliness during operation))) That's why this tile was collected.
The heater was taken from an industrial electric stove, from one section, in a cast-iron body of which there are 2 heating elements of 3 kW 220V each, one was taken, of this design.
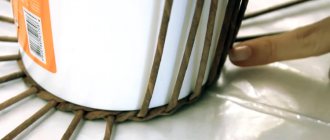
A titanium sheet of approximately 3-4 mm and a suitable size was taken as the top plate, 4 bolts were welded to the plate, so that they were located between the “waves” of the heating element, covered with a second plate on top and tightened with nuts, you get a kind of sandwich.
M6 bolts are screwed through bronze bushings (sawed-off driven anchors) to the mounting bolts in such a way that the heating element output does not touch the table; a piece of wire with a plug is used as a current supply. In the future I may add a thermostat, it heats up in one fell swoop.
Conclusion
I will definitely use this method of replacing LEDs. I like the fact that you can desolder all the LEDs within a minute. After that, within 5 minutes you can clean the pads, apply solder paste, install new LEDs and quickly solder everything back.
The only significant drawback is the darkening of the PCB, but using reflectors all this can be corrected.
All links to LEDs and the soldering table itself are posted below. Thank you all for watching and good luck with your repairs. I look forward to your feedback on this method.
TABLE-OVEN FOR LED SOLDERING REFLECTOR LENSES FOR LED BACKLIGHTING LEDS, GLUE FOR LED BACKLIGHTING TV MATRIX SOLDERING PASTE
Author of the publication
We do it ourselves
Many craftsmen assemble tables themselves from scrap materials. Everyone chooses available raw materials in specific conditions. Some craftsmen, working in the garage, use doors from old refrigerators as countertops.
Other lovers, located in apartments, choose more aesthetic options. Many solders like PCB as the basis of a working surface. It is a little expensive, but very convenient to use.
Sometimes they take thick glass and make a tabletop out of it. You need to work on it very carefully. Impact-resistant glass is expensive, and regular types are easy to break if you are careless. It’s scary to imagine the picture of a soldering table falling apart in working condition.
Stainless steel is very reliable. You can use a very small plate, the size of a landscape sheet, placing it on a wooden or plywood base. This is enough for home soldering.
It is recommended to weld a piece of pipe to a steel table, which will serve as a holder for a soldering iron. You can attach metal legs to the sheet or place it on a workbench.
Stainless steel heating table
If desired, it is easy to provide ventilation to the table and provide lighting. A little effort, minimal costs and a certain amount of time will allow the soldering worker to equip a decent workplace.
The main thing you need to remember is safety. All parts of the table must be secured so that no falling tools can damage it.
Source
DIY metal case, the easiest way. Infrared Soldering Station
The operating principle of an infrared soldering station is to influence the element with strong waves of 2-7 microns in length. A device for soldering with homemade IR soldering stations, both homemade and purchased, consists of several elements:
- Bottom heater.
- The upper heater is responsible for the main effect on materials.
- Board holder design placed on the table.
- Temperature controller consisting of a programmable element and a thermocouple.
Soldering table for LEDs or a mess of iron.
I have been installing LEDs for a long time, I usually put them on hot-melt adhesive paste or thermal paste and mechanical clamp, but there is another way. If you solder the bottom of the LED, and even to a copper substrate, then the heat dissipation through the solder is much better than through the paste. You can overclock XML to 6 amps and do other interesting things. After an unsuccessful attempt to solder an LED to a copper wire with a 10mm hot air gun, I realized that I needed a soldering table. If anyone is interested in how to assemble a soldering table from an iron and a PID temperature controller in an evening, you can read on.
LEDs are very sensitive to temperature and die when overheated. There are temperature charts, for example this one
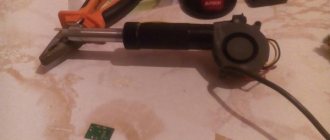
It is not possible to do this with a soldering iron, an industrial hair dryer, or a hot air gun at a soldering station. A set of a thermostat, a temperature sensor for it and a solid-state relay was ordered. A lonely Soviet iron was found in the trash. The iron was disassembled to the ground, the standard thermostat-turner went into the trash. I lightly drilled the iron in the center of the platform, put a little thermal paste, and pressed the temperature sensor with an iron plate. The iron gets hot (oddly enough), so I had to secure the box through spacers, otherwise the box would float. The solid-state relay holds up to 40A, that is, almost 9 kilos of power at 220 volts. Iron 1KW, heating of the relay was not noticed. When a voltage of 3-32V is applied to the relay input, it opens. The thermostat of this version already produces a 12 volt signal (there are others with dry contacts), that is, an additional power supply is not needed. The thermal resistance must be connected taking into account the polarity; the color on the terminals seems to hint at this.
Auto-calibration for the current situation is possible. In this case, the controller evaluates the inertia of the heater and sets the parameters of the PID controller.
Enter the menu (long press the SET buttons).
Change the AGU parameter from 0 to 1.
Exit the menu by pressing the SET button. The AT symbol lights up on the display. The regulator raises the temperature to the set temperature (150 in the photo).
When the set temperature is reached, the load is turned off, but the temperature rises by inertia (about 170).
The iron cools down, when the temperature drops below the set point, the thermostat pushes it up a little with impulses, holds it exactly, the temperature does not fluctuate. When auto-calibration is completed, the AT symbol goes out. After auto-calibration, the thermostat accurately maintains the temperature; I raised it to 300C. At first, the load is turned on constantly, when approaching the set temperature, the controller turns off the load for some time, jumps a little over the set temperature, lowers it and stabilizes. Manual correction of any of the parameters of the PID controller is possible, it seems that it can also work for cooling, there is an alarm output (the alarm temperature is set as the first parameter in the menu).
If necessary, you can make a video, but the process is slow, you will have to take a Timelapse.
Now the iron has received a second life. You can solder LEDs, you can fuse rosin into a solid state from powder and pieces, you can warm up tea or your hands, the minimum temperature is not limited. Ironing is not convenient, the thermostat gets in the way.
Pros of REX-100 - +everything included, all included. A power supply is not needed, 220V is enough. easy to use and understandable, no cons found.