Dolls have been man's faithful companions since ancient times. There are many techniques for creating dolls using various materials and tools. Today we invite you to sew a textile doll: this article contains the best 15 master classes on creating toys in different styles.
Some of the lessons can be repeated even by a beginner, while others will require a certain level of preparation. You can find a detailed description of each master class by clicking on the link or photo, and at the end you will find a bonus lesson on painting a doll’s face.
Happy creativity!
BONUS: How to draw a face for a textile doll
Where does a doll start? Of course, with a cute doll face! Step-by-step lesson from sketching to placing highlights. More details >
What can be made from old jeans: 8 master classes + 3 inspiring selections > How to sew a skirt with your own hands: 10 master classes + BONUS on modeling > How to sew a pillow: 12 master classes for every taste >
Subscribe to the Masters Fair on social networks: Yandex.Zen, Instagram, Facebook, VKontakte
Interior doll: detailed master class and patterns
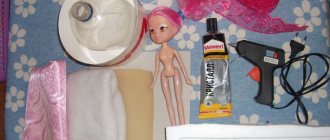
To make a doll you will need:
- knitted fabric for the body;
- fabric for clothing – cotton, knitwear;
- interlining;
- finished shoes for the doll;
- doll hat;
- hair tresses;
- foam ball Ø 8 cm;
- two types of filler - padding polyester and padding polyester (you can get by with just padding polyester);
- white and beige threads;
- lace braid for decoration;
- glue "Moment" transparent;
- Chinese chopsticks;
- sewing pins;
- long needle;
- buttons according to the diameter of the arms and legs - 4 pcs.
- scissors.
Description
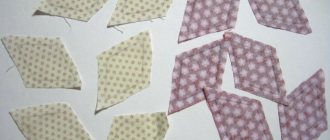
We start by making a pattern: print it in full size on A4 format, cut it out. The optimal doll size is 25 cm, but you can make a doll of any size.
We cut out parts for the body from knitwear. Interior dolls are usually made from special knitwear that has a special structure and properties. It barely stretches. If you use regular knitwear, then so that it does not stretch too much, glue it with non-woven fabric, except for the area for the head.
It is better to cut out the parts using zigzag scissors. If you don’t have these, then simply make notches on the folds so that the fabric does not pull after turning it out.
We fold the parts in pairs and grind them down, leaving room for turning them inside out.
After grinding, we finalize the legs. Fold the foot, aligning the seams, and draw a semicircular outline of the foot.
Sew along this line and cut off the excess fabric.
We turn the parts inside out using a long narrow stick.
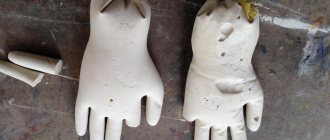
We cut out a round piece of padding polyester, sufficient to completely wrap the ball.
We insert the ball in the padding polyester into the sewn parts of the head through the hole left at the top.
Now we will make a nose for the doll. If you decide to do without it, then simply skip this step. To make a spout we will need a pin with a bead at the end, some padding polyester, thread and glue.
Lubricate the tip of the bead with glue and wrap the padding polyester around it.
Fold the wound padding polyester in half and tie it with thread at the base of the bead.
We find a place on the head where we will make the doll’s nose, and stick a pin there.
Carefully unscrew the fabric, remove the pin and insert the spout into this place inside the head.
Straighten the fabric.
Hand sew the top edge on the head.
The next stage of our mk is making the neck. For this we need a Chinese wooden chopstick. It needs to be cut and one end sharpened. You can use wooden skewers instead of such a stick, but they are less durable.
In addition, we will need glue and a strip of padding polyester. The strip should have a width equal to the size of the cylindrical section of the stick, and its length should be such that after wrapping the stick, the result is a cylinder equal to the coverage of the doll's neck.
We coat the stick with glue and gradually wrap a synthetic padding strip around it.
We insert the neck through the open lower hole of the body, and impale the head on the sharp end of the stick.
We fill the body tightly with synthetic down. To do this, take small pieces of filler and gradually place them, distributing them with a wooden stick. If you use padding polyester, you need to tear it into small pieces and fluff it up.
First, fill the neck area tightly and evenly. At the same time, we try to avoid the formation of lumps.
Further stuffing can be done by hand, without using a stick. So that the finished doll can stand, we stuff it tightly, slowly, using small pieces of filler. If you hurry and place the filler in large pieces, you will end up with a lumpy surface of the doll’s body, the so-called cellulite.
Having finished stuffing, sew up the bottom hole.
The next stage of our mk is stuffing the arms and legs of the toy. For this operation you will definitely need a wand. First we insert the stick into the leg, and then we insert the leg into the shoe. Then we start stuffing. In this case, the foot is not deformed, but when stuffed, it will take the shape of a leg. Having finished densely stuffing the arms and legs, sew up the holes.
Now let's figure out how to sew clothes for an interior doll.
First we cut out the pants. Mark the contours on the folded fabric and cut it out. Fold and stitch the top and bottom edges. We make the side seams.
We sew a narrow lace braid along the bottom edge.
We unfold the panties and sew the instep seams.
We turn the pants inside out and put them on the doll's legs through the top.
For the next stage of MK you need to prepare a long needle, buttons, strong threads, a thimble and pliers.
How to attach the arms and legs to the doll is shown schematically in the following figure. We first pass the needle in one direction, sequentially piercing the button, the limb, the torso, the second limb, the second button. We do not tighten the thread. Then we perform punctures in the opposite direction in the same sequence. After this, we tighten the threads and tie them tightly. We are not sewing on the handles yet, we will do that later.
We put on pantaloons. We fold them on the back and attach them to the body with a few stitches.
If the trouser legs turn out to be a little wide, gather them with thread and sew them to the legs.
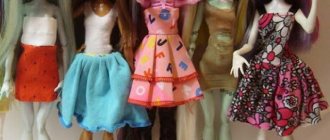
The next stage of our MK is dedicated to sewing a doll dress. It will consist of three parts - top, skirt and sleeves.
First, let's take measurements for the top piece. We measure the circumference of the doll's torso at waist level.
We also need the height of the body from head to waist.
The dimensions are 21 cm and 7.5 cm. We add allowances - for width 5 mm, for height - 2 cm. Cut out a rectangle according to these measurements - 9.5 cm by 21.5 cm.
Fold the top and bottom edges and stitch.
Since the size of the torso decreases at the top, we will also decrease the size of the dress detail at the top by making darts. We wrap the body with a cut-out rectangle, chop off the excess fabric (or sweep it away) in the form of a dart, first on one side.
Then we make a similar dart on the second side. Finally, we chop and sew by hand the seam on the back with blind stitches.
Next, we’ll figure out how to sew a skirt and petticoat. The shape of the petticoat and skirt blank is a rectangle. Its width is equal to the length of the skirt. Please note that the skirt is sewn full and pleated. Therefore, it will visually look shorter than its actual length. The second size of the rectangle is equal to the width of the skirt including folds, plus 2 cm for allowances. For our MK doll, this size is 45 cm. It is possible to make a skirt from several parts, sewing them into a common stripe.
On the cut piece, we hem the top and bottom edges, and sew it into a circle. Gather along the waistline, tighten and sew to the body.
Then we sew a skirt using the same technology. But, we don’t gather it on top, but fold it into folds.
If desired, the underskirt can be made of tulle for greater pomp.
Along the waist line, to cover the seams, you can sew or glue a lace braid.
Next, let's work on the jacket. We will make it from knitted fabric with a cotton lining. We cut the fabrics with right sides facing each other. We mark the pattern in the form of a trapezoid and stitch it, leaving room for turning it inside out. Turn it inside out and sew up the left hole.
We try on the jacket, focusing on the nose, joining the shelves, pinning them together. Then we make several connecting stitches and sew on a button. You can leave the jacket unbuttoned, it all depends on your desire.
To cut the sleeves, prepare a piece of knitwear. To do this, fold and stitch the bottom edge. Having folded the fabric in half, we outline the contours of the sleeves using the patterns for the handles. Pin the fabric.
Sew along the pattern lines and cut out. Turn the sleeves out and put them on the arms. Let's sew on the handles by sewing them through the buttons, just like we did for the legs.
The last stage of our master class on sewing an interior doll will be creating a hairstyle. We will make the hair from tresses. They can be sewn (which is easier for beginner needlewomen) or glued. Let's consider the second method.
Draw a circle line around the head with a pencil. Squeeze out a narrow strip of glue along the line.
We apply a number of tresses with the base on the glue, fix them for a few seconds with pins. By the time the second row is glued, remove the pins from the first. We do not cut the tresses.
Then we coat the second circle with glue and glue the next row of hairs in a spiral. So we get to the top of the head.
There is another option for making hair - you can simply buy a ready-made wig. This wig is placed on the head and sewn along the edge.
To decorate the doll’s face, paint the eyes with acrylic paint and tint the cheeks with blush or pastels.
We complement the image with details - put on a hat, make a handbag or a toy. The doll is ready!
Creation Rules
Making twisted dolls is simple, but it is important to follow the manufacturing traditions that have been preserved since ancient times. The spell will work if the toy is charged correctly.
The most important rules:
- Fabric and threads cannot be cut, only torn off.
- A red cross is made on the dolls as protection to all cardinal directions.
- For prosperity and health, amulets are twisted on the waxing Moon, to get rid of diseases and negativity - on the waning Moon.
- For good wishes, threads are wound an even number of times and tied three times.
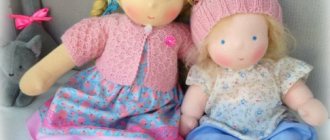
No. 13 Touching baby
A very rare textile doll pattern. At least judging by the fact that it is impossible to find a file with a clear image. Only the ones presented here. However, the cut here is simple, there are no small details, so this image is enough. And the toy baby itself is so cute that it would be more correct to say “not enough, but definitely.” Just imagine how it will decorate the interior