- July 1, 2020
- Crafts
- Irina Kasabutskaya
Do you want to give a unique and original gift to yourself or your loved ones, but don’t know how? If you think that everything on store shelves is too banal and tasteless, then there is only one way out - to do something with your own hands. But here you are faced with a new task: what exactly to do? We have one option for you!
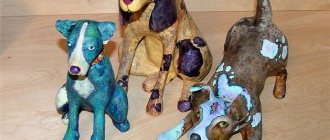
You can make your own crafts from plaster
It is not difficult, but exciting, you will gain new experience and surprise your loved ones.
You can make plaster figures with your own hands in various ways:
- Pour plaster into the prepared mold.
- Create a mold from an existing figurine and pour plaster into this mold.
- Apply plaster to the surface of objects, and then, after drying, carefully remove.
- Cover the object with plaster and leave it like that.
- Create molds from plaster with your own hands, for example, flower pots.
The last point mainly concerns organic objects, such as flowers or leaves, for example.
Methods for making a hand from plaster
There are two ways to make such an item:
- An impression is made using a rubber glove filled with plaster.
- A cast of your own hand.
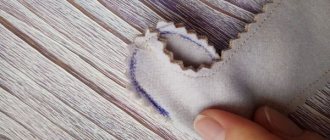
For each of these methods, it is worth remembering the most important thing - if possible, avoid the formation of air bubbles when filling the mold with plaster, or reduce their presence to a minimum. The fewer bubbles there are, the less time you will need to sand the product and eliminate imperfections.
The photo below shows an example of bad work. Where air bubbles have formed, unsightly cavities remain that cannot be corrected by sanding.
Let's consider both methods of making a plaster hand with your own hands.
Master class No. 1. Plaster and rubber glove
You will need:
- gypsum;
- container in which the plaster will be mixed;
- water;
- thick rubber glove;
- a five-liter water bottle or any other stand on which you can attach the glove;
- tight hair tie;
- stationery knife;
- scissors;
- acrylic paints;
- napkins with beautiful designs;
- acrylic clear varnish.
Now let's get to work! Let's figure out how to make a hand from plaster using a rubber glove.
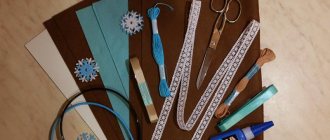
Preparation
Prepare the necessary material, accessories and tools in advance:
- Alginate mass for impressions;
- Gypsum;
- Stirrer (stirring stick), spoon and, if available, hand mixer;
- Water;
- Bucket or plastic container;
- Measuring cup, scales;
- Primer, protective varnish, sandpaper and acrylic paint for subsequent processing and finishing! (optional).
Prepare all the materials in advance because you will have very little time when you start mixing materials! The alginate mixture must be processed as soon as possible before setting time begins.
Manufacturing process step by step
- Step one. Prepare everything you need for work. Cut off the bottom of a five-liter bottle. Slide a rubber glove inside and secure it at the top of the neck with a hair tie. Make sure the glove is held securely.
- Step two. Pour plaster into a special bowl. Depending on the size of your glove, determine by eye how much plaster you need. Then add a little water and stir thoroughly. Ideally, the proportion of gypsum to water should be 6:4. After mixing, the gypsum should be similar in consistency to thick sour cream. You can stir the plaster with your hands, kneading it so that there are no lumps. Be sure to wear gloves before stirring, because the plaster hardens quickly and is very drying to the skin. Take care of your hands. You can use a whisk with a mixer or attach the whisk to a screwdriver. If you stir with your hands, remember: the plaster “lives” for ten minutes. So if you spend five minutes stirring it, you only have five minutes left to pour it into the mold.
- Step three. Pour plaster into the glove a little at a time. Check with your hand that the mixture is well distributed over the fingers of the glove. Take the bottle by the neck and shake it well, tapping it on the surface you are working on. Pour more plaster and shake, then add almost to the very top of the glove and shake again.
- Step four. Leave the plaster to dry. It usually takes 10-15 minutes for the plaster to harden, but it will still be better if you pour it in and leave it for a while while you go about your business.
- Step five. Remove the glove from the bottle, take the scissors and carefully cut it. But that is not all. Now the hand needs to be treated.
- Step six. Take a utility knife and carefully cut off the unsightly edges at the base of the plaster brush. You can also use a knife to scrape away any unevenness or roughness. You can use sandpaper instead of a knife. But be careful not to overdo it and grind your hand into dust. If you were unable to avoid air bubbles and there are still cavities on the plaster arm, you can try diluting a little more plaster and carefully covering up the imperfections.
- Step seven. Take acrylic paints. You can choose any color you like, but we still recommend taking white to start with. Cover the surface of the plaster hand with paint and wait for it to dry.
- Step eight. Take napkins with drawings and cut out the pictures you like with which you would like to decorate your plaster hand. Remove the white layer from them, there are usually two of them on napkins. Apply them to the plaster hand where you want, on the paint that is not yet completely dry, so that the picture sticks. Repeat as many times as you wish.
- Step nine. Cover your hand with clear acrylic varnish and leave to dry.
- Step ten. After completing all the previous nine steps, your product is ready.
Preparation of alginate mixture
Take a container and fill in the required volume of alginate. Then stir the mixture with a hand mixer (if you have one) and beat once with a beater.
Please note: small lumps in the wet mixture are not a problem.
Ratio:
- 20 ml water + 9 g alginate;
- 100 ml water + 45 g alginate;
- 1100 ml water + 500 g alginate.
Allow about 45 seconds for mixing and about 1 minute until you place the sample in the container.
The setting time of the alginate mass depends on the temperature of the water used . Warm water gives the alginate a shorter setting time.
Now immerse the sample in the alginate mixture without touching the edges of the container. When the mass becomes hard (rubber-like, elastic) and no longer sticky, carefully lift/pull the sample out of the frozen mass.
Master class No. 2. Your hands and plaster
To make a realistic plaster hand with your own hands, follow the steps from tutorial No. 2.
You will need:
- gypsum;
- alginate powder;
- container in which the plaster will be mixed;
- a container in which the alginate powder will be mixed;
- water;
- oil;
- stationery knife.
Let's look at the process of creating the plaster hand itself, without touching on the coloring process afterwards. You may not decorate such a hand with anything at all, leaving it looking like part of an ancient Greek sculpture. Or you can paint it in skin color to give the plaster hand maximum realism.
Why is this so popular?
Couples in love use 3D impressions of their intertwined hands to capture life's important moments. Often such compositions are timed to coincide with the day of engagement or wedding.
Young parents make impressions of their babies' hands to remember what they looked like as babies/children. Often such casts are elegantly decorated and given to relatives. And in some families there is even a tradition: on each baby’s birthday, another cast of his hands and feet is made. As a result, a whole collection of “sculptures” appears, clearly showing how the child grew from year to year.
Connoisseurs of non-standard solutions in the interior make casts of their own hands to make them part of the decor. Such an element of the composition can be used, for example, as an elegant solution for storing rings.
What is “alginate powder for impressions”
The use of this powder can most often be seen in dentistry. Using alginate, dentists make impressions to model dental prostheses, as well as to clarify the patient’s bite.
The powder sets quickly. Its “lifetime” is about fifteen minutes. So from the moment the water touches the powder, you don't have much time to stir it and then have time to stick your hand in there to create an impression.
Alginate holds its shape well, so it is often used for making impressions not only in dentistry. You can dip your hand into the alginate only after you have mixed the substance with water until it becomes thick sour cream. It will turn pink and change to yellow as it hardens.
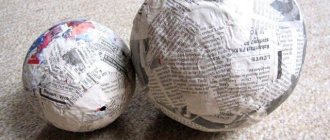
Base for plaster mask
To make a plaster cast, you first need to make a papier-mâché base.
What you will need:
- paper towels;
- Vaseline or any fatty cream;
- brush;
- PVA;
- clean container.
For the master class, it is advisable to have one more person present, since making a cast of your own face may not seem very convenient to someone. In addition, before taking an impression you need to take small precautions:
- cover the eye and eyebrow area with tissue paper;
- It is best to hide the hair under a rubber cap or bag;
- insert cardboard or paper tubes into the nostrils to facilitate breathing.
What do we have to do:
- Apply Vaseline or cream to your face. It is better to make the layer thick, especially in the eye area and along the contour of the hair, so that the impression can be easily removed.
- Pour some glue into the container. Tear the towels into pieces and soak them well with glue.
- Cover the entire face evenly with paper.
- It is important to be careful in the eye and nose area. Do not press on the eyelids so that the glue does not penetrate into the eyes. The same goes for the nose.
- To make the papier-mâché base more reliable, you can apply a small layer of glue with a brush.
- Now you can dry the mask with a hairdryer. It is important to agree in advance with your assistant on the symbols in case the air from the hair dryer is too hot.
- When it hardens a little, you can carefully remove the mask and leave it to dry until it becomes plastic.
This completes the making of the base cast.
How to make a realistic hand from plaster
Step one. Preparation of materials
The container in which you need to stir the alginate should be of such a size that your hand fits into it without touching the walls. This could be an unnecessary plastic bucket or an unnecessary water bottle with the top cut off.
Also prepare a container for plaster and the water with which you will dilute it in advance.
Step two. Preparation of alginate. Creating a mold for an impression
Pour 500 grams of alginate powder into the prepared container. The powder should be diluted with water in a 1:1 ratio. Pour in the water gradually, stirring the substance to prevent the formation of air bubbles.
When the alginate is ready, insert your hand into the substance in the position that you want to make the impression in the future.
And now all we have to do is wait. Sit still for 15 minutes, and after the time has elapsed, begin to slightly move the brush and gently pull it out of the container with the substance.
The mold for the impression is ready.
Step three. Working with plaster. Making a hand from plaster with your own hands
Thoroughly mix the plaster with water until it reaches the consistency of thick sour cream. Make sure it doesn't form lumps.
Pour some plaster into the impression mold.
Take the container with alginate in your hands and twist it so that the plaster is evenly distributed throughout the mold. This is necessary to ensure that there are no air bubbles in it, and therefore, there are no flaws in the product.
After this, fill the mold completely with plaster and leave it to harden for 10-30 minutes.
Step four. Removing the impression
When the product hardens, it is necessary to remove it. If you used a bucket, you can take a knife and carefully run it along the sides of the container. Then the frozen alginate will be easier to remove. Or, if you used a water bottle and don't mind ruining it, just cut it with scissors.
Hardened alginate breaks easily. Carefully separate the alginate from the plaster hand so as not to damage the product.
After this stage, your cast is ready.
Ready-made compositions: take and stir
There is more than one known recipe for a plaster mask. Janssen Thermo Face Mask is an anti-aging treatment. It is carried out twice a week for a month. You will need to dilute the entire contents of the bag with water to the desired consistency and mix well. Quickly apply to the skin, without touching the skin near the lips and eyes, and leave for a third of an hour until it hardens. We start removing from the chin, and wash off the residue with tonic.
The modeling composition Biomatrix will improve the tone of the face, provide lifting, and remove the tired look. For the procedure to have a greater effect, you will need to purchase ampoules with a special serum. Place the plaster on a gauze base. Prepare as usual, mixing with water. Then we apply the serum to the skin, and put gauze and plaster on top. Leave the composition of the cosmetic face mask for half an hour.
After the chocolate mask, regeneration will improve, and the skin will be cleansed, nourished and moisturized. To prepare, mix one hundred grams of water with two hundred grams of gypsum powder with cocoa in the composition. Apply moisturizing cream to your face and put gauze on top. Spread the composition in a thick layer with a spatula. The mass will harden in a third of an hour, and will be removed in one piece.
The pink Alg Mask contains zinc oxide and talc. It will dry out inflammation and correct the shape of the face. We apply the concentrated preparation from ampoules to the skin, gauze is laid out on top of it. We dilute eighty-five grams of powder with water to the consistency of a paste, put it on gauze and distribute it over the face and neck. Leave the cosmetic face mask on for a third of an hour and remove when it has completely hardened.
Plaster masks should not be used for rosacea and rosacea, during infectious diseases, or for claustrophobia. In case of individual intolerance to the components and high blood pressure, the procedure is contraindicated. You should not do it during pregnancy either.
And with cosmetic procedures, plaster cosmetic face masks will ensure the preservation of a young and fresh appearance, relieve serious skin problems and provide a well-groomed appearance.