Crafts are a very exciting journey into a country called Fantasy. Each kid has his own view of creativity. It is important to support him and help in his endeavors. You can do crafts both at home with your parents and in kindergarten with a teacher. When making paper bears, various techniques are used (folding, origami, appliqué, gluing) and additional steps, for example, to construct a craft, sometimes you need to print a stencil taken from the Internet. The simplest and most popular instructions for creating paper bears are collected in this article.
Why is it useful for children to make crafts?
Bears made from paper
Children love to learn new things and create. One of the favorite activities of all children is doing crafts. This exciting activity will bring your child a lot of positive emotions. When doing crafts, children get acquainted with different materials and things. It broadens their horizons. Crafts develop hand motor skills, creativity and sense of taste.
Pattern of a deer toy
Below is a diagram according to which you can sew a three-dimensional figurine of a character, but this is a more complicated option. It is best performed by a person with experience. The first diagram shows a template. You can use it to decorate a wreath or simply make a souvenir of this shape.
To create such a voluminous toy, you will need to cut out the following elements:
- ears - 4 pieces (two pieces are brown, two are pink);
- horns - 4 pieces (a pair per horn);
- head - 2 parts;
- nose - 1 piece.
All elements are sewn inside out. Be sure to leave a hole for filling. Before turning, it is worth making neat cuts in places of complex shape transitions, so that later the parts have a smooth surface. If you don’t want to complicate the work, felt is easy to sew on the front side (even if we are talking about a complex product), but the seams need to be neat and even.
The following pattern allows you to create a full-fledged toy in a simple way. The head can be made flat or sewn from two identical parts. The torso is also performed in the same way.
So, you have seen how a felt deer is made. The soft toy pattern, applique template and any of the presented options deserve attention and can be used as an idea for creating a New Year's gift. Choose, sew, craft. Create beautiful souvenirs with your own hands.
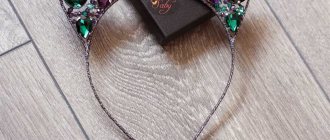
This New Year I decided to stock up on funny headbands with deer antlers - for myself and my guests, as well as for gifts. They are not at all difficult to make, but at the same time exciting, filling the entire creation process with New Year's magic and the expectation of a miracle, which is so much lacking in Rostov's rainy, not at all New Year's weather.
So, to create our horns you will need:
Headbands: thin, without decoration. They can be found, for example, in the central market, for 20-30 rubles apiece. Or take inexpensive headbands from Centro and remove excess decor from them;
Satin ribbons, not very narrow, but not too wide. About a centimeter wide. We will need them for winding the rims. Such ribbons can be found everywhere: in fabric and accessories stores, in art supplies: in any color to suit every taste;
Felt is the most important component of decoration. I bought the cheapest thin felt, but a fairly large piece, from the Leonardo craft store. It can also be found in stores such as “Ton of Beads”, “Needlewoman” in the central market and in various fabric stores;
Thread and needle. I used thick floss threads. But you can use any available ones;
Glue, cardboard (regular white for children's creativity) and scissors
Various beads, half-beads, rhinestones, studs: whatever your heart desires can be found in a box of sewing supplies;
I also used lace and outlines on the fabric. In general, you can use any material that comes to hand, the main thing is that you like it :) Well, the main thing we need is a creative spirit, good mood, imagination and a bit of free time :)
Let's brew ourselves a big mug of tea, with ginger or sea buckthorn. Or we’ll make cocoa with marshmallows - the most Christmas drink and start :) First, we’ll process the rim, wrapping it tightly with a satin ribbon.
We fix the tape with glue on the back side of the rim, at the bottom, wrap it a couple of times and begin to wrap the rim, placing the tape diagonally, slightly overlapping, as in the photo. We reach the center of the rim, fix it with glue and cut it off. Next, repeat the same steps on the other side. The seam in the center of the headband will be hidden under the horns.
Then we sew the edges of the horns with any simple seam and begin to decorate the product using threads, beads, rhinestones, lace and any other interesting materials :)
You can also use paints and outlines on fabric to create designs, patterns and patterns.
How to make a paper bear using a template
Before doing the craft, you can talk to your child about bears. Tell that every bear has a den in which he sleeps and spends the winter, and in the spring, in March, he wakes up. The bear is very dexterous. Despite its heavy weight, it can climb a tree if necessary. It’s worth remembering with your child the poem “Bear Bear,” in which a pine cone fell on the bear. Such a preparatory conversation will help the child remember everything related to bears.
Before you make this paper bear, you need to prepare the necessary materials and tools: paper of four colors (white, yellow, brown, pink), as well as a compass, scissors, a black felt-tip pen and glue.
Required Tools
Step-by-step instructions for making a bear craft with your own hands:
- Fold the brown sheet in half, fold up.
- Draw a circle so that it does not fit completely on the sheet.
- Complete the bottom of the sheet, marking the contours of the future teddy bear.
- Using scissors, cut along the contour of the circle.
- Glue the two finished parts together.
- Cut out a face from brown paper. To do this, you need to draw a small circle.
- Take brown and pink paper to create the bear's ears. Parts of two colors are glued together.
- The bear's ears are glued to the head.
- Cut an oval out of yellow paper and glue it to the face.
- Cut out the eyes from white paper and paint the insides black using a felt-tip pen.
- Also decorate the nose and mouth with a black felt-tip pen.
- Glue the body to the muzzle.
- Cut out a small tail from brown paper and glue it too.
- At the end, bend the legs to make the craft stable.
You might be interested in How to make a glove doll with your own hands
Paper bear craft
Additional information. If your child is still small, you can use colored paper to explore colors.
Teddy Bear
I present to your attention a step-by-step process for making a moving paper toy “Teddy Bear”. The master class will be useful for primary school teachers, kindergarten teachers, and young parents who have a small child. The baby will find it interesting because the toy’s legs move with the help of a thread. In addition, mothers and fathers can make similar toys themselves and introduce their children to wild and domestic animals in a playful way. Also, older children, following step by step and relying on photographic material, can make a bear cub with their own hands and give it to their younger friends.
For manufacturing you will need the following material:
- sheets of colored paper in blue, red and orange; - white cardboard (1 sheet); - PVA glue or pencil; - scissors; - a roll of wire with a diameter of 0.45 mm; - a simple pencil; - an awl; - a stand for making holes with an awl in the places where the parts of the teddy bear are attached;— a spool of thread;— a black thin marker for drawing the eyes and nose of the teddy bear (can be replaced with black paper);— a toy template – a teddy bear: the base of the toy, the back and front legs (elements of movement), 12 washers PC.
Description of work
Step No. 1. Using a pre-prepared teddy bear template, you need to cut out “clothes” from colored paper to make the toy bright. To do this, mark out the decoration elements for the teddy bear on colored paper. From orange paper - a teddy bear's nose, a blouse (upper body), from blue paper - a tie and panties (lower body).
Step No. 2. Now we cut out all the parts with scissors.
Step No. 3. Using a glue stick, glue the orange parts onto the teddy bear (nose, blouse).
Step No. 4. Then glue the blue parts in the same way: pants, tie, draw the eyes with a black marker and outline the outline of the nose.
Step No. 5. Take an awl and a stand to make holes in the parts - the legs of the toy and on the main part of the teddy bear.
Bear made of colored accordion paper
To make such a teddy bear, you need:
- cardboard (brown and orange),
- pencil,
- compass,
- scissors,
- glue,
- felt-tip pen.
Execution order:
- First, the torso is created. To do this, you need to cut two brown strips from an A4 sheet two centimeters wide.
- Next, one strip must be glued to the end of the other to form a corner.
- To make an accordion, you need to apply one side of the strip one after another towards the center. When the accordion is finished, the end needs to be sealed.
- Next comes drawing with a simple pencil, and then cutting out the legs, which should be double.
- Bear leg blanks are glued to one and the other end of the accordion.
- To create the head, you need to draw a circle on brown paper with a compass.
- A smaller circle will go on the ears.
- The muzzle should be made yellow.
- Next, all the blanks are assembled together.
- The features of the muzzle are drawn in - arches on the ears, a nose with a smile, eyes.
- The head is glued to the body.
Bear made of colored accordion paper
Important! The child may not know what an accordion is. In this case, you need to first introduce him to the meaning of this word.
You will need:
- Simple pencil
- Packaging corrugated cardboard with a thickness of at least 2 mm
- Scissors or utility knife
- Paints, colored pencils, markers, pastels (optional)
The simplest paper bears for kindergarten
For creativity in kindergarten, it is better to use the simplest paper crafts. Several options for creating paper bears are described below.
Paper bear
To create a bear from a paper rectangle you will need:
- paper (brown, white, yellow);
- scissors;
- felt-tip pen;
- glue.
Step-by-step instructions on how to make a paper bear:
- You need to draw and cut out a rectangle along the entire length of the sheet, the width of which will be 9 cm.
- Next you need to fold it in half.
- The part that is at the top is rounded, and the part at the bottom is bent.
- Apply glue to the bottom side and glue the same second piece to the first.
- Then you need to create the bear's ears.
- Next, you need to cut out circles from brown and yellow paper, some smaller, others larger. And glue yellow circles onto the brown layer.
- The ears are glued to the rectangle.
- Next, you need to take brown paper and draw paws. They need to be cut out and glued to the rectangle.
- “Claws” are drawn on the sides.
- To make the lower legs, you need to cut out circles. They are glued to the bottom of the rectangle and painted with a yellow felt-tip pen.
- To create a face, you need to draw circles, cut and paint them, and then stick them on a rectangular blank.
- The next part of the workpiece is made of yellow color; only the nose and mouth are completed.
On a note! This bear can be made from cardboard. If you make it larger and adjust it a little, it can become a template for a New Year's mask.
Paper bear
Teddy bear on a stand
Making such a teddy bear is very simple. To do this you need to prepare:
- glue;
- toilet paper roll;
- brown colored paper;
- black felt-tip pen.
You might be interested in How to crochet a teddy bear
How to complete the craft:
- To start, take a toilet paper roll. This will be the base of the bear cub.
- Next, cut out four small strips of brown paper. These will be the bear's paws. They are glued to the body, that is, to the toilet paper roll.
- To make the head, you need to cut out a circle with ears and glue it to the top of the sleeve.
- All that remains is to add some detail to the bear. To do this, you need to take a black felt-tip pen and draw claws on the paws, as well as a muzzle with eyes and a nose.
Teddy bear on a stand
Teddy bear made from scrap paper
This craft is based on an unusual type of paper – scrap paper. Step-by-step instruction:
- Take paper of any color you like and cut out the base of the bear.
- From pink paper, cut out a circle - the muzzle of a bear cub, as well as a red tongue and a black nose.
- For the eyes you need to take white and black paper.
- The decoration of the bear will be a yellow butterfly cut from the same paper.
Teddy bear made from scrap paper
Family of three bears
To make a family craft, you need:
- Take brown paper and cut out three trapezoids.
- Roll them into a cone, securing the edges with paper glue.
- Cut out the cubs' paws.
- Draw and cut out a muzzle with ears along the contour. The eyes will be unusual, flower-shaped. To do this, draw a flower resembling a daisy on white paper. A blue circle slightly smaller than the flower will be its core.
- Next, connect these two parts with glue and glue them to the face of each teddy bear.
- For the nose, cut out a circle from dark brown paper, as well as two white stripes for the antennae. Connect the two parts and glue.
- To distinguish the cubs, you need to decorate them. Dad needs to cut out a tie from white paper, mom needs an apron from beautiful paper for decoration, and the child needs a small apron, also from beautiful paper.
Family of 3 bears
Please note! When gluing parts, you need to apply glue in small portions so that it does not spread.
Application: different types
This type of creative work can be varied, since the material can be used not only colored paper, but also other materials that are glued to the outlined outline of the future bear:
- cereals;
- small pebbles;
- wool scraps;
- pieces of fabric;
- dry leaves, etc.
The easiest way to start is with the classic paper appliqué technique.
Features of working with paper
Before starting work, you should invite your child to come up with a plot for future work. A good theme for a little artist could be the tale of the three bears.
The kid can transfer one or another plot of a fairy tale onto a piece of paper, making the surroundings of a bear's house from the inside or outside.
After the plot is chosen, parents need to draw a sketch of the future application with a simple pencil, according to which it will be easier for the child to stick on the elements of the drawing for the three bears craft.
The easiest way is to make an applique from colored paper, choosing suitable colors for each character in the picture.
Parents should also draw on colored paper all the elements of the future picture, which then the baby, with the help of the mother, will have to cut out and paste in the right place on a cardboard base.
Even if the mother takes on half the work, drawing a sketch, elements of the applique, which she then cuts out herself, the child will greatly benefit from such an activity, choosing the right place to glue the desired element in its place.
You can complicate the work process by inviting your child, after gluing, to color the work with a pencil or paints, drawing the eyes, nose and mouth of all the bears, dishes with food on the table, flowers and ruffles on the beds, as well as other decorative elements.
You can also use volumetric decor in the form of beads, buttons and other types of volumetric decor that can be found in any home.
Polar bear - paper craft
In nature, polar bears live in the north. But you can create them yourself using origami techniques. The modular way of working will help with this. To create this craft, you only need white paper and a felt-tip pen.
Step-by-step instructions:
- Take a piece of paper and bend it in half, on both sides.
- A revolution is taking place.
- You need to fold the sheet diagonally.
- Then you need to take two opposite sides and fold them inward. It turns out to be a triangle with a double layer.
- The first top layer is folded into a diamond shape.
- Next you need to turn it over.
- One part of the triangle must be folded towards the other.
- Next, the paws are formed. You need to lift one side up and then to the side. Then repeat this on the other side. Both legs are bent into the middle of the workpiece.
- The top corner points down. This will be the head.
- The paws need to be spread apart to give shape.
- You need to form a couple of folds in the bottom corner.
- Using a felt-tip pen, draw the features of the bear - eyes and nose.
You might be interested in: Making your own Snowball doll
Polar bear origami made of paper
Felt mask
Felt masks are distinguished by their softness and durability.
from paper counterparts. Such products are not only pleasant to the touch, but will also last for many years, so the accessory can be used repeatedly. To make such an accessory with your own hands, you do not need to have special skills or spend a lot of time.
Bear mask
The next master class will help you make a bear mask on your head in a short time. This mask is perfect for a carnival, a cute accessory will perfectly complement the costume:
- Transfer the proposed patterns onto paper (or directly onto a sheet of felt), and then cut out all the details.
- As shown in the picture, cover the holes with black felt, highlighting the eyes. Don't forget to stick on the nose and decorate the bear's ears.
- Using glue, connect the edges of all the darts on the mask. To make them more firmly attached to each other, secure the parts with ordinary office clips.
- Take a piece of wire and attach them to the backs of your ears. Mask the wire with a piece of brown felt, and then carefully glue the ears to the accessory itself. Your DIY bear mask is ready!
Mouse mask
To make such an accessory for a festive costume, use the materials from the following master class.
Print Thank you, great lesson +6
In addition to the costumes of bunnies and foxes, you can also see a bear at the children's party. Such a character can often be seen in fairy tales and cartoons. Therefore, if the child chose a bear as his costume, make a mask with him from paper and other materials.
- Half cardboard brown, yellow, black
- Black waxed cord
- Stationery glue
- Scissors
- Pencil
Volumetric bear according to the scheme
This craft is made using the origami technique. The procedure is as follows:
- Two corners of the paper blank, facing each other, must be folded towards the center.
- The side edges are folded towards the center.
- Then you need to fold the side corners towards the center.
- Next, a revolution is made.
- The bottom corner must be folded in the opposite direction.
- Next you need to pull out a couple of triangles that are inside.
- Then you need to open and fold the left corner.
- Pockets also need to be opened.
- On the left side you need to bend the corner back.
- It is necessary to flatten and bend the edge that is located below.
- Next, a couple of lines are marked.
- The triangle of the muzzle must be raised.
- Then bend a couple of triangles on the left side.
- Fold in the bias edge.
- Next, you need to push the muzzle onto the body and bend the right side.
- The triangle that is at the back (where the back is) must be inserted into the workpiece, and a couple of triangles should be folded at the location of the chest.
- The lower part of the triangle must be inserted in the same way.
- The triangle is folded into the resulting pocket.
- Next comes opening and shaping the ears.
- Then you need to adjust the head.
- A triangle that is curved must be inside.
- The ears open up so that they become voluminous.
- Then the legs are created.
Volumetric bear according to the scheme
cotton wool
A creative solution for crafts is to make a bear out of cotton wool. It is also convenient to use cotton pads. They have the same sizes, so it will be very convenient to work with them.
Additionally you will need:
- Sheet of cardboard,
- Glue,
- Scissors and markers.
The process of creating crafts is very exciting:
- The base will be a sheet of cardboard. Here you need to immediately think about how the main elements will be located.
- In the central part there will be the main character - a bear.
- It is proposed to make it from two cotton pads. One of them will be the body. The second disk is the head. It should be further reduced by cutting off the excess so that the bear turns out harmonious.
- Paws, tail, and ears are also cut out of cotton wool. The parts of the bear are assembled together and glued to the base.
- You can make snowdrifts from cotton pads. To do this, they are cut into two equal parts. These parts are glued from below.
- When the main elements are in place, you can add some additions to make the bear craft more interesting; small snowflakes are cut out of paper and glued.
- If you wish, you can draw a sun or something else at your discretion.
Cardboard bears
Crafts made from cardboard are very inexpensive, since there is no need for very expensive materials. These bears can be used, for example, in a puppet theater, as they are given “liveness” by their legs. For the craft you need:
- white cardboard;
- scissors;
- glue;
- purchased eyes for toys;
- pompom for nose;
- felt-tip pen.
Important! It is necessary to help the child so that he does not cut himself, because this is painstaking work and it requires accuracy.
Procedure:
- Three circles are drawn, from large to small. One circle will be used for the head, one for the body and one for the ears of the bear.
- Next they are glued, logically arranged.
- The eyes and nose are glued on.
- A smile is drawn.
- At the bottom of the body, a hole punch or scissors is used to make slits, that is, two circles. These will be the legs. If you stick two fingers into them, you get a bear that can walk.
On a note! If you plan to stage the fairy tale “The Three Bears” in a homemade puppet theater, you need to make 2 more of the same larger bears - for mom and dad.
Cardboard bears
You can create many different bears from paper. These could be the crafts presented above, or some other models. When creating them together with your child, it is important to remember his safety and discuss such moments before work. And then the lesson will be exciting, interesting and safe.
Koala in modular technology
This funny animal is endemic to Australia and most closely resembles a teddy bear. However, it belongs to the two-incisor marsupials, being the closest relative of the kangaroo and wombat. The koala is called “bear” in English-speaking countries, which sometimes leads to confusion in concepts.
The appearance of this amazing creature is deceiving. As soon as you see him, you want to pick him up and treat him like a cute toy. But the koala is unlikely to be happy with such contact - by nature it is aggressive, irritable and, according to scientists, is not distinguished by high intelligence. That is, he is unable to adequately respond to a person and establish social connections with him. The reason for this behavior is the low calorie content of the animals' food - they eat exclusively eucalyptus leaves, and therefore, in order to save energy, they slow down all life processes, both motor and mental. Experiments have shown that koalas are absolutely helpless outside their habitat. They are not able to recognize their only delicacy - leaves, if they are not on a tree, but, for example, lie on a horizontal surface: a table or chair. In a room full of eucalyptus, a koala may well die of hunger, never realizing that food is very close, only it looks a little different.
Considering these features, it is better to leave living “teddy bears” where they have lived from time immemorial, and make an origami toy for yourself from three-dimensional modules. The model is simple and will not take much time, and the result will be impressive:
Tools and materials
To make a soft bear yourself, you need to prepare fairly simple and affordable materials for work. Many of them can be found in home bins.
Fabric selection
Inexperienced craftsmen are recommended to start working with simple non-bulk materials. These include the following types of fabrics:
- fleece;
- cotton;
- felt;
- velours.
Sewing a fluffy toy is a more complex process. Fabrics with piles of varying lengths fall off when cutting and stitching. They require some special skills and knowledge. To create a fluffy bear use:
- natural and artificial fur;
- mohair;
- plush;
- velvet;
- suede.
The required amount of fabric depends on the size of the toy. The first soft toys should be made of medium size (25-30 cm). Miniature figures are the hardest to sew.
Types of filler
After selecting the fabric, prepare the material for stuffing the toy. Most often they use synthetic winterizer or holofiber. You can also use cotton wool, sliver (non-woven wool), and fabric scraps. To develop fine motor skills, it is useful for children to play with toys that are filled with small bulk material. You can use special granules, cereals, sawdust, and coarse sea salt as it. Some craftsmen sew bags of lavender into bears, which helps babies fall asleep soundly and peacefully in the company of a soft friend.
Sewing and decoration
In addition to the basic materials - fabric and filling - it is necessary to prepare threads for sewing and embroidery . The parts are connected using cotton or silk threads. For embroidering small elements, floss thread is used. When cutting fabric, especially loose fabric, you should use very sharp scissors.
To decorate soft toys, beads, beads, and ribbons are used. Sometimes bears are dressed up in hand-sewn clothes. To make it, you can use various scraps of fabric or unused clothing.