Hello!
At first I was very surprised when I found out that there are now cat ears
They are worn not only by cats and cats, but also by many beautiful girls, girls and women. And even Hollywood stars! But then I thought that this was not surprising. After all, we cats have simply charming ears!
But then I thought that this was not surprising. After all, we cats have simply charming ears.
If you want to look fashionable and cool and feel like a star, and also if you are interested in the question of how to make cat ears
with your own hands
, then quickly click on the “next” button.
Of course, in stores you can find a huge number of all kinds of hats, scarves and hoods with ears. The more original and elegant the product, the more expensive it is.
But to be honest, making your own cat ears is quite easy.
Option #1. Making cat ears for a hat.
So, let's say you have a ready-made hat, but you would like to change it a little and attach cat ears to it.
To begin, select fabric or fur from the store that is in harmony with the product you already have.
You will also need plain or woolen threads of a suitable color and thickness.
We start by drawing cat ears
on a sheet of cardboard. As you already know, cats' ears have the shape of a triangle with rounded ends. We cut out “patterns” from cardboard and sew them “on the spine” to the hat. And go to the mirror to make sure that you have made the ears of the appropriate shape and size. A sense of proportion and form is very important here. If you overdo it and mess up the form, then you are guaranteed a “Cheburashka bow”.
We cut out the final version of the ears from thick cardboard. To prevent the cardboard ears from getting wet when washing the hat, I advise you to cover them with cellophane.
You can cut ears out of a plastic bottle and then melt the sharp edges over a candle.
We cover the ears with fabric or fur. You can cut out the parts from fabric, and then sew them “over the edge” with beautiful threads, not forgetting to first insert a dense base inside, which we already talked about in the previous step.
Sew the ears to the hat in the place where you like it most. And we wear the “cat” hat with great pleasure.
Yes, I almost forgot: you can wash such a hat either by hand or in a special bag for washing clothes, setting the machine to the “delicate washing mode”.
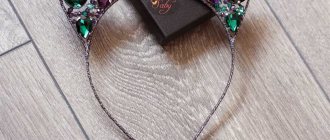
Option #2. Making a cat ear headband
.
We buy a ready-made plastic headband in the store. Be sure to pay attention that it is not too small, otherwise you will feel extremely uncomfortable in it. And no amount of creativity will help here. It is even better to choose a slightly larger rim, since it will shrink as a result of wrapping with ribbons.
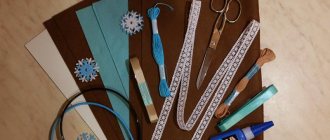
We purchase or look for pieces of lace, beautiful fabric or fur in the “bins” of our home. It all depends on what style you chose.
You will also need to find a good thick wire, a satin ribbon of medium thickness and transparent moment glue, or a “liquid gun” (the second option is more reliable).
We wrap the headband with a satin ribbon (or cover it with any beautiful fabric). Along the edges and in the middle of the rim, be sure to fix the tape with glue or a gun.
We cut out patterns for cat ears from cardboard. Then we attach them to the fabric or lace using pins and trace the outline. That's it, cut out 2 parts of the right ear and two of the left.
We take out the wire and bend it to the size of the ears, taking into account the seam allowance.
We sew the ears together, immediately sewing wire into the seams.
We sew the ears to the headband and decorate them to taste: with beads, rhinestones or beads.
Taking pictures wearing a headband with cat ears
of our own production, we post our gorgeous photos on pages on social networks so that all friends and not
completely friends “died or at least burst with envy.”
Congratulations on your wonderful purring new thing!
Still, it’s great to know how to make cat ears
with your own hands
and
how to make a “cat ears” headband.
Mur-mur, your black scientist cat Jose Careras on la-murmur.ru.
PS: Do you have your own ideas on this matter? Maybe you have better ideas? Be sure to share them in the comments to this article. This will be useful and interesting for all fashionistas and cat lovers.
DIY cat ears are a very bright and interesting addition to the carnival image of a cat. In childhood, almost all children love to transform into various animals, but it is the image of a cat that is most in demand and loved. Therefore, if your child wants to become this mysterious animal for the New Year or just came up with a fantastic role-playing game with the image of a cat, give him cat ears on a headband or on an elastic bandage, we are sure that the child will be absolutely delighted.
How to make cat ears with your own hands
Using the same principle, you can make cat ears on a headband, but we didn’t have any on hand and decided to make a master class on making cat ears on an elastic bandage. And as it turned out, on the headband the ears do not fly off and stay on more securely; most likely, this would be difficult to achieve on a hoop.
To sew cat ears you need the following:
- made of paper in natural size;
- elastic fabric of the main color (black is used in MK);
- small pieces of fabric for the inside of the ears of a different color (white in MK)
- thread, needle and scissors.
And now everything step by step with photos
We cut out the ears from paper and transfer them to fabric using chalk or a bar of soap.
We make 4 large blanks from black fabric and 2 smaller ones from white.
We sew the white blanks to the black ones and carefully sew the parts on the outside.
We stuff them with padding polyester or cotton wool.
We make a bandage of the desired width that will hold the ears. The main thing is to make room for seams and correctly calculate the length of the bandage so that it does not squeeze the child’s head and does not fall off. You can also use a headband covered with the same fabric.
Sew the ears to the headband and...
... sew the bandage.
So, together with you, we sewed cat ears for the child. We can enjoy the result and admire our cute cat.
The child fully enters the character