Peculiarities
Many people consider boxes to be trinkets that simply take up space. They're actually quite functional.
They are often used to decorate the interior. Moreover, if the style requires a large number of small details, you simply cannot do without boxes. In order for such decorations to be appropriate, you need to carefully consider their design.
They help to maintain order and properly organize the storage of various things. The practicality of such a container is determined by its strength, size and shape.
The fruits of your labor can be safely used as a gift. Moreover, such a gift will appeal to both a very young girl and a fairly adult woman. Moreover, the box, depending on its design and purpose, can be presented to a man. Sometimes people accumulate a lot of little things that simply need to be placed in suitable boxes.
Beginners who are faced with making boxes for the first time should pay attention to cardboard. It is no coincidence that this material is popular. Among the advantages of cardboard are:
- environmental friendliness;
- ease of processing;
- low cost;
- availability.
Cardboard can be found in any office supply store. In addition, it can be safely reused. There are many ways to decorate a finished cardboard product; you can choose any that suits your strengths and abilities.
Lockers
Not everyone has the opportunity to purchase expensive sewing thread organizer cabinets, but adding compartments inside the cabinets you already have is actually not that difficult. Moreover, it is absolutely not necessary to use wood; partitions can also be made from cardboard.
Cabinet doors can easily be turned into a convenient organizer, but for this you will have to work with wood.
Measure your door and determine the position of the slats: be extremely careful as your door needs to close tightly. Mark the position of the holes on the slats.
Drill holes using a drill and drive in pegs.
Paint it the color you want and glue it to the doors.
Choice of shape and size
When making boxes, it is important to carry out all the steps in stages - this way the work will progress more smoothly and will not require too much time. The first step is to determine the shape and size. These parameters depend on the amount of material, location and purpose. In addition, the degree of difficulty must correspond to the skill of the manufacturer. , simpler options are better
- square;
- rectangular.
Next, you can try to make a round box or in the shape of a polyhedron. These varieties are the most common and traditional.
Since cardboard cuts, bends and crumples quite well, you can find more complex products in the form of a heart, shell, suitcase, watch and even a piano. In the same vein, you can make a hiding place, disguised in the form of a book or the base of any figurine.
In addition, the box may have:
- concave or curved sides, cover;
- legs, handles, hinges, locks and other fittings;
- drawers.
Decorative boxes are designed to store:
- money;
- documents and photographs;
- jewelry and costume jewelry;
- business cards and stationery;
- hours and much more.
For people who deal with a lot of small parts, organizers with internal compartments are necessary. Boxes for handicrafts or creativity are made using the same principle.
Boxes can be either very tiny - up to 5-7 cm, or large - up to 20 cm or more. Small ones can be placed on small surfaces - open shelves, bedside tables, tables. Volumetric ones take their place in the closet. In principle, their parameters are limited by the size of the cardboard sheets.
In addition, it is worth considering that the walls and bottom of wide organizers must be strengthened, since the cardboard will sag. And decorating small boxes is much more convenient and less tedious.
Bobbins
It’s very simple, but I still don’t know where to find such a ring. Can be replaced with a carbine
The transparent box allows you to see the entire arsenal of bobbins
I recently bought a box like this through Aliexpress. The set also included 25 different colored bobbins. They fit my Janome machine perfectly, I don’t see any difference with the original branded ones. The reviews say that the owners of the Brother machine were also satisfied with the purchase.
Of course, I wrote that the minimum sewing kit should include 3-5 bobbins. But I wind a full bobbin of every thread I have - to save time.
To prevent the threads from the bobbins from getting tangled, put small elastic bands on them.
Did you also notice that these are ice molds?
Each bobbin will have its own place in the medicine boxes
I really liked this idea: especially when you have 50 shades of white thread in your arsenal. But it seems that then the skeins will take up too much space.
Necessary tools for creating a casket
Before you start making the casket, you need to prepare the basic tools. Below is a list of what must be at hand, since sometimes during the work there is no time to be distracted by searching for available tools.
- Scissors
- Paper
- Clear adhesive tape
- Glue
- Ruler
- Pencil
- Eraser
- Penknife
Materials for decorating the chest:
- rhinestones,
- clothespins,
- laces,
- ice cream sticks,
- threads,
- postcards, etc.
Regarding the last point, you can look for materials for decoration after the casket is ready, since it will take some time for the glue to dry well.
Also, if necessary, you can add to the above list, because making crafts is a purely individual process and each person’s imagination works differently, so other improvised means can be added.
The most common materials for crafts
As for materials for creating a box, there are many options. It all depends on the ideas and available tools of the master. Below are the materials from which caskets are usually made, as well as master classes on the intricacies of making caskets from different materials. So, basically, boxes are made from:
- Cardboard
- Postcards
- Newspaper sticks
- Popsicle sticks
- Shoe box
- Plywood
- Matchboxes
Of course, the materials can be completely different, depending on what a person has at hand, but the above are the most common.
From cardboard
A heart-shaped small storage chest can be a wonderful gift for Valentine's Day or any other holiday. To make this craft, you need to prepare PVA glue, 3 sheets of colored cardboard, a ruler, a measuring tape, beads and paper flowers for decoration. On the cardboard you need to draw 2 hearts the size of the future box.
The heart intended to serve as a lid should be 1 mm larger. Then, using a centimeter ruler, you need to measure the perimeter of the heart, cut 2 strips of the required length with notches on one edge, with which they are glued to the bases. After the glue has dried, all that remains is to decorate the casket and the gift is ready!
From postcards
It’s not at all difficult to make a beautiful box if you have old postcards with beautiful drawings lying around at home. To make it, you only need scissors, sewing thread, 5-6 postcards, a needle, a ruler, and a pencil. First of all, you need to sew 4 postcards together, and then the cover is sewn separately on one side. After this, a box is made from thick cardboard, also by sewing the sides together and all sides are covered with fabric. The postcards sewn together need to be slightly bent and sewn to the cardboard frame. The lid is sewn on last.
From newspaper sticks
In addition to newspaper, pages of old books or glossy magazines are suitable for twisting “straws”. First, you need to cut the material used into strips about 5 cm wide. Then you need to take a knitting needle and wind a sheet on it diagonally. In this case, the tip of the sheet must be glued with glue. You should have about 18-24 sticks on hand.
The sticks are painted with paint according to the needleworker's taste, and time is given for the paint to dry. Then you need to take a piece of cardboard of the shape that the casket is supposed to be and glue the painted tubes to it. After this, the entire contour of the bottom is first braided with one longer stick and the remaining tubes are glued onto it until the desired height is reached.
When the box reaches the desired height, you can bend and trim the ends of the tubes. Then you can start making a lid for the casket by gluing a textile bow or other decor onto it.
From popsicle sticks
Another idea is to make a box using popsicle sticks. In this case, you need about 30 of them. You will also need hot glue, a little corrugated cardboard, acrylic paints of two colors, scissors, a ruler, a pencil and satin ribbons.
It will look interesting if you paint 14 sticks one color and 15 another. From corrugated cardboard you need to cut 2 rectangular fragments with parameters 5.5 by 7 cm, 2 semicircular fragments with parameters 7 by 3 cm, then all these pieces must be painted.
To assemble the bottom you will need 7 sticks. Cardboard sides are glued to the bottom in a vertical position. The other two sides are lined up with 6 sticks each and attached to the sides of the cardboard sides. The semicircular fragments are connected to each other with 10 sticks, thus completing the lid. Tape is glued to the ends, and the lid is attached with two tapes.
From shoe boxes
One of the easiest options to make a beautiful and useful box is to use a shoe box. To create a casket, just cover the box with fabric or colored paper.
If you need a smaller box, you can use a box of tea, milk, etc. as a basis.
In the case of a milk carton, it will be enough to tip it on its side, make a slot in the shape of the letter “C” on top and bend this piece of cardboard. This will be the lid. Then the box needs to be covered with a beautiful fabric, after which the lid and bottom should be covered with two satin ribbon ties.
Types of templates
There are many types of ready-made packaging box templates. They differ from each other not only in size, but also in shape. For example, you can package a gift in the shape of a flower or make a complex design in the form of origami.
Children will definitely be delighted with boxes of candy or carrots. And lovely women will be surprised to receive a gift in an incredible box, stylized as a dress or a diamond. Strict men will be delighted by the laconic beauty of square or round packaging.
From plywood
Another fairly simple way to create a casket at home is to make an object from plywood. The only difficulty that may arise in the first step is preparing the required size plywood bars.
If you take a lid and a bottom of 10x10 cm, then the sides should be 10x8 cm. The sides of the casket are glued together at an angle of 45 degrees. The sides are pre-cut properly. Then the bottom is glued. To secure the lid, you need to install hinges using self-tapping screws. It is very important to chamfer the hinges on one of the sides and on the lid of the box. The outer part of the resulting box is decorated based on the imagination of the master.
Step 4
I bend the cut circles in half, then again. I cut a hole in the center and notch one side.
From matchboxes
When making a chest from matchboxes, the craftsman expects some minor work. The crafter will need 10 boxes, thick cardboard, glue and various things for decoration: beautiful photos and fabrics for pasting, artificial flowers. First of all, you need to cut out a square frame from cardboard. Then you need to glue the matchboxes together. Usually they are glued together in 2 or 5 boxes, but the quantity can be absolutely any. The boxes in this case will serve as retractable chest of drawers.
The resulting chest of drawers must be glued to the frame so that the cardboard inserts are on all sides. The next step is decorating the box. You can use nails, small hooks, and decorative stones as handles for drawers.
In conclusion, it is worth noting that there are many options for making and decorating caskets at home.
The article provided listed the basic materials at hand and step-by-step instructions with the necessary actions for gluing the boxes. In addition to the above materials, boxes can be made from bamboo napkins, vinyl wallpaper, salt dough, sewer pipe, etc. There are many options and it all depends on the means at hand and the skill of the craftsman. Also, boxes can have unusual shapes and be decorated as much as your imagination and creativity allow.
Partition structure
To figure out how to make a plasterboard partition, let's turn to engineering reference materials. A simple single-layer wall has three main elements - a load-bearing metal frame, sheets of plasterboard and an inner layer of mineral insulating boards. The frame is made of a special metal profile with a section of 50x50 mm and 50x40 mm. Its cladding is made with sheets of plasterboard (gypsum plasterboard).
The question often arises as to which drywall is best for a partition. Professionals recommend using material with a thickness of 12.5 mm, since the new interior wall should be as durable as possible. Thinner sheets of 9.5 mm can be used for finishing main walls, but it is better not to use them as cladding when installing partitions.
The internal space of the partition is filled with mineral insulating material. It provides additional sound insulation between rooms and also serves to create a thermal barrier.
Once assembled, 1 m² of structure will weigh 28 kg, which is quite normal for such a wall. If there are additional reinforcing elements inside, provided for attaching furniture or plumbing fixtures to them, then the total mass of the wall will increase accordingly. The maximum permissible height of the partition is 8 meters. Most often, this value does not exceed 3 meters, since the standard ceiling height in most apartments ranges from 2.5 to 2.7 m.
The technology for attaching to the floor will be described in the next section. The diagram below illustrates in detail the location of all elements in the structure.
The installation diagram of the partition to the ceiling is similar. These images were compiled by professional engineers and published in a directory of typical building structures, products and assemblies.
Some stages of work, such as chamfering the upper edge of the gypsum board adjacent to the ceiling and putting it on, will be omitted from the instructions. They are not mandatory in conditions of non-professional do-it-yourself assembly, and in addition, they require the use of specialized equipment. The functional significance of these elements does not directly affect the strength and durability of the entire structure.
In the table below you can see a list of materials that will be required for the construction of a section of plasterboard interior partition with an area of 1 m².
As mentioned earlier, the standard are profiles 50x50 and 50x40 mm. Guides and racks of large dimensions are used in rare cases; they are practically never encountered during renovations in an apartment or during interior finishing work in a private house.
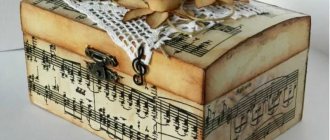
Cardboard book box
A box in the shape of a book, which you can make yourself from cardboard, can become an excellent souvenir for a teacher, mother, grandmother and work colleague. Creating this craft does not take much time, and the result will definitely delight you.
Attention! The base of the box can be made either from thick cardboard or from the cover of an old book.
Reel storage
Spools of thread should be stored so that thin threads do not unravel or become tangled. If sewing is your favorite hobby, then you undoubtedly have a lot of such material. In this case, you can use the drawers of your bedside table or chest of drawers, which are equipped with special inserts with pins on which the coils are placed.
The palette of threads for machine embroidery, for example, can have a fairly large number of shades of the same color. In this case, transparent plastic buckets will help you store the coils, in which you can put the coils according to a certain color.
Seven daily habits of happy people
The star of the series “Sultan of My Heart” spoke about the choice of his future wife
25 children of a childless man: an extraordinary reunion
You can sew a convenient and practical organizer for spools with your own hands - add a piece of thick fabric with loops made of regular underwear elastic, under which the spools will be tucked.
You can also set a goal in a craft store to find a convenient option for storing spools of thread. For example, in the form of a transparent rotating barrel on a stand.
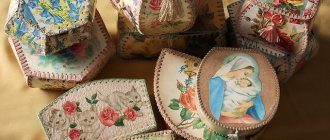
Boxes made of cardboard and fabric
You can use fabric to steal absolutely any cardboard box. But if you don’t have time to create the base for such a product, you can use a juice box.
Creation option:
- First, mark the future cover and then cut it along the contour on three sides.
- The sections are covered with masking or paper tape.
- Finally, decorate the product as desired. You can use bright fabric, guipure, tulle and satin ribbon.
Step 9
First, I put the parts inside the box to remember the configuration. I then use a glue gun to glue them together to create a single storage structure.
Tips from needlewomen
Working with cardboard is not difficult if you follow some tips:
- For cutting, it is better to use a special cardboard knife with a sharp end. If this is not available, then a regular or stationery one, but well sharpened, will do.
- Before cutting parts, be sure to draw a contour according to the template, strictly observing the dimensions.
- To bend thick cardboard, make a shallow cut along the fold line, using a ruler.
- It is not recommended to use colored stationery paper for decoration; it is better to replace it with one intended for scrapbooking.
- When gluing paper to a cardboard base, it is important that it is saturated with glue. Since applying a dry sheet will lead to the formation of bubbles. It should also be smoothed from the middle to the edges. The fabric is glued identically.
Templates
In some cases, it is convenient to use ready-made printouts of templates made on a color printer.
But to add gloss and sophistication, experienced craftsmen recommend the use of decorative elements.
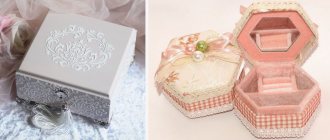
Shabby chic style box
This master class is dedicated to making your own pincushion box in the shabby chic style. A small product turns out to be inexpressibly cozy and cute. This box can be made as a gift for your mother if she is interested in sewing.
Tools and materials
To make such a box you will need the following materials:
- a box from Raffaello and a small piece of foam rubber 4-5 cm thick and 13 cm in diameter;
- cotton fabric 20x20 cm, lace, decorative needles and scissors, hemp twine 1 m, chipboard or small frame;
- paper and knitted flower buds, half beads, cotton lace braid, plastic or plaster moldings, a string of pearl beads and a sheet of paper 30x30 cm.
And:
- scissors;
- centimeter, ruler;
- pencil, tailor's chalk;
- heat gun, Moment glue, compass.
Step by step diagram
- A strip of paper is cut to the size of the box and one edge is tinted with distress ink, and the other with a stamping pattern, and then glued to the base.
- A circle suitable in diameter for the box is cut out of a piece of foam rubber, and scissors are used to give it the shape of a hat.
- A circle with a diameter of 18-20 cm + an allowance of 1.5-2 cm is cut out of textiles.
- Next comes the turn of the cardboard - a circle of the same diameter as the foam rubber is cut out of it.
- Now the foam rubber is covered with fabric, trying to ensure that it lies flat and beautiful.
- Carefully glue the finished pillow to the top of the box.
- The borders are masked with a “pearl” thread, a lace bow, or a decorative droplet element.
- The lace is placed around the perimeter of the package and tied with twine.
- To decorate, cut out a suitable picture, apply a tone to the edges and glue it onto a piece of white cardboard, leaving 0.5-1 cm free edges.
- The cardboard is cut with curly scissors, obtaining a fancy edge and also tinting it.
- Since the lace and twine have added noticeable thickness, the upper and lower parts of the picture are fixed with double-sided tape (before gluing, the picture must be pressed tightly to the box and held, giving it the desired bend).
- All that remains is to decorate the pincushion with the prepared elements, giving it a finished look.
Master class on making a box with dividers for small items
Master class on making a box with dividers (for small items).
So here's how I made the box with dividers.
We’ve been on sick leave for a month now, there’s a lot to do and we can’t get around to our hobbies. But I still snatched an hour for myself.
At least I took a little break from household chores.