A beautiful and bright box is an indispensable assistant for every child, teenager or adult woman. In the original box you can store jewelry, a personal diary, and favorite souvenirs as keepsakes.
In modern stores, every buyer will undoubtedly find a huge assortment of chests of all sizes and shapes. However, you can always make a bright accessory with your own hands, using your own skills, dexterity and a set of available materials.
Peculiarities
Wood has always been a high-quality, sought-after material, from which not only reliable buildings or pieces of furniture were made, but also various accessories. The latter include charming boxes. These products can be safely called universal, since they can be used to solve many different problems. A beautiful wooden box can be a wonderful gift for a birthday, New Year or any other holiday.
You can store rings, earrings, chains and other ladies' jewelry in it. There are many areas of application for these products.
Today in souvenir shops you can find a lot of different models of wooden boxes. Consumers can find an excellent model that will become a spectacular interior decoration. However, many people do not want to spend extra money on purchasing such an accessory, because it is quite possible to make it yourself at home.
A homemade wooden box can be absolutely anything. The shape and size of the object will directly depend on the ideas of its creator. At home, it seems possible to make not only a simple, but also a chic carved model.
The process of making plaster itself is creative - here the master can let his imagination run wild. The main thing is to show a little patience and stock up on all the necessary materials/tools.
Tubular newspaper box
It is very interesting to make crafts from newspaper tubes, where boxes are no exception. The products turn out to be so beautiful, memorable and original that for many this activity has long turned into an exciting “hobby”.
Initially, the tubes are prepared, and then the most interesting process occurs - braiding using a wide variety of patterns. They can be complex - for masters, or easy and simple - for beginners.
The corresponding coloring gives the product shades. Such a product can later be modified using a beautiful case and decoration items.
Choice of shape and size
A wooden box does not have to be as simple as possible, having a standard square or rectangular shape. The product can be made more original and interesting. Everything here will depend on the wishes and project of the master who makes the accessory. Thus, models designed for various accessories and jewelry can have medium or small sizes. They often have soft inner lining.
For the latter, materials such as velvet or suede are ideal. Such additions protect expensive metals from accidental damage and scratches on the wooden surface of the box. Typically, these designs have wider compartments designed to store necklaces, beads and special rollers for fixing bracelets.
Wooden boxes designed for storing all sorts of household little things - keys, small documents and other similar trinkets can have similar sizes. Larger boxes should be made with drawers. They make a kind of mini-chests of drawers.
The size of the box being made directly depends on what exactly it is being made for. If you plan to store a lot of medium or large items in it, then its dimensions should be appropriate. If the box is made to contain all sorts of little things, then it can be made compact and neat.
The shape of a wooden box can be absolutely any. Here home craftsmen are not limited in anything. Of course, most users make classic models with a rectangular or square structure, but a more interesting option can be made.
Wooden boxes with the following shapes look vibrant and bright:
- chic options in the shape of a heart;
- elongated oval or round options (look especially interesting if complemented with carvings);
- curved options (in the shape of the letter “C”);
- in the form of an original wooden gramophone (this way you can make a music box);
- in the form of a luxurious royal casket;
- in the form of a complex mechanism with many small parts (difficult to implement options).
Today, unusual boxes with non-trivial shapes are especially popular. The accessory can be made in the form of a baby grand piano/upright piano, a safe, a book, or a treasure chest. The design of the product can be completely unexpected.
Often, at first glance, nothing in these items gives away the box - they seem to be just an interesting souvenir, but in fact the souvenir turns out to have a secret, and there is a place in it to store all sorts of things.
Choosing the shape of the casket
The shape of the chest should be chosen so that it not only fits well into the interior, but also brings benefits.
You can choose between the following forms:
- Simple rectangular
- Square
- Round
- Triangular
- Heart shaped
Required materials and tools
If you decide to make a beautiful wooden box with your own hands, you need to stock up on all the necessary tools and materials. In order for the casket to turn out to be of really high quality and beautiful, you should not skimp on the specified details.
Let's consider what you will need to buy to make a beautiful accessory yourself:
- you will need sheets of plywood or wood - it is recommended to select boards with a preferred thickness of 1-1.5 cm;
- cardboard;
- special adhesive composition for wood;
- loops for installing the lid of the box;
- accessories;
- selected scenery.
Depending on what particular model of box you plan to make, you can use materials such as plastic, cardboard, bamboo, steel and even marble. It is important to have not only suitable materials, but also good tools, with which the process of making an accessory will be quick, easy and hassle-free.
You will need the following tools:
- pencil and ruler;
- hand saw or special electric jigsaw;
- set of files;
- wood saw (will be needed for cutting material);
- a screwdriver, if some parts will be fastened together with screws;
- hammer;
- wood file;
- a manual router may be useful;
- sandpaper for sanding workpieces;
- paint, rollers and other equipment that will be needed to complete the final finishing of the product.
Having all the necessary components, you should not immediately rush to make the box. First, you should draw up a detailed diagram, a sketch of the future product.
It is advisable to indicate in the drawing all the dimensional parameters of the casket. Having such a plan, making the accessory will be faster and more understandable.
Necessary tools for creating a casket
Before you start making the casket, you need to prepare the basic tools. Below is a list of what must be at hand, since sometimes during the work there is no time to be distracted by searching for available tools.
- Scissors
- Paper
- Clear adhesive tape
- Glue
- Ruler
- Pencil
- Eraser
- Penknife
Materials for decorating the chest:
- rhinestones,
- clothespins,
- laces,
- ice cream sticks,
- threads,
- postcards, etc.
Regarding the last point, you can look for materials for decoration after the casket is ready, since it will take some time for the glue to dry well.
Also, if necessary, you can add to the above list, because making crafts is a purely individual process and each person’s imagination works differently, so other improvised means can be added.
How to make a classic box
Even a teenager with minimal skills in handling woodworking tools can cope with this task. Such a box is made from multi-layer plywood, and the selected sheet should not have visible damage: knots, cracks.
At the initial stage you will need a pencil and a ruler. In order not to complicate the task, it is better to choose the correct geometry of shapes for the walls, lid and bottom, for example, a square or rectangle. On a sheet of plywood, draw the outlines of four walls: 2 side walls are shorter and 2 front walls are longer.
Note! The sides of the bottom are calculated in such a way that after gluing the sides, it is recessed inside the walls.
Then all the drawn elements are carefully cut out with a jigsaw, the irregularities are processed with sandpaper. To ensure that the end and side walls are beautifully connected to each other, small grooves can be made at the edges of the ends, corresponding to the thickness of the plywood sheet. This tip will help give the case a monolithic look and overall make the structure stronger. The walls are glued together, then the bottom of the box is placed. If the lower part enters with difficulty, the edges are processed with a file. The bottom should fit tightly.
- After this, they begin to make the lid. To make the design more original, it is better to choose not a flat, but a deep lid. For this, the scheme described above is used. A large blank is cut out, which will directly serve as the lid, end and side walls. In essence, it turns out to be a smaller copy of the casket body. All parts are sanded and glued together. The lid is attached to the body using small hinges. After assembly, the finished product is varnished or painted in any color you like.
- In a similar way, you can make a box from solid wood. A wooden board is used for this. It must be sanded and cut into pieces of the required size. It is more difficult to cut wood with a jigsaw; it is better to use a circular saw. Curly edges can be made with a router.
If you need a drawer
In general, a wooden box with a drawer is made in the same way as the classic version, but there are a number of features.
- A simple rectangular shape of the lid and bottom will spoil the appearance of the product. It is better to make the long sides of these elements wavy using an electric router. In addition, by choosing this option, the lid and bottom are not placed inside the body, but left outside.
- The walls are made of different heights. In particular, the back part and ends are made of the same height and glued together. For the front wall, cut out a die half as wide as the back part. This element is not recessed between the ends, but is installed overlapping and fixed with glue.
- The box consists of two parts: the box, which fits freely between the walls, and the front part, which is similar in size to the top die. The elements are also mounted on wood glue.
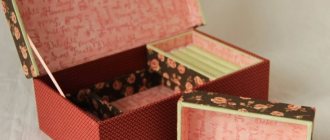
A partition is installed between the upper and lower parts, which will serve as the bottom of the upper compartment of the box. Inside the retractable and stationary drawers, you can make partitions from thin plywood, delimiting the internal space into several compartments. The lid is installed on decorative hinges, the wood is covered with several layers of furniture varnish.
Decorate the box with fabric
To decorate a cardboard box with your own hands, you can use not only old press or wallpaper, but also decorate it with fabric. Using the covering, it is possible to cover the box with fabric. Such a thing can serve as a separate gift, as well as as an organizer for storing small household items, for example: toys for children, home decor items, sewing supplies.
Materials and accessories that are indispensable for covering the box with fabric:
- Box. When choosing, you are allowed to apply the rules described above for working with press, magazines, and wallpaper.
- The fabric itself will be used to cover the box.
- Specialized glue, tape.
- Sharp scissors.
- You may need an awl, as well as a strong cord (you need to choose the color of the fabric).
In order to do everything accurately and get an excellent result, you need to follow the recommendations:
- To make a pattern, you need to determine the dimensions of the sides, and also remember to leave allowances for the part that bends to the other side.
- Glue the main part. It is recommended to choose an adhesive that does not saturate the fabric, causing stains. You can use suitable double-sided tape if it adheres the fabric to the cardboard well.
- The fabric should be pressed tightly against the cardboard. If necessary, you need to remove excess material.
- When you have finished decorating the outside, move on to decorating the inside.
How to decorate with carvings
Carved boxes look much more original and interesting, but such work requires certain skills and knowledge. For beginners who decide to try their hand at wood carving, experienced craftsmen recommend starting with simple geometric shapes and large patterns. With a certain amount of patience, even a novice master will be able to cope with such a task.
The drawing is applied to the surface with a pencil, each line is well drawn. After this, the pattern is carefully cut out with an oblique knife or chisel in strict accordance with the applied markings. Small flaws and irregularities can be corrected with a file or fine sandpaper.
Tips from needlewomen
Working with cardboard is not difficult if you follow some tips:
- For cutting, it is better to use a special cardboard knife with a sharp end. If this is not available, then a regular or stationery one, but well sharpened, will do.
- Before cutting parts, be sure to draw a contour according to the template, strictly observing the dimensions.
- To bend thick cardboard, make a shallow cut along the fold line, using a ruler.
- It is not recommended to use colored stationery paper for decoration; it is better to replace it with one intended for scrapbooking.
- When gluing paper to a cardboard base, it is important that it is saturated with glue. Since applying a dry sheet will lead to the formation of bubbles. It should also be smoothed from the middle to the edges. The fabric is glued identically.
How to put a lock
An interesting solution is a mortise lock, which will be opened with a small key, but such work is difficult to do even for an experienced specialist. Therefore, it is better to limit yourself to a padlock or a decorative hook.
To install a padlock, loops are placed in the central part of the side wall and lid, which are screwed with small screws. The location of the hinges must be calculated in advance: even a slight displacement will break the symmetry, and the box will lose its attractiveness.
From shoe boxes
One of the easiest options to make a beautiful and useful box is to use a shoe box. To create a casket, just cover the box with fabric or colored paper.
If you need a smaller box, you can use a box of tea, milk, etc. as a basis.
In the case of a milk carton, it will be enough to tip it on its side, make a slot in the shape of the letter “C” on top and bend this piece of cardboard. This will be the lid. Then the box needs to be covered with a beautiful fabric, after which the lid and bottom should be covered with two satin ribbon ties.
Original double-walled box
Making such a box is much more difficult, but we will help you figure it out.
Step 1. On the pre-processed workpiece, you need to draw cut lines with a pencil. And here one important point should be taken into account: when transferring the sketch, it is imperative that the longitudinal orientation of the fibers be observed!
Step 2. An even longitudinal part is cut from the workpiece (its thickness should be 1.5-2 cm). This part will serve as the cover of the product in the future.
Step 3. Next, change the inclination of the saw table. It is necessary to change the angle literally by a few degrees.
Step 4. After this, the part is cut into 2 parts and the internal waste part is cut out. Thus, a conical cavity of the product is formed.
Step 5. The halves are glued back together. Thanks to this, by the way, internal stress is also relieved and cracking and deformation of the product are prevented. The glue should be applied in a thin layer, and all excess inside should be carefully removed.
Step 6. The glued parts are placed under the clamps. In this case, you need to carefully ensure that there are no distortions or displacements.
Step 7. The table returns to the horizontal position, a couple of slices are cut from the waste part. This will be the bottom and cover of the future product.
Step 8. The interior of the box is painted. It is more convenient to carry out painting at this stage, while there is free access from both sides.
Step 9. The table returns to the inclined position, after which cuts are made along the outer contour.
Step 10. A thin layer of glue is applied to the ends of the bottom, then it is inserted into the lower part of the product (you need to press it with your fingers until it stops).
Step 11. The lid elements are glued to the workpiece, cut off at the initial stages of work.
Step 12. When the glue has dried, the main outline of the lid is outlined, after which this part is cut out.
Note! The technique described above is universal, because it makes it possible to experiment with shapes and designs, making original and beautiful boxes with your own hands.
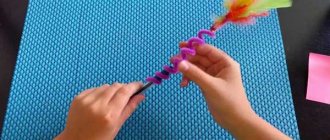
From newspaper sticks
In addition to newspaper, pages of old books or glossy magazines are suitable for twisting “straws”. First, you need to cut the material used into strips about 5 cm wide. Then you need to take a knitting needle and wind a sheet on it diagonally. In this case, the tip of the sheet must be glued with glue. You should have about 18-24 sticks on hand.
The sticks are painted with paint according to the needleworker's taste, and time is given for the paint to dry. Then you need to take a piece of cardboard of the shape that the casket is supposed to be and glue the painted tubes to it. After this, the entire contour of the bottom is first braided with one longer stick and the remaining tubes are glued onto it until the desired height is reached.
When the box reaches the desired height, you can bend and trim the ends of the tubes. Then you can start making a lid for the casket by gluing a textile bow or other decor onto it.
How to decorate?
For a homemade box, it is important to think about beautiful decor so that it looks more interesting, brighter and richer. There are many ways to decorate this accessory. The most popular solution is to decorate the product with carvings. Carved caskets look very beautiful and solid.
It is not recommended for a novice craftsman to immediately begin applying intricate and complex carved patterns to structures. You should start with simple shapes or large lines. A master with minimal experience can handle such work, but you need to be very careful and patient to avoid mistakes.
To add carvings to a product, you should apply a certain design/pattern to its surface with a pencil. Each line must be drawn as accurately and noticeably as possible. Next, you need to take a special knife or chisel.
These tools carefully cut out lines and patterns in accordance with the applied design. Small imperfections and defects can be removed with a file or sandpaper.
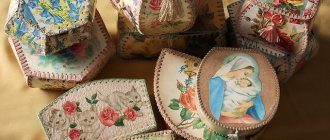
If you don’t want to waste time carving the product, you can turn to a simpler solution - paint the casket or coat it with a special varnish. The color of the accessory can be absolutely any - it all depends on the ideas of the home craftsman. Caskets decorated using the decoupage technique look interesting and stylish.
The final design of the box can be anything:
- products are often complemented with precious/semi-precious stones and beads;
- the design can be effectively painted;
- attach a flower arrangement to the lid;
- create an aging effect using the craquelure technique;
- attach pearls (natural or imitation) to the lid.
Crafts are simple and quick
If you don’t have the time or skills, you can make a simple craft.
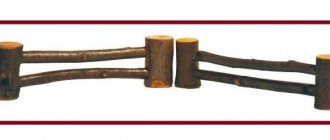
Sinyushkin well
For crafts, take thick twigs or wooden sticks. They may not be smooth, with bark or its fragments, or with knots.
Fold the sticks in the shape of a well according to the principle of folding a log house. For greater stability, make indentations at the joints of the sticks.
Place the well on a brown or green cardboard stand, place a blue feather next to it or place a doll in a Russian sundress. All! Even a child can handle this kind of work on his own.
Silver hoof
Place the finished figurine of a deer on a stand, and attach multi-colored pebbles nearby. Can be supplemented with cotton wool that imitates snow. If there is a figurine of a cat, place it next to it. If desired, you can decorate the deer's hooves and antlers with rhinestones.
Collection of Ural stones
Cover a box with low sides with colored paper and line the bottom with dark blue corrugated cardboard for crafts. Using a glue gun, secure the mineral samples in even rows. Decorate the box with lizards. Ready!
Do crafts with your children. Read Bazhov's fairy tales, imagine what the heroes of fairy tales might look like and start tinkering. This will broaden the child’s horizons, introduce him to the work of the Ural writer and develop his imagination.
Useful tips and tricks
If you decide to make a beautiful and high-quality wooden box with your own hands, then you should take on board some useful tips and recommendations.
- If you are making a box for storing jewelry, it is advisable to decorate its interior with soft, velvet fabric, and glue a small mirror under the lid. With such components, accessories will not be scratched, and they will be very convenient to try on.
- If desired, you can make a casket “with a secret”, in which, for example, you can store cigars. An interesting solution is a model in which pleasant music plays when you open the lid. Such products are difficult to implement and require special tools. It is better to do such options under the guidance of a more experienced master.
- You can make a box using pieces of wood of different species that have beautiful textured patterns.
- It is necessary to cut out all the details of the future design as accurately and clearly as possible. You should not violate the boundaries of the drawn blanks, otherwise it will be very difficult to assemble the product in the end.
- It is recommended to clean small parts with fine-grained sandpaper. This item will be especially relevant in the process of decorating carved elements on the casket.
- If you are making a chest not for jewelry or small trinkets, but for sewing accessories, then it is advisable to provide several separate compartments in it, and add an easy-to-carry handle to the top part.
- If the box is made of beautiful, dark wood, then its texture can be effectively emphasized by waxing. If the model is made of lighter wood, then it is best to coat it with linseed or other oils (if you have chosen this finishing method). To experiment with colors, you should turn to high-quality, water-based stains with coloring pigments.
Where to begin
Making any craft begins with a project, a diagram. The master imagines exactly what his masterpiece will be like, and, starting from the drawings, stocks up with the necessary materials and tools.
For many ordinary people, a wooden box appears as a rectangular box with a closing lid. This is true, but not entirely. A box is a real work of art, and even a handicraft made from scrap materials can look like an expensive antique.
Any box has its purpose in the house. Based on this message, the master thinks over the shape of the product. The following options are possible here:
- for jewelry. Such wooden models have a traditionally rectangular shape, but the internal surfaces are lined with velvet, and the lid is complemented by a mirror. As a result, jewelry is not scratched and is convenient to try on;
- for jewelry, trinkets. A characteristic feature of this product are drawers that move freely inside the case. The number of retractable elements is unlimited, and a tight fit does not require special guides;
- A small box for treasured and memorable items. Made in the shape of a heart and great for storing letters, cards, photographs and other things;
- Puzzle. A rather complex product that simultaneously serves as a decorative decoration and a children's toy. A system of wooden gears, reminiscent of a clock mechanism, is installed here, and the lid opens after rotating the handle or one of the wheels;
- to hide a small amount of money. It is made in the form of a rectangle, but the external decoration is made to resemble a book;
- for needles, threads. Such wooden boxes usually have several compartments where you can store sewing supplies. The case is often complemented by a carrying handle.
In addition, there are boxes with watches, locks and secrets, original boxes and drawers for storing cigars, and products that make melodious sounds when the lid is opened. The shape is not limited to rectangular. In fact, with modern tools for woodworking, it can be anything, including round.
It is noteworthy that all of the above options can be done independently at home. But it’s still better to start learning how to make wooden boxes with your own hands with simple designs, complicating the task as skills develop.
Simple walnut box
A similar sequence of actions underlies the next project - a four-wall wooden box. Thanks to its unusual curved shape, its design looks stylish and modern.
Interesting ideas for decorating a product
The structure of the tree is beautiful in itself. You can simply varnish the product, but it will become truly original after creative decoration, for example, using the technique of relief carving. Using different techniques, you can create unique patterns or compositions on the surface:
- using a semicircular chisel you can make small dimples on the wood;
- An angle chisel will help make the grooves.
Advice! A wooden box must be coated with protective compounds. For light wood, any oil, for example, linseed, is best; for dark wood, wax. You can experiment with the color palette using water-based stains with different pigments.
How to make a plywood box with your own hands
Making a box from plywood is quite simple, you just need to be patient and approach the process creatively. Such boxes will be a wonderful gift for your beloved women.
What you need to prepare for work
To make a budget box with five compartments we will need:
- plywood 6 mm thick;
- sawing machine;
- sandpaper;
- milling cutter;
- masking tape, brush and wood glue;
- oil with a blue tint.
Detailed master class on manufacturing
- Our plywood box with dimensions (L×W×H) 14×10×7 cm consists of six parts: a bottom, a lid, 2 long and 2 short sides. Let's get to work.
- From a strip of plywood, cut 2 parts L×W 14×10 cm, 2 parts – 14×7 cm and 2 parts – 10×7 cm.
- Process all edges of the workpieces using a cone cutter at an angle of 45º
- Prepare a level strip in order to align the edges of the box. Lay all the sidewalls along it, alternating long with short. Connect them together with masking tape
- Turn the tape over with the grooves facing out and apply glue to all transverse joints, including the sides. Distribute the composition more evenly with a brush
- Place all the edges in a box and secure the last one with masking tape.
- Apply glue to the edges of the box and the blanks for the bottom and lid, then connect them together. Secure joints tightly with masking tape
- After the glue has completely dried, remove all the masking tape and cut off the cover at a distance of about 2 cm. The disc overhang should be more than 6 mm
- Sand the cut area of the body and cover with sandpaper for 3-5 minutes
- Make several partitions from plywood and glue them inside the box; small blocks can be used as temporary support
- Rub the oil into the body of the box using a soft cloth
- After the composition has completely dried, insert it on the back side of the loop.
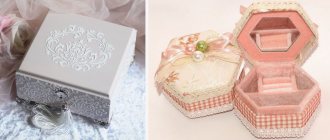
Making a box in shabby chic style
Components for making a box:
- candle;
- decoupage napkins;
- casket;
- decoupage glue;
- white acrylic primer;
- acrylic lacquer;
- acrylic paint;
- sandpaper;
- sponge.
You need to cut out a pattern from a decoupage napkin, then divide it into layers. Cover the entire area of the pre-made cardboard box with paint. Use a hairdryer to dry and leave until completely dry. Rub the candle on the box in places where there will be abrasions. Be sure to rub the corners with a candle. Cover the box with white acrylic primer and dry.
Rub the box with sandpaper to create a worn effect. Attach the decoupage pattern to the box and apply glue on top. Let it dry and paint the edges of the pattern with your own hands. Dry and varnish.
Master class on making a decorative cardboard box
Cardboard is one of the most affordable materials found in every home. To make a decorative box, you can use ready-made boxes or make them yourself.
What you need to make a cardboard box
To make the box we will need:
- corrugated cardboard;
- glue gun;
- scotch;
- PVA glue;
- double sided tape;
- decor
Step-by-step manufacturing instructions
The dimensions of our box are arbitrary depending on what things you plan to use it for. Let's take a closer look at all the manufacturing stages.
- Cut 2 blanks of the same size from cardboard for the bottom and lid, as well as the back wall of the box. Glue it to the bottom and connect it with tape on both sides from the top
- Coat the outside of the frame with PVA glue and glue decorative paper, wrapping it inside
- To avoid thickening in the folded areas, cut off excess paper
- Glue a sheet of paper from the inside of the frame, stepping back about 1 cm from the edge
- Cut two end sides and one longitudinal side from corrugated cardboard and wrap them in decorative paper
- Coat the bottom and side edges of the blanks and glue them to the frame
- Cut a small strip of decorative paper and glue it with double-sided tape to the lid and side of the box
- Decorate the box with decorative beads
Drawings for making a travel bag
The first and most important stage of any master’s work is preparing a drawing. The diagram of the future casket can be found ready-made or sketched on a sheet of paper. The following points must be noted on the drawing:
- Dimensions of the accessory itself, including the height of the walls, width and length of the bottom. The lid is depicted as a separate element, since its width must exceed the dimensions of the base.
- In addition, the plan diagram should indicate what type of cover is planned to be made (folding or removable model).
- Don’t forget to display the shape of the decorative toiletry case.
The best solution would be a separate image of the accessory as a whole, and sketches of each detail.
How to make an unusual miniature box with your own hands from a reel of tape
If you want to please your loved ones with a small box to store jewelry or small items for handicrafts, you won’t find a better material than a spool of tape. You can make an absolutely stunning product out of it. No one will guess what served as the basis for creativity.
What you need to prepare for work
For our amazing box you will need completely accessible materials:
- a spool of tape 4 cm high;
- corrugated thin cardboard from biscuit;
- thin cardboard for the bottom;
- screw cap from a jar of suitable diameter;
- glue “Moment” and PVA;
- white acrylic paint;
- 2 single-layer decorative napkins;
- decorative paper, you can take it from a candy box;
- colorless varnish.
Master class on making a box from a tape reel
- Coat the edges of the reel with white acrylic paint. Cut cardboard from under the roll 4 cm wide and cover the inside of the reel with it. Press well so that the strips do not fall behind on the sides
- Cut the bottom out of thin cardboard according to the diameter of the reel, and you can also use the cardboard that is inside any screw-on lid
- Glue decorative paper on one side of the bottom with PVA glue
- Glue the bottom to the bobbin with Moment glue with the decorative side inward
- Glue white decorative paper to the outside of the reel and to the top of the lid
- Cut out decorative elements from a single-layer napkin
- Glue the elements with PVA glue to the inside and outside of the lid, as well as on the sides.
- Decorate the bottom and sides of the bobbin in the same way.
- After the adhesive composition has completely dried, coat the workpieces 2 times with colorless varnish
- These boxes are made from an ordinary reel of tape
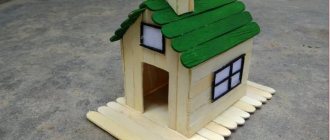
From popsicle sticks
Another idea is to make a box using popsicle sticks. In this case, you need about 30 of them. You will also need hot glue, a little corrugated cardboard, acrylic paints of two colors, scissors, a ruler, a pencil and satin ribbons.
It will look interesting if you paint 14 sticks one color and 15 another. From corrugated cardboard you need to cut 2 rectangular fragments with parameters 5.5 by 7 cm, 2 semicircular fragments with parameters 7 by 3 cm, then all these pieces must be painted.
To assemble the bottom you will need 7 sticks. Cardboard sides are glued to the bottom in a vertical position. The other two sides are lined up with 6 sticks each and attached to the sides of the cardboard sides. The semicircular fragments are connected to each other with 10 sticks, thus completing the lid. Tape is glued to the ends, and the lid is attached with two tapes.