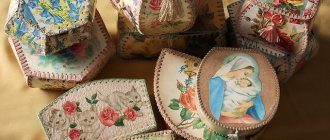
Interest in handmade products is growing day by day. And it’s not just about savings: mass-produced products lack something ephemeral that gives things a special charm. Usually this elusive substance is called the Soul of the Master.
And even though the master is not yet very experienced, and his creations are far from perfect, they still have soul and individuality. Every time you open a jewelry box made by yourself, you will receive a charge of positive energy that will help you get through another difficult day and make the holiday even more joyful.
Relevance
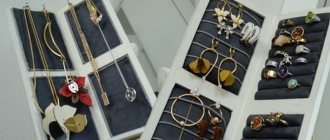
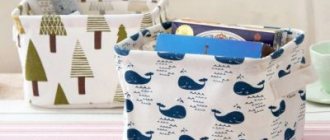
A box is a unique item in the interior of each apartment. These beautiful boxes, designed to store jewelry and treasures, have been used by women and men for many centuries. And today they have not lost their relevance.
On the eve of the holidays, be it the eighth of March or a birthday, thoughts become confused, and nothing comes to mind except the usual perfumes, sweets and flowers. But you want the gift to be bright and memorable. It’s good when the gift is not only attractive, but also functional. A handmade box will be just such a significant gift. You can make any fantasy come true without spending a lot of money and effort. And the process of making the box itself will bring an amazing charge of positive energy.
Baby food jars
DIY crafts from baby food jars can also be very different. Often, due to their small size, they are used for snow globe-type products.
Any subject and any material can be chosen as content. You can sculpt plasticine figures with your children by stringing them on wire and attaching it to the lid.
You can take ready-made plastic figures and also attach them to a metal strip or wire.
The most important thing is to create a solution that will be poured into the jar. The whole secret is in glycerin: it is what gives viscosity to the internal filling.
- For the solution, take water and glycerin in a one to one ratio.
- Don't worry if you end up with a little more of the first ingredient.
- The glitter added to the jar will settle more slowly due to this.
- Small jars are often used as candle holders for small round candles.
- The jar must remain transparent so that the candle light can penetrate through the glass.
- Decorate it to your liking.
Box from an egg container
Making a box from an egg container
To make a box, you need the following materials:
- plastic container for eggs;
- toilet paper;
- PVA glue;
- pasta and peas;
- spray paint.
So, first you need to pour PVA glue into a cup. If the glue is too thick, you should add a little distilled water. After tearing the paper into small pieces, you need to lower it into a cup of glue. The result should be a homogeneous porridge-like mass, which must be glued to the lid of the egg container with a layer of approximately 3 mm. Without waiting for it to dry, you need to cover the lid with curly pasta and peas, and spray a layer of paint from the can. The box is ready! In such a box you can store small jewelry, as well as materials for needlework (beads, glass beads, seed beads, etc.).
50+ ideas for decoupage boxes
Exquisite box decorated using decoupage and craquelure techniques
Currently, decoupage boxes are gaining more and more fans, which is not surprising. After all, decoupage allows you not only to express your creative abilities with your own hands, but also to get an interesting thing.
Even corresponding books appeared on sale. What is decoupage? This is a special technique with which you can transfer any picture to a surface.
In this article we will look at the decoupage technique for a box.
Content
Necessary tools for decoupage boxes
Necessary materials for creating a box using decoupage technique
The box decoupage technique involves the use of the following items:
- preparing a box (you can use a blank purchased at a specialized store);
- napkins for decoupage technique;
- sandpaper;
- PVA glue;
- decoupage glue;
- acrylic paints;
- sponge;
- wax candle;
- tassels;
- screwdriver;
- adhesive tape or tape;
- various decorative elements;
- acrylic primer.
Example of a decoupage card
Box decoupage technique
So, having collected the necessary tools, we proceed directly to creativity. Perhaps the most ideal material for decoupage is wood.
At the same time, using this technique, you can process both the tea box and the plastic surface with your own hands. Whatever material you choose, in any case, the box must be prepared first.
To do this, we treat the surface of the box with sandpaper.
First, sand the wooden piece with sandpaper.
The workpiece can then be primed using acrylic primer.
Priming the workpiece with acrylic primer
It is better to remove metal elements using a screwdriver. The next stage is toning the workpiece. To do this, paint the box with acrylic paint.
The next step is to directly transfer the design to the surface of the workpiece. Such pictures for transfer can be purchased at a specialized store. To do this, we separate with our own hands the top layer of the decoupage napkin on which the design is applied. We tear out the elements of the drawing with our hands. Having placed the napkin on the desired field of the box, apply glue for decoupage.
One of the simplest ways to apply glue to a decoupage napkin
Leave until completely dry. Apply varnish on top in several layers. The next stage is decorating the box with your own hands.
Next, we decorate our work, depending on the chosen style.
First, we return all the elements removed at the first stage of work. Decorating the box depends solely on the style chosen for decoupage. In addition, the product can be refined using the craquelure technique.
The final stage is to coat the entire work with varnish.
To better understand the sequence of actions, watch the video at the end of the article.
Ideas for decoupage boxes
Handmade box made in classic style
Decoupage of a box is a creative activity, so even if you follow clear instructions, you will end up with an original thing. Let's look at the basic ideas that are used when decoupaging boxes. Among the most popular:
- vintage;
Stylish vintage never goes out of style - Provence;
Light nature motifs on a box in Provence style - shabby chic;
Shabby chic style is gaining more and more popularity every year
Decoupage in vintage style: ideas
Perhaps one of the most common ideas is decoupage in vintage style.
Chic vintage box created using decoupage technique
This way the workpiece can be given an interesting aged look. A greater effect can be achieved using the craquelure technique.
To give the workpiece a vintage look, at the tinting stage we apply two layers of paint: the first is dark, the second is light.
Advice! Before painting the box, cover its internal edges with adhesive tape to prevent paint from getting inside.
A vintage style box will be both practical and an excellent interior decor
Apply the first layer with brown paint. Let it dry for about half an hour. Apply a layer of varnish. Let it dry for a while. Then we proceed to create the worn effect. To do this, rub the edges of the box with a wax candle.
This will allow the second layer of paint to wear off a little, which will give the desired effect. Apply a second light tone. After it dries, we rub with sandpaper the places that were rubbed with the candle. We do this until the brown layer of paint shows through.
Then we wipe the box to remove dust. Leave the product until completely dry.
An example of making a vintage box using decoupage technique
Advice! Using a sponge, we will make an imprint of brown paint on the edges and edges of the chest, enhancing the “antique” effect.
The scuffs and brown tinting on the vintage box give it a special old-time charm.
Dried rose buds, antique lace, heart-shaped pendants, and retro pictures will fit perfectly into this style. You can attach them to the edge of the box with your own hands. Or we use the craquelure technique.
Romantic box in vintage style
The vintage style looks especially organic with the “wooden box decoupage” technique.
This handmade box will be an extraordinary gift for your loved ones.
To give the box a vintage look, the craquelure technique is ideal.
Vintage box made using craquelure technique
Decoupage in Provence style
Another fashionable technique is decoupage in Provence style.
Handmade box in delicate Provence style
To implement it, it is necessary to carry out the same sequence of actions. However, the Provence style involves the following nuances:
- using pictures of flowers as drawings;
- turning to pastel shades;
The peculiarity of the Provence style is floral motifs and pastel colors
Provence style is perfect for a round box. To transfer to the surface, it is better to use pictures with rustic motifs. It will be interesting to look at decoupage in the Provence style in combination with the craquelure technique. The craquelure style is characterized by the appearance of cracking of the picture.
Box in Provence style, made in lilac color
Box made from a tape reel
Making a box from a spool of adhesive tape
Every home is sure to have a spool of adhesive tape. What if you don’t throw it away, but transform it into an unusual box?!
To make such a box you need the following materials:
- tape reel;
- Super glue;
- bookbinding cardboard;
- scissors;
- pencil;
- sandpaper.
Making a blank for the box is quite simple. On the binding cardboard it is necessary to outline the bobbin three times on the inside and twice on the outside. The cut out circles are intended for making the lid and bottom of the future box. Three circles of a smaller diameter and one of a larger diameter need to be glued together using superglue. The edges of the resulting lid should be sanded down with sandpaper. Then you need to lubricate the end of the reel on one side, glue the remaining circle to it and sand it with sandpaper. The box is ready.
Now you can start decorating the box; everything here depends only on your imagination and available materials. You can paint the box and decorate it with beads, ribbons or artificial flowers. You can also paste over the blank with old notes, and decorate the lid of the future box with lace or ribbon.
Decoration methods
The finished box, made of any material, must be decorated to give it a beautiful, “festive” appearance. What is used as decoration:
- “kanzashi” technique;
- pasting with textiles, leather, colored paper, wallpaper;
- decoupage;
- trim with ribbons, bows, knitted lace;
- painting, hand-coloring;
- decorating with pieces of eggshell;
- mosaic from various materials;
- decoration with “natural gifts”;
- decor from figured pasta, various types of cereals;
- burning, wood carving.
Differently designed products will decorate a retro-style hall or a romantic nursery, a marine interior or a Provence room, a loft hallway or a boudoir in the Baroque style.
Pasting with fabric
You can cover the box with textiles both inside and outside. To cover the internal space, a cross-shaped template is cut out of paper, which is then transferred to fabric. It's best to take velvet. It is important to make allowances - up to one cm on each side. Next, the paper is carefully spread with glue and glued to the fabric, bending the latter so that it is not visible from the outer edges of the paper. The product is dried under a book press, after which it is placed inside a decorated box, pressed, and dried.
The easiest way to cover a round box with textiles is to measure its height, wrap the fabric around it, cut it, coat the box with PVA glue, press the fabric against it, and dry the product. The same is done with the lid. A wooden or plywood box can also be covered with knitwear - it is laid on the surface in beautiful folds, gluing only to the bottom, and secured with a stapler.
A product covered with fur, with a scattering of beads on it, fastened with buttons or snaps, looks interesting.
Decor using the kanzashi technique
The “kanzashi” decorating technique is the art of creating flowers, leaves, birds, butterflies from fabric and ribbons. To design the product in this way, you will need the following materials and tools:
- cardboard cylinder, diameter 9-12 cm;
- felt fabric;
- cardboard;
- satin ribbons;
- organza;
- glue gun;
- sharp scissors.
Progress:
- the cylinder is outlined on a piece of felt and thick cardboard, six such blanks are made: four according to the size of the outer contour of the pipe, two - along the inner;
- the parts are connected in pairs - you get two large circles, one smaller one;
- the bottom is glued to the box, the lid is tried on;
- The parts of the lid and bottom are cut out of the fabric, they are cut, and coated with glue;
- the fabric is glued to the bottom and sides, folded inward;
- the lid is covered in the same way, but a textile loop and a wide short ribbon are glued to its inside;
- the smaller circle is coated with glue and glued to the inside of the lid;
- the inside of the box is covered with felt;
- to decorate the outer part of the lid, take pieces of tape measuring six by six cm, which are folded into petals and glued in a circle along the edge;
- Next, pieces of tape five by five cm are taken, and an inner circle of petals is made from them;
- a large bead, button, or pebble of a suitable color is glued into the middle;
- the sides are also decorated with two or three rows of petals;
- the very bottom is decorated with a wide ribbon.
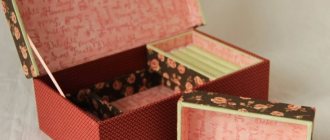
Pasting with paper or wallpaper
The appearance of a box covered with paper depends on the thickness and texture of the latter. When using silver vinyl wallpaper, it is easy to create the effect that the product is covered with metal. To work you will need PVA glue, paper towels, transparent varnish, multi-colored acrylic paints, the wallpaper itself, and other paper.
Parts are cut out of the wallpaper, taking into account the shape and size of the future product, plus small allowances for tucking. The glue is applied to the back surface of the wallpaper, the paper is left for a couple of minutes to soak, pressed tightly to the box, and smoothed out. It is important to carefully ensure that no air bubbles form during gluing.
Next, black acrylic is applied to the surface, then red is applied using paper towels and dried. The next layer is silver, after that - bronze, again black and red, green and gold. The product must be thoroughly dried and coated with one or two layers of varnish.
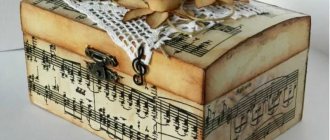
Decoupage
To decoupage a cardboard, plywood, or wooden box, you will need:
- the base box itself;
- patterned napkins, magazine clippings;
- pieces of fabric, lace, ribbons;
- PVA glue;
- varnish;
- acrylic paints;
- tassels;
- scissors;
- sandpaper.
If the product is wooden, it is carefully sanded, a picture or pattern is made from pieces of napkins, magazine pictures, scraps, and tried on the product. Next, glue is applied to the surface, all parts are carefully glued, smoothed, and excess glue is removed with a sponge. The finished box is dried and varnished. You can glue the inside of the box in the same way.
Coloring, painting
You can paint the chest with your own hands using acrylic, oil paints, and gouache. When the product is previously covered with fabric, it is painted using the batik technique, using special dyes and contours.
To paint a simple wooden box, you will need a primer, multi-colored acrylic paints, brushes, stencils (you can easily make them yourself from cardboard or buy them in a store), sandpaper, and masking tape. First, the structure is well sanded and varnished. Next, apply an even layer of primer, dry it, and sand it again. Afterwards the box is covered with paint, the layer is secured with varnish.
Using masking tape, cover parts of the product that will not be decorated with a design. Stencils are fixed in a place free from adhesive tape, their inside is painted over with thick paint. If the tone is not bright enough the first time, another one is applied on top. When the painting is completed, the box is completely varnished.
Eggshell decor
You can decorate the box with pieces of eggshell - chicken, goose, quail, or any other eggs are used. Also, to decorate the chest you need different paints, PVA glue, a wooden manicure stick, brushes, a napkin with a pattern, a box of a suitable size, which is carefully sanded with zero-grade sandpaper.
Work process:
- a part of the future box, several cm square in size, is smeared with glue;
- take a piece of eggshell, apply it to the glue-coated surface, and press it with a manicure stick;
- under the influence of the stick, the shell cracks and breaks into several parts;
- the distance between the pieces of shells is adjusted with the same stick and can be anything;
- then the entire surface of the product is gradually pasted over - only the top or all sides completely;
- A layer of PVA glue is applied on top of the chest and dried;
- white acrylic paint is applied in two layers and dried;
- Now take a two- or three-layer napkin, separate the top layer with the pattern from it, cut out the fragments you like;
- a piece of napkin is applied to the box and quickly and carefully covered with PVA glue.
If you want to make the product look “antique,” it is coated with black or brown paint using a semi-dry sponge.
Mosaic decor
The mosaics here are sunflower and lupine seeds, sea and river shells, wood cuts and pieces of bark, broken colored glass and beads, coffee beans and watermelon seeds. After gluing the decor, the chest is usually coated with spray varnish and partially or completely painted.
Three-dimensional decor made from baked polymer clay is also popular. Also needed for work:
- round box;
- liquid plastic, fimo-gel;
- sharp stationery knife;
- working surface made of glass or ceramics;
- ruler;
- brush;
- satin ribbons;
- stamps for polymer clay, texture sheets;
- baby powder or talc;
- rolling pin for plastics;
- varnish
How to do:
- The plastic is rolled out in a thin layer, rectangles are cut out of it, slightly larger than the internal height of the box;
- the inner walls are lubricated with fimo-gel, plastic is applied to the surface and pressed tightly;
- the top edge is trimmed with a sharp knife to create even “sides”;
- then a circle is cut out of plastic, which, after smearing with gel, is also placed in the box;
- the junction of the bottom and walls is decorated with thick thread or lace;
- then the lid is made in the same way;
- both parts should be baked;
- using texture sheets, several prints of different colors are made - so that they do not become clogged with clay, the forms are sprinkled with talcum powder;
- layers with patterns are cut into small squares, with a side of 10-20 mm;
- the outer part of the chest is covered with parts that alternate in color;
- before gluing the last fragment, a piece of satin ribbon is inserted under it to connect it to the lid;
- the sides of the lid are decorated with squares, the top part with triangular fragments, it is important not to forget to glue the ribbon to this part as well;
- A loop of satin ribbon is attached to the front of the box to make baking convenient;
- After baking, the box is painted, but before it is completely dry, the paint is carefully wiped off the convex parts.
Box made from a plastic jar
Making a box from a plastic jar
To make such a box you will need the following materials:
- plastic jar (from mayonnaise, honey or sour cream);
- wide double-sided tape;
- hemp twine;
- a small piece of vinyl wallpaper (you can use other thick paper with a pattern);
- Super glue;
- beads;
- nylon tape.
Making a box from a plastic container will not take much time, but will bring quite a lot of positive emotions. So, first you need to cut out a circle from vinyl wallpaper with a diameter equal to the inside of the bottom of the jar and glue it. Then you need to cover the outside and inside of the jar with double-sided tape. The outer surface is decorated with twine, and the inner surface is decorated with plain white paper. For reliability, the ends of the twine are fixed with superglue.
Next you need to start finishing the handle and lid of the future box. The handle is wrapped with twine, and its ends are secured with superglue. A pre-cut circle of vinyl wallpaper is glued to the cover of the blank, and its edges are framed with twine. Decorate the resulting box with beads and ribbons. The box is ready. In such a box you can store both jewelry and materials for needlework (threads, satin ribbons, etc.).
Author: Irina Kiseleva
Source
Series of messages “Packaging, boxes, caskets”:
Part 1 - Box with a folding lid. Part 2 - Quick box. Mk... Part 36 - Money chest. MK. Part 37 - Original box - box. Photo, video mk. Part 38 - MASTER CLASS! Bamboo Napkin Box! Part 39 - MK. How to make a gift box.
Shoebox box
Making a box from a shoe box
Every housewife in her house always has a free shoe box and a pile of unnecessary magazines and newspapers. Few people think that from these items you can build unusual, original and very useful things.
To make such a box you need the following materials:
- empty box;
- newspapers or magazines;
- colored cardboard or self-adhesive colored paper;
- Super glue.
First you need to roll the sheets of paper into tubes of the same size. Next, you need to turn the box upside down, draw a rectangle around the perimeter and glue the pre-twisted tubes one by one, leaving a distance of 4-5 cm between them. At the corners of the box, the tubes are glued crosswise. The bottom of the box can be decorated with colored cardboard or self-adhesive paper with or without a pattern. Next, you need to start gluing the tubes along the side surfaces of the box, layer by layer, in a horizontal position. There should be no gaps between the tubes, otherwise the future box will look careless. Having covered the side surfaces, you need to start decorating the lid. It is glued over in the same way as the base itself. The box is ready.
Fabric Trim on the Interior of the Box and Sides
The inside of the box will be lined with fabric. I took elastic fabric and cut it not to the size of the napkin, but about 1 cm smaller on each edge. Then I sewed it on the back side, stretching the fabric. This is necessary so that the fabric does not form wrinkles. If your fabric does not stretch, then it is better to cut it to the size of the napkin and glue it.
For the sides, I cut out pieces from fabric to the size of the cardboard, also four pieces.
After you have sewn the fabric to the wrong side of the bamboo napkin, proceed to cover all the parts of the cardboard sides with fabric (as shown in the photo below).
Tip 2: How to make toothpicks
Not all cafes and restaurants have cups with toothpicks on the tables. Meanwhile, some visitors, especially those with large gaps between their teeth, are irritated by pieces of food stuck between their teeth. A toothpick can be made very quickly from available materials.
You may be interested in: How to make salt dough for crafts
You will need
- - Match;
- - Nailfile;
- — Knife or scissors;
- — Skewer for sandwiches;
- - A piece of paper.
Instructions 1 If you have the habit of carrying a manicure set and matches with you, you can make a toothpick very quickly. Pull out the match and cut off the head. This can be done with nail scissors or even a restaurant knife. Grind the match on one side so that you get something like a needle. In order not to plant a splinter, treat the toothpick with a manicure file. 2 But not everyone carries a manicure set with them, and neither do matches. Sometimes you have to look for suitable materials right on the table. If you are in a decent cafe and order sandwiches, you will be given toothpick material along with them. Sandwiches are often cut with a plastic skewer. Using a restaurant knife, cut off the tip of the skewer. You will need a piece of 2-3 centimeters. Sharpen it sharper with the same knife. 3 If you don’t have anything suitable at hand, and you can’t do without a toothpick, find at least a piece of paper. You can even use a receipt from the same cafe. Tear off a square piece about 2x2 cm in size from it. The shape in this case does not matter - you just need to make a dense, pointed stick from this piece. Fold the square along the diagonals. Fold the resulting triangle in half again, then in half again. This will be quite enough. Video on the topic Useful advice You can use a toothpick and a cocktail stick. You need to cut a piece from it, then cut the tube lengthwise and sharpen it on one side; If there is a piece of cardboard on the table, even better. In a cafe that serves food on disposable dishes, you can tear a piece from a cardboard plate or glass; Don’t forget to throw away the toothpick immediately after use.