In today's article I will tell beginners how to choose the right weaving material to make the creative process more enjoyable. Hand made, created by craftswomen, is increasingly appearing on pop stars and film artists. You can create such beauty yourself. All that matters is great desire and diligence in work. To start creating a product, you need to have an accessory such as a beading machine. It is quite possible to make it yourself from available materials. With it you can create a picture, weave a wallet, handbag, mobile phone case, belt, bracelet, picture, flowers, book cover and even a large decoration - a bedspread for a sofa. There are different types of looms, it all depends on what exactly you plan to weave, what size the product is, narrow or wide, large or small. They are able to expand their capabilities in bead weaving and weave or embroider beautiful ornaments or designs.
The very first one made of cardboard and wood
It is necessary to prepare thick cardboard, a board, plastic or metal corners - 2 pieces, used in apartment renovation, and also purchase office clips from office supplies - 10 pieces. We cut out rectangles from durable cardboard with the size of the product (2 pieces) that you are going to weave. Next, we wrap the corners with cardboard, make slits about 2 mm deep on the fold and attach them to the board on both sides with office clips. Then we pull a certain number of threads, bend the ends and secure them to the board with clamps on both sides. It is lightweight and easy to use.
What types of beading machines are there?
As a rule, a beading machine is a rectangular frame with stops (crossbars) onto which the fishing line or thread for weaving is stretched. Depending on the model of the beading machine, you can adjust its tilt and adjust the design itself.
Beading machines manufactured in factories come in two varieties:
- Wooden beading machines.
- Metal machines for beading.
Prices vary accordingly. Wooden beading machines are good because they do not deform when a fishing line or thread is pulled on them. Metal machines are more resistant to damage and are stronger than wooden ones.
Factory machines come in different widths. You choose depending on the product you will weave. For beginning needlewomen, small machines for working on a wire frame are an excellent option. On such machines, the thread is adjusted using screws.
The second method using nails and wood
You need to prepare the following components: PVA glue (for wood), a wooden board (50 by 40 cm), two bars (4 by 40 cm), many small nails. Now we make it, attach the blocks with glue along the edges to the board. Once we are sure that the bars are firmly glued to the board, we begin to nail the nails. We do this in a checkerboard pattern, the distance between each nail should be 0.5 cm. We tie the fishing line to the first outermost nail and pull it in the form of a snake until the end of the last nail. With such mini-equipment you can weave pictures.
Herringbone
- You can string beads onto wire and then make a pyramidal spiral.
- You can also weave a flat Christmas tree.
- But the most interesting option would be a product made using the needle technique. Follow this pattern for weaving a beaded Christmas tree for beginners, making 4-5 branches in each row. Twist the finished product along the axis of the trunk, arranging the branches in a checkerboard pattern.
Beaded brooch: beading lesson for beginners. diagrams and templates for making your own (120 photos)
How to make a Christmas tree from glass beads, watch the video:
- You can use the brick technique or hand weaving, weave a strip of the desired length and width, sew it along the edges, gradually filling the strand with filler.
- Or use the weaving technique in a circle and fill the product every 5-6 cm.
- You may find it easier to sew beads onto the fabric (see how to embroider with beads) and then form a rope.
We offer a video with a lesson on weaving a rope of beads for beginners:
If a rope seems like a very rough product to you, try weaving a necklace out of beads.
The easiest alternative for beginners
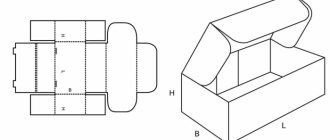
The third version is very simple. This lightweight beading machine is suitable for beginners in weaving bracelets, wallets, belts, and baubles. You will need a cardboard shoe box, a utility knife, tape and a strong nylon thread or fishing thread. Along the edges of the box we make cuts with a sharp object with a depth (about 0.5 cm), or even smaller with a distance of approximately 0.2 cm - 0.3 cm. Then we pull a thread or fishing line tightly through the cuts and seal the edges with tape on the back side of the box or make nodules.
Weaving the first lace
To begin, take 4 threads of different colors and a disk. The length of the threads is based on the “desired length of the cord + another 30 cm.” Let’s tie the threads into a knot: this will be the beginning of the work. And then we will thread them into divisions according to the compass principle (north-south-west-east). First, two opposite threads make their “move” vertically, then horizontally. Each of the threads moves to the opposite position diagonally, i.e. rotates 180 degrees. When all four threads are in opposite positions, the first round of weaving is completed. And then we repeat everything again: first, vertical threads move into opposite divisions, then horizontal ones. You will get a braid of four threads. Now let's stop and think. What's next? You can weave the same braid from threads of other colors or replace silk threads with cotton ones. Or you can even weave the same braid from threads of beads, of course, in four colors. From the same braid, if you vary the thickness of the threads, you can also make a belt and a cell phone strap. Are you tired? Then let's get to the palettes!
The basis for embroidery is canvas, hoop
The fabric should be dense, especially if beads are combined with beads or stones, which will give the design a special beauty and uniqueness. The craftswoman must take into account the size of the canvas cells with the size and sew them correctly to the canvas in order to avoid gaps, unclear patterns, folds or stretching.
Also, to make embroidery easier, you must use a hoop. Then you will avoid distortions on the fabric and the embroidery will be neat and flawless. Such devices have different shapes (oval, round, square), it all depends on the picture that you prefer to depict on textiles. Hoops can be wooden, plastic or metal.
What to look for when choosing a beading machine?
If you decide to buy a beading machine at a craft store rather than make it yourself, then I advise you to pay attention to several very important factors:
- Maximum length of the machine. When choosing a bead machine, be sure to ask the seller or check yourself the maximum length of the product that can be made on the selected machine. There are machines where the length is limited.
- Beading machine width. The same. If you weave bracelets and baubles, then this criterion is not so important to you. But for weaving pictures and canvases from beads, the width should be maximum.
- Adjusting the position of the machine mechanism. Please note that some machines do not have this feature. The ideal position of the machine for the human eye is 45 degrees.
- Adjusting the tension of fishing line or thread. In order to start weaving, you need to tighten the thread tightly; during work, for convenience, it is better to loosen the thread.
- The material that makes up the beading machine. Wooden or metal – it’s a matter of everyone’s taste. But here are the additional components: springs and wires must be strong in any case.
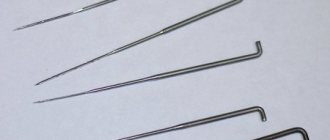
Needles, threads, scissors
The use of sharp needles plays an important role in the embroidery process; there should be several of them. This will make it easier to complete the drawing in colors. The needles should be thin with a wide eye; their numbering usually corresponds to the bead numbers; No. 12 is considered popular.
The choice of threads is very simple. You can use elastomeric, silk, silicone or nylon threads, as well as floss. In some cases, a thin fishing thread or wire is used. When embroidering, it is advisable to match the color of these improvised means to the color of the canvas. Each of the listed accessories has its own advantages and disadvantages. It all depends on what work of art the craftswoman starts working on. For beginners, to master this creativity, it is best to purchase a special set. In the future, you can choose the necessary tools yourself to create unique masterpieces.
silk
floss
Generally, scissors are an essential tool. It is very convenient when you have sharp, compact, curved scissors at hand, with tips curled up and more. You can cut the thread blindly, from the inside out, ideal for evaporating threads without damaging the fabric. Multiple options and amazing designs of scissors exist nowadays, just choose the ones that are comfortable for you.
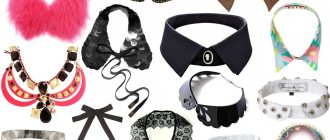
Making baubles
To make a hand bracelet for a boy, a guy or an adult man, you will need a minimum of materials and tools, as well as a creative mood. Why pay more? Let's try to create an exclusive decoration with our own hands.
Bauble is a great gift for a stylish guy
DIY baubles are always a unique decoration
Leather bauble for a real man
A somewhat brutal, massive bracelet can tell about a man’s character without words. By tightly clasping your wrist, the accessory will give you self-confidence and create the image of a person standing firmly on his feet.
Brutal leather bracelet
The bracelet can be decorated with a chain or iron rivets
To work, you will need two pieces of thick leather, buttons for fastening and several rivets for decoration. Tools that will come in handy include scissors, glue, a ruler and a pencil for marking out the baubles diagram and being in a creative mood.
The algorithm is as follows:
- Let's cut out a base from one piece of leather, to do this we measure the wrist. Using a pencil from the wrong side, we outline the location of the fastener buttons.
- We make a hole with scissors, insert the foot of the button, and secure it with the cap.
- We cut the second piece into several strips, but not completely. We braid all the sections into a braid and secure the ends with glue. We will secure the braid to the base.
- We insert rivets between the weaving or into the prepared holes.
Craft magnifying glass
It facilitates the process, needlework becomes easy, convenient and enjoyable. At the same time, the vision is not very strained and the craftswoman will perfectly see her work in an enlarged form. The magnifying glass has a special device that is attached to any surface and has a backlight that has a positive effect on the process. The lighting should be very good. This is painstaking work and puts strain on the eyes. There are many different models, for example, a magnifying glass with a special cord that hangs on the neck, which gives space to the workplace and hands, binocular, backlit with a tripod, and also one that is attached to the workplace.
stand
with backlight
with fastening
on the neck
Dear needlewomen, you can understand the technique more deeply from the video in our section. Also, thoroughly study what accessories you will need for embroidering mosaic designs.
Modern beads come in:
Glass
Plastic
Calibrated
Ordinary
Before we start weaving, consider:
- material for making beads
- bead size
- hole diameter
- bead shape
- future product format
- quality of coloring
- need for fittings
Loom weaving with beads
A woven surface in beading is a very dense multi-row beaded fabric in which the beads of adjacent rows are located strictly under each other. There is not the slightest displacement of elements in such a fabric, and such a beaded product looks professional.
Weaving with beads on a machine
Weaving can be hand or machine. Machine tools involve the use of special equipment, which, however, is not necessary to buy. You can make a machine for weaving beaded bracelets yourself using one of the common patterns.
Advantages of loom weaving:
- the beaded fabric appears faster;
- it is convenient to use the equipment to make handbags, wallets, wicker boxes and cases;
- It is possible to use patterns for cross stitch.
Machine craft also has its disadvantages. The quality of the beads itself must be impeccable; in handicrafts, you can occasionally use material with a small presence of defects. The downside is that loom weaving will not allow you to weave, for example, balls, Easter eggs, pens, boxes. It should be understood that a hand-woven surface will always be stronger than a machine-made one.
Recommendations for material selection
When choosing glass beads, you should consider its cost. This type is expensive and it is important to choose it with the opportunity to touch and look. It is difficult to do this from the illustrations. You can take beads that are painted inside or completely painted over, or you can purchase them from colored glass beads. For crafts intended for long-term use, it is preferable to prepare beads from a material that is resistant to abrasion. The same tips apply to plastic beads. The difference between the beads is not visible in the photo, but plastic is easier to work with and it rarely loses color, since it is created on the basis of painted plastic.
It is easier to work with large size beads, for example number six.
Using large beads offers some advantages:
- They are easy to work with and result in quick results.
- allows you to correct errors in a timely manner
- ability to change the shape of the product
It is important to mention schematic images. The diagrams are not very clear without explanations written underneath them. The diagrams become more readable after the first lesson.
Tips for craftswomen
Much depends not only on what kind of beading machine you have, but also on the quality of the beads, so preference should be given to Czech or Japanese material. Then you are guaranteed to receive a neat product. When working on the machine, it is important to make the first row correctly. It is the most difficult. Because the beads do not hold on yet and slip off. To measure a finished product, it is enough to use a pin with a plastic head as a mark. It doesn’t matter what kind of beading machine you have: store-bought or home-made. The main thing is that thanks to such a device you can create a magnificent thing in just one evening, without making any extra effort.
Material used in weaving
When creating products you need available tools:
- beads of different shades and sizes
- organizer
- needles
- tweezers
- pliers
- wire
- glue
- fishing line
- beads
- pins with caps
- various accessories
- scheme
- scissors
Organizer and its range
This is a container with lockable cells, convenient for placing beads. It is indispensable in the creative process, since beads of all colors are always at hand and do not roll out anywhere. Each compartment is numbered, corresponding to the number of beads. It is convenient to collect beads from here. Often, needlewomen use a fishing organizer. When choosing a container, you need to provide a compartment for needles and threads, and the width of the cells. Wide divisions make it easier to pick up beads.
If the container does not snap securely, it is recommended to place it in a case. This way you will be protected from its opening and scattering of beads.
Wire: pros and cons
When you decide to start beading on wire, you need to consider a few tips. When weaving, it passes through the bead. You need to study and highlight how many times it is threaded through the bead in the diagram. The beads should fit tightly to each other and not dangle. The wire chosen is neither thick nor thin. One breaks too often, the other bends heavily. Copper wire is ideal. Many bead products are made with special thin needles with a small long eye. This needle easily passes through the bead.
Fishing line and thread in needlework
Needlewomen also use fishing line and thread. When working with thick fishing line, you can do without a needle. The fishing line is taken new, without damage. When selecting translucent beads, it or a thread is selected in the same tone. Monofilament can be used. Its color range is varied, it is durable, silky, and glides well.
How to use?
First of all, it is important to ensure a comfortable workplace. Having the right lighting is very important when working with small objects, as such work creates a lot of strain on the eyesight
To work you need two needles. One long one (minimum 5.5 cm) for weaving and another smaller one for embedding threads. The size (diameter) of the needle depends on the number of beads (the width of the hole in the bead).
First of all, it is necessary to ensure the correct thread tension on the machine. To do this, high-strength threads are selected, which are pulled from the right side of the machine to the left or vice versa. The instructions for the machine must tell you how to thread the warp threads onto it. All of them should be tensioned with the same force, there should be no overtightened or sagging areas. The length of the threads is the length of the planned product plus 40-50 cm for ease of attachment to the machine. The number of threads should be equal to the number of beads in one row plus one more thread. Each row of beads must be secured carefully to avoid the pattern shifting.
Strong fastening of the threads is also required upon completion of the work. To remove the finished fabric from the loom, you should pull all the warp threads tightly to the weave. The strength of the threads ensures that the beads will not fall apart during use.