Interesting ideas for choosing a location
To store cereals, it is permissible to choose interesting places that will help maintain its freshness and save space in the kitchen.
Secret sliding panel
To hide your supplies, you should build a pull-out shelf into your kitchen unit. In appearance it resembles an ordinary decorative panel. This is an unusual method that does not require significant costs.
Hanging shelves
This option is well suited for a small kitchen. Moreover, it is quite acceptable to place hanging shelves on the refrigerator. This will help save space and become an unusual design solution.
Retro cabinet
A hanging wooden cabinet, complemented by glass doors and metal handles, looks good. This design will fit perfectly into a classic kitchen. In this case, the boxes can have a symmetrical or chaotic arrangement.
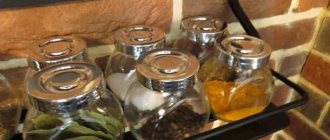
Alchemy laboratory
Small corks with spices and flasks with cereals look good on a hanging shelf. To make the design even more impressive, add mystery vessels filled with vegetable oil or vinegar. Such a structure will look very mysterious and interesting. However, it is not recommended to hang such a shelf above the stove. Constant exposure to high temperatures negatively affects the performance of products.
Hanging stand
A non-standard option are containers that are hung with strong hooks. They can be fixed on metal or wood. It often has to be made protruding in order to organically arrange dishes with cereals. It is best to choose elongated narrow containers.
Magnetic board
This method is more suitable for spices, since large dishes will look a little strange. In addition, it is much easier to place small containers on the board. To implement this solution, it is worth attaching a magnetic sheet in a convenient place. Then you should choose small jars with metal lids or magnets. They should be attached to the canvas in any order. To use this method for cereals, you will need a lot of space and powerful magnets. However, the containers should not be too heavy. They are placed so that you can comfortably reach each can.
How to store fireweed tea at home, rules and methods of drying
Rack with pull-out shelves
An unusual option would be a small narrow cabinet with pull-out shelves. It is worth making several spacious drawers for pasta and cereals. It is also permissible to provide space for tea, coffee and spices. A cabinet designed to match a kitchen set will look very organic. Pull-out shelves greatly simplify the search for products and organize their placement.
As decor in the kitchen
Fans of rustic design should place beautiful containers for cereals and spices on small shelves. It is recommended to choose beautiful covers for them - they can be wrapped in fabric. You should not place more than 2-3 containers on one shelf. In this case, the interior will be overloaded.
Drawers
An interesting solution would be many small sealed boxes that have transparent side doors. At the same time, you should allocate a separate area in the kitchen for containers or order an unusual set with built-in drawers. Thanks to this, the room will look more original.
Alchemy laboratory
DIY gift box: how to make beautiful boxes from paper, cardboard and other materials
Probably, almost everyone in childhood dreamed of becoming a wizard. Now you can at least partially realize your dreams! Small narrow test tubes with spices and wide flasks with cereals and pasta will look very impressive on a hanging shelf.
You can also add mystery bottles of vinegar and vegetable oils. This design looks very interesting and mysterious. However, be careful not to hang it over the stove, even if your beakers are heat-resistant: constant heating does not improve the properties of the food.
An interesting technique: Containers with glass of different colors can add originality to an already interesting idea. If you decide to place vegetable oils on this shelf, make them aromatic - add herbs or berries to them. This will make your shelf look even more like the shelf of a wise wizard.
Box with lid
Well? Let's proceed directly to creating the box? To get started, we suggest choosing one of several templates. There are options with a hinged lid and a lid that will separately cover the box.
Each of these box options is interesting. For example, a narrow box is more suitable for watches, gloves, books, a tie, jewelry, and a voluminous wide box is more suitable for toys, vases, tableware and other gifts.
So, first you need to transfer the pattern to the main material and cut it out. Now you need to carefully bend the box along the dotted lines (use a creasing tool).
Use double-sided tape or PVA glue (or any other glue) to join the box pieces together.
Now all that remains is to decorate the box, for example, using regular postage stamps or any other decor that will match the theme of the gift.
Travel organizer for cosmetics
Cardboard furniture for a dollhouse: making the interior from improvised materials (54 photos)
The travel organizer is a fabric case with many pockets and compartments sewn onto it. It easily rolls up and unfolds if necessary. This organizer takes up little space and is very convenient for traveling. We will sew an organizer from felt. It is easier for beginners to work with, since felt does not require additional edge processing. We will need:
- 2 pieces of felt. First piece: length – 30-50 cm, width – 20 cm. Second piece: 2 cm longer than the first piece, width – approximately 10 cm.
- Velcro or tape;
- scissors;
- needle and thread.
Sew a travel organizer:
- Connect two pieces of felt so that one edge matches in length and width.
- Sew the smaller piece to the main one along the width edge.
- Sew the pockets without stretching the fabric (so that you can put mascara, lipstick or a brush there).
- Sew the remaining sides of the pocket along the length and width.
- Sew on some tape or Velcro to keep the organizer closed, and you're good to go.
Creative box
You will need: cardboard, scissors, a utility knife, pine cones, bamboo sticks, glue, acrylic craft varnish, ruler, pencil.
Master Class
- Cut out a square of cardboard measuring 5.5 x 5.5 cm - this will be the bottom of the hut.
- Cut out 4 trapezoids measuring 5.5x7.5cm and 5.5cm high - these will be the walls of the hut.
- Cut the ceiling out of cardboard measuring 7.5 x 7.5 cm.
- Cut 4 strips measuring 6.5x1cm.
- Cut out 2 equilateral triangles with sides measuring 6cm and 2 rectangles measuring 7x6cm - this will be the roof of the hut.
- Glue the parts of the house together.
- Glue the roof parts together.
- Draw windows and doors with a simple pencil.
- Cut off the scales from the cones and glue them to the roof as shingles.
- Cover the hut with bamboo sticks.
- Select windows, doors and chimney as in the photo.
- Glue 2 cones to the bottom of the hut as chicken legs. Glue additional scales as fingers.
- Glue bamboo sticks together to form a ladder.
- Cover the hut box with acrylic varnish and leave to dry.
The hut box on chicken legs is ready!
Where to place
DIY cardboard letters
This criterion depends on the type of set. Containers can be presented in the form of compact sets intended for serving. They can be easily removed if necessary or moved to another surface. You can also see such models in restaurants or cafes.
If you plan to use many spices in large volumes, then you will need spacious containers for them. It is better for them to immediately assign a place in the kitchen where it will be convenient for them to reach. If the storage surface is metal, then it is advisable to purchase a set with magnets. This option is convenient because it will not accidentally tip over and spill the contents.
A set that can be screwed to the wall would also be a good choice. This way you can save space on your work surface. And the necessary jars are always before your eyes and within reach.
How to decorate with rope: master class
There are different ways to design a storage box. From ordinary cardboard containers you can create an original basket for threads, socks, toys or cosmetics. An interesting solution is a product with rope decor.
To make it you will need a regular cardboard box, rope, and a glue gun. Then we proceed to making a decorative container:
Take the box.
Use scissors to cut the flaps off the box.
Then wrap the rope around the box. As you work, you need to glue each part of the harness.
- The rope must be glued to the very edge of the box.
- In order for the product to acquire a complete look, it is necessary to make an insert from a light material. The lining is placed inside and the fabric is folded outward.
A beautiful homemade basket can be used for various interior solutions.
DIY kitchen organizers
How to organize your kitchen space: organizer ideas
No matter how much space there is in the kitchen, there is always not enough. It’s not surprising, because this multifunctional space requires so many accessories - all kinds of dishes, food, cleaning products, useful and decorative items
At the same time, it is important that using the kitchen is as convenient as possible, and that being here is comfortable and pleasant. Various organizers will help prevent clutter and clutter in your space.
They can be purchased at the store or made from scrap materials. Use the ideas below to bring beauty and order to your kitchen.
Stages of work
A ready-made frame can be purchased at an art store or hardware supermarket, but it must be uncoated in order to be able to paint the product in the desired color.
Do not forget that after each stage it is advisable to clean the brush of paint, especially before applying varnish.
A piece of beautiful fabric, lace or a regular picture is inserted into the frame, which will become the background for the future organizer.
The decorations will be held on by ropes (ribbons) or self-tapping screws. Sections of rope along the length of the frame are located along the product and secured either with a stapler or glue.
You can hammer in 2 small nails on each side and simply pull the rope over them. Large nails, metal hooks and baskets can serve as jewelry holders.
At the last stage, you need to secure the loop with a self-tapping screw in order to hang the picture on the wall. The jewelry organizer is ready!
What can it be made from?
Various types of materials are used to make organizers. What materials are suitable for the kitchen:
- Tree. The kitchen space becomes cozy and homely if the interior contains objects made of wood: kitchen furniture, shelves, cabinets. Wood is an environmentally friendly material, but it does not tolerate high humidity.
- Plastic. Containers, trays, and stands are made from high-quality plastic. Plastic is resistant to thermal and mechanical damage, moisture resistant, but fungus may appear on plastic objects.
- Metal. Spice racks, dryers, towel holders, rails and other organizers are often made of stainless steel. Metal objects fit perfectly into the high-tech style, but require some care. After contact with water, stains may remain, so you should carefully wipe metal products and use special cleaning products.
What materials are best avoided:
- Chipboard. Despite the fact that budget kitchen furniture options are made from this material, it is the most short-lived and fragile. In addition, chipboard contains harmful chemical compounds that begin to evaporate over time. Chipboard quickly gets wet, completely absorbs moisture, which is why it quickly loses its original appearance.
- Low quality plastic. When choosing organizers for storing kitchen utensils, do not buy products made from cheap, low-quality plastic. They will quickly lose their appearance, fade, and become covered with stains that cannot be removed. It should be noted that some products made from low-quality plastic are coated with cheap paint that contains harmful substances.
Wood
Metal
Plastic
How to sew decor for a sweater box
Unconventional ideas, for example, a storage box made from a sweater, will help you decorate the space in your home. To do this you will need an old knitwear item, a cardboard box, scissors, a glue gun and ribbons for handles. Wicker elements can also be used as handles.
The master class includes the following stages:
- From the middle of the sweater, cut a suitable piece of fabric that should cover the box with a margin. The material lies around the perimeter.
- The canvas is glued to the cardboard base using glue.
- Tuck the edges of the knitted fabric inside the box and secure them firmly.
- Attach pre-prepared handles to the sides.
The result is a stylish item that will fit perfectly into any interior.
DIY oak spice boxes
Hello to all those who love working with wood. In this tutorial we will look at how to make beautiful spice boxes, as well as a special shelf for them. Everything is made from oak; finding such material should not be difficult for you - it is ordinary dead wood that often lies in the forest for years. The boxes are made very quickly and simply, they are solid, you don’t need to glue anything except the handles for the lids. The main tool in this matter is the router. This homemade product will be a great gift for your hostess and not only! I suggest you read the instructions in more detail.
List of materials:
- dead oak; - wood glue; - wood oil; - wooden dowels.
List of tools:
— milling cutter; - pendulum saw; - grinder with Velcro attachment; - drill.
Homemade manufacturing process:
Step one. Cutting the blanks
First of all, we need to cut the required number of blanks. We take oak logs of suitable diameter and cut them with a chainsaw. Next, the author gives them a rectangular shape using a pendulum saw. The machine cuts quite well, the cut is clean. Make sure that there are no large cracks in the wood, otherwise the box may fall apart.
Step two. Milling
For ease of work, we place the workpiece on the table and fix it on all sides by screwing blocks or planks. Now our workpiece is not going anywhere.
Step three. Making caps
We also make handles for the lids; here we will need small blocks. We sand them, give them an oval shape and glue them into the lids with wood glue. The author carefully hammers the handles into the holes in the lids, so they will hold as securely as possible.
Step four. Shelves
Don’t forget also about the legs; we make them and attach them to the base using dowels and glue.
Step five.
Impregnation Step six.
Completion That's all, our masterpiece is ready! I hope you liked the homemade product. Good luck and creative inspiration if you decide to do this again. Don't forget to share your ideas and crafts with us!
Become the author of the site, publish your own articles, descriptions of homemade products and pay for the text. Read more here.
Long-term storage of spices
Long-term storage of spices, for example, in reserve, is best done in vacuum bags. This method is optimal from all points of view: it eliminates contact with air, which during long-term storage can cause changes in the taste and aroma of spices. Vacuum bags prevent the smell of spice from permeating surrounding objects.
Typically, spices, which are dried, sometimes crushed parts of plants, are not a perishable product. Therefore, there is no need to keep them in an absolute vacuum. Simply release excess air from the bag and secure the bag closed with a clip, clothespin or any other device.
If necessary, spices can be stored in this form for years. True, for successful storage of spices in this state, certain conditions must be met: when packaging, the contents must be absolutely dry, and the packaging process itself must be carried out at low air humidity.
Otherwise, when packaging a damp product, it may change its taste and aroma qualities over time.
How to tell if your spices have gone bad
Dried herbs and spices don't actually expire in the traditional sense, and they don't spoil.
When a spice is said to have gone bad, it simply means that it has lost much of its flavor, potency, and color. Fortunately, eating spoiled spice is unlikely to cause any harm.
Store-bought spice packages are labeled with expiration dates, which indicate the length of time they will retain their strongest flavor and quality ().
In general, spices that have passed their expiration date can still be safely consumed, although they will not add as much flavor as their fresh counterparts.
If you don't know how long your spices last, you can tell if they need to be replaced by their smell and taste. Crush or rub a small amount of spice into your palm. If the smell is weak and the taste is dull, it's probably time to replace it.
Applying a marble pattern
- Fill a large plastic container with warm water. Then add a few drops of nail polish in several colors.
- Using a toothpick, carefully spread it over the surface to create abstract splashes.
- Put on gloves and pick up a tin can.
- Gently dip it into the water, turning it a little at a time. You will see how the varnish sticks to the surface, forming a bizarre pattern.
- Add a little more varnish to the water and repeat the same procedure with the lid.
Let the can dry for 24 hours and then coat it with clear varnish. You can experiment with a variety of colors and combine them in different ways. But keep in mind that the most “natural” patterns produce cream and white, as well as light green pastel shades.
I love how the resulting cookie boxes look in my kitchen. All the beauty is in the details.
Found a violation? Report content
What containers should you store spices in?
Most types of spices are sold in sealed paper, foil bags. Suitable packaging, but only for opening. Houses need to be rebuilt immediately. You can’t tear off a corner, throw it away, or throw it in a box. The contents of the sachet will expire during storage. We make it a rule to immediately transfer it to another container. And be sure to close tightly after each use.
Suitable container:
- glass jars;
- ceramic containers;
- sealed bags.
Not suitable:
- plastic bags;
- fabric bags;
- plastic.
Many housewives use plastic containers. They reliably protect from foreign moisture. Only the material absorbs the aromas of other products and then releases them. Plastic can also release its synthetic odor. Hindus believe that magical additives should be kept exclusively in natural materials. For this reason, polyethylene is rarely used.
Glass jars are ideal for storage. They reliably protect from moisture. When kept indoors, it is not necessary to buy special containers. An excellent temporary solution is jars of baby food and various sauces. If necessary, remove the label and decorate the surface.
Previous Storage systemsOptions for making a garage rack Next Storage systemsDescription and production of shelves for wine
Organizer made from packaging containers
Every home has hard packaging for household appliances, gadgets, shoes and other household items. To make your own stationery organizer, these boxes can be an excellent base.
The work does not require design skills; you only need scissors, glue and materials for decoration.
Example:
- Give the shoe box a beveled shape, cutting off the excess. Carefully cover the sections with tape or tape.
- Make partitions from the lid, secure them with glue or using fixing slots.
- Decorate as you wish - with colored paper, decorative film, stickers or paint.
Since shoe packaging, as a rule, uses dense and processed material, the characteristics of which are close to thin plywood, a product made from it will be quite strong and durable.
Also suitable as walls for a built-in solution - in a desktop drawer.
Where will we place the jars?
We have decided on the containers for the product, now we need to think about where to put them. There are also several ideas for this, and which one to choose is up to you.
Kitchen drawer
The most common way is to put our jars in a drawer. This way you won’t have to look for them for long. In addition, they will always be protected from direct sunlight and moisture.
Railings
A railing is an iron tube fixed to the kitchen wall. You can hang anything on it: souvenirs, mugs, cutlery. Therefore, if your spices are stored in containers with a hook or in bags, the rail will be an excellent assistant for storing them.
Multi-level rack
A multi-level rack is several narrow shelves with holes into which jars or test tubes are inserted. This design will not take up much space and will always look laconic in any interior.
On the side of the door
This option will save you from worrying about the safety of spices. Being on the inside of the door, they will always be in the shade and will not deteriorate for a long time.
Now you know the basic ideas for storing in the kitchen, you can stylishly arrange your spices in different containers.
Rules and terms for storing spices in the kitchen
First of all, it is worth noting that spices cannot stale, rot or deteriorate so much that they become unsuitable for food.
The only thing that can happen to them is loss of taste and aroma. And this is much more offensive than mold on the seasoning.
Therefore, when replenishing your set of spices, be sure to look at the date of manufacture and promptly update the contents of the “jars,” bags or bags.
Remember that the shelf life of spices in powdered (ground) form is several times lower than that of whole spices.
- For whole spices: 1-2 years for flowers and leaves, 2-3 years for seeds, and 3 years for roots.
- For ground ones: 1 year - for leaves and seeds, no more than 2 years - for root vegetables.
- The leaders in terms of shelf life are pepper, cloves and the beloved cinnamon.
As for storage rules, they were invented back in the days when every spice was worth its weight in gold.
They haven't changed since then:
- Spices should be stored in containers with tight-fitting lids. For example, in ceramic, glass or tin containers. It is not recommended to leave this “kitchen gold” in bags due to their absolute leakage after the first opening of the package.
- If you buy whole spices and then grind them, you should not grind the entire volume at once - store them in their natural form and grind exactly the amount needed to prepare the dish. This way your spices will “live” much longer (especially nutmeg, cinnamon sticks, cloves). To compare the aroma, you can conduct an experiment on storing ground black pepper and peppercorns: the latter, even after six months, will remain fragrant after grinding, while the ground one will lose its “freshness” and pungency.
- Hide spices from the light! Do not place your precious clear jars in direct sunlight. It is better to choose opaque containers and put them in a dry and dark cabinet.
- Do not dip a wet spoon into the spice jar. And don’t climb there with wet fingers (and you shouldn’t use dry ones either). The seasoning loses its properties after getting wet, in addition, the formation of mold is quite possible. This advice also applies to those housewives who pour seasonings into a saucepan, holding the jars over steam - this should not be done for the same reasons. Use a knife or spoon.
- Individual spices/condiments are stored exclusively in the refrigerator. For example, seasonings based on paprika or chili. It is in the cold that their wonderful taste and aroma are preserved. You can also put sauces and vinegars, herbs, aromatic herbs, celery and ginger in the refrigerator. Other spices, on the contrary, do not like cold.
- To avoid the colonization of your spices by various insects, you can place a bay leaf on top of the seasoning in each container.
- Keep spices as far away from the stove as possible. Many people like to beautifully arrange jars over the stove so as not to waste time searching, but this storage method significantly worsens the properties of spices.
- Once every few months, do a complete audit of the spices in your kitchen. Check their freshness, aroma and shelf life.
- Place those spices that contain oil in the freezer (note: sesame seeds, poppy seeds, etc.). This way you will avoid them going rancid.
By the way, many of the spices and seasonings are natural antibiotics.
Rules for storing spices
All spices are stored in the dark and far from heating devices, including the stove.
Do not take out the seasoning with damp spoons or wet hands and pour it into the dish, holding the bag over the steam.
It is advisable to store spices in dark jars or bottles with tight seals. The best option is tin jars with tight lids.
Storing red pepper, chili, paprika, preferably in the refrigerator. Poppy and sesame seeds are stored in the freezer because they have a high oil content. They won't go rancid in the cold.
To prevent bugs from infesting, each spice should be accompanied by a bay leaf.
It is advisable to store different seasonings separately so that they do not absorb extraneous odors.
It is imperative to check spices annually for shelf life and shelf life.
Closed storage method
Advantages:
- Less time is required for cleaning - the spices will not accumulate as much dirt as when stored openly.
- You can store seasonings in their original packaging, which is quite convenient and economical.
- The kitchen is guaranteed to look neat, regardless of whether you have tidied up the spice rack or not.
- Simplicity and ease of use, without constant attention to beauty.
Flaws:
Spices will have to be taken out from somewhere each time, and then put away again - this requires self-discipline, otherwise chaotic storage throughout the kitchen will return.
Whatever method you choose for yourself, do not forget 3 rules for organizing storage:
- All packaging and containers should be clearly visible, so you should not pile up packets of seasonings on top of each other, or block one jar with another.
- The contents of the jars or name labels should also be very clearly visible. If in a spice box you only see a lot of identical opaque lids, then there is no question of any effective storage, because it is very difficult to find anything in such a box.
- Try to store all the spices in one place (on one shelf, in one drawer, on one door, etc.) - this saves space in the kitchen, ensures order and makes searching easier. It is very difficult to find something when spices are scattered across different cabinets and shelves.
From general recommendations we will move on to a description of specific methods, which for convenience we have divided into 2 large groups - for open and closed storage.
Manufacturing process
First you need to prepare the surface of the cans for work.
Will the museum of Lady Lamp, who was a nurse in Crimea, be closed due to debts?
A friend taught me how to make a chocolate “Cube” with filling: a simple recipe
You can’t relax in these: what US beauty salons were like in the 1950s-1960s.
- Tear off all tags and stickers, both inside and outside. If the paper is difficult to come off, use white spirit, which will neutralize the glue. Or leave the jars in water for several hours. If necessary, sand the surface with fine-grit sandpaper.
- Then spray the jars with a coat of white paint. It is best to use aerosols, since in this case the pigment spreads evenly. If you only have a brush at your disposal, then do not forget to lightly sand the surface after. Apply at least 2 coats.
How to store spices: original DIY ideas
What if there are a lot of spices, but not enough space in the kitchen? There are many practical and aesthetic solutions to this problem.
On the inside of the cabinet door you can make a convenient shelf for jars of seasonings, and paper bags are well stored in special pockets. A drawer that can be divided into compartments for convenience is also perfect. Some housewives use a narrow, high box for spices near the sink, in which household chemicals are usually stored; you can make several shelves for jars in it.
Creative and imaginative cooks have come up with interesting ways to store seasonings, such as gluing jar lids to the outside of wall cabinets or attaching magnets to the lids and then molding the jars onto the refrigerator or metal knife holder. This method can become an original decoration for the kitchen, as can stylish racks for seasonings or multi-level stands, which are best kept on a table or in a cabinet, away from the sun.
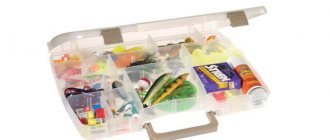
An economy class option is to store spices in a beautiful cardboard box, basket or plastic container. You can make or buy a shelf and hang it on the wall, place spices on a rail, or hang paper bags with seasonings on clothespins. An excellent option is an organizer with many transparent and convenient pockets, jars of Tic-Tac pills that you can take on a trip, and medical test tubes that turn the kitchen into an alchemist’s laboratory.
Spices can change the taste of any dish beyond recognition; they make familiar home-cooked food brighter and more interesting. However, if you are cooking for children, do not use hot seasonings and add spices to food in small quantities. Nutritional supplements can be used in children's food from two to three years of age, but turmeric and saffron are best left for school age. Store seasonings correctly so that they retain their original taste and freshness for a long time!
Budget organizer option
You have already seen that you can make an office organizer with your own hands without much effort and financial expense. You can easily find a master class on the global network. And if you know how to think creatively, come up with your own version. For example, you can make an original cup from a tin can. Decorate it at your discretion with any accessories. To avoid being irritated by the sound of pencils and pens hitting the metal bottom, cover it with viscose fabric.
Make this a fun and super convenient box organizer, perfect for displaying and storing your ship supplies and desk accessories. Apply artist's tape of your choice to the outside of the drawers. Start painting on the outside of the box and leave it dry.
DIY dream catcher - jewelry organizer
Now apply masking tape to the back of the box in the design of your choice. Paint the inside of the drawer in the color of your choice. Paint the edges of the box with a complementary color and set to dry. For a design that pops, try a complementary neon color.
Step-by-step description of the creative process:
- To create an organizer, any can of canned food, such as green peas or sweet corn, is suitable.
- We thoroughly wash and dry the jar.
- The edges of the tin can must be bent well with pliers to avoid injury.
- Now you can start getting creative. Tip: Do not remove the paper sticker from the jar, this will make it easier to decorate.
- Take decorative paper and measure the tape to the height of the can.
Repeat steps 1 and 2 with other fields. Apply a thin coat of paint to each bulldog clip in the same color as the edge of your boxes. Allow the paint to dry completely before applying the next coat. Use bulldog clips to join the boxes together. You can arrange your boxes in any design. Try stacking them on top of each other, or placing them in a row diagonally and connecting them together.
Ok, your box organizer is now ready for storage! Use a bunch of boxes to maximize your office to its full storage potential or choose a few boxes for small storage. Your new colorful containers will help reduce desk clutter.
Glue it to the jar and let it dry for 10-15 seconds. Now we coat the second part with glue and glue it. To ensure that the decorative paper lies flat, smooth it with your fingers and press. We pay special attention to the joints; they must be well saturated with glue.
It's compact enough for small spaces and provides space for everything. It is very convenient for storing ship accessories and over time, you can easily rearrange and add more boxes to suit your needs.
What do you think of my storage solution for your desk? Do you have any other clever storage ideas? Read on to know how! Rule Pencil White tail brush. The first step to start creating your work organizer is to measure the template using a ruler and pencil. Remember to leave enough space on the edges of the templates to ensure it is secure enough when your desk organizer is finished. When you have all the templates checked and cut out with your chosen measures, you are wondering what is the second step in how to make an organizer.
- The sound of objects hitting the metal bottom will become annoying over time. There is no need to stress yourself out and take sedatives; it is better to prevent this right away.
- We take viscose fabric, maybe a kitchen napkin, trace the bottom of the jar and cut it out.
- Glue viscose to the bottom.
- Our organizer is ready. We built an unusual stand for stationery items simply, quickly and cheaply.
Open storage
To make seasonings look beautiful and neat, they need to be stored in identical jars. Storing in original packaging and jars of different colors, sizes and shapes does not look attractive and is unlikely to decorate the kitchen: no matter how beautiful a shelf or stand they are placed on, the different packaging will still create a feeling of untidiness and disorder. The same goes for labels - if you are signing jars, all labels need to be made in the same style.
Shelves for spices in a kitchen set are undoubtedly one of the most beautiful and convenient solutions for open storage. If you are in the process of choosing kitchen furniture and want to store seasonings on open shelves, then the best option is to order them as part of the set.
The only thing you should pay attention to when ordering is the height at which the small drawers will be located (if they are present in the project). Make sure you are tall enough to easily look into them
Two of my friends had the same funny situation: they both had to stand on a stool for this purpose. Only one friend has drawers that can be pulled out freely, so she doesn’t have any particular problems using them. But another friend has them firmly mounted into the base, so she cannot use them normally.
Open shelves are also a great solution for storing spices. They delightfully transform the kitchen if you successfully match them with the rest of the interior. The use of shelves gives unlimited scope for imagination: you can find a beautiful ready-made option, or you can make them yourself or beautifully decorate the purchased product.
There are interesting collage shelves on sale that can give the kitchen a unique coziness and charm.
The main secret to conveniently storing spices on shelves is that they should be very shallow - literally enough for one jar. Otherwise, the seasonings will stand in several rows, covering each other. Needless to say, every time the required jar will end up in the farthest corner, and in order to get it, you will have to “dig up” the entire shelf? And this is long, inconvenient and instantly creates a mess.
Railings are quite often used for open storage of seasonings in the kitchen. They are convenient and functional, take up minimal space and can be made in a wide variety of styles and designs. In addition to the usual matte or chrome roof rails made of white metal, the modern market offers collections in gold, bronze, brass, black and brown, etc. Thanks to a wide variety of styles and shades, beautiful and comfortable rails can be easily matched to any kitchen.
Another popular method is to store seasonings on a rack. The large number of commercially available options makes it easy to choose the product that is optimal in size, functionality and appearance.
This solution provides another additional benefit - the ability to easily move spices from place to place, which can be very useful from a practical point of view. For example, if you want to have all your seasonings at hand while cooking, but you don’t like the idea of open storage due to dust and dirt settling on them, then storage on a stand will be the best option for you: before you start cooking, just put it’s next to the hob, and then just put it in the closet.
Magnetic spice jars are a very convenient, functional and quite original way to openly store seasonings in the kitchen, allowing you to place them on any metal surface.
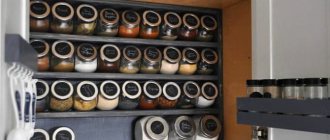
Another original solution could be the placement of seasonings under wall cabinets. Technically, this is done in 3 ways: magnetic strips for metal containers or lids, a metal sheet for magnetic jars, or regular rotary lids for screwing jars of seasonings into them (for example, baby food) are attached to the bottom surface of the wall cabinet.
It is very important to choose beautiful identical jars so that this original solution does not look cheap and sloppy
To organize open storage of spices, you can adopt a few more unusual ideas:
Storage in a special chest of drawers, which combines the advantages of both open and closed methods.
Storage in test tubes. To prevent the test tubes from falling into the holes in the wooden shelf, rubber O-rings are placed on them. And the test tubes on the stand can be stored either openly or closed - inside the cabinet.
Storage in bags on railings
Knitted boxes and baskets
With a little effort, you can create stunning crocheted storage boxes. Such products are suitable for the interior of any room. The original solution is boxes for the dressing room. Such items will not only decorate the interior, but also make it more functional and practical. They are used to place all kinds of things. You can make stylish decor with your own hands.
Detailed lessons on how to weave a basket yourself, as in the photo, follow the link!
Compact and spacious baskets will help create coziness in the kitchen. To make them you will need a hook and ribbon knitted yarn. Such products can be used for storing nuts, eggs or baked goods.
Additional storage containers will also come in handy in the bathroom. With their help, you can correctly place all the items. Original baskets can be fixed in one of the corners of the room.
The elegant decor is also suitable for decorating the living room. You can store blankets, books, firewood or TV bullets in it. A similar basket is especially appropriate in the hallway. Changes, bank cards, wallet or keys will fit inside.
This knitted item looks perfect as a flower pot. Bright decorative elements will create original accents in the room.
Crocheted boxes are best made using a crochet hook. There are a large number of schemes with which you can create an original product.
Baskets made from Ribbon or Spaghetti yarn, braid, rope or knitted yarn are popular. To create decor, you can choose synthetic or cotton yarn. This material is a continuous narrow strip. Products made from yarn are knitted in a short time and hold their shape remarkably well. The original box is ideal for the garden. The basket can be made with or without handles. You can also create a knitted item from old T-shirts, cut into ribbons. The knitted strips should be pulled in different directions so that the edges are rounded. A 10 mm hook is used for this work. Knitting a basket begins with an amigurami ring. For this you will need a special circuit. Then knitting is done in a circle.
Storage shelves
It is quite possible to use shelves in the kitchen for storage, in which there is no humidity and there is no direct sunlight. But for convenience they need to be slightly modernized. Options:
- Make "steps". The step height of such an improvised ladder is approximately 1/3 of the height of the can. You can place spices along the steps, with those that are used most often placed closest.
- Create a retractable system. It will require several vertical type guides. An open mini-shelf with spices will move along such a rail. The guides need to be mounted to the “ceiling” of the shelf.
- You can use the original system. When the spices are not in standard jars, but in test tubes. Moreover, each will have its own small compartment, where it will be immersed to half or a third of its height.
Textile box: master class
Using simple materials, you can create an original textile product for storing various items. To make it you will need a piece of thick fabric.
So, a fabric storage box is made in several stages:
- You will need a piece of fabric with dimensions 48*43.5 cm.
- This piece of material has squares cut out at the four corners, measuring 14 cm by 12 cm.
A template is made from paper. With its help, it will be possible to make markings to connect the parts of the textile box.
The distance between the marks should be 15 cm in length . When performing calculations, you need to make sure that there is enough material for the job. Marks can be made using a ruler.
Then place the template on top of the material. Using the marks, cuts are made along the width of the strip of fabric that will be used to sew the box together.
Then strips of fabric are pulled through the holes made.
- A total of four strips are required, 0.7 cm wide and 16 cm long.
- After pulling the pieces of fabric into the product, they need to be cut off at the top.
When the box is ready, you need to put heavy pieces of wood into it to give it the desired shape.
Plain fabric or pieces of leather are selected as strips for stitching.
A spacious and original storage container is ready.
Spices storage and packaging
One piece of advice right away: store those spices that you use frequently in close proximity to the cooking area. Ideal when all you have to do is reach out your hand to get the jar you need.
Soft store packaging
This is the easiest and cheapest way. Such storage is far from ideal; after opening the package, one of the important conditions is not met - the tightness of the container. What can you advise in this case? After opening the package and using part of its contents, fold the torn edges twice and secure with any clamp, at least the same paper clip. Store the sachets in a container or box.
You can place seasoning mixtures (for chicken, fish, barbecue) separately. Arrange the remaining seasonings in alphabetical order.
One of the manufacturers of kitchen utensils came up with a convenient way to maintain tightness and store such bags. At the first opening, a dispenser with a clip is put on the bag. The dispenser lid may have different openings depending on the particle size of the contents.
When finished, such bags can be hung on a carousel stand designed for this purpose or on a wall holder.