Autumn is the time when you want to create, because inspiration can be found everywhere, you just have to go outside, take a walk in the park or to the lake. Very soon, someone will begin preparing for Halloween, while others will simply want to decorate their home with autumn motifs. Pumpkin is a key feature of autumn, and it can be made from plaster, as - see in this article.
How to make a pumpkin from plaster with your own hands
DIY plaster figure of a pumpkin
In anticipation of Halloween, you can make long-lasting, interesting and beautifully scary decorations. In this master class we will make something like a pumpkin using a special solution. The result will be a plaster figure of a pumpkin, created with your own hands, which you can then use repeatedly.
To work you will need:
dry gypsum for mixing the solution;
marker or paint;
glitter paint;
Step 1
. Select a small to medium sized pumpkin and thoroughly clean it of any dust or dirt.
Step 2
. Take a marker or paint and use it to draw on the pumpkin the shape of the eyes and the outline of the holes where the nose and mouth will be located. At this stage, you can give the workpiece a good or, on the contrary, an ominous expression.
Step 3
. Using a knife, cut out all the necessary details of the future mask.
Step 4
. Place the resulting pumpkin blank on the surface. It is most convenient to use soil in which the pumpkin must be buried to the middle. Instead of earth, it could be sand. Point the character's cut-out face upward. To make the plaster easier to separate from the vegetable, you can lubricate its surface with a thin layer of Vaseline or oil.
Step 5
. Mix the gypsum solution. For the first layer it should be liquid. You can see the approximate consistency of the composition in the photo. This is necessary so that the solution accurately follows all the drawn lines. Apply plaster of Paris to the pumpkin.
Step 6
. Let the first layer dry a little and then apply the second. You will need two layers in total, and each time you can mix the solution thicker. As a result, the thickness of the walls of the mask should be about 3 cm.
Step 7
. Carefully separate the hardened plaster mask from the pumpkin.
Step 8
. Using a knife, following the existing outlines, cut off all excess and adjust the mask to the shape of a real pumpkin.
Step 9
. Paint the resulting pumpkin on all sides with gold glitter paint.
The decorative craft is ready! When you light a candle, it will look very bright and original; in the light of the flame, the sparkles will shimmer. You can use this mask repeatedly.
Source
DIY plaster pumpkin: MK
Autumn is the time when you want to create, because inspiration can be found everywhere, you just have to go outside, take a walk in the park or to the lake. Very soon, someone will begin preparing for Halloween, while others will simply want to decorate their home with autumn motifs. Pumpkin is a key feature of autumn, and it can be made from plaster, as - see in this article.
How to make a pumpkin from plaster with your own hands
What is papier-mâché?
It's easy to make a papier-mâché pumpkin for Halloween celebrations. You need to prepare unnecessary paper, it could be old newspapers or unnecessary notebooks covered with writing by students.
You also need to pre-brew the paste. It is made as follows: take a tablespoon of wheat flour, slowly add one glass of cold water in a thin stream, while stirring constantly. Then put on low heat and, continuing to stir, bring to thickening. It must be taken into account that when it cools, the paste hardens even more.
Plaster pumpkins. It wasn't as easy as I thought.
Good evening, my dears!
Yesterday a video was released on the channel in which I shared with you an interesting and budget-friendly way to make beautiful decorative pumpkins from plaster. The result is really beautiful and unusual, but I wouldn’t call the process very easy.
Girls, I worked with plaster for the first time and I’ll honestly say that I ruined the first bag of plaster. I decided to immediately mix the solution for two pumpkins and while I was making the first one, the remaining solution had time to set and was no longer suitable for further work. Therefore, my advice is to knead first on one and only then on the second pumpkin.
The next stage also surprised me a little. I thought that the nylon would come off the plaster very easily, but in reality this turned out to be completely different. I was covered in white plaster dust, with torn nails, but with rather cute pumpkins.
Halloween symbol
The main symbol of this holiday is the “Jack Lamp”. It used to be made from turnips, but pumpkin was cheaper, and the poor switched to making candle vessels from pumpkin. People believed that if you cut a scary grinning face out of a pumpkin and put it on the windowsill, then all evil spirits would avoid the house.
Now many people make such a pumpkin from papier-mâché. Using this technique, you can come up with any shape, give it individual features, and use your imagination. This has become an interesting hobby for many hand-made masters.
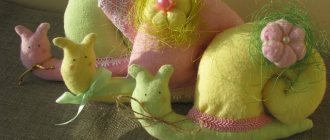
Spectacular decor: DIY concrete pumpkin (master class)
Today we will make beautiful concrete pumpkins that look very interesting both in garden and interior decor. By the way, on our website we have a large review with ideas, which presents 12 master classes on making pumpkins from a wide variety of materials, follow the link for inspiration! Well, in today’s review we will present to your attention another method for making pumpkins.
What can I use for the base?
To create a papier-mâché pumpkin, you need to have a base. This is a form that is subsequently pasted over with strips and pieces of paper. Many experienced craftsmen use an inflated balloon. To make the pumpkin figure ribbed and look like a real one, the ball is tied tightly with rope, creating sectors such as in the photo below.
After finishing the work and completely drying, the ball is simply pierced with a needle, and its remains, together with the rope, are pulled through the hole.
DIY concrete pumpkin (master class)
WHAT YOU WILL NEED FOR WORK:
- Cement;
- Dry moss (sold in garden stores);
- Perlite for plants (can be purchased at a garden store);
- Nylon tights;
- Scissors;
- Elastic bands or twine;
- Sisal rope;
- Bucket;
- Water;
- Spoon for stirring;
- Hot glue;
- PVA glue;
- Brush;
- Coffee grinder.
Well, let's get started. First, cut off the bottom stocking part of the tights.
Pour perlite into a bucket, add cement, pour water and mix everything thoroughly.
Perlite will allow the finished product to ultimately be light, and not so heavy if only cement were used.
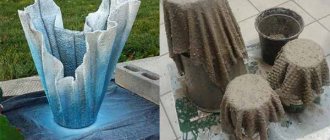
Fill the tights with this mixture. We tie a knot at the top. And without delay we create slices by fixing rubber bands.
So we prepare a large pumpkin, put a smaller pumpkin on it, and place the smallest pumpkin on top. This will allow the pumpkins to press against each other when drying and lock in the desired position.
Leave the pumpkins alone until completely dry for 4-6 days. Then cut off the tights. And glue a tail made of sisal rope onto the top pumpkin. The tail can be glued with hot glue, and its tip can be narrowed by trimming with scissors.
To create the effect of growing moss, you can use dried moss from a garden store, which can be turned into crumbs by passing through a coffee grinder. Next, apply PVA glue to the pumpkin slices and sprinkle with moss.
How to cover a ball?
When the papier-mâché base for the pumpkin is ready, start gluing. When making any craft, you need to know one condition for successfully removing the work from the base. The first layer is not spread with glue. The base or pieces of paper are moistened with water, and the wet leaves stick to the figure themselves. If you are making, for example, a cup, then it is better to coat it with vegetable oil, then the dried papier-mâché will be easier to remove from the base.
The second layer of paper must be applied to the paste. A piece of the ball is coated (not all at once, since the paste dries quickly) and covered with pieces of paper. The work must be done carefully so that there are no unpasted areas left.
To make sure that you haven’t missed anything, there is one tricky way. You need to choose different types of paper for pasting. For example, the first layer of a papier-mâché Halloween pumpkin is made from newspaper, and the second layer is made from a checkered notebook. Then - again the newspaper. So immediately when pasting it is clear whether all places are covered or whether there are gaps. In this way, at least 5 layers are applied. If the figure should be rigid, then layers are added.