New Year's crafts from plastic spoons
When the New Year's mood is clearly expressed in the house and you want to fill the whole house with holiday, release your energy while spending pleasant time with your little family members by making wonderful Christmas trees from disposable spoons.
This is one of the simplest products; you will need plastic tools, a paper cone, special strength glue, and watercolors. We cut the devices, leaving only the oval parts.
We glue the frame, placing rows on top of each other. At this stage, everything is ready and, if desired, you can decorate the Christmas tree in any shade. The toy is suitable for a school project or home decoration.
Snowflake
An ordinary snowflake will become a New Year's toy made from disposable spoons, which will decorate the apartment and give it a winter atmosphere. To make such a craft from disposable spoons you will need: a rosette core, a specially strong adhesive, scissors, and a small circle of cardboard.
We cut off the ends of six scoops, place them on a cardboard circle, and glue them together. We take three ladle, cut off everything except the oval component, connect them with the already glued devices.
Glue the core into the center. If possible, decorate with snowflake stickers. Such snowflakes will look great on the New Year tree and add white shades to the apartment.
Note!
- How to properly make a birdhouse with your own hands from scrap materials: we create an original birdhouse according to sketches
How to make candles with your own hands: instructions for making wax, gel, scented, homemade decorative candles with a wick
- What you can make from foamiran with your own hands: we create flowers, Christmas tree decorations, snowflakes, three-dimensional paintings (photo + video)
Decorations
Bracelet. To make it, you need to cut off a fragment of a spoon or fork and bend it with an arc of lower diameter. Next you need to make two holes and fasten the bracelet using a connecting ring.
If the length is not enough, the gap can be hidden using a short chain or several beads that are connected by thread or fishing line.
A good option would be to take the whole device. This is suitable for those who have thin arms. You just need to wrap the object around the brush and secure it. In addition, you can take elements of a tea set made of silver or cupronickel. This way you can make a beautiful decoration.
Let's not forget about silverware, which can be bent in the form of an arc, at one end of which there will be a hook. A combination with a leather loop, which is fixed with metal holders.
Long earrings
To produce this jewelry, you need a special device that makes it possible to apply patterns and engraving.
Note!
DIY vase: step-by-step photo instructions, master class for a beautiful and unusual craft
- Paintings from buttons, panels, appliques and compositions with your own hands: how to make flowers, a butterfly, a fish or a tree craft from buttons
- Flowers made of wool (85 photos) - how to felt a flower from felt or a wool brooch. Step-by-step instructions for beginners
Rings
The manufacturing procedure is very simple. First you need to cut off the long part of the kitchen utensil. Correlate the volume of the resulting circle and the size of your finger. Next, you need to remove the excess fragment of material and connect the two components of the remaining one.
Romantic pendants
To do this, you need to take a spoon or fork with patterns, polish it and connect it with a thin chain. Everything is as fast and simple as possible.
Commemorative keychains
We cut off the lower part of the device, make a small hole, and connect it using a connecting ring. Next, we attach another, larger one to this ring and our keychain is ready.
Decorating with plastic
With a small budget you can create a beautiful, original design in your home. It is enough to have the desire and free time. Decor made from plastic spoons includes many elements.
Of these, the following stand out: paintings, flower pots, vases, candlesticks, clocks, decorative roses, signs with plant names, garlands and much more.
The most uncomplicated of the many products are: a lamp in the shape of a pineapple, a frame for a mirror, a candlestick.
Components of decor
Shade
We take an old lampshade as a basis and hang the devices on thin chains.
dream Catcher
Spoons and forks must be fastened with threads. To make the product beautiful, it is better to organize two rows - top and bottom. Each row consists of six starting materials.
Panel
Kitchen utensils are painted in a bright, rich color and are also attached to the canvas.
Chandelier
This product requires a large amount of raw materials. They are connected at the edges of the chandelier thanks to pendants.
Kitchen wall decorations
It is necessary to apply matte paint to the dishes. Fix the composition on the canvas.
Elegant forks
The basis for the work is the cutting. Care and skill must be exercised when producing the product. The idea is to twist the teeth with pliers.
Pineapple made from plastic utensils
An original piece of decoration in a child's room. It is easy to make, practical and fits into almost any room interior. To make it you will need: an oval lamp, a glue gun, spoons, yellow gouache, a knife, green cardboard, a bottle.
We cut out a cylinder from the bottle, cutting it off on both sides. We paint the devices in a yellow shade, after cutting them and leaving only the top side. We take the deep sides of the tools and attach them to the bottom row.
Glue another layer to cover the gaps between the petals. Thus, we glue the entire bottle. We make leaves from green cardboard and glue them to the base of the bottle. Finally, place the pineapple on a suitable lamp.
Glowing water lily
An original idea for a garden craft made from spoons – a water lily with a built-in lamp. Due to the resistance of materials to moisture, such products can be used to decorate a garden or local area. They can even be placed in a small garden pond.
Materials and accessories:
- Disposable plastic spoons;
- Polystyrene foam, preferably dense enough;
- Hot melt adhesive;
- Waterproof paint, preferably acrylic;
- Stationery knife;
- Miniature lamp with solar battery;
- Scissors.
Manufacturing procedure:
- Cut a cone-shaped shape from foam with the top cut off (the top should be flat). For convenience, you can first make a cube and then cut off the ends.
- Cut the handles of the spoons at an angle, leaving 2-3 cm. Cutting at an angle will make it easier to install into the foam.
- Make a hole in the foam and install a lamp in it. Waterproof, solar-powered lanterns can be purchased at garden decor stores.
- Insert spoons in a circle into the blank, forming a flower head from the petals. You need to make several rows of petals. A glue gun is used for fixation.
- Cover the foam with green acrylic paint.
Thanks to the lightness of the spoons and the porosity of the foam, the craft can be placed in a home pond and will not sink.
It is not necessary to use a flashlight, but with it the flower will glow beautifully in the dark.
Mirror frame
This frame will refresh your old mirror and give it a new look, and most importantly, you can choose the color to your taste. To create such an element you need: plastic scoops, hot glue, scissors, spray can, cardboard.
We take measurements, transfer them to cardboard, and cut them to the desired shape. We take the power tools and cut off the main side. We connect the spoons with the cardboard with the concave side, in several rows, to add fluffiness.
When the structure is dry, paint it in the desired color. Then we glue the mirror into the center and enjoy our design move from plastic devices.
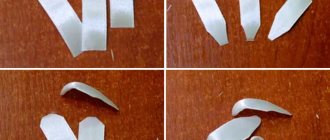
Roses
It will be a little more difficult to make a rose with your own hands.
We recommend that you do everything yourself, entrusting your child only with painting the finished product. You will need:
- Plastic spoons;
- Lighter or fire on the stove;
- Scissors;
- Pliers;
- Glue gun.
Hold the spoon over the fire and then use tongs to shape it into a rosebud. Be careful! If you hold the spoon too long, the plastic will start to drip.
Do the same with the other spoons, but they will already be petals framing the bud. Therefore, they should be made wider.
We recommend reading:
Crafts from natural materials - a step-by-step master class on creating original crafts for children and adults (100 photos)- Wood crafts - the best craft options, instructions for beginners and ideas for making wooden crafts (85 photos)
- Fabric crafts - the best ideas and the most practical crafts and toys made from various types of fabrics
Thus, each subsequent spoon will be subject to less and less deformation.
Next, cut off the stems of all spoons except the one from which you made the bud. Use a glue gun to glue all the petals onto the bud. At the very end, you can paint the finished product in any colors.
Candlestick
Another opportunity to recycle scoops would be a decorative candle stand. For such a product we will need: several oval pieces of disposable tableware, a scented candle and super glue.
We create a decoration in the form of a lotus flower, gradually gluing the spherical parts. At the end, you should definitely glue the candle itself to the center of the flower. This trinket is made quite quickly and quite simply, but at the same time it will creatively improve your life. It is recommended to use spray paint as it will go on smoothly on the frame.
ladybugs
Prepare a set of disposable spoons. To make 1 ladybug you will need 3 spoons. You will also need: glue, several large buttons and paint (black, red, white).
Cut off the stems of the spoons. Leave only the oval part of each - these are the wings and bodies of your future ladybugs. Paint two ovals red with characteristic black polka dots.
And one oval part in black is the body of the ladybug, it will slightly peek out between the wings.
Glue the wings together when the paint is dry. Secure the button on top - this is the ladybug's head. You can paint eyes on it with white paint.
Products for kindergarten
When children start going to kindergarten, parents understand that they cannot do without products. Especially for such an occasion, there are several trinkets that will delight everyone, especially adults, because they are so simple that even a child can make them.
This does not mean that the child will do them himself, but he will do most of the work himself. The main thing is to make sure that he does not eat the adhesive. In this article you will learn how to make cones, a snowman and a peacock from plastic scoops.
Tulips
The easiest way to make tulips. Especially if you are new to such experiments.
You will need:
- Plastic spoons (5 spoons for 1 product);
- Colored paper (corrugated);
- Glue, scissors;
- Green electrical tape;
- Cocktail tube.
Cut equal, even squares of colored paper. Wrap spoons in them and seal them so that they resemble tulip petals. Pre-cut the legs of the spoons.
Clamp all the spoons together to collect the flower. Secure the result with duct tape and attach a stem from a cocktail tube to the flower. Cover the stem with green electrical tape and glue colored paper leaves to it.
We recommend reading:
Crafts from isolon - a manufacturing master class, nuances of working with the material and step-by-step instructions on how to make a craft (85 photos)- Crafts from saw cuts: stylish and beautiful options for decorating the garden and interior with your own hands (130 photos)
- Crafts from toothpicks - interesting ideas, manufacturing examples and the best crafts for children (120 photos)
Even a child can do what is described. Save all children's crafts (even unsuccessful ones) from plastic spoons: over time, you will be curious to track the progress of the little inventor.
Cones from disposable spoons
It is important that the design will be suitable not only for kindergarten, but also for home comfort. You need to find: paper, plastic scoops, glue, braid for a loop. We crumple the paper until it forms an oval shape, then attach the loop.
The next step is to cut off the main side of the spoon, and row by row we completely cover the paper ball. We wait until it dries, then we paint it in a natural brown color and enjoy your child’s work.
A few final ways
A disposable product opens up new boundaries for creativity and creation. Plastic forks and spoons can be used as hangers, hooks or coasters. Crafts from such material can be made in two ways. The first method is based on the use of glue.
As a result, you can get a fan or an umbrella. Another method is to heat the feedstock. This way you can make flowers or a Christmas tree. These are unique New Year's crafts made from forks. The integrated use of different types of disposable tableware makes it possible to create complex designs.
Kitchen utensil masterpieces pave the way for unleashing creativity. The main component of success is improvisation and the desire to move forward. There are many video lessons and master classes on similar topics. Crafts made from disposable forks deserve special attention.
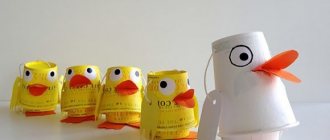
Funny snowman made from devices for one time
Such a snowman will not leave anyone indifferent. First you should go through the most difficult step - sewing clothes, but here you can use your imagination and make whatever you want, starting with a hat and scarf, and ending with a complete set of clothes.
Next, you need to revive the snowman, draw a face on the round part of the scoop. After these processes, it is enough to insert it into the lid with plasticine. The spoon snowman is ready.
Items used in everyday life
Storage area for small items
The spoon needs to be bent in the area of the handle and nailed to the wall.
Key hooks
We bend the handle with pliers and attach it to a wooden block.
Fruit bowl
A large amount of utensils and a soldering tool are required. The procedure involves shaping the devices into a vase shape and soldering them together.
Sign holder
The plate is fixed between the teeth of the kitchen utensil.
Note pendants
A hook made from a fork, they hang on the wall and hold notes on them. In a similar way, you can make a crochet spoon.
Curtain tieback
First, we blunt the teeth of the product, then bend it and fasten it to the appropriate place.
This is how you can answer the question: What can be made from a fork?
Plastic peacock
In ancient times, peacocks decorated the estates of nobles. Nowadays, it is called the royal bird. This peacock is not very easy to make, but if you make it, it will decorate your family nest.
First, paint the spoons white so that the paint lies evenly on the surface. When the dye dries, we begin to draw multi-colored patterns. While the paint layer is drying, cut out a bird carcass and an even circle from cardboard. Cut to any size, but keep in mind that the larger the size, the more raw materials required.
Color the circle yellow. The next step is to paint the cotton swabs blue, after which we paint the bird carcass. Also in blue. After drying, cut off the blue part from the cotton swabs. We glue the cotton elements to the body of the peacock until a three-dimensional surface is formed.
We assemble the head from the main parts of the instrument, paint it blue and attach it to the neck. The spoons are glued to the yellow circle, and thus we create a tail. We make a tuft of blue cotton wool and decorate it with glitter. We draw on the eyes and beak. We attach the body to the tail, and we get a beautiful bird - a peacock.
Watch design
Plastic spoons can be used to decorate a simple round clock. Such a decorative element will look great in the kitchen.
For production you will need:
- A relatively compact watch with a round shape and no protrusions on the outer part of the case;
- A4 paper;
- Compass;
- Pencil;
- 30 plastic spoons;
- Hot melt adhesive;
- Pasta in the shape of small circles;
- A can of spray paint in the desired color.
The order of decorating the watch:
- Cut a circle out of paper in the shape of a clock. To make the circle even, you will need a compass. The blank is needed to protect the dial from paint.
- Glue plastic spoons along the entire perimeter of the body. The scoops should be directed outward, and the handles should be glued.
- To decorate and separate the handles from the dial, make an inner circle of pasta.
- Cover the clock with paper and color the pasta with spoons in the desired color.
You can use more than just spoons. To make them more attractive, you can alternate them with other cutlery, for example, forks and knives.
Photos of handicrafts made from plastic utensils directly at the master class
Please repost
0