Country construction, repairs and decoration are processes that take up a lot of free time and finances, and when, after completing useful tasks, you notice a lot of remnants of various materials, it becomes a little disappointing for the money spent. But we won’t be upset, because all the leftovers can be put to good use and there is no need to throw them away. DachaDecor.ru will tell you right now what can be made from building materials.
Never rush to throw away construction waste and leftover building materials. Everything that was not included in the main work can still become useful for the dacha.
Crafts from plasterboard
A truly versatile material, you can also use it in the form of scraps and broken pieces.
You can make the following from drywall:
- Small vases for dry bouquets, you just need to cut the plasterboard into even pieces and fold it into a mold using a mounting profile;
- Various geometric shapes for decorating country house rooms, gazebos and patios;
- There are quite interesting solutions for miniature pieces of furniture in a children's tree house. For example, the same shelves, racks, different decor.
If you can no longer use drywall, give it to the kids, because with any piece of damaged material you can simply draw on asphalt or slabs, using the material like chalk.
Master Class
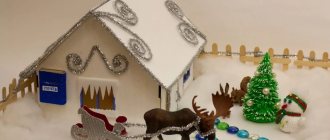
Inspired by the New Year theme, we decided to show you a simple and stylish way to create holiday packaging.
But, before you start decorating, you need to make a PVC box that is the right size for your gift. You can easily find the diagram on the Internet. Next, we proceed directly to the design.
To work you will need the following:
- Double-sided tape;
- Scissors;
- Two sheets of crepe wrapping paper (different but matching colors);
- Colored tape;
- A small New Year's composition.
- When everything you need is at hand, cut out a piece of suitable size from one sheet of paper that should cover the top and two sides of the box. Attach the paper with small pieces of tape;
- Now take the second sheet, it should cover the entire box;
- Next, fold the second sheet (on the front side) so that you get a triangle;
- Secure everything carefully with tape;
- Make several cuts on the sides of the resulting triangle, the distance between them should be about 1 cm;
- Bend the resulting cuts upward (so you get something like a colored Christmas tree);
- At the end, decorate the box with colored ribbon (diagonally) and attach a New Year's composition.
What can be made from pieces of tin
This material is very practical, because, like pieces of stainless steel, it can be bent into any shape. This makes it possible to create the most unusual crafts for the garden.
- First of all, these are original lamps, which, with the help of metal scissors or a grinder, take on bizarre shapes;
- Also, from similar material, thin steel or scraps of tin, you can make small country bins and ashtrays;
- If the pieces are large, they can make good containers for flowers, even hanging ones;
- You can also use stainless steel and thin steel for more useful things, for example, putting patches on cracked linoleum, using strips of tin to connect the joints of flooring in a country house, making clamps for bolts and nuts, cutting washers, tightening wooden buildings and fences with pieces of material, installing them as a lining when tying large tree branches so that their bark is not damaged by the rope.
DIY wall kitchen shelf
In the opposite corner of the window, I decided to make a shelf for tea and coffee supplies. The essence of the idea: when installed, the window sill is shifted to the right from the window, to the wall. As a result, in the right corner of the room, which is hidden by the refrigerator, a small shelf was created due to the window sill board.
The lower additional shelf is made from scraps of plastic window sill to size. For aesthetic and sanitary reasons, the sections of the wall adjacent to the shelf are trimmed with scraps of wall panels in the same color as the finish of the window slopes. The result was a rather original design that fits into the overall interior.
Since the shelf is not noticeable at first and is designed quite compactly, the items stored in it do not clutter up the room. Separately, I would like to talk about the tray, because the thing turned out to be quite convenient to use (carry a cup of tea, make a sandwich, etc.).
The tray is made from a piece of plastic wall panel, a starting profile and a plastic corner. On top, for convenience, the plastic panel is covered with a piece of linoleum.
Useful uses of leftover and off-cut boards
Almost anything can be made from wood, within reasonable limits, of course. Naturally, we are talking about garbage residues, because we already create many useful things in the country from solid lumber.
- So, if there is a thin strip left, it can be used for boxes, just like, in principle, a small board with timber;
- Cuttings of furniture panels, for example, from a press, will become excellent containers for vertical gardening;
- Larger boards can be sanded and cut into kitchen utensils - chopping and chopping boards, hot mats;
- Naturally, if there are good quality materials, they will always be suitable for country furniture - shelves and racks, small stools and chairs, shoe stands, etc.;
- It is worth noting that sawdust also brings benefits in the country, but all our readers know this very well.
You can make a lot of interesting things out of wood, and therefore you shouldn’t throw away any of its remains.
If among the readers there are masters of wood carving, they will find another original use for all materials!
Sale
Finishing is always purchased with a reserve. Damage during transportation, during installation, unsuccessful docking and many other factors lead to the fact that the purchased volume may not be enough. And the shade of base panels in another batch may differ significantly. Therefore, cladding is purchased with a margin of 10–15%.
However, in the absence of unfavorable factors, this excess remains unclaimed. Basement siding: its remains, if they are large fragments or even entire panels and vinyl slats, can be sold. For this purpose, there are numerous online platforms, like Avito, where free advertisements for the sale of any type of material are posted. Moreover, the cost of what is offered is determined only by the seller. Avito allows for sale both new and used products.
You can offer the trimmings to your neighbors in the country. It is quite possible that just a pair of plinth panels is not enough to cover the foundation.
Useful scraps of OSB and plywood
Construction waste obtained from these materials will be a godsend for people with imagination.
But whatever you come up with, we have ideas too:
- A birdhouse and a house for a squirrel are the first things that come to mind!
- Next, feeders for birds and even animals, where the material will serve as the base of the roof;
- OSB and plywood scraps can be turned into quite good boxes for storing food and non-food products, a variety of bulk products;
- An interesting idea is to use pieces of plywood and slabs to create formwork for the construction of small architectural forms;
- Such garbage can also participate in the production of country furniture, along with lumber, which was discussed above;
- If you have a jigsaw, you can always cut out original garden figures or fragments from leftover materials.
The main stages and features of making a homemade shelf
Homemade shelves can be made using corner structures attached to the wall with self-tapping screws. The welded structure can be replaced with wooden blocks, wall brackets, etc. I used scraps from plastic window sills as load-bearing shelves (stands) for the kettle and stove. There were no other, more durable materials among the available remains.
Wooden cross bars are installed for the sole purpose of hiding the metal structure and slightly improving the appearance of the shelf by using scraps of plastic wall panels.
Since both items for which the shelf was intended are volatile, I built my own socket group into the shelf. To install the socket, I needed a piece of metal profile from drywall. The main features of making a homemade electrical household shelf are in the photo below.
General appearance of the shelf and its placement in the office:
It is logical to assume that if there is a kettle and a stove, then there must also be tea (coffee) accessories, such as tea utensils, the products themselves (tea, coffee, sugar, etc.), which also need to be stored somewhere. Since a place for electrical appliances has been determined, a place for storing “accessories” should be located nearby.
Thus the next idea was born.
Using old polyethylene
It is unlikely that the film will be used to equip a new country greenhouse or even a small greenhouse, but individual plants can be placed in spring protective structures - film cubes.
In addition, you can cover anything with old film... the same piles of sand for construction, stacks of bricks or decorative tiles for arranging a summer house, bulk materials, feed. You just have to fold it several times, and even old and worn plastic film will become a good protection against moisture.
It will also find excellent use in major construction projects. The film can be used to cover foundations and only poured areas so that the concrete does not dry out and crack in the sun.
In the issue of film, we moved a little away from the main topic of crafts and leftover building materials, but now we are returning to it.
Wall decor.
PATCHWORK.
If you have many small pieces of different types of wallpaper, you can use them to cover one wall or opening. This technique will focus on a certain part of the room or allow you to divide the space into zones. This design will be a cute decoration for a child's room. A patchwork wall will support the vintage idea of any room decorated in a country or retro style. But don’t forget about color combinations, choose no more than three main shades.
FIGURES FROM WALLPAPER.
You can move away from clear geometric shapes and decorate a plain wall with figures from wallpaper. This idea is especially relevant for children. Patterned balloons, cars, airplanes, letters, numbers may appear in it; from the bright remnants of wallpaper - animals and plants of all varieties - everything will look organic in the nursery. By the way, such an application can be an excellent way out of a situation with unexpectedly painted walls. The figures on the walls will allow the child to touch the fairy tale, and the images of fairy-tale characters will lift the mood.
FALSE PANELS
. Using false panels, you can quickly and inexpensively update the design of walls if you want to change something in the old finish. Framing walls in this way allows you to make the room look more elegant in a matter of hours. False panels can be glued on top of plain, smooth wallpaper or on a wall painted with water-dispersion paint. Fragments of wallpaper of the required size and shape are glued on top of the main finish.
It is preferable to choose thick, textured wallpaper that will imitate panels. Wallpaper with silk-screen printing looks elegant. After drying, the “panel” is framed. For this, moldings, wooden slats, and plastic strips are used. The frames can be painted to match the wallpaper inserts or left contrasting. Mirrors, sconce lamps, small framed paintings, wall clocks and other wall decor are hung inside the wallpaper panels. This design of walls with filling panels is typical for interiors in a classical style. For a modern-style interior, you can choose a different frame material: use metal or plastic strips.
HEADBOARD.
A bed with a high headboard is an integral element of a bedroom in a classic and English style. If your bed does not have a headboard, you can simply cover part of the wall with wallpaper of a different color and texture, thereby imitating a headboard and creating a particularly cozy atmosphere. Patterned wallpaper against a plain wall is a simple and inexpensive accent that looks very stylish, especially when paired with a similar pattern on bedding or a bedspread.
You can paste over an existing headboard, or you can create an intricate design from a sheet of plywood and wallpaper. Give your headboard an interesting shape and your bed will become a unique focal point in your bedroom.
Turn on your imagination, and then with the help of leftover wallpaper and minimal costs you can transform your interior and make it more comfortable and original! Don't be afraid to take the initiative, be unconventional and free!
Construction is impossible without waste. What can you do with them? Many people throw it away. Do you know how many unique things will come out of them? Read on for details.
Lumber
The naturalness of wood is appreciated everywhere.
Based on the parameters of the leftovers, a lot of things can be done. Thin slats and small boards are useful for knocking down boxes for apples, pears and vegetables, for baguettes or photo frames. Fragments of furniture panels will be used for vertical gardening and containers for potted plants. Sanded flooring and other boards - for cutting hot trays and cutting utensils. Larger remnants are useful for creating stools, shoe shelves, hanger panels, and country furniture. You may need to decorate the front door, the gate to the area, the doors of a dresser or cabinet - small trimmings are perfect for small openings. Any scrap of board will be the basis for a drawing, a panel, or a starting plane for using a burning machine or wood cutters.
Plywood, OSB boards
A favorable material for working with a jigsaw. Painted flat figures will perfectly complement your home and site. The remaining pieces are used to make original birdhouses, bird feeders, and garden figures. Many people make food boxes, pieces of furniture, and use them for formwork. With imagination you can do a lot.
Foam insulation with foil
Ecofol, adgilin, penofol and other types of foil insulation can decorate a room and a summer cottage.
Indispensable as New Year's street decorations (snowflakes, stars, figurines). The reflective effect scares away birds. To do this, three-dimensional forms are made from insulation, attached to a fishing line and hung on trees in the summer. If you want to have a double-sided reflector, you can glue two blanks.
Economic summer residents make portable refrigerators. It's not difficult: you just need to glue the lid and the inside of the box/box. Such containers are suitable for winter storage of vegetables on the balcony, as they will retain heat.
Siding, PVC panels
After sheathing a house or renovating the interior, a lot of scrap and scraps of plastic remain.
Make a mini fence for your flower garden. This material can be used to delimit plantings in beds. The moisture resistance of such waste is used to cover small outdoor buildings, including woodsheds, rabbitries, showers, and wells. With skillful placement, you can make a gutter for water drainage. Together with a wooden beam, you will get shutters for windows, a canopy over the gate, and a parapet for a gazebo.
Drywall
Anything will be used: broken pieces, scraps, crumbs.
Complex structures are attached to a frame, which is created using a mounting/ceiling profile. Small parts are glued to a gypsum mixture (milk + plaster). The creator's thoughts are limitless. Here are some examples: Decorative elements for patios, gazebos, living rooms (geometric shapes, plant options); photo stands, stationery, vases for dried flowers; miniature furniture for children's houses; shelf for the bathtub, casing for communications; niches for heating radiators, slopes for doors and windows; decorations for hangers, shelves, racks; decorative false fireplace.
Pieces of tin
The practicality and convenience of the material are noted.
You can really bend, cut, saw, resulting in any configuration. The material is suitable for outdoor crafts. For example: lamps of fancy and primitive shapes (pendant, lawn). Some people use the trimmings for garden urns, ashtrays, and flower containers, including hanging ones. The home craftsman makes stainless steel patches on linoleum, interior thresholds, and floor protection against sparks near the stove and fireplace. The thrifty owner uses small cuts in the form of clamps and gaskets for nuts/bolts. They tie together building elements with strips and use them as a spacer to tie up a large tree. Large sections limit creeping roots in flower beds.
Ceramic tile
The remains of floor and wall tiles are used to decorate a country pond and garden figurines.
They finish the basement of the house and add fragments to the blind area. Small pieces are used in the decoration of kitchen furniture and wall cladding. They are turned into a mosaic, they are used to lay out the surface of the tabletop, and embedded in cement paths. There are still many ideas for using construction waste. It is important, before parting with such “garbage”, to think about its possible use. There are plenty of topics for fantasy.
Country construction, repairs and decoration are processes that take up a lot of free time and finances, and when, after completing useful tasks, you notice a lot of remnants of various materials, it becomes a little disappointing for the money spent. But we won’t be upset, because all the leftovers can be put to good use and there is no need to throw them away..
Never rush to throw away construction waste and leftover building materials. Everything that was not included in the main work can still become useful for the dacha.
Foam insulation: using scraps in the country
Penofol, ecofol and other insulation materials based on foamed polyethylene and foil will be an excellent material for the original decor of any country house.
Most often, such materials are used before the New Year holidays, since snowflakes and stars of a wide variety of shapes can be cut from them without any problems. But they can often be used for standard room decoration.
One side of this material is foil-coated or coated with reflective material. That is, it shines. This makes it possible to create bright shapes that will transfer sunlight to the walls, floor and ceiling. Such crafts look especially interesting when suspended, on a fishing line or thread.
Most often, all thermal insulation work where such materials are used occurs with insulation that is foil-coated on one side. But if you need a double-sided object, you can cut out two mirrored shapes and glue them together on the back side. Then the star, snowflake or figurine will shine on both sides.
Savvy summer residents find many other uses for penofol, for example, they additionally insulate the sides of greenhouses, make small portable refrigerators with their own hands, simply by sewing the material inside onto the walls of a small box. But the most fun use is sewing children's costumes and their various elements from the material.
DIY shoe shelf
In my office I have two sets of shoe cleaning supplies (brush and cream) of different colors. I decided to make auxiliary ones where they can be stored. The work algorithm is in the photo below. The following features can be noted.
- The sliding doors for the shelves are made from scraps of PVC panels and two starter and one T-bar as guides. Percussion-cut holes with a diameter of 28 mm are used as handles for sliding doors.
- I decided to use the top part of the shoe shelf as a flower stand. For this I used a piece of plastic window sill. In addition, I slightly refined the corner of the room with scraps of wall panels. The main stages of work are shown in the photo below.
Most often, the remnants of wallpaper after renovation are left just in case, in case something needs to be glued over time. But usually these leftovers lie idle. But you can use wallpaper with your own hands to decorate and make our interior original and new. To bring your idea to life, you can also look for leftover designer wallpaper on sale at a discount. This wallpaper decor will be especially relevant in the country.
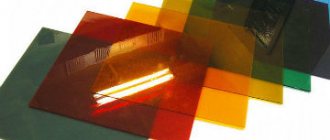
Remains of plastic, polycarbonate, acrylic
After installing a fence, greenhouse, canopy or even a partition in the bathroom of a country house, such materials may remain, even in the form of scraps. You shouldn’t throw them away, because they are useful decorative elements.
- First of all, various flashlights come to mind. We have studied with you many lighting options for the garden and dacha area, and therefore it will be easy for you to come up with lanterns and lamps made of plastic and polycarbonate, especially if the scraps of materials are colored;
- Colored plastic and polycarbonate with shades in the decor of the fence look very good. Once we already raised a similar topic and even showed you photos of similar fence decorations;
- From small scraps of acrylic you can make boxes and chests, which can perform both decorative and household functions;
- In addition, these materials can fully participate in the production of garden figures. By combining wood, steel, plastic and other materials, you can make garden gnomes, fairytale castles, and various animals with your own hands.
We update furniture.
Every home craftsman can update furniture in this way. The main thing is patience and accuracy. We decorate any surface of the cabinet - walls, doors, shelves, drawers.
If you paper the inside of the side and back walls of a cabinet, rack or shelf, the furniture will sparkle in a completely new way.
For a longer service life of such decor, it is first necessary to clean off the old coating: peeling paint or varnish. This can be done using sandpaper. Irregularities or deep scratches, chips must be repaired with wood putty, then sanded well with sandpaper so that the glue adheres better. At the end of the preparatory work, apply a primer and dry the surface thoroughly.
If any part of the furniture needs painting, then do it before working with the wallpaper.
We measure the surface and cut out pieces of the required size from the wallpaper. We glue them to the surface of the cabinet with PVA glue or wallpaper glue, carefully smoothing them out and expelling the air. It is better to use wallpaper glue, because... it allows more time for corrections and processing of bends.
Paper wallpaper must be varnished to protect it from dirt and damage. You must first apply a protective film to the pasted wallpaper, otherwise the varnish may corrode the paper. For protection, use a regular PVA-based primer or remaining wallpaper glue.
The protection is applied to the dried wallpaper in a thin layer. When the protective film has dried, you can coat the surface of the wallpaper with water-based varnish. To make sure that nothing will happen to the wallpaper after varnishing, first try the process on a small piece, and then, after making sure that everything is fine, proceed to the rest of the wallpaper. When choosing wallpaper for decoration, it is worth considering that varnishing makes the wallpaper several tones darker.
If you work with vinyl wallpaper on a dense base, you don’t have to worry about contamination: such wallpaper can be easily wet cleaned. Alternatively, you can use self-adhesive wallpaper. You can decorate not only external, but also internal surfaces. This technique enlivens the space, and gives you the joy of a new thing made with your own hands.
Such furniture will look advantageous if the color of the wallpaper matches the shade of the curtains or decor in the room. Or, on the contrary, among objects of restrained colors it will become a bright accent. If you want to add brightness, you should cover sections of a cabinet or shelving unit with pieces of different wallpaper.
Modern fittings and other details will emphasize the stylishness of the updated furniture. This decor from leftover wallpaper is an opportunity to include an additional pattern, color, or ornament into the design of the room.
Furniture covered with the remains of wallpaper will take on a new style - Provence, country, vintage or any other. If the top is scratched and worn, losing its former luster, you can stick suitable wallpaper on it. This method is used to update various pieces of furniture: chest of drawers, cabinets, dressing table. And to decorate the top of a coffee table, just cover the top of the wallpaper with thick glass. This way you can remove or change the wallpaper at any time. Remnants of wallpaper can also be used to cover any furniture, such as cupboards, drawers, screens, stairs, racks and shelves.
The interior staircase looks stylish with the risers covered with the remains of wallpaper. Remnants of moisture-resistant wallpaper, harmonizing in color with the surrounding interior, are ideal here. A contrasting geometric pattern or traditional ornament will look great.
Remains and broken bricks
We use this type of construction waste perfectly as backfill and materials for leveling holes. But today we propose to think about more useful structures.
- These can be the same fairy-tale castles of a decorative nature, located in the garden, in which the brick will act as the base;
- In addition, small lamp columns can be built from brick;
- The building material will also be used in the production of heavier and more permanent furniture, for example, as a base for benches or even under a table in a new gazebo.
Necessary materials
To make a plastic box you will need:
- metal profiles for frames such as UD and CD;
- polymer panels;
- silicone sealant;
- PVC skirting boards for masking joints;
- inspection doors;
- self-tapping screws;
- sharp construction knife.
What to make from PVC plastic panels
Covering walls and ceilings and various buildings outside and inside with plastic is a fairly popular process for renovating a dacha. But, due to the low cost of the material, or due to incorrect calculations, we often buy PVC panels with a reserve. Then, when the material remains, we think for a long time about where else it might be useful.
We have already mentioned certain options, but there are more interesting ideas:
- A miniature fence made of PVC panels will last for several years until the material deteriorates due to the influence of atmospheric phenomena;
- The material is also excellent for demarcating garden beds and flower beds. The result is a multi-colored and very colorful decor;
- If we return to country crafts, then plastic can become the roof of small garden buildings, be used as gutters for collecting rainwater, or even serve as simple but quite attractive shutters for the windows of a country house, if you combine the panels with wooden beams.
Preparatory work
Before you begin assembling the box, you need to carry out several preliminary activities.
- Inspect all pipes that will be hidden. Eliminate defects while communications are visible. If a new pipeline is being installed at the same time, try to keep the number of connections to a minimum.
p, blockquote 7,0,0,0,0 –>
- Decide what appearance the box will have in the bathroom. It can hide only a small area where the pipes pass, or occupy a fairly large area. The advantage of the first option is the saving of material and the absence of the need to sacrifice free space. When choosing a more voluminous modification, additional space inside the structure can be adapted for storing things.
p, blockquote 8,0,0,0,0 –>
Advice: if you are going to lay the walls with tiles, it will be more convenient to make a box first. It will hide part of the ceiling, and there will be no need to lay tiles in this place.
- Take the necessary measurements and make a drawing of the box. At this stage, provide such important additional elements as hatches for access to meters, valves and unreliable connections.
- Calculate the amount of material needed with a small margin.
Bulk mixtures and use of their residues
Plasters, putties, cement and other building mixtures always remain after construction or repairs.
This can be either several scoops in a bag or a whole bag of material. Naturally, such material will not go to waste at the dacha - grease, seal cracks, repair garden paths, etc.
But the mixtures can also be used for decorative purposes, for a wide variety of crafts.
- We have already talked about how to produce decorative blocks for walls using the simplest, even homemade forms;
- Also, they told you how to make a drinking bowl from cement, quickly and quite simply;
- But you can use your imagination, select special molds and pour out whole figures for the garden, which will easily last up to ten years even under the worst outdoor conditions. You just need to treat the finished crafts with protective paints, which will give them a brighter look.
Other options
Plastic corks are used to make decorative curtains, stands for frying pans or pots. By gluing the lids bottom down to the plywood, you can make a massage mat.
Remains of ceramic tiles and mosaics
They say that materials of this kind are irreplaceable in the country, but mainly in economic terms.
- The remains of the tiles can be used to decorate the base of the house to protect it from external influences;
- The same material can be used to cover a new blind area;
- If there are very few tiles, and they represent a battle, then, like the mosaic, it is worth moving it to the garden. Here you can decorate garden figures with pieces of multi-colored, glossy material with various patterns. For example, you are making a garden gnome... so now you don’t have to paint it, you can decorate it with pieces of tiles. A turtle from the remains of cement in the garden will receive an exclusive shell in the same way. Tiles or mosaics will serve as an unsurpassed finish for a small decorative pond in the country.
We have hundreds more tips in our arsenal, but we simply cannot fit them all into one article. We have mentioned almost all the popular materials used in the garden, and now you just have to focus on the fact that not everything should be immediately thrown into the trash, because any piece or scrap can be useful.
Crafts from building materials and the beneficial use of construction waste are interesting and popular topics. Thousands of summer residents across the country every day come up with incredible decor from metal and wood, leftover foam and paint, scraps of polyethylene and dry mixtures. So why don't we try it? We are sure that with our experience the crafts will turn out just as good!
Homemade shelves for household appliances
Taking into account the fact that some things in my office did not have a permanent place of registration, I decided to use waste to make homemade shelves.
To begin with, I made a sketch. For what?
- Firstly, everyday experience has taught me: it is better to think through everything in advance before making a shelf with your own hands.
- Secondly, you need to clarify the dimensions of the future shelf for these specific items (kettle and microwave oven).
- Thirdly, since I made everything from leftovers, I had to try to find the right scraps, both in size and quantity.
The result of creative efforts is shown in the figure below. Since I made the sketch for myself, I apologize to the reader for the readability of my creation. The content of the sketch: the dimensions of the stove are indicated, the dimensions of the stand for the kettle are indicated, the general dimensions of the shelf are indicated, approximately the necessary materials and parts and their quantity are indicated.
The finished shelf for the kettle and microwave oven is shown in the photo below. Compare how the actual design differs from the sketch.
Border tapes
The popularity of plastic borders is primarily due to ease of installation, affordable cost and excellent aesthetic characteristics. Tapes are sold in rolls, the length of which depends on the specific manufacturer. The thickness of the material varies between 0.5-2 mm, while the height of the fences can range from 10 cm to 28 cm. When purchasing, you need to choose a specific width of the material based on the plants that are planted on the territory: the higher they are, the wider it should be be a curb tape.
Note! As for density, it is better to give preference to plastic whose axis of rigidity runs along the top edge.
This material allows you to easily construct land structures of various shapes and sizes. It is also worth noting that tapes are divided into several groups according to texture and color (corrugated, wavy, etc.). These parameters do not in any way affect the practical side of application, but they play a very important role in terms of decorativeness.
Ways to use border tapes
- Products less than 10 cm wide can be used to limit the construction of embankment paths. Such tapes allow you to construct paths of any shape and prevent the material from scattering.
- Wider fences (up to 25 cm) are used for beds, especially sloping ones, so that moisture will be retained in the desired area and not spread beyond its limits.
- Using tapes up to 30 cm wide, shrubs and grasses that reproduce by root shoots are protected.
Also, such fences can be used to completely seal greenhouses. To do this, the tape is placed around the entire perimeter of the greenhouse, so that pests and weeds do not penetrate into it.
In addition, tapes are used to protect decorative flower beds (including multi-tiered ones), small artificial ponds, fruit trees, seedlings, and paths. Finally, products with maximum width are used to create compost pits.
How to install border tape
The installation procedure, as noted above, is not complicated. The main working material is the tape itself. You will need scissors for cutting, and liquid nails or a soldering iron for fastening. It is advisable to do the work with an assistant.
First, a trench is dug around the perimeter of the bed for the border (the depth depends on the specific width of the fence). To protect plants from the cold, it is desirable that the tape be wide. The borders are equipped with plastic pegs, which need to be dug in at the corners, as well as along the perimeter, with the step specified in the instructions, and then stretch the tape itself between them. After this, the trench is covered with earth. As you can see, everything is extremely simple.
The remaining material should be rolled up and placed in a dry place - it may still be useful. With the onset of winter, it is advisable to cover the border with something so that it does not lose its appearance. You should not step on the fence - it may not support the weight and crack.
Video - Border tape
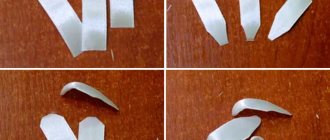
Mushrooms
Wonderful fly agarics will cheerfully nod their caps in the wind. A plastic bottle is cut into two parts. The bottom element will serve as a cute hat. The top of the bottle will become the stem.
The hat is decorated with red paint, and the characteristic white spots are not forgotten. You can use other colors to get fun shapes.
Plastic flowers and animals may appear next to the mushrooms. It all depends on the ideas of the owners and their imagination.
Flexible border “Garden Constructor”
Another type of border tape, which makes it possible to build beds of any size and configuration. It is a set of plastic elements that are connected into a circuit and closed.
The image clearly shows that thanks to such elements you can build the most bizarre flower beds (even consisting of several levels).
Installation of the structure is extremely simple: the required number of elements are connected to each other using special fasteners and installed. At the bottom of each element there is a sharp protrusion that ensures reliable fixation. The installation procedure is shown in more detail in the video below.
Video - Installation of the “Garden Constructor”
Other ideas
Triangular tent
You can quickly build a hut in the form of a triangular tent with your own hands in a couple of hours. To work you will need:
- several planks;
- construction stapler;
- flooring;
- covering fabric.
The slats are connected to each other in the shape of a triangle - this will be the frame of the structure. It is covered with fabric; preference should be given to waterproof fabric - to protect it from rain and wind.
If you plan to build a house inside an apartment, then you can use any fabric. Next, all that remains is to prepare the flooring and come up with the decor of his new shelter together with the baby.
A triangular house can also be built from branches. In this case, the basis of the frame will be thick and small shoots of trees - most often they use those that remain after filing fruit and berry bushes and trees, but you can prepare them yourself in the nearest clearing. To make the hut neat, you should draw a circle and dig the thickest branches around the circumference with a slight inward slope. At the exit, the structure should take a cone-shaped shape.
Make sure the structure is strong, and then reinforce it with small branches. At the last stage, all that remains is to lay the flooring and invite the baby to play.
Wigwam
To build a wigwam-type house, you need to build a frame with 6 sides
It is important that the height of the structure is twice the height of the baby. This frame looks like a cone - the sticks are fixed in a circle with an intersection at the top point
Fixation is performed with twine, alternately tying the frame elements to each other. For maximum strength, 2-3 knots should be made on each support or nailed with small nails.
To make the supports more decorative, it is better to varnish or paint them; after this treatment, the material becomes resistant to moisture. If the hut is being built on the street, then several additional slats should be nailed along the perimeter between the boards - this will strengthen the structure and create additional protection from the wind. When organizing a play space indoors, this is not necessary. You can use a rug, blanket, warm blankets and pillows as flooring.
This Indian wigwam turns out to be very strong and practical. The kids will be happy to furnish it at their own discretion and spend time playing games and chatting with friends. You can put up such a wigwam both in the apartment and in the yard.
From hoop and fabric
From a hoop and scraps of material at home you can make a very light, removable hut; you can hang it in your apartment or take it with you on a trip. To work, you will need a small hoop, nylon threads and canvas for a canopy; it can be sewn from leftover curtains and pieces of fabric. The fabric should fit snugly to the ground/floor, so select the length in advance before fixing the fabric. The total height of the structure should be 1.5-2 times higher than the height of the child, so that he can move freely inside the structure.
First you need to form a mount. To do this, four pieces of string are tied to opposite ends of the hoop and connected to each other. Then the canopy is secured with clothespins, not forgetting to leave space for entering the shelter.
The hut is ready - all that remains is to hang the tent from the ceiling hook if the hut is installed inside the apartment, or to a tree branch if the yard is chosen for games.
In order for children to enjoy their games, it is extremely important that the structure is not only durable, but also comfortable inside. This will require some improvements
- The floor should be covered with dry leaves or straw, and it is advisable to put a thick blanket on top.
- Attach a curtain at the entrance; it can be made of any material. In this way, you will block the path of annoying insects and additionally insulate the structure. In hot weather, you can use simple tulle - this will allow air to flow inside.
- So that the baby can play in the house in the evening, you can hang a small lantern or even a New Year's garland inside.
The huts are interesting designs. You can relax in them during a hiking trip or give them to children as a play area. A little practice - and all questions about how to properly build a hut will completely disappear. Rest assured that after a few tries, you will surely be able to build the perfect children's shelter.
To learn how to make a wigwam for a child with your own hands from scrap materials, see the following video.
Making the frame of the box
When installing the structure frame, follow the following instructions.
- On the walls adjacent to the corner, install guides (UD profiles) that will determine the dimensions of the box. Don't forget to use a level. To attach load-bearing profiles to the wall, use European screws and dowels. If the surface is tiled, you can take metal screws 2.5 centimeters long and 3.5 millimeters in diameter. They are screwed into the seams between the tiles.
p, blockquote 13,0,0,0,0 –>
Tip: To save space in the bathroom, install profiles closer to the pipes. The minimum distance is 3 centimeters.
- If the pipes run horizontally, place the profile parallel to the floor and secure it to it.
- Start forming the outer corner. Twist a corner post from two UD profiles. Direct their shelves in different directions at right angles and connect them with small screws - “fleas”.
p, blockquote 14,0,0,0,0 –>
- Cut the CD supporting profile into pieces, the length of which will correspond to the dimensions of the structure. Attach the corner stiffener to the wall. Insert the finished profile pieces with one end into the guide installed at the first stage, and the other into the stiffening rib. Thus, both parts of the corner are connected to the profile.
- Every 50 centimeters, add jumpers, which are necessary for the subsequent fastening of PVC panels.
- The second corner profile is attached in a similar way to another wall.
p, blockquote 15,0,0,1,0 –>
Multi-colored ladybugs
Even first grade students can make the products. To do this, the bottom of a plastic bottle is painted in any color you like. It is also necessary to draw black spots on the blanks.
Children's crafts made from plastic amaze with their simplicity and beauty. You can make a ladybug's head from half a Kinder Surprise container.
- Crafts for Mother's Day - how to make simple and beautiful original decorations and toys with your own hands (130 photos + video)
- Craft flag - how to make it with your own hands correctly? Master class on making for holidays and parades (105 photos)
- Eyes for crafts: how to make templates and a master class on making eyes from various materials (100 photos)
The part is painted black and attached to the body. The antennae are made of wire or plasticine.