One of the most beautiful birds is the peacock, whose peculiarity is the play of colors in its plumage. And it is the bright play of colors that often inspires artists and sculptors. And for little craftsmen there is an opportunity to make a beautiful bird from plastic mass. A small but very bright plasticine peacock is just a great idea for a craft for a competition or exhibition for school and kindergarten.
A plasticine peacock turns out to be very colorful if you use bright contrasting shades
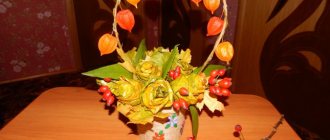
How to make a peacock from natural material?
As you can see, the craft consists entirely of natural material. The only exception is plasticine, but this was used to a minimum.
To begin, glue the acorn to the side of the pine cone and a stand, thanks to which the peacock will hold a vertical position. It is better to make them from not very bright plasticine, for example, brown.
Next, make a beautiful peacock tail. Here you can show all your imagination and make, in fact, an applique of leaves, using small pieces of plasticine or PVA glue for gluing. You can stick smaller leaves of various colors onto a large maple leaf; even rowan berries attached to the edges of the maple leaf would be a good idea.
Make a small cone-beak from orange plasticine, and eyes from white and black. Glue these parts to the bird, attach a chic tail to the pine cone, and a small leaf on the head, which will serve as a crest.
Peacock applique made from dry leaves
Peacock applique made from autumn leaves. The peacock is a majestic bird with a luxurious tail. It is unlikely that in nature you can find such a proud, handsome creature who never ceases to show off his huge feathers shimmering in the sun. We suggest that you and your child make an applique in the form of a peacock, using natural material in the form of a dry herbarium for this.
Autumn leaves will be an excellent puzzle that needs to be assembled into a beautiful picture.
Materials for work:
• leaves are preferably oblong; • lionfish seeds; • PVA glue; • half beads or sequins; • thin branches or tails from the leaves themselves; • paper.
What you need to sculpt a peacock from plasticine
Making a peacock from plasticine is not as difficult as it might seem at first glance. Despite the fact that the craft itself involves many small details, even small children will find it interesting to do it. But for the job to be successful, you will need the following materials and tools:
- plasticine of different shades;
- stack;
- toothpicks;
- thin wire.
Advice! Beads, beads, buttons and other decorative details can be used as additional elements. They will help decorate the bird itself and its beautiful feathers.
Step-by-step making of a peacock from dry autumn leaves
1. First take glue, paper and leaves. Half beads will be needed at the end for decoration. Select oblong parts of the herbarium.
2. Glue an ash leaf horizontally in the center of the sheet. On one side, attach a perpendicularly directed acacia leaf to it.
3. Attach a small round head at the top.
4. Now you need to pay attention to the tail - fluffy and very long. Divide the lionfish seeds in half. Start attaching the oblong helicopters from the back, pointing down.
5. Use enough detail to create a beautiful silhouette down.
6. Glue a small beak in front, add a crest at the top. Draw a small eye on the head.
7. Use thin twigs to make the paw. Decorate the peacock's lush tail with half beads. Glue the wing onto the body using the same lionfish seeds. The autumn peacock applique made from leaves is ready.
The principle of making the main parts of the figure
Before making a peacock from plasticine, you need to think through the entire algorithm. The step-by-step implementation consists of the following steps:
- Divide a piece of plasticine of the main color into 3 parts, but not equal. You need to divide the entire piece in half, and then cut off another 1/3 part from one of them - this will be the head; the larger part is the tail; half is the torso.
- From a small part, first make a sphere, which then needs to be converted into an oval. This shape will be ideal for shaping the head.
- From the piece for the body, separate a small piece that will need to be rolled into a sausage - this is the neck. It is worth considering that in a peacock this part of the body is short and not too thick.
- The body is formed according to the same principle as the bird’s head.
- The third part should be divided into several equal pieces. Each part is a feather, so the more parts, the better. To do this, you need to roll out all the pieces into sausages, which should be approximately the same length and thickness. Flatten each element, forming a long teardrop-shaped oval.
A full-fledged plasticine peacock will be obtained only after assembly and finishing, which should be done according to the principle of pottery.
Application "Owl" from autumn leaves
You will need: autumn leaves, a sheet of cardboard, a sprig of wild grapes, a bunch of rowan berries, PVA glue, scissors, plasticine.
Master Class
- Select sheets of suitable shape.
- Take the yellow owl body sheet and shape it into the desired shape using scissors.
- Glue a green leaf as a head onto the cardboard.
- Make eyes from white and black plasticine.
- Glue them.
- Cut out a beak from a red leaf.
- Cut out the eyebrows from the yellow sheet, then glue them on.
- Select 2 green leaves of the same size and glue them as legs.
The “Owl” applique made from autumn leaves is ready!
How to make a peacock from plasticine with your own hands
Crafts in the form of a peacock can only be made from plasticine or using additional materials.
Advice! In addition to the standard figurine, children may like a picture made using the plasticine technique, or an option with a fir cone.
Simple plasticine peacock
One of the most popular options for creating a peacock is sculpting its figurine from plastic mass. And to simplify this task, you can use the following master class:
- First of all, the body and head of the future bird are formed.
It is best to perform these elements using blue. The body and head should be completely proportional in size to each other - Next, the eyes and beak of the peacock are decorated. To do this, roll two balls of different sizes. In total, you should get five pairs (three white pairs and two black pairs). The first two white balls are made into a teardrop shape and flattened, attaching them to the head. Then, alternating, apply the remaining flattened balls.
- The peacock's beak is made from two pieces of different sizes.
In this case, you should choose orange or red plastic mass. The junction of the two halves of the beak touching the head should be smoothly lubricated - Two main elements are connected - the body and head of the peacock.
Also, the junction of the head and neck should be lubricated - Start forming the wings; they can be made in any color you wish.
Make flat, drop-shaped blanks and use a toothpick or stack to apply a pattern that imitates feathers. Connect elements. Both wings of a peacock should be identical to each other - They begin to perform the tail.
To do this, first large and small elements in the form of a drop are formed from a darker plastic mass. Large parts are made in an odd number, and small parts are made in an even number. - A characteristic pattern is made on each feather.
It is made using plasticine balls of different sizes. You can use any color. You shouldn’t make too many balls, just use four different colors - The resulting feathers are combined into a fan and glued to the peacock’s body.
Connect feathers in two rows - Next, the paws and crest are performed.
Small parts are fixed with wire - Finish the craft.
If desired, decorative elements are added in the form of patterns made of plasticine in a contrasting color. The tail can be made more magnificent by adding a row of feathers
Peacock made of plasticine on cardboard
A peacock is no less interesting if it is made in the form of an applique made of plasticine. For production you will need:
- sheet of cardboard;
- plasticine;
- chenille wire;
- stack;
- stationery (pencil, scissors).
Step-by-step master class:
- Before you start painting a peacock from plasticine, you need to make a sketch of it.
The sketch should be done without a tail - Then they take the desired color of plasticine and begin to fill in the drawing along the contour.
The neck is done first. Be sure to smooth the surface so that there are no unevenness - Using a stack, the neck is made textured.
These lines imitate feathers - Let's start with the head.
It is created from a circle of a different color. Add elements in the form of eyes and beak. Eyes are made from circles of different sizes and colors - Two flagella are rolled from a plastic mass identical in background to the neck.
Glue them on as legs. The flagella are slightly pressed - The body is made of multi-colored circles.
To do this, roll out many identical small balls and, using pressure, glue them to the cardboard. It is better to use colors that are close in shade - Using green plastic mass, a clearing is made.
A texture imitating grass is applied in a stack - The tail, wings and crest of a peacock are made from chenille wire of different shades.
You can also make bushes from this material, completing the craft
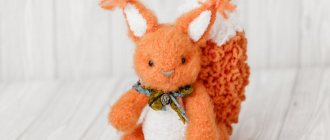
Peacock made of plasticine and cones
In addition to plasticine, other materials can also be used in the work. Below is a step-by-step algorithm for making a peacock from plasticine and pine cones:
- The peacock begins to be made from the tail; for this, a flat circle is made from any color desired.
Next, roll out multi-colored balls of different sizes and create a pattern by sculpting them on top of each other. For the pattern you can choose 3-4 contrasting shades - Having completed the bright tail, proceed to the body.
The cone is fixed with the base down on a plasticine stand. Then the paws are formed. For the body, use an elongated spruce cone - Next, the eyes, beak and crest are sculpted.
Plasticine elements should be pressed well against the base of the cone - The wings are shaped like a drop.
Fix them on the sides of the cone. Using a stack, a pattern is created on the wings that imitates feathers - The craft is completed by attaching the tail to the body from a pine cone.
A peacock made from plasticine and pine cones turns out to be very unusual
Application “Autumn Landscape”
You will need: thick blue cardboard, PVA glue, brown plasticine, stack, rowan berries, autumn leaves of different colors, a simple pencil.
Master Class
- Roll a tree trunk out of plasticine.
- Roll up some branches.
- Glue the trunk and branches onto the cardboard.
- Press the plasticine with your finger, making the structure flatter.
- Apply cracks to the wood using the stack.
- Mark the boundaries of the tree's crown with a pencil.
- Break the leaves into small pieces.
- Apply glue to part of the tree and sprinkle with crushed leaves.
- Cover the entire crown of the tree with shredded leaves in the same way.
- Mark the boundary of the land with a pencil.
- Apply glue.
- Glue the chopped leaves.
- Glue the rowan berries and leave to dry completely.
Application “Autumn Landscape” is ready! I recommend watching the video master class!
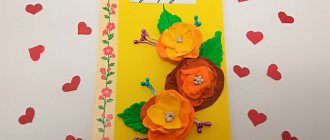
Application "Peacock" from autumn leaves
You will need: colored cardboard, PVA glue, scissors, gold and red autumn leaves, felt-tip pen.
Master Class
- Place 5 yellow leaves in a semicircle on the cardboard.
- Glue them.
- Place 7 smaller red leaves on top of the yellow leaves.
- Glue them.
- Cut out the peacock's body and glue it on.
- Cut out the beak and glue it on.
- Draw the eyes.
The “Peacock” applique made from autumn leaves is ready! I recommend watching this video!
Crafts for the autumn exhibition
Master Class. DIY peacock
Author: Antonina Nikolaevna Lysenko, teacher, MDOU “Kindergarten No. 52 “Cheburashka”, Novoaleksandrovsk, Stavropol Territory.
The master class is designed for children 5-6 years old.
Making crafts for the autumn exhibition, as a gift.
Like an important gentleman
The peacock spreads its tail !
Goal : Formation of environmental culture among preschoolers; instilling a love for nature and nurturing a caring attitude towards it.
Tasks:
— Development of fine motor skills of the hands.
— Acquaintance with natural material – feathers.
— Training in non-traditional appliqué techniques.
— Cultivating attention, concentration, and accuracy when working with scissors.
Materials and equipment:
- a sheet of thick white cardboard;
- rhinestones for decorating crafts.
Execution order:
1) Trim each feather with scissors, giving the shape of a peacock feather from the tail.
2) Draw a partial oval at the end of each feather with white paint.
3) Glue a rhinestone into the middle of the oval, thereby decorating each feather.
4) Glue the top row of feathers onto a sheet of cardboard like a fan.
5) Glue the bottom row of feathers.
6) Trim the pine cone almost at the very base.
7) Glue it onto a sheet of cardboard, making a “breast” for the peacock.
 Cut off part of the acorn.
9) Decorate the peacock’s head by gluing eyes from rhinestones, a “crest” from the tip of a feather and painting the “beak” red.
10) Glue the peacock's head.
11) Make “wings” from the tips of two feathers and paint partial ovals with white paint.
Application "Fish" from autumn leaves
You will need: blue cardboard, autumn leaves of different colors, scissors, PVA glue, doll's eye.
Master Class
- Glue a yellow piece of paper in the center of the cardboard as the body of the fish.
- Glue 2 red leaves as a tail.
- Cut out a heart from a red sheet and glue fish as sponges.
- Cut part of the red leaf in half and glue it as fins.
- Glue the eye.
- Prepare twigs with green leaves.
- Glue them at an angle as seaweed.
The “Fish” applique made from autumn leaves is ready!