Application helps develop creative skills and hand motor skills. This kind of art is relevant for all ages and problems, but most often, educators practice this process in kindergartens and primary grades.
To keep the boys busy for a few hours or to spend fun and useful time with them, they make car panels from scrap materials. Now we need to look at machine templates for appliqué for children of different ages.
Simple car applique for kids
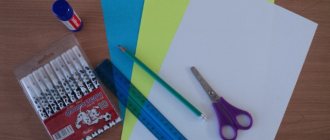
This simple option is suitable even for small children from 2 years old. To work you need to find material:
- Colored paper - the more shades, the better. It is better to develop color perception from infancy.
- Safety scissors are plastic.
- Glue stick.
- The base is cardboard or a thick white sheet.
It is difficult for children to draw figures; in the early stages they are printed using a printer on colored paper. Parents should be involved in the process so that the baby can observe the actions and repeat. Simple application instructions:
- cut out 2 small circles, 1 rectangle and a square;
- small ovals are cut out of red paper, which will indicate the presence of headlights (since the panel will be two-dimensional, only 2 pieces will be needed);
- then the assembly process begins - each part is coated with glue and placed on the base.
The shape of the car, colors are selected only at will. The main essence of this work is to develop motor skills by working with small parts.
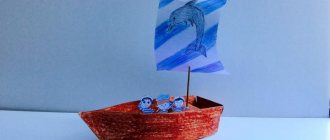
Volumetric machine applique
Many adults remember this option. Previously, there were children's magazines on sale, where the authors included special car templates for appliqué for children, from which they assembled a full-fledged car.
Today it is difficult to find something like this; adults can print any model on their own. Assembly instructions are simple:
- You can use the suggested options.
- Next, the vehicle is printed on a thick A4 sheet.
- After that, it is cut along the dotted line.
- For convenience, a ruler is used; it will help make the folds even.
- Next, the parts are glued together with tape or PVA glue.
Thus, you can make any model that will become a full-fledged interior decoration. The work is suitable for older people, as gluing and folding parts requires skill.
Sequencing
- Prepare cardboard, glue, diagrams and scissors in advance;
- According to the drawing, cut out the elements and glue them onto a cardboard template;
- To complete the picture, you need decorations in the form of the sun, grass or bushes...
As a result, a unique fake appears that will delight parents and their baby. You can fit several machines into work at once, creating entire storylines. To detail the wheels, improvised means are used: buttons, bottle caps.
Car applique
This option is good for all ages. To inspire your child, you can take a short walk around the city where he can watch the traffic. Next, it is recommended to study the master class:
- Parents often develop creativity through the “observe and play” technique.
- Children see the world differently, and with the help of art they can show it to adults (by the way, appliqué often helps to identify experiences or concerns; psychologists use this method).
- To work you will need colored paper, safety scissors, glue stick, rulers, compass.
- Using a compass, wheels and the sun are drawn on black paper.
- Next, using a ruler, the main elements are formed - trunk, windows, doors, body, etc.
- It is necessary to make a background - it is done using colored paper.
- Clouds or gas emissions are made using the torn technique - colored material is carefully torn, the child can create any interesting shape.
- Next, all the details are cut out and folded onto the background, after which they are glued.
Such work can even be submitted to a competition in kindergarten.
Truck applique
Children love to watch massive and large vehicles that amaze them with their majesty. Therefore, if a child is impressed by what he sees on the street, this is an excellent reason to make an applique with him at home. Necessary materials:
- Drawing.
- Cardboard.
- Scissors.
- Pens or pencils.
- Glue.
First you need to download a dump truck template made from thick paper, which many have already assembled. This will make the preparation process easier and the child will not lose interest in work. It is recommended to print the template on white cardstock.
If you only have regular printer paper, this will work too. However, cardboard is better, it is thicker and stronger. This will make it easier to draw the pattern on colored thick paper, and it will retain its shape for a long period.
After the pattern is printed, you next need to cut out the parts using scissors. For realism, add a little brown color for the ground, this is optional.
Using a torn technique, it can be added to the very bottom; each detail is glued with a glue stick. All parts are first placed on the base and then glued using regular PVA. You can complement the concept using watercolors, drawing clouds, houses, the sun, etc.
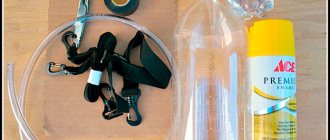
Homemade washing machine
There are many publications about homemade washing machines, used mainly in the country. I also had several such designs. At first, I tried to restore old washing machines like “Malyutka” and the like that were thrown out by their owners. But I soon became convinced that it was not profitable for me. It was necessary to purchase some parts in the store to ensure tightness at the installation site of the activator, and also to design a mount for the “non-native” drive (electric motor) to the standard plastic tank of the machine.
I am one of those do-it-yourselfers who live only on a pension and do not have their own car. I have been building a dacha (150 km from home) by myself for several years now. The volume of construction over the summer is determined by the amount of materials that I can purchase in the spring.
When designing this machine, I adhere to one main principle - a minimum of purchased parts, no welding or turning, etc.
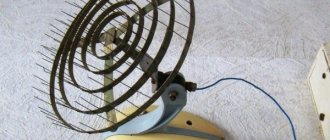
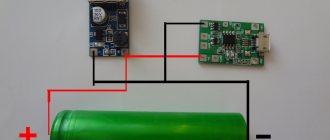
And now directly about the design of the washing device, which completely satisfies me (Fig. 1).
. As a drive, I used an electric motor from the Skillful Hands machine without modification, and instead of a tank, I used an enamel pan. A washing device mounted on a plastic disk 8 mm thick and with a diameter 100 mm larger than the diameter of the tank was placed loosely on the pan on the tank (photo 1).
Fire truck applique
This craft is so simple that even small children can do it. And if the child is a little older, he can even help cut out and trace the template. Necessary materials for application in the senior group of fire trucks:
- Drawing.
- Cardboard.
- Scissors.
- Pen or pencil.
- Glue.
As in the previous version, it is recommended to print the template on cardboard. You can also use regular printing paper if your printer won't accept thick paper, but cardstock is an economical and convenient option that can be reused many times in the future.
Once the pattern is printed, the child simply cuts out the shapes using scissors.
Once all the shapes are cut out, you can start choosing the background color. Most often it is blue, as it resembles a clear and bright sky. On this basis, the red details will look even more impressive.
First of all, the children glue the body onto the base. Then two black outer tires and a center one. Two windows are added, a staircase and finally a yellow light at the top.
You can add a road under the fire truck or clouds in the sky to complete the scene to your liking. The fire truck applique is an excellent reason to tell your child about this profession while working.
Creative machines - paper crafts (full instructions)
We accumulate quite a lot of tubes after using toilet paper. And if we used to throw them away, now we decided to make crafts out of them. The results were such wonderful machines. Do you want the same? Let's get started!
We will need:
- Scissors or knife
- Glue
- Brush
- Toilet paper tubes
- Acrylic paints
- Cardboard
- White and colored paper (for decoration)
- Small nails or buttons
- Pencil
How to make paper cars (instructions)
1) We prepare as many straws as we want to make machines
2) Paint the tubes with acrylic paints. While waiting for them to dry, you can move on to the next step.
3) Draw circles with a simple pencil (attach any round object and trace it) - these will be our wheels. For one car you need 4 large circles and 1 small one (for the steering wheel)
4) Paint the circles with black paint, the middle with white paint
5) Cut a hole in the middle of the tube - this will be our seat. Glue the steering wheel and attach the wheels using nails or buttons
6) And lastly, and also the most exciting thing, we cut out various decorations from paper and glue them onto our supercars :)
That's all! We hope you found the model you like!
Ambulance application
The sound of an ambulance can be heard several hundred meters away, such a car attracts attention. Making it at home using the appliqué technique is quite simple. What we need for the colored paper applique machine:
- Colored paper.
- White cardboard.
- Scissors.
- Glue.
Let's start with a minibus template. It consists of two parts - a body and a frame with wheels. First we make the body, having previously estimated the size on paper. We also make the rear part of the body separately and glue it to the roof using glue.
After this, you need to cut out a cross separately and place it on the body. Red flashing lights and black wheels are cut out separately, depending on the size of the overall part.
All parts are carefully glued to the cardboard. If you have an old stencil at home that you can use to make letters, you should definitely use it.
Toy with drum and powder tray
For older and more demanding children, there is a more complex version of a toy washing machine - with a retractable tray, a rotating programmer and a drum. Manufacturing will require more time and materials, but the analogue will almost completely replicate the real technology. First, let's prepare the consumables:
- cardboard box;
- wide plastic bottle;
- an empty baby juice pack;
- lid from a plastic container;
- two deep disposable plates;
- wrapping or plain white paper.
The dashboard of a toy car should resemble an adult “tidy”.
You will also need scissors, PVA glue, felt-tip pens, tape, old rags or bags. Is everything collected? Then we begin to make a washing machine for dolls.
- We cut off the neck of the bottle so that the remaining part fits in the prepared box.
- We wrap the bottle with foil outside and inside.
- We cut a hole in the box for the programmer and insert the cut neck of the bottle into it (close the lid from the outside with a drop of glue - it will hold on and rotate).
- We attach a juice pack to the box and cut out a hole for the dispenser.
- Cut out the bottom of the plates.
- Between the plates we fix a plastic cover cut to the template - this is the hatch door.
- We make a hole in the box for the drum and hatch.
- We insert the drum bottle and secure it with rags, bags and tape.
- We make two holes on the “hatch” and fix it to the body with wire.
- On the other side of the plates we make a lock from a ring from a key fob.
- We cover the product with paper (it is better to use self-adhesive wallpaper or cover the box with thick paint).
- We transform a pack of juice into a powder receptacle (cut off the top part, glue the outer sides, make a recess-handle).
- We fix the resulting powder receptacle in the box (be sure to glue larger pieces of cardboard on both sides so that the tray does not pull out completely from the machine).
- We draw the dashboard of the washing machine (power button, timer, several modes and other keys).
As a result, you get an almost complete duplicate of an adult washing machine. The child will be able to repeat the entire washing process: add laundry, add powder, turn the program selector. What is important is that due to the wire fastenings on the door, a separate powder receptacle and a button-lid, such a toy will last a long time.
Police car applique
It's a fun activity to make things out of paper with your own hands. Parents need to: download and print the template, cut it out, fold it along the lines, and glue it.
You can also paint the car yourself by pre-printing the drawing in black and white. The car will be unique. The main point of assembling such a machine using origami and appliqué techniques is the possibility of play.
If made from thick cardboard, the vehicle will be stable and strong.
Such a machine can even be made from an old cardboard shoe box or equipment. Any ideas:
- Cut several holes for windows.
- Next, cut off the parts for the doors; this must be done so that they can open.
- Afterwards the structure is simply covered with colored paper.
This version of the craft can become a full-fledged toy or work for a competition. This work is similar in technique to fire truck appliqué.
Simple toy out of the box
The simplest version of a paper washing machine is a duplicate made from a cardboard box. For this craft you will need any empty packaging of a suitable size, scissors, a stationery knife, glue, a marker and polyethylene. The former is easy to ask for at any grocery store, and the latter are always available at home. The toy is crafted for about 30-40 minutes.
You can make a toy washing machine from an empty cardboard box in 30 minutes!
The washing toy is made according to the following instructions:
- cover the box with paper or paint it (if you don’t like the original color);
- draw the facade of the machine with a simple pencil;
- mark the location for the future hatch (it is better to attach suitable sized plates to get perfect circles);
- depict the dashboard (duplicate buttons, switches, icons, powder receptacle);
- outline the outlines with a bright marker;
- use a knife to cut a smaller circle of the “hatch”, acting as carefully as possible;
- cut a large circle, leaving a “loop” in the middle on the left - 4-5 cm (this is how the door will open and close);
- on polyethylene or a stationery file, outline a smaller cut out circle, then add 1.5 cm to the diameter and cut out a circle (this will be the glass of the hatch);
- glue the “glass” to the hatch from the inside.
All! The toy washing machine is ready. There is enough functionality for children's fun: you can open the door, load laundry into the “drum” and press the buttons. This way, the child will be able to “do laundry” safely, imagining himself as his mother’s assistant.
Fabric machine applique
This part of the master class is suitable for mothers who want to decorate towels or bed linen for their babies. Stripes are often used for identification in kindergartens; teachers may ask them to buy them or make them themselves.
The technique is quite simple, especially if you have a sewing machine at hand:
- First you need to choose bed linen or clothing on which embroidery will be done.
- Next, you need to download and print a special machine template for the applique. It will make the work much easier.
- After this, the threads are selected.
- The sewing machine is refueled and you can start working.
- Each detail is carefully stitched.
You can also do this work on a separate piece of fabric to use the machine as a patch. If the work is done for a kindergarten or camp, it is appropriate to add the name or the first letters of the initials. This can also be done using standard stitches.
If you don’t have a machine at hand, you can do the appliqué by hand, which will take more time.
Applique is a great way to develop motor skills and creative skills in a child. Working together brings adults and children closer together, which will have a positive impact on relationships in the future.
Homemade washing machine
There are many publications about homemade washing machines, used mainly in the country.
I also had several such designs. At first, I tried to restore old washing machines like “Malyutka” and the like that were thrown out by their owners. But I soon became convinced that it was not profitable for me. It was necessary to purchase some parts in the store to ensure tightness at the installation site of the activator, and also to design a mount for the “non-native” drive (electric motor) to the standard plastic tank of the machine.