Just four centuries ago, the cocked hat of pirates was considered a distinctive feature of these gloomy sea robbers. In this article, we propose to create a pirate cocked hat with your own hands, which boys will definitely like. Why them? Well, most of all, the greatest interest in pirates came from male representatives. They absolutely love interesting legends, fairy tales and horror stories about pirates. Any holidays are accompanied by carnival costumes, which is why the problem arises of how to complement the image of a little pirate boy with a beautiful cocked hat. Without it, it is absolutely impossible to imagine the costume of a sea villain.
Vietnamese straw hat: name, photo, how to make it yourself
A cone-shaped straw hat is a headdress popular in all Asian countries without exception, and especially in Vietnam. And if earlier the Vietnamese hat was the only salvation from the sun for peasants working in the fields, today it is used as a fashionable and unusual accessory and addition to a summer look. It will be useful for those who want to be in trend to know the correct name of a Vietnamese straw hat, how to wear it and how to make such a headdress yourself.
Scheme of work
- An ordinary newspaper, folded in half, will be the basis for the work.
- The edges of the newspaper are folded towards the middle of the sheet and the seams are smoothed out.
- The bottom edges of the newspaper sheet should be folded inward.
- The resulting workpiece must be turned inside out. Bend the ends up.
A simple cocked hat for repair work is ready.
If you want to make a pirate headdress, it is more convenient to use a sheet of A3 paper. The product can be painted and added with an emblem.
We recommend reading:
DIY polymer clay jewelry: review of the best master class with step-by-step instructions for beginners (150 photos of original ideas)DIY polymer clay flowers (120 photos of the best ideas) - simple instructions with full description + master class and video tutorials
Quilling for beginners (200 photos) - step-by-step instructions with description. The best master class on creating quilling crafts with your own hands
History of origin
According to ancient Vietnamese legends, the nonla straw hat was invented many hundreds of years ago by a certain mysterious lady who traveled around Vietnam wearing a similar headdress, and where she appeared, the prolonged downpours immediately stopped and the sun began to shine brightly. It was with the appearance of a mysterious woman in a cone-shaped hat, as the story goes, that good weather established in Vietnam, which allowed the country's residents to engage in farming and growing rice.
Traditional Vietnamese nonla was made from dried palm leaves, which were held together with silk threads. This headdress saved the peasants not only from the scorching rays of the sun, but also from torrential rains. In order for the hat to better protect from the heat and pleasantly cool the head, the Vietnamese dipped it in cold water and put it on their heads directly in this form, without waiting for it to dry.
In the last century, during the war with the Americans, the cone-shaped hat was also used by the Vietnamese military as a headdress to protect from the scorching sun. Moreover, soldiers often painted straw green for better camouflage in the jungle.
Currently, the traditional straw headdress is still used by ordinary Vietnamese (and residents of other Asian countries) - both living in the city and working in the fields. In Asia, where the sun is quite bright most of the year, you cannot do without a hat to protect your head from overheating.
Fashion for Vietnamese hats
Asian countries, including Vietnam, have recently become one of the most popular tourist destinations. Gorgeous beaches, seas, summer all year round, exotic cuisine - all this attracts people from all over the world. European and American tourists, along with souvenirs, often bring home the national Vietnamese headdress - the nonla hat: fortunately, it is sold in almost any market and costs mere pennies.
Fashion designers also liked the exotic straw accessory – and more and more often you can see how fashion designers and stylists offer to complement summer looks with a cone-shaped straw hat. A Vietnamese hat can really diversify any woman’s look and attract the attention of others to a fashionista. Examples of how and with what you can wear a straw Asian hat.
This hat looks original as an addition to a standard everyday look consisting of a T-shirt and a mini skirt:
The Vietnamese nonla hat can be an interesting decoration for an evening or holiday look with an elegant maxi dress (great if it is also made in an oriental style):
A triangular straw hat combined with a bright knitted dress:
The big advantage of Vietnamese hats is that all models have the same size, suitable for any head. When choosing or ordering in an online store, you don’t have to worry that the accessory will be too small or large.
It all depends on the volume
As you can see, there is nothing complicated in making hats; it is quite possible to do it yourself. Any of the above methods will help in this matter. The main criterion is the size of the head of the object for which the future product is intended. It could be:
- a hat on a bottle of champagne;
- children's;
- cowboy;
- for a doll;
- like Dunno;
- sombrero and many other types.
The decorative elements and materials used to make a hat mainly depend on availability, capabilities and preferences.
The most important thing when doing needlework is to have the desire. Articles on this topic, video lessons, master classes and other sources can serve as an assistant. It is also important to correctly measure the volume of the future headdress.
If you are not lazy, experiment and strive for the desired result, you will create beautiful, neat crafts, and you may even enjoy this activity.
DIY Vietnamese hat
A Vietnamese cone-shaped hat can be easily made with your own hands from straw or paper: the pattern of the product is quite simple even for a beginner.
From palm leaves and bamboo
The Vietnamese traditional headdress is made from dried palm leaves, which are attached to bamboo stems. The method is not the simplest, and the main difficulty is finding suitable material - dry palm leaves and bamboo sticks.
Pre-dried bamboo stems are used as the frame of the hat; hat hoops are also made from them.
Dry palm leaves are placed on top of the frame and begin to weave together.
Make a Vietnamese cone-shaped hat, trimming the bottom of the product.
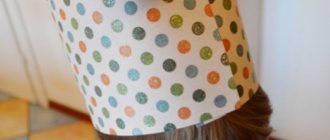
From paper
Since palm trees and bamboo do not grow in our latitudes, the easiest way to make a traditional Vietnamese headdress is from paper. For the hat you will need:
You need to cut out a medium-sized circle from cardboard. Then, starting from the center, draw a small triangle-slice (the circle at this point will resemble a cake from which an even piece has been cut). Cut the triangle with scissors, and connect the edges of the circle with each other using glue.
You can also make small holes on the sides and thread a lace or ribbon through them to help the hat stay on your head better.
The decor of such a hat can be the most unusual:
Video tip on how to make a children's cone-shaped hat:
Decorating the yard
A pirate-themed birthday party can be held outdoors - in the courtyard of your own house, with a trip to a park (for example, Zaeltsovsky Bor) or in the country. Now we will look at the holiday scenario specifically for the dacha.
So, we decorate the yard with pirate-themed posters, balloons and flags. It’s a good idea to hang signs on the fence outside where the holiday is taking place. You can prepare them on the computer and print them out, or take boards, paint them white and write in black paint: “Pirate Party”, “Adventures Ahead” and so on.
Making a pirate ship. At the dacha, its role can be played by a gazebo, which needs to be decorated with pirate flags, a streamer of flags, various colored ribbons and braid - long so that they flutter in the wind. It is advisable to put a compass and other pirate accessories on the table (the table will also be useful for holiday treats).
You can use your imagination and improvise a little, make a “ship” separately (as in the picture). For this you need a table, a rope, a ladder/step-ladder, a bench, chairs, curtains, pillows, straw roller blinds and other things that can be found in the country house. Yes, yes, people with imagination can easily build a ship from all this! It’s easy to make a boat frame from plywood, draw stripes on it that imitate boards, make a mast from three sticks, dig it into the ground, string the sails...
Prepare stencils of the skull and crossbones and anchor and sprinkle flour on the grass on the lawn. It should look like the photo below.
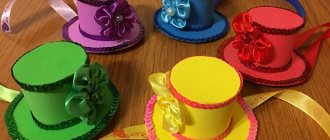
Lesson #1: Top Hat
You will need a regular plate, pencil, scissors, glue and thin cardboard. This is a classic version of creating a hat, based on it you can come up with your own ideas.
1. Cut the cardboard intended for the top of the hat into two strips of the same width (note that their width determines the height of the cylinder).
2. Measure the circumference of the child's head, divide the resulting number by 2, and you will get the required length of each strip. Make an allowance of about 2 cm on the glue line, and cut off the excess cardboard.
3. Glue the two fragments overlapping along the transverse side. You will get one long strip of cardboard.
4. Next, roll the strip into a cylinder with the colored side facing out, and glue its transverse edges overlapping.
5. On the conditionally lower side of the cylinder, make cuts about 2 cm deep, located at a distance of 2 cm from each other. Then set the part aside for a while.
6. Lay out the cardboard on the table intended for the brim of the hat. Place a regular soup plate on it and trace its outline with a pencil. Then place your cylinder in the center of the circle and circle it too. Cut out the resulting “donut”.
7. Return to the cylinder. Place it on the table with the cuts facing down and apply a little glue or a piece of double-sided tape to each.
8. Place the donut onto the cylinder and press down until the glue sets.
9. If you want to hide the gluing areas, cut out another circle and glue it to the bottom surface of the margins.
10. Decorate the hat with a contrasting paper ribbon and you're done:
Video lesson
Below we provide a visual video with which you can easily make such a hat:
Spyglass, cardboard hook, boots for a pirate party
toilet paper
- 3 toilet paper rolls;
- roller for removing pills from clothes;
- colored paper;
- scissors;
- glue.
If you have artificial leather, cut out two rectangles from the red one. The first large size is 10x9 cm, the second is slightly smaller - 8x9 cm. Also made of black leather - 8x9 cm. Roll each rectangle into a tube, glue the edges.
For the small black and red tubes, you need to cut out another small rectangle to roll each into a small tube, put it down each of these blanks, and glue them.
Now coat the rounded inserts with glue, insert the first small one, different in color, into the large tube. Then to the second and third. Cover the roller left over from a hand tool designed for removing pills from clothes with leather. Place the end of the three-piece tube into it, gluing it.
If you don't have artificial leather, you can make a spyglass for a pirate party using cardboard sleeves. Cover them with colored paper. Cut out small inserts from cardboard, roll them up, and glue the edges. Also insert small tubes into large ones. Assemble the pipe in the manner just described.
Thick paper will help you make another attribute of a pirate party - a hook. For it we used:
- empty cardboard cup;
- foil;
- wire;
- black or red marker;
- scissors.
Bend the opposite end of the wire in the shape of a question mark. This is how cardboard packaging turned into an attribute of a formidable pirate.
- black rubber boots;
- red braid;
- 6 large artificial pearls or the same number of buttons on the stem;
- wide black elastic;
- 2 buckles;
- a piece of thick fabric (fleece, drape);
- glue;
- scissors;
- twine;
- threads with a needle.
Measure the ankle of the boots and cut a wide elastic band to that length. Thread the buckle through it. Sew both ends of the elastic.
Corrugated paper sports cap
- Corrugated paper with vertical folds for the base
- 2 corrugated paper strips in contrasting color
- 1 ribbon of thick paper or thin cardboard
- Lace or braid
- Decorations (eg paper applique)
1. Fold a sheet of corrugated paper in half, iron the fold and unfold it.
2. Apply a thin bead of glue directly below the fold line. It is better to use thick, non-spreading glue.
3. Place cardboard tape over the adhesive. Its top edge should coincide with the fold line of the base, and a little corrugated paper should protrude on both sides. Fold these edges over the sides of the tape and glue to it.
4. Apply a thin bead of glue along one edge of the contrasting colored paper tape.
5. Glue the tape along the top edge of the base so that its clean edge (without glue) matches the edge of the base.
6. Fold the bottom edge of the base up and glue the second corrugated paper tape over it.
7. Make a fringe along the entire top edge, capturing both the base and the ribbons.
8. To make a flap along the bottom edge of the hat, simply fold it up 1 or 2 times the width of the cardboard tape inside.
9. Now wrap the piece around your head from the lapel side, measure and cut off the excess warp on one side. Don't forget to leave a small seam allowance for gluing.
10. Glue the hat in the lapel area or fasten it with a stapler. Cardboard tape placed between the layers of paper will prevent it from tearing.
11. Place the hat on your head and carefully gather the top part into a bun. Tighten it with braid or lace and fluff out the fringe.
Read also: How to make a lampshade for a table lamp with your own hands from fabric
12. Decorate the lapel with paper applique or other decorative elements as desired.
Lesson #3: Cardboard hat
Finally, we will provide instructions on how to make a cardboard hat with a pompom from crepe paper.
- Take a cardboard container that holds popcorn, cheese, or other food item.
- Glue as many strips of crepe paper to the bottom as possible.
- When the glue dries, gather the strips into a bundle and secure.
- At the open edge of the container you need to make holes for the ties - one on opposite sides.
- Insert a piece of tape into each hole.
- On the inside of the container, tie a large knot on each ribbon so that they do not slip out of the holes.
Homemade cap
An origami cap is a universal thing. Its role assignment depends solely on how it is decorated (painted, painted) by you. Let's figure out how to make a cap out of paper. Look at the figure below - a detailed analysis of the circuit will tell you about the process in detail. In Fig. 2 specifically shows how to make a cap from a newspaper, since its standard spread sets a sufficient size of headdress for an average head. So:
- An origami cap is folded from a rectangular sheet. Fold it in half, and then bend the upper “closed” corners of the fold inward, bringing them together corner to corner, face to face (see figure);
- Fold the top “side” up twice, then turn the workpiece over. Bend the planes on both sides towards you, setting the desired size (we are making a cap for ourselves, a teenager, a small child);
- Fold the bottom edge of the workpiece towards you without overlapping the protruding folds, unfold the edge and bend its corners along the intended line of the new fold;
- Bend the bottom plane upward twice, covering all previously made folds. Essentially, the paper cap is ready;
- Turning the workpiece over, bend the top of the roll downwards, aligning it with the base of the workpiece. Then tuck this fold over the side of the package, straighten the product - you have a pioneer cap in your hands. I managed to make a paper cap with my own hands in just a couple of minutes.
What are Vietnamese hats called? Photo. How to make a Vietnamese hat out of paper
Who isn't passionate about Asia and its culture? Now, perhaps, almost no one, because eastern customs and traditions attract tourists so much that they don’t want to go back. When talking about Vietnam, people most often mention a strange wardrobe item for them - a cone-shaped hat. What kind of “fruit” is this? What are Vietnamese hats called? This may come as a revelation, but such headdresses are common in all Asian countries, they just have slightly different names.
Mysterious name
This type of hat has its own name in every language. For example, the people of Korea call it "satkat", but mainly only Buddhist monks wear it.
The Chinese and Taiwanese gave it the name "dou li", which literally means "ten liter hat." This is not surprising, since such a wardrobe item in the past was used not only as a headdress, but also as a container for water.
In Japan, a conical hat is called "sugegasa", which translates to "sedge hat", or "amigasa" (woven hat). Japanese names are also very practical - such headdresses are most often woven from plant materials, but more on that a little later.
In Vietnam, the hat was called “non” or “non la”, which means “leaf hat”. A type of conical hat that is produced in Hue is literally called “nonbai tho”. The word translates as “poem hat”, and this is due to its appearance. Such headwear is hand-painted with various patterns, and various Chinese poems are written on them, which can only be seen in the light.
Vietnamese legend of the origin of the headdress
Residents of this country are very fond of various legends, one of which concerns the famous Vietnamese hats. The legend tells of a beautiful tall woman wearing a magic hat made of strange leaves connected by bamboo. She walked from one settlement to another, and every time she appeared, the clouds in the sky instantly dispersed and good weather arrived. This woman taught the Vietnamese people a lot: how to grow vegetables, fruits and trees, how to cultivate fields... And then she disappeared. No one knew for what reason, but everyone was sure that she had gone to heaven. Since then, people began to make hats like that sorceress’s, because they believed that her invention would protect them from the sun, rain, illness and adversity, just as its owner did.
Fashion for Vietnamese hats
Despite the fact that the headdress is traditionally considered peasant, Vietnamese girls adore these hats. Firstly, it’s convenient - some beauties attach a secret mirror to the top of the cone to discreetly monitor their appearance. Secondly, it is considered incredibly attractive: a young girl in a traditional Vietnamese ao dai dress and a non hat looks mysterious and charming, like the heroine of the hat legend.
Functional "cap"
As mentioned earlier, Vietnamese hats are very practical. First of all, this is a very comfortable and sophisticated wardrobe item. It is worn to hide the head from the scorching sun. This hat is also very convenient as an umbrella - there is no need to hold it in your hand, because it is firmly fixed above your head.
It is used as a basket at the market, as a fan in the heat, as a plate during a picnic, as a stylized lamp. If the headdress is straw or made of matting, then it can be dipped in water and used as another means of cooling in the heat. However, young people like another option for using a hat - its radius well hides a kissing couple during dates.
How to make a Vietnamese hat?
Traditionally, this wardrobe item is made from dried palm leaves, bamboo and natural threads, which in modern production have been replaced by fishing line. From the outside it may seem that this process is not so complicated, but it is not.
First you need to collect the leaves and prepare them for sewing. Most often, the leaves of the Sabal palmetto palm tree are taken when they are still green. They are cut into strips, ironed and left to dry in the sun to bleach. They are then treated with sulfur to protect them from mold and insects.
Bamboo is used for the frame of the hat. It is attached to kitchens, where smoke protects them from damage and insects. For the hat, shoots with long logs are taken, which are then cut into narrow strips.
Then the hat making process begins. What it will be like depends on the talent and skills of the craftsman - some are able to make such a dress that there will be no noticeable holes from the needle on it, and the leaves themselves will softly shimmer in the light. The hat ultimately consists of a frame - several bamboo rings from 4 to 40 cm in diameter - and palm leaves attached to it, sewn together. The headdress is secured with either a leather strap or silk ribbons, depending on its purpose.
A simple way to make a hat
The process described above is very complicated, but sometimes a headdress of this cut is simply necessary, for example, as interior decoration or as decoration for a themed party. The solution is to use slightly unconventional Vietnamese hats made from paper. This headdress will be suitable for everyone.
How to make a Vietnamese hat out of paper? Simple and easy, because the hat looks like a cone that schoolchildren make in geometry lessons. It is necessary to cut out a circle of the required diameter from paper or cardboard. Next, you need to make a cut to the center and glue the hat in the right place, making sure that the cone is not too sharp. Next, you can decorate the product with paints, sparkles, and magazine clippings to make the headdress sparkle with bright colors.
Another option is corrugated cardboard. There are folds on its surface that will imitate straw. From a distance, such a hat will look as if it was made by a real Vietnamese master.
The Vietnamese are very attached to their national headdress, although in capital cities the hats are worn mainly by tourists or cyclists. Nevertheless, this wardrobe item will be an excellent souvenir, which is not only inexpensive, but also conveys the unique atmosphere of Asian culture.
Costumes and props for a pirate party
A themed birthday party can be organized at almost any age, albeit according to different scenarios, so from my selection you can easily choose something for both 4-year-old pirates and fun-loving adults.
I know from experience that when you need to find something urgently, it is very difficult to find it :-). Therefore, today there are not just ideas for a holiday, but specific items for organizing fun. All this is in Ozone.
Let's print it out!
If you remember, I have a similar selection for princesses.
I again turned to designer Natalia Ruleva for help.
You can quickly and free print from Yandex Disk:
- wall newspaper in A3 size (in .jpg and .psd - it’s easy to insert photos in layers, but a little skill in Photoshop is still needed. Don’t be confused by the fact that only one red bandana is visible - when downloading you will get a full-fledged newspaper :-))
- invitation (A5)
- a strip that can be easily used to glue a napkin ring together
- a small box that is placed on each guest’s plate
- circles with a toothpick glued between them - this is for cupcakes and canapés
All layouts HERE
Let's dress up!
Let's start with the costumes. A pirate costume can also be assembled from scrap materials, because pirates dressed from looted chests, so mixing eras and styles is quite acceptable. You can buy an entire outfit, or you can limit yourself to masks; I’ve collected a few examples:
Decorating the room
I don’t suggest attaching all these interior stickers to the walls forever, but you can come up with something.
- glue them to the back side of a strip of any paper wallpaper, and secure them along the wall at eye level
- cut cardboard in the shape of figures, stick pictures, make a “mobile” that will hang from a chandelier or suspended ceiling fixtures.
Banner set Fun idea “Pirate Yo-ho-ho” will be an excellent holiday decoration. The set includes a banner with the image of a small pirate (36 cm x 24 cm), a pirate ship (31 cm x 24 cm), a treasure island (23 cm x 18 cm), a parrot in a porthole (17 cm x 13.5 cm), a cannon (18 cm x 14 cm), shark (21 cm x 18 cm), treasure chest (18 cm x 13 cm), mermaid (30 cm x 17.5 cm), skull and crossbones (13 cm x 9.5 cm ) 3 pcs., starfish (9 cm x 9 cm) 4 pcs., as well as an adhesive strip. Thanks to the adhesive strip, banners can easily be attached to any flat surface without the additional use of tape or glue.
Table setting
You can buy tablecloths, napkins, glasses and table decoration items HERE.
Candles in the shape of little pirates are a cool idea! Sold in sets of three, you can also put them together to make a cake for a 12-year-old birthday boy :-). By the way, from the “Merry Idea” collection you can pick up comic, undying candles that spontaneously ignite even after the tenth attempt to light them!
Ice molds
How can you have a pirate party without ice guns, skulls and fish bones? No way! These molds can be filled with not only water, but also warm soap base and paraffin. If you get such homemade props, you can come up with competitions and just a creative master class.
Stickers
Small stickers with a pirate theme can be used to reward winners in competitions (they stick well to clothes). Another option is to make homemade cardboard medals with them.
Here's another good idea - decorate with them the most ordinary transparent glasses without a pattern. Firstly, there is no need to buy disposable pirate tableware, and secondly, each child will have his own drawing, so the glasses on the table will not be mixed up. And it's just fun!
When searching for an online store, search for this: “Pirates decorative sticker set.”
Let's play!
I liked the walking game (the most common one with chips and dice) called “Chasing Pirates.” Quite suitable for boys 6-9 years old.
Another interesting activity for treasure hunters is game sets from the “excavation” series. The point is to “unearth” jewelry and a pirate skeleton with a mysterious note from a brick using special tools and brushes. Adults are not impressed by all this (the box is 11 by 12 cm), but children really like it.
Making Vietnamese conical hats
alt=”Vietnamese hats” /> alt=”Vietnamese hats” />Early April is a lovely time for residents of villages located near the city of Hue in Vietnam. Here, traditional Hue music is played on the radio everywhere. The landscapes are especially picturesque in the rice fields, where the yellow-green grass sways slightly in the wind. The entire village of Tau Ho, which is located on the banks of the river, is saturated with the aroma of young rice.
At the end of the road I saw a woman on a bicycle, with one hand she was holding the handlebars and in the other she was holding a child. Several dozen conical hats hung from the bicycle. “Can you tell me how to get to the house of Mrs. Tu Bon, who makes conical hats?” - I asked.
“Every family here makes conical hats,” she replied. After talking with her, I finally found out the right direction. I saw a stone house, just as poorly equipped as most of the other houses in the area. Mrs. Tu Bon was replacing a torn strip on her hat with a new dry sheet, and was talking with Mrs. Zen, who happened to be a member of the local women's association. Their conversation about sewing conical hats was suddenly interrupted by Mrs. Zen's loud laughter.
“Are you asking when people started making conical hats in Hue? Who knows?" Mrs. Zen said her 75-year-old grandfather told her that his grandfather also made conical hats.
In Tau Ho village, up to 80% of families still practice this ancient traditional craft. Today they make 3 types of conical hats: laque hats, three-layer hats and poetry hats. Mrs. Tu Bon makes la que hats.
“A hat is usually made from 34-50 strips of leaves, depending on the width of the strips the number varies. From a distance, the hat should shine in the sun, and there should not be a single visible hole in it when you look through the hat into the sun. All seams should be smooth and uniform, without bulges.” - Mrs. Tu Bon explained to us.
alt=”Vietnamese conical hats” /> alt=”Vietnamese conical hats” />Making conical hats is not at all an easy task. First you need to choose leaves that are the same color so that the hat looks even and beautiful. The most difficult stage in production is pulling the strips together so that they all fit in shape. “You need to arrange the stripes well, so that the tip of the hat is very small, like on this hat.” - Mrs. Tu Bon said. She threaded a thin wire through the top of the hat, showing us its quality. “The thinner the hole, the better and more expensive the hat.”
Mrs. Zen remembered her mother making conical hats. Her father brought bamboo sticks, cut and hewed them to make frames for the hat, and her mother sewed hats. Every family member here knows how to make hats. When she grew up and got married, her parents were only able to give her a sample hat frame and a knife. Some girls also received scissors as part of their dowry. The bride could also choose her favorite sample frame for her future family.
At five in the morning we go to the Dza Le market, which is 5 km away. from the village. Local residents sell hats for 5,000 dong (which is only 30 cents), of which 2,000 to 3,000 dong is their income. One family earns only 1 million dong for a month of hard work.
Making conical hats is a long process. First you need to cut the leaves, then dry them in the sun, then leave them overnight to absorb the dew. After this, the leaves are ironed with a hot iron. “This work is very difficult, but this way we can earn some money, and the best part is that the whole family gets together to work.” - Mrs. Zen said. Remembering her husband, who had recently died, she smiled sadly. “Usually, when I went to the market every day to sell conical hats, I promised to buy sweets for my children and cigarettes for my husband.”
This market used to open at 3 or 4 am. In those days, it was common to see young Hue girls in lilac or green traditional clothes selling tofu or sticky rice on the street. Until the end of the war, conical hat sellers also wore traditional clothing.
Poem hats require even more experience and diligence than regular conical hats. This type of hat is usually made from the leaves of the xan tree, which are shaped like a fan. Large leaves are cut, tied into piles of 10 pieces, and then crushed and dried over coals. After drying, the leaves are ventilated in the air overnight. And then they are lowered into water, cut into strips and ironed. The edges and veins are cut off, so the rough side of the sheet is invisible. Paper is placed between the layers of leaves.
Popular traditional designs on hats include the Trang Tien Bridge and the silhouette
Did you like the article? Share with friends: ,
Instructions
We bring to your attention a description of the manufacturing process of the most popular models of wedding hats.
Model with veil
To make this elegant headdress you will need the following :
- any fabric that drapes easily;
- lining fabric (felt);
- fabric for the base (any scraps of cotton fabric);
- dense voluminous padding polyester;
- mesh veil;
- threads;
- tape measure;
- decorative elements (textile flowers, plastic buttons);
- pieces of lace;
- ribbons;
- hairpins
Step-by-step instructions (+ video from The SALON channel):
- Using an iron, steam the padding polyester to a thickness of 0.5 cm.
- Make a pattern from paper: set the desired radius and draw a circle with a compass.
- Fold the circle in half and cut off the top in a neat rounded arc.
- Place half of the pattern on the padding polyester and cut out two parts.
- Place these pieces on the cotton base and topstitch them 0.5 cm from the edge, moving in a spiral towards the center along the entire perimeter.
- Sew the resulting parts together and press along the seam.
- Turn the cap upside down.
- Lay the main fabric over this piece and secure with pins.
- Drape excess fabric beautifully.
- Trim the hanging edges of the fabric, leaving 1.5 cm from the workpiece.
- Baste the edges of the fabric inward.
- Using the pattern, cut out the felt lining and baste it to the main piece.
- Cut a rectangle from the mesh, for example, 47*30 mm in size.
- Cut off the top two corners of the rectangle.
- Drape the mesh and secure it to the main workpiece.
- Sew the lining and mesh with a hidden seam.
- Sew a pin to the lining.
- Secure the decorative elements with thread or using a glue gun.
Pill hat
For this simple option you will not need a lot of consumables :
- balloon;
- 2 large spools of plain thread;
- transparent PVA glue or gelatin;
- bias tape;
- tulle.
Step-by-step instruction:
- Measure the volume of your head.
- Take the balloon and inflate it to the appropriate volume.
- Soak the threads in glue or pre-prepared gelatin.
- Wind the thread tightly around the ball.
- Wait for the glue to dry completely and carefully deflate the balloon.
- Remove the ball from the threads.
- Carefully cut the sphere of thread in half and knead it at the top to give it a tablet shape.
- Finish the edges of the hat with bias tape.
- Add decorations as you wish.
* Author of the idea: stylist Anna Muzykantova (Russia, Petrozavodsk)
You can make such cute models of hats for the bride yourself. A wedding headdress, sewn yourself, will fully suit your taste, perfectly harmonize with the outfit as a whole and, importantly, will significantly save your budget.