You can rest assured that I have prepared a surprise for you for the holidays! And this is a collection of postcards. I will show different options for greeting cards that our kids can make on their own or with your help. There will be hand-drawn models, applications, and works folded from a sheet of paper. If you like the article and you use its tips, you can tell your friends about your successes and at the same time give them a link to this article.
DIY postcards for February 23
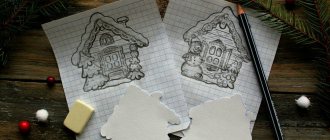
Fast does not mean simple and usual. And the proof of this is a card that can be made in a matter of minutes. Just get the link first and print out the details for this craft: numbers and a star!
Source
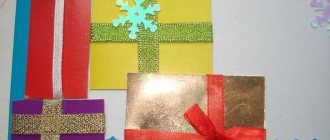
Choose colored paper in two colors. In the master class it is green and red.
Green - for the base of the card. Red is for details. Download the basic template by clicking on the link: postcard star and Star-for-card.pdf
You can also draw templates from the screen and transfer them to paper. Then cut out the base from green paper. We mark on it where the stars and the inscription will be located.
Cut out the stars.
We bend the base in half.
Cut out numbers and a star from red paper.
We bend the side parts of the star.
We bend each ray of the star in half.
Using folds based on the star, we add volume to the figure.
Glue the star to the inside of the card. The star should be visible in the cut hole. We apply glue exclusively to the bent side parts of the star.
Under the star, on the front side of the card, glue the numbers.
Making a postcard:
With a pen under the numbers we write: “February”;
Around the cut out holes, a large and a small star, we make a “hatching” ornament;
Cut out 6 thin strips from yellow paper. We glue these strips onto the postcard vertically and horizontally, 3 pieces each.
Source
You can make a congratulatory inscription inside the card.
Shooting gun
You will need: thick colored paper, glue gun, ruler, scissors, tape, rubber band, pencil, pen spring.
Master Class
- Take a sheet of paper and a pencil, twist the tube diagonally from the corner, then secure it with tape and pull out the pencil.
- Twist the second piece of paper around the first tube, then separate them. The second paper tube should be slightly larger in diameter than the first so that it can be used to shoot in the future.
- Secure the second tube with tape, then cut off the edges.
- Twist 2 more paper tubes in the same way.
- Cut the tubes into pieces of this length: trunk - 2 tubes 15 cm long; handle – 7 tubes 5 cm long; trigger – 1 tube 8 cm long.
- Glue 5 cm tubes diagonally to form a handle.
- Glue the 8 cm tube on top of the handle so that the remaining 3 cm protrudes to the right. This is the trigger.
- Glue two 15cm tubes together and glue them to the top of the gun as the barrel.
- Roll two thin tubes from yellow paper.
- Bend a thin tube into a “U” shape and insert one end into the trigger and the other into the upper tube of the handle. Trim off the excess. This will be the trigger.
- Make a trigger guard from the second thin tube. To do this, place one end of the tube into the handle (into the second tube from the top) and glue the rest of the tube to the bottom of the barrel.
- Roll up the pink paper tube, flatten it and tape it around the handle as shown in the image. It is worth noting that the rear hole in the trigger must be open.
- Pull the trigger out of the top tube of the handle and insert the spring. It is worth noting that the spring should rest against the tube covering the back of the handle. Reinsert the trigger.
- Roll up a thin, thick tube of yellow paper, secure with tape and trim the edges so they are even.
- Fold the edge, put on an elastic band and secure with glue.
- Insert the tube with the rubber band into the lower tube of the gun barrel and pull the rubber band forward, hooking it between the two tubes.
- Roll paper bullets, load the gun and fire.
The paper shooting gun is ready! I recommend watching the video master class!
HOW TO MAKE A SHOOTING GUN FROM PAPER IN 10 MINUTES
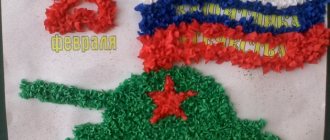
Card for kindergarten made of paper for Defender of the Fatherland Day
The person behind the idea called the card “magical.” And I completely agree with her. We will get a double postcard with a secret. I'll show you how to do it. When you pull on the inside, the tank magically paints itself!
Author https://www.youtube.com/watch?v=vR9YRQFDkHc
Fold a sheet of single-sided colored (green) paper in half. Cut along the fold line.
Take half a sheet. We bend a strip at one edge, about 0.5-1 cm wide.
We bend the resulting part of the sheet in half.
From the inside of one half of the workpiece, measure 1 cm from the top, bottom and sides and draw lines. Cut out the inside, leaving a “frame”.
We apply the workpiece to a white sheet. Outline the workpiece. We make additional stripes on the sides, about 0.5-1cm wide.
We cut out the second blank (white) taking into account the side stripes.
We bend the side stripes on the white blank. Apply glue to the side strips of the white blank.
Glue the white piece inside the first, green piece.
Apply glue to the bent side strip of the first workpiece. Glue the 2 halves of the workpiece together.
Again we apply the blank to the white sheet and outline it. At the bottom we draw a strip 1.5 cm wide. we make the side side narrower by 0.2-0.3 cm.
Cut out the third blank. It should be longer and narrower than the first blank. Then it will fit freely in the “pocket” of the first workpiece and part of it will be outside so that this workpiece can be taken out of the pocket.
Take a file or a thick transparent bag. We outline the third blank on it. Cut it out.
We place both blanks: the third and the transparent one, on top of each other. We glue a green strip to the edge of these blanks (bottom and top of this edge), bending it.
On the third blank we draw a tank. Let's paint it.
Cover this blank with the transparent part. We outline the tank with a black marker.
We push these blanks into the “pocket”. The color picture should be under the second, white part. The transparent blank should be on the second white part.
If the picture is inside, then the colored part is covered by the second white part.
And from above you can see a black and white drawing. But once you get a picture, you can admire the decorated tank.
Product options
You can slightly enhance the effect of the main object. For example, grease parts of the tank with glue and sprinkle with various cereals. After drying, shake off the residue and paint it in any color. A child will be happy to bring such an original “tank” craft to kindergarten.
Volumetric postcard to school for February 23
Once again I am convinced that beautiful crafts are very simple to make. You just need to get into the process. And I'll show you how to make an original card with a minimum amount of material and time.
Author https://www.youtube.com/watch?v=_k2EIOJjiaA
First, let's prepare the material. You need paper or thin cardboard of the required sizes:
- The base is thin cardboard 21 by 15 cm.
- The inner part is 2 parts 21 by 14 cm.
- Clouds – 3 pcs. 8 by 8 cm.
- The inscription is 20 by 6 cm.
Fold the paper for the inside in half.
Along the fold, from the corner we measure 3cm.
We bend the workpiece along the mark. Just bend it not exactly, but at an angle. The corner of the folded side should be 2.5cm from the middle of the opposite side.
Unfold the fold and cut off a small corner to the 3cm mark.
We unfold the workpiece completely.
On the left side we lift the top part of the sheet along the fold.
Stepping back 2-3cm from the central fold, we form another fold. The corner of this part should not reach the central fold.
On the right side, we wrap part of the sheet along the fold back. We bend the entire workpiece back along the central fold line.
We bend the edge of the right side of the workpiece in exactly the same way as the edge of the left.
We unfold the workpiece. We turn it over so that the central fold is directed upward.
We form all the folds alternating: top-bottom-top... We do this, taking into account the top-directed central fold, sort of like a fan.
Draw a “cloud”. High arcs fall on the bend. Cut out the cloud.
We bend ¼ of the workpiece. Draw 2 parallel lines at a distance of 1cm from each other.
We connect these lines at a distance of 1 cm from the fold.
We make 2 cuts.
Unfold the fold and turn the workpiece over. We continue the lines 3cm from the cuts. Let's connect these lines.
Extend the cut towards the middle.
We lift the strip that has formed up and make a fold.
We bend the second rectangle for the inside in half.
Glue the first piece vertically to the second. The central folds on the “cloud” and the second part must match. Apply glue to the outer parts of the “cloud”.
We cut off the protruding part of the cloud.
We make a cut on the fold of the “cloud”.
Bend the top part forward and make a fold.
We bend the paper for the clouds diagonally. Drawing clouds. Cut it out. Draw along the edge of the clouds with a blue pencil.
We make small cuts on the clouds. We insert one cloud into another. Glue the clouds onto the blank.
Print out a picture of an airplane. Cut out the picture and color it.
Glue the plane to the postcard.
Fold the paper for the inscription in half. We measure 2 cm from the edge. connect the mark to the corner on the fold.
We measure another 1cm. and draw a line parallel to the first one.
At the fold we cut off a corner (from the side of the 1cm strip).
We bend the measured 1 cm from one edge of the workpiece.
Unbend the strip. We round the edges on one side and the other (to different lengths). Let's cut it off.
On one part we write: “February”.
Glue the numbers 2 and 3.
Glue the workpiece to the base. Apply glue to the bent strips. The fold lines of the workpiece and the base must match.
We glue the resulting blank onto a cardboard base, bent in half.
Decorate the front side of the card to your liking.
A link to the aircraft template is attached. But if you wish, you can find any other aircraft template on the Internet. If it’s not clear what I said, watch the video
What crafts will bring a smile to your face?
Basically it all depends on the skill and what materials you work with. Let's consider an unusual option, let's call it a “sweet tank”. All you need is:
- Two different sized boxes. One of them should be smaller.
- Sweets, for example, candy. Choose them to your taste.
- Green corrugated paper.
- For our wheels we will take a bushing.
- Scotch tape will come in handy.
- Cardboard.
- Don't forget the glue stick.
- Scissors.
- You will need a stapler later.
- Pencil, pen, felt-tip pen.
- For the barrel, a regular juice or lemonade tube will do.
- Awl.
Don't eat all the material, the craft won't work. Now let's look at the cooking instructions:
- We wrap boxes and other small items with paper using tape.
- We will make five wheels no larger than two centimeters in size. Place them in one row on cardboard. Then we wrap it, immediately making a base for the tracks, and glue the blanks. For this you will need glue.
- To complete the preparation of the caterpillar, we cut out one strip of thick paper, fastening the belt with our stapler.
- Take a glue gun. Pierce with a skewer to increase stability.
- Let's do the easiest thing - the barrel. A juice straw will come in handy. Let's think about it, let's get to work.
- Decorating the craft. Carefully glue the ends of the candies with tape, the so-called tails. Paste it on tape.
- We carefully place the candies on the skewers that we broke. The result is obvious.
Not a bad idea that every child will like. If you don’t want a tank, you can make a car, a ship, an airplane from the same materials. At the end, take a photo, send the photo to your distant relatives, let them be surprised.
Don’t relax, you need to give to everyone: husband, son, friends, grandfather, co-workers.
Pictures and postcard templates for Soviet Army Day
I have also prepared postcard templates for all those who have many interesting ideas of their own. Here you can get the help you need: pictures on the theme of the holiday. Use them to make your own projects. And share the result, what you got, and how this collection of templates helped you!
I'll start with a postcard with a boat - you can make it for your brother, dad or grandfather.
The template itself:
We cut out a ship and an anchor on blue paper according to the template. It is convenient to use a breadboard knife or a stationery knife. Don't forget to place cardboard or board under the sheet.
All that remains is to glue it onto a sheet of contrasting color. And you're done.
But a card for a man who is a jack of all trades.
And a template for it:
And here is the famous shirt postcard. There are many options for making it, here I am posting the simplest ones, and just below is a video with a more complex one.
Another simple fold pattern:
And finally the last option:
The next congratulation will be in the form of a medal. Great option for grandpa!
And templates for the medals themselves and the decor for them.
Well, and many other useful pictures for February 23. Trace from screen or print. Create your own unique congratulations!!
Tank layout (T – 44)
It is advisable to combine plasticine of two colors (black = green) before starting work and soften it thoroughly. This way the plasticine will take on a dark green hue.
You will also need pieces of light tone and gray color, a stack for working with plasticine and a working board. It would be very good to use a photo of the model of this combat vehicle to more accurately create a T44 tank craft.
And now everything is step by step:
- How to make a tower: you need to form a ball. Then sculpt it into an oblong-shaped tower with slightly smoothed edges (as you work, you should constantly compare the created part with the sample).
- From most of the plasticine, sculpt a block - the body of the tank. You need to smooth it out well with your fingers to get sharp edges.
- Connect both components.
- Start sculpting the wheels. Pay attention to their number: 10 large and 4 small products.
- Lightly press each ball onto the surface with your fingers and apply a stack to the axles on all wheels.
- You need to sculpt two long oval planes - these will be the tank tracks.
- Each belt should have wheels in the following order: small wheel - four large ones - small.
- Make a long ribbon from gray plasticine and go around the tracks with it.
- Attach the structure to both sides of the housing.
- Use strips of basic plasticine to form a protective casing.
- Since this model has a thin barrel, it will be difficult to fashion it strong enough. It is better to use the core of a ballpoint pen, covering it with plasticine of the main color. Insert the finished barrel into the unit tower.
- Next, make a canopy for the front of the combat vehicle. Attach a light flatbread to a slightly flattened dark green block (bumper) (alternatively, you can use a light shiny button).
- Attach the bumper with the flashlight to the front of the base.
- Make two massive hooks from gray plasticine and also attach them to the bumper on both sides.
- The tank craft can be improved by adding various details to it (see photo). These will be bolsters on the sides of the protective casing, as well as three hatch covers on the turret.
- Attach the antenna (a piece of wire) to the tower.
- The final step will be to apply a certain (from the sample) relief with the tip of the stack.
Such a gift will be a unique gift for dad - a tank driver.
A tank made of wood looks like an interesting craft. In this case, the help of an adult man will be simply necessary. Because you need to choose the right type of wood, have a certain tool, and know how to use it.
Also, when creating a layout, you should know the safety rules when working with various devices and devices. Don’t despair if you still want to give such a gift. An original designer set - a prefabricated model of a wooden tank will appeal to any boy, and dad will not mind joining in the creativity.
How to make such a wonderful tank craft will be shown in the instructions that accompany this set, with a lot of details.
Happy holidays and creative success.
Master class on how to make a card for dad in the form of a shirt
Another option for a holiday card is a craft in the form of a shirt and tie. You will be surprised how easy this work is to make!
Author https://www.youtube.com/watch?v=KzlF5qvRm8w
We need thin black (one-sided) cardboard. Glue a white sheet of paper to the inside. Fold a sheet of cardboard in half.
Divide the left side of the base in half. We put a mark on the inside.
From the mark downwards we draw a line of 4 cm. Cut the cardboard along the line.
We close the postcard. We draw lines from the 4cm mark to the left and right corners.
We bend the corners.
Take a strip of white paper 5.5-6 cm wide. We put the strip in the middle, under the “shirt collar”. Glue it. Cut off the excess part at the bottom.
We bend colored double-sided paper measuring 13.5 by 5.5 cm in half.
We draw 2 stripes at an angle along the edges of the workpiece. One strip is from the very edge, the second is slightly retreating from the edge.
Cut it out to make a tie. This is a template.
Using a template, we cut out a tie from bright, beautiful paper.
Glue the tie to the shirt.
Draw a small pocket on black cardboard. We make side flaps on the sides of the pocket. Cut it out.
We bend the side flaps.
Cut out a small square from paper of the same color as the tie.
Glue the square on the back of the pocket.
Apply glue to the valves. Glue the pocket to the shirt.
Thanks to the valves, the pocket seems voluminous. All that remains is to sign the postcard.
Massage T-shirt
The children are playing and dad is resting. An ideal gift for the head of the family!
What do you need
- 2 or 4 sheets of A4;
- scotch;
- pencil or marker;
- template - optional;
- White T-shirt;
- acrylic paints or permanent colored fabric markers.
How to do
Secure the sheets of paper with tape and draw a route. If you don't feel like drawing, print out the template and glue it together.
Then insert the sheet into the T-shirt so that the design shows through the back. Outline the drawing with black paint or a marker and color the rest.
Beautiful card for grandfather
Let's try and prepare another card to give to grandpa. This is a medal postcard. It will be very nice to receive it. To make this craft you need colored paper of three colors. For the base, a rectangle measuring 15 by 20 cm. Red small rectangle 3 by 4.5 cm and gold paper.
Author
Fold the base in half.
Cut a rectangle of 4 by 4.5 cm from the gold paper.
We make marks on the side edges of this workpiece: 0.5 cm from the top and bottom. We connect these marks, retreating from the edge 0.5 cm.
Cut out the selected parts.
Place the red rectangle along the golden blank.
We bend the edges of the red rectangle over the golden blank. Glue these parts together.
Cut out a round piece from gold paper.
Glue both pieces to the base.
We draw stripes connecting both parts. We sign the medal and the postcard itself. The result was a very beautiful postcard that would be pleasant to the heart of any grandfather.
Unusual men's set
A very practical gift that is appropriate to give to your loved one. The message of such a gift will become extremely clear to any man - to build his own house, raise a worthy son and plant a tree.
You will need:
- Cardboard box;
- baby pacifier;
- paper with camouflage pattern;
- hammer;
- acorns.
Preparation method:
Note!
- Do-it-yourself passe-partout - a master class with step-by-step do-it-yourself schemes. Making tips + photos of the best examples
- Decoupage with napkins: TOP-150 photos of ways to decorate with napkins. Simple instructions for beginners at home
- Amigurumi: features of do-it-yourself knitting technique. Step-by-step master class on making toys for beginners + 180 photos
The box should be rectangular in shape. If it is not very strong, you can strengthen it by pasting it on the sides with thick cardboard, and then with paper with a camouflage pattern; put a hammer, acorns and a baby's pacifier in it, close the lid. To emphasize the solemnity of the moment, you need to tie the gift with a satin ribbon. The gift for Defender of the Fatherland Day is ready.
Congratulatory application for February 23
I will show in the photo what details should be there. We cut them out ourselves or using the templates, the link to which I give you. For the base you will need colored double-sided thin cardboard. You can use it to make other parts of the postcard (except for the parts for the parachute).
Author https://www.youtube.com/watch?v=4B8zPVrx63A
We cut out 5 circles from colored paper (double-sided), with a diameter smaller than the part for the base.
Fold the parachute cups in half twice.
Apply glue to the edge of the parachute blank, bent in half, departing about 1 cm from the fold line.
We bend the workpiece in half again, gluing the halves of the workpiece.
We get triangles. Apply glue to the side of the triangle and glue it to another triangular piece. Thus, we fix all the workpieces with their sides.
Apply glue to the top and bottom sides. Glue the parachute onto the base.
Under the parachute, we gradually glue all the other parts.
A head with a cap...
- ...body and arms,
- ...palms,
- ... from the palms of the rope,
- ...legs,
- …clouds,
- ...the chest of a parachutist,
- ...eyes,
- ...stars.
- We draw a mouth for a parachutist.
All the details for this card can be cut out by adults. And stick it with small children.
More details in the video
Box with a surprise
You will need: black cardboard, gray leatherette, scrap paper, hat elastic and black eyelets, ruler, creasing tool (not a writing pen, crochet hook), chipboard (cardboard cutouts for decoration), sewing machine, black threads, glue, decorative an inscription, a gift set - a bottle of alcohol, a screwdriver, a pack of cigarettes, a morning-after pill or other...
Master Class
- Cut a rectangle from black cardboard for a box measuring 37x27 cm. Box height - 8 cm, bottom length - 23 cm, width - 13 cm.
- Cut a rectangle from cardboard for the lid measuring 27.2x17.2 cm. Height of the lid is 3 cm, length is 23.2 cm, width is 13.2 cm.
- Cut out the corners (8x8 cm squares) from a large rectangle.
- Punch and bend along the marked lines.
- Punch the lid of the box as shown in the image.
- Cut triangles near the corners of the lid and fold along the marked lines.
- Measure each side of the box and lid, then prepare pieces of leatherette according to the resulting dimensions. Prepare parts from scrap paper in the same way, just make them slightly smaller than the leatherette parts.
- Sew the leatherette and scrap paper parts together.
- Sew one of the rectangles to the front side of the lid.
- Glue one rectangle to the bottom of the box.
- Install the eyelets and attach the elastic as shown in the image.
- Cover the inside of the box with rectangles of scrap paper.
- Install holders from grommets and elastic bands for other gift elements.
- Glue the lid of the box and cover the outside of the box and lid with stitched rectangles.
- Fill and decorate the box with lettering and a chipboard.
The men's surprise box is ready!
The inscription "February 23" on a postcard
How to sign a postcard beautifully? If you have your own ideas, or you know the secret of a beautiful congratulatory inscription, tell us about it in the comments to the article. And in this section, I’m ready to help with the final touch – making an inscription. With such an inscription your card will look incredibly beautiful!
Plasticine tank.
It will be much easier to work with soft plasticine. Some tips if the plasticine has hardened.
You should resort to available heat:
- Just hold it in warm hands (if time allows);
- Knead gently;
- Place plasticine on the windowsill in sunny weather;
- Place it on a hot battery (necessarily on some kind of base);
- Use a microwave oven;
- Place the plasticine in a plastic bag moistened with water and keep it in a container of hot water.
As soon as the material is ready to work with, you can begin creating a tank of any model (at the creator’s choice). The article provides a step-by-step process for manufacturing a military unit.
Sock bouquet
Men can never have too many socks. The sock bouquet will replenish supplies for several more months. Even a fifth grader can put together an unusual bouquet.
You will need:
- Seven pairs of socks;
- pins;
- blue corrugated paper;
- satin ribbon;
- beautifully designed box.
Preparation method:
One edge of the sock bends and curls. The second edge remains free. The main task is to form a semblance of a flower bud by twisting. Having reached the free edge, the bud is fastened with a pin. Since in this example there are seven pairs of socks, there will also be seven buds.
Next, take a box, each bud is wrapped in a piece of blue corrugated paper and beautifully laid out in the box. The result is a delightful gift bouquet of socks that will bring sincere joy to any man.
Presentation "Bottle"
Every representative of the stronger sex will gladly accept a bottle of good alcohol as a gift for a men's holiday. And if the bottle is also decorated thematically, it will impress the man even more.
You will need:
- Men's shirt;
- a bottle of cognac or other drink;
- needle with thread;
- sharp scissors;
- stylish tie.
Preparation method:
First of all, a man's shirt is put on the bottle, then the buttons are fastened on it. It is advisable to tie the sleeves at the back of the gift bottle. Next, take a tie and tie it around the neck of the bottle. Excess shirt material can be trimmed and neatly hemmed. You can also supplement the composition with medals - souvenirs.