We are all looking forward to the holiday, I love Valentine's Day. You can exchange gifts with friends and family, and receive a pleasant surprise from a young man. And also, supplement your main gift with a greeting card.
Sometimes, pleasant little things make a huge difference. I really love making beautiful things with my own hands. Today I will share a wonderful selection of holiday cards. I tried to collect the most interesting and easy ideas in one place.
You can pour yourself a cup of tea, and look through the ideas to bring them to life, and please your loved ones on such a wonderful day.
Pleasant little things make you happy and lift your spirits. They can perfectly complement a bouquet of flowers, or a box of chocolates, or even a banal chocolate bar. And adults can arrange a romantic evening for themselves.
Make a three-dimensional postcard with your own hands. Eight-bit heart.
This original three-dimensional postcard is quite simple to make, despite the fact that its design seems intricate.
It is ideal for a loved one (girlfriend, mother, grandmother) and the occasion can be any: birthday, March 8 or Valentine's Day.
You will need:
- cardboard or thick paper
- stationery or wallpaper knife
1.
First you need to print the postcard template, which is located
here
. Just in case there are 2 copies.
* You can try to draw a heart layout yourself using a pencil and a ruler, it’s not difficult.
2.
Using a utility knife, make vertical cuts on your template.
3.
Now you need to carefully fold the card without creasing the parts. First make the folds, which are indicated by yellow lines in the picture. Next, begin to carefully fold the card.
*The rest of the card should fold on its own. Don't forget to smoothly stroke the card with your fist so that all the elements work smoothly.
* For convenience, you can temporarily attach the postcard to the table using tape.
4.
Decorating a voluminous card. You can cover the edges of the card with paper of a different color.
Now almost everything is ready, all that remains is to add warm words.
Step-by-step instructions with photos
Congratulate your loved ones and people close to you on Valentine's Day. A charming DIY Heart card will be a beautiful addition to a holiday gift. Undoubtedly, they will be pleased to receive such a gift!
Step 1: Draw the design
Using a gray pencil and a ruler, draw two parallel lines on white paper, 13 cm long and about 3 cm wide.
Write the desired message along the contours of these lines. Use large letters and leave plenty of space between words, which will be useful for the next step.
Now take a black marker. Use it to trace the pencil words and the lines between them at the top and bottom along the outline of the gray lettering.
Step 2: Cut out the design
Cut out a rectangular piece of paper with the lettering on it and place it on the mint green paper. Using a stapler, staple both pieces of paper at the edges.
Place both stapled pieces of paper on the cutting mat. Start by cutting out the smallest dots and indentations inside the letters, then move on to the outline of the lettering. While cutting, trace only the black lines, not following the design too closely and cutting through the top and bottom layer of paper at the same time.
Step 3: Cut out the heart
Take a piece of white paper measuring 13x13 cm and fold it in half. From the top of the folded paper to the bottom edge, draw a curved line in the shape of half a heart.
Cut out the paper along the contour of the drawn line and unfold it. You will get a heart!
Step 4: Make a Card
Once you've finished cutting out the heart, take a rectangular piece of white paper measuring 25x18 cm and fold it in half.
Place a paper heart on the front of the rectangle in its middle and trace it along the outline with a pencil. Cut out the part.
On the back of the paper, only on the side where the heart is cut out, glue your green inscription.
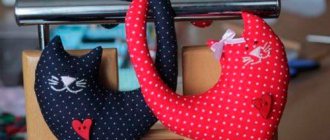
DIY voluminous postcard. Heart.
Despite its simplicity, this card will look beautiful if you do it right. Anyone can make a Valentine card like this.
You will need:
- white thick paper
- red paper
- glue
- scissors.
1.
You will need a postcard template (or you can draw one yourself - look at the picture for how to do this).
2.
Cut out a card from white paper.
3.
Fold the red paper into an accordion shape. Next you need to cut it out.
4. P
Glue the resulting hearts to the card.
Ready! All that remains is to decorate to taste and sign.
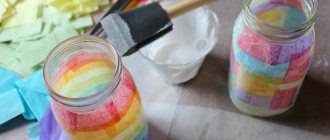
Valentine card using quilling technique
Very beautiful Valentine hearts and cards are made using the quilling technique. The activity will not take much time, but the crafts look quite elegant and elegant. There are no limits to imagination, you can come up with anything and design your fantasy in different ways. We suggest considering at least one.
To make such a heart-card, prepare:
- cardboard base;
- scissors;
- paper of different colors;
- a needle intended for quilling;
- glitter thread;
- PVA glue;
- paper cutter.
Moves on to completing the craft:
- Cut long strips of paper, 2 to 5 mm wide.
- Use a needle to twist the strips.
- Draw the outline of the heart on cardboard and cut it out. This will be the basis for our Valentine's card.
- Fold the curled pieces of paper in the center of the cardboard blank, laying out the pattern.
- Use a brush and a wooden stick (toothpick) to secure the curls together.
- Decorate the Valentine's card to your liking: by tying a beautiful braid, making a pattern around the edges, and gluing rhinestones.
How to make a three-dimensional postcard. Volcano of hearts.
This card consists of two halves that are glued together.
You will need:
- colored paper
- thick paper
- scissors
- glue
*You can try to draw hearts yourself, but you need to know certain rules - they are listed below.
1.
Remove the large heart from the middle (it's right on the fold).
2.
Cut out the hearts, leaving only their folds intact (see picture).
3.
Make cuts on the hearts shown in the picture (gray lines on opposite hearts), this way you can fasten them.
* The card will close better if you cut the paper at the center fold and glue them separately to the base (the base is thick red paper that serves as the background for the card).
4.
Glue the halves to the base and connect the hearts in which you made the cuts.
Rules
*The sizes of the hearts on both sides are the same.
*The blue line in the diagram shows that the distance from the fold in the middle to the cut is the same, and the red lines indicate the same distance between the hearts close to the middle of the card.
Easy valentine made of paper and glue
There are several ways to create a simple paper valentine. We will present two.
Method 1.
Prepare:
colored paper, paints, scissors, tape.
How to do?
- Take a piece of paper and place it in front of you. After wetting your palms a little with water, run them over the paint and apply it to the paper so that the print is close to the shape of a heart.
Advice!The palms should be of contrasting colors in relation to the paper and to each other.
- Use scissors to create the desired shape.
- Make a hole and thread ribbon or string.
Method 2.
Before you start, take:
- 1 sheet of red cardboard;
- 1 sheet of pink construction paper;
- a simple pencil;
- scissors;
- glue.
Completing of the work:
- Fold the cardboard in half, carefully draw and cut out a heart.
- Cut the pink paper into fringe and wrap it around a pencil.
- Fix with glue at the base and straighten the fringe to make a flower.
- Make several of these flowers and decorate the heart. Individual elements can be opened with shiny nail polish.
- Write your wishes in the middle and the card is ready.
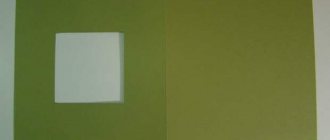
Volumetric postcard templates
2.
Make cuts in the indicated places (see the picture - where the red lines need to make cuts, where the green lines are folds).
3.
As you begin to fold the card, your little monster will begin to “hatch” out of the paper. Take your time, do everything carefully.
* If the mold does not come out automatically, try helping yourself with a toothpick or something similar.
4.
Glue the card to separate paper, which will hide the holes and serve as a base for the card.
*You can put your postcard in an envelope.
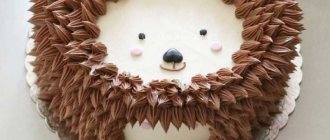
Hearts made from paper cupcake tins
Hearts cut out of paper cupcake tins are interesting. Cut out the heart from the mold.
Cut out the heart
Let's straighten it out.
heart
You can color them using prints made with cotton swabs.
Apply paint to the hearts
Moisten such prints a little with water and you will get an original color.
Pour water from a pipette
You can glue a ribbon to the heart.
Heart made from paper molds
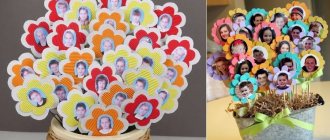
Volumetric card for mom
You will pleasantly surprise your mother or grandmother with this beautiful three-dimensional card. It will be suitable for birthdays and March 8th, or maybe you can come up with a reason yourself.
You will need:
- colored paper
- colored cardboard
- scissors
- glue stick
- ruler
1.
Cut out a stem with leaves from green paper. Use any other color of paper for the flowers.
2.
Fold 2 sheets of construction paper in half.
3.
Set one sheet aside, and from the other, measure 8cm from the edge and 5cm from the bottom (see picture). Now you need to cut along the solid line and fold along the dotted line. Do the same procedure on the opposite side of the sheet, and bend the resulting steps inward, they will serve as a support for the flowers and create a volume effect.
4.
Measure 4cm from the edge of the sheet and 2.5cm from the bottom (see picture). Now bend the steps inward again.
5.
Start gluing the stems to the steps, and flowers and leaves on top of the stems.
6.
Now you need to hide the holes made for the steps - to do this, glue your postcard to another sheet that you first folded - it will serve as the cover.
Ready! All that remains is to add the appropriate text.
Mini photo album for Valentine's Day
Making a mini-album will take a certain amount of time and effort, but such a gift will definitely please your soulmate.
To work we will need:
- Cardboard decorative box
- Black construction paper
- Double-sided tape
- Stationery knife
- Iron ruler
- Chocolate candies in the shape of a heart
Let's get started:
- You need to take thick black cardboard and cut out a strip the width of the photo from it.
- Next, we bend the strip several times to make it look like an accordion. To make it easier to make bends, you need to lightly mark them with a pointed object.
- Glue photographs to each part of the accordion. For best effect, it is better to use black and white photographs.
- We take the heart candies and put them in a box, and on top we place an accordion with photographs.
- To decorate the box, you can cut out a heart using a patterned hole punch and stick it on the lid of the box.