2/5 — (3 votes)
Good afternoon
I decided to go with a boyish theme today. Yes, really... What kind of things are there? Probably, hahaha. For me, all this technology, especially military equipment, is not something, well, I would say difficult. My son himself and they constantly ask their mother to buy them cars.
Since February is approaching and exhibitions and craft competitions will soon begin again in kindergartens and schools on February 23, I remembered that perhaps someone would want to make a tank on their own. Or perhaps on the threshold of May 9, and there, too, the boys are starting to do just such “stuff.” But what can it be made from? I think that using improvised means you can build a bunch of such simple and uncomplicated works. Both preschoolers and schoolchildren can cope with them, and adults even more so.
I decided to wander around the Internet and collect such products, and then show everything that I found to you, my subscribers and guests. I hope you will be incredibly happy about this. And be sure to share the information you find on social networks and write me a short review below.
Among other things, don’t forget that with the guys you can learn poems for dads or just on a military theme. Design wall newspapers and sign them with beautiful congratulations and wishes cards. So, go for it, because that’s what the holiday is for.
Creative project using the technology “Cannon of the Patriotic War of 1812.”
For preschoolers and students in grades 1-11,
a record low registration fee of 25 RUR.
Completed by: 8th grade student of school No. 27
Checked by: technology teacher Nigai E.I.
Calculating the cost of a product
Product evaluation and completion
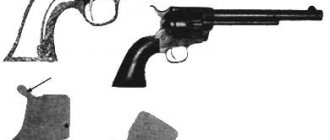
Cannon of the Patriotic War of 1812
guns appeared in Russia
in 1376, after the campaign of the Russian army against the Volga Bulgars, called mattresses, which in 1382 were used in the defense of Moscow from the troops of Khan Tokhtamysh. In 1389, armata (from the Latin arma - weapon) were brought to Rus' “from the Germans”.
At the beginning of the 19th century, Russian artillery experienced a radical reform. No technically revolutionary guns were adopted, but the structure fundamentally changed, and most importantly, the uniformity of artillery systems was introduced. Of the many dozen types of guns in the field artillery that existed under Catherine the Second, only six types of guns were retained.
The artillery reform is associated with the name of Count Alexei Andreevich Arakcheev (1769-1834), an ambiguous and contradictory figure, but it is to him that Russia owes the fact that in the Patriotic War of 1812 Russian artillery was not inferior, and in many ways surpassed Napoleon’s artillery.
Count Alexey Andreevich Arakcheev (1769-1834)
Arakcheev introduced a new uniform system of guns in 1805. All artillery systems were significantly lightened, unnecessary decorations were removed from the guns, all channels of the 1805 model guns had a smooth cylindrical channel ending in a standard hemispherical bottom.
One of Arakcheev’s most important innovations was the creation of horse artillery as a combat-ready structure. Horse artillery is not a horse-drawn cannon, but an artillery unit attached to cavalry regiments and divisions.
In order for horse artillery to have the same mobility as cavalry, the lightest field guns were chosen and the number of rounds carried on the limber was reduced. During the campaign, the servants were removed from the limber and carriage, who had to ride on horseback next to the gun.
The idea of creating horse artillery is sometimes attributed to Platon Zubov, who in 1794 submitted a petition to Catherine the Second to establish five horse artillery companies, which were formed by February 1796. Immediately after the death of Catherine II, Paul disbanded the horse artillery companies and created a new horse artillery based on the “Gatchina artillery”.
In 1812, the Russian army had 1,620 field guns. 60 guns as part of the Life Guards Artillery Battalion and the Life Guards Horse Artillery Battalion. 648 battery, 648 light and 264 horse guns. The total number of people in the artillery units was 52,500.
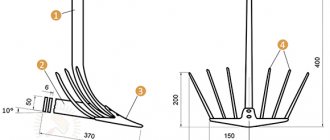
While studying the history of Russia in the 7th grade, I was inspired by the victories and exploits of Russian troops for the glory of the fatherland.
After searching for information on the Internet, I wanted to make a more advanced model of a “gun on carriages.” More detailed information is provided in the historical information.
I decided to make it from wood because it is the most suitable material not only for crafts, but also as a construction material.
Source
Making antique cannons
We propose to consider such an unusual business option as the production of models of ancient cannons from the 16th to 19th centuries. At first glance, the idea seems absurd. However, this is not quite true. Nowadays, most city dwellers strive to have a plot of land with a country house. Many people want to decorate their area. Some people want their plot to be different from similar plots of their neighbors out of simple vanity, others simply love everything beautiful or unusual. antique cannons can be an original decoration for a suburban area . They give the site a solid and unusual look.
Business will most likely go in big cities - where there are people with a lot of money. However, even in small towns the products can find their buyers. At the same time, no one is stopping you from making guns in a small locality and selling them to intermediaries in big cities. You will definitely find your buyer.
The gun barrel in its most primitive form is an ordinary thick-walled cast iron pipe, tightly welded at one end. This doesn’t sound very nice, of course, but it reflects the essence of the product.
Of course, it is better to make guns based on real prototypes - you can find many drawings of old guns on the Internet. Any client will definitely want the gun to look like a real one. Even on an ordinary metal pipe, you can create the outer relief of the barrel in such a way that the gun will look like the original.
If you live not very far from metallurgical plants, you can contact them directly - they will machine any part from any metal to the required dimensions. As a rule, real cannons were mainly made of cast iron, however this is not a prerequisite when creating a model of an antique cannon .
All that remains is to place the cast iron blank on a wooden frame (carriage), and the product is ready. A wooden carriage will be made for you in any carpentry workshop - just have time to take it out. Some difficulties may arise with the manufacture of wooden wheels, but specialists will make them without difficulty.
The main thing is that the guns are not stolen for scrap metal, but this is more a problem for the buyer, not the manufacturer. If the gun is placed on an area where the client lives year-round, then it is unlikely to be stolen. It will be more difficult if the site is left unattended during the winter. But thieves are unlikely to covet a concrete product.
Since the production of antique guns is not yet highly developed (more precisely, it is not developed at all), any advertising is good for promoting products. You need to use any advertising - in the media, by distributing flyers, business cards on the street. Advertising in cottage villages, dacha cooperatives, and the private sector of the city will work well.
Currently on the market the cost of such guns (with a metal barrel) ranges from 25 thousand rubles and above - it all depends on the quality of workmanship and the size of the product.
In the absence of competition, you can make a good profit by becoming the first manufacturer of antique guns in your city.
More information on this idea for starting and running a business can be found here.
You may be interested in the following business ideas:
Sock tank for February 23rd - step-by-step instructions for beginners
I’ll show you several descriptions at once, and you can decide which one you like best. All of them are so elementary that any boy or girl can figure it out even without words. It’s impossible to accumulate a year’s supply of accessories for a man. But five or six pairs of socks are quite possible.
You can make a tank either with a bottle (in this case it will act instead of a barrel), or without it. I decided to show all the models.
So, here is a ready-made master class in pictures, take it and create.
The next product is simpler; you will also need men's socks, plus a satin ribbon, scissors, colored paper, and an elastic band.
Twist three pairs of socks into a tube and secure with an elastic band.
Next, decorate with another sock and decorative ribbons.
Roll the turret and barrel out of socks, do as shown in the picture.
For brightness and festivity, glue red stars.
Well, now, as promised by a couple of new products this year, take your pick, maybe you’ll make just such a beautiful tank.
Making a cannon
Follow these instructions:
As you can see, there is nothing complicated in the assembly process, and such simple entertainment will help pass the time at home or at work, as well as amuse those around you or your own son.
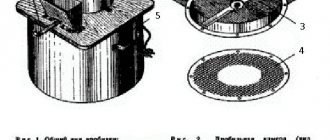
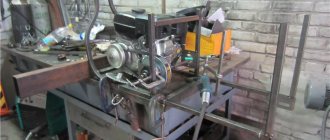
So, first of all, you should get a tractor cylinder, which is considered a completely ready-made base for a salute gun. If it is not there, any other small cylinder with one plugged end and an oil pipe outlet will do. It is necessary to make a cleaning rod. To create it, a wooden rod with the appropriate diameter is used, which is clearly adjusted to the outer diameter of the trunk. As for the length of the ramrod, it must certainly be 0.5 meters longer than the length of the barrel. A metal can is filled with a powder mixture. Using a wooden shelf (for example, a branch), the oil pipe hole at the beginning of the cylinder is clogged. Next, the cylinder is installed in a vertical position so that its “barrel” faces upward. You need to pour the powder mixture into it a centimeter above the level of the hole in the oil pipe. Using a cleaning rod, be sure to compact the mixture well.
Plasticine craft in the form of a military tank
For the youngest children, preschoolers and elementary school children, I recommend making another craft in the form of a tank from plasticine or special clay (dough) for modeling. Diversify your children's leisure time, or use this type of work in labor lessons or art classes.
Besides, this process is so exciting and you definitely won’t get bored, it’s better than surfing the Internet or watching cartoons at home.
Take soft plasticine and tear off a piece from it, roll it into a ball, then flatten it into a washer, make six of these things. Moreover, each should differ slightly in size from each other. In the picture, you can see this.
These blanks will be needed to design the caterpillar.
And so that the caterpillar doesn’t run away, ahah, hide these “wheels” in a long strip of plasticine.
In a similar way, roll up the second track product. Use a stack to create the outline of the wheels.
Now mold a box out of plasticine; it should be rectangular in shape.
Attach the chassis to the resulting car.
Next, start making a tower, roll out a puck of the same color as the body.
As you can see, it is better to make it not from a small piece of plasticine.
Next, complete the craft with a cannon; if you want, make a machine gun and fuel tanks.
And even make the headlights a different color, just like real tanks. Good luck, friends!
Making antique cannons
We propose to consider such an unusual business option as the production of models of ancient cannons from the 16th to 19th centuries. At first glance, the idea seems absurd. However, this is not quite true.
Nowadays, most city dwellers strive to have a plot of land with a country house. Many people want to decorate their area. Some people want their plot to be different from similar plots of their neighbors out of simple vanity, others simply love everything beautiful or unusual. antique cannons can be an original decoration for a suburban area . They give the site a solid and unusual look.
Business will most likely go in big cities - where there are people with a lot of money. However, even in small towns the products can find their buyers. At the same time, no one is stopping you from making guns in a small locality and selling them to intermediaries in big cities. You will definitely find your buyer.
The gun barrel in its most primitive form is an ordinary thick-walled cast iron pipe, tightly welded at one end. This doesn’t sound very nice, of course, but it reflects the essence of the product.
Of course, it is better to make guns based on real prototypes - you can find many drawings of old guns on the Internet. Any client will definitely want the gun to look like a real one. Even on an ordinary metal pipe, you can create the outer relief of the barrel in such a way that the gun will look like the original.
If you live not very far from metallurgical plants, you can contact them directly - they will machine any part from any metal to the required dimensions. As a rule, real cannons were mainly made of cast iron, however this is not a prerequisite when creating a model of an antique cannon .
All that remains is to place the cast iron blank on a wooden frame (carriage), and the product is ready. A wooden carriage will be made for you in any carpentry workshop - just have time to take it out. Some difficulties may arise with the manufacture of wooden wheels, but specialists will make them without difficulty.
DIY antique cannon
What would a holiday be without fireworks? It will be great if an artillery salvo sounds on your mother’s or grandmother’s birthday. And there is also New Year, Defender of the Fatherland Day, March 8 and other holidays, or you can just play pirates. So a fireworks cannon in the house is necessary.
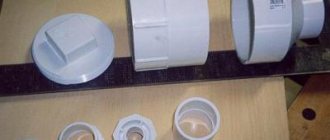
I propose to make an antique ship cannon. The guns are loaded with ordinary firecrackers. Therefore, the main condition of our work is that the internal diameter of the gun barrel should be slightly larger than the diameter of the firecracker. I don’t give the size of the gun - it depends on your desire and capabilities.
Working principle and first tests of the potato gun
We take potatoes slightly larger than the diameter of the trunk and press them firmly into it. Then you need to push it further with anything. For this purpose, you can make a cleaning rod from a ski pole. We push the potatoes to the end of the trunk, but not into the firebox itself. To do this, you can create a notch on the ramrod so that you can see where to push the projectile.
Then we take an aerosol can with acetone, unscrew the cap, spray a little into the firebox and close it back. We press the button of the piezo lighter, the explosion of the projectile is pushed out by burning acetone vapors.
Don't forget acetone and burning acetone vapor is quite dangerous.
Also, using weapons, you can use the drawings that we have on our resource to make a crossbow with your own hands
.
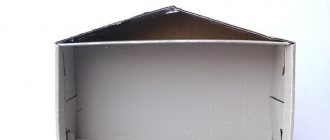
How to make a papier-mâché cannon
1. We are looking for a suitable base. You can take a tube from a vacuum cleaner or a wooden handle from a shovel. And the best thing is a cone-shaped leg from a coffee table.
3. On the form, mark the length of the gun and add another 2 centimeters on both sides.
We begin to cover the form with paper. You can take unnecessary newspapers, and if you can find wallpaper, that will be even better. We cut the paper into strips 4–5 cm wide and begin to paste over our form. For work we use liquid PVA glue or any wallpaper glue. We try to glue smoothly, without folds. After 5-6 layers, let the trunk dry. And so we glue it to a thickness of 1 cm. To make it more similar to a real cannon, we will try to give our barrel a cone-shaped shape.
8. The time has come to think about the combat capabilities of our gun, or rather, about ways to load it.
9. If you want to load a gun from the rear, “breech” part of the barrel, then you need to install a bolt. This method reduces the time it takes to load the gun and makes it much easier. But for this you need to show inventive abilities.
In my gun, the bolt is made according to the principle of a hook, which at one end is attached to the end of the barrel with a screw, and at the other end it is attached to a ledge located on the opposite side. So far it's working fine.
And another very important piece of advice. To prevent your mother from scolding you and forcing you to clean the room after a salute, you can modernize the firecracker: carefully remove the safety paper and carefully pour the contents of the firecracker (confetti) into the trash basket. The effect of the shot will remain (there will even be a smoky cloud), and there will be less or no debris at all.
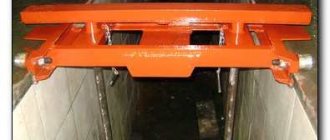
10. Now about the gun carriage.
The carriage can be glued together from wooden blocks - it will be more believable and reliable, for this we will need a saw. But this is a troublesome matter. Let's look for something to replace the tree with.
Let's take packaging corrugated cardboard. It’s better if you get a two-layer one. In accordance with the dimensions of the trunk, we will approximately mark the sheets of cardboard and glue them together. It is advisable to select cardboard so that the direction of the corrugation does not coincide: this will increase the strength of our carriage. When the workpiece reaches a thickness of 4–5 cm, we make the final cutting of the carriage parts and glue it together. Don’t worry about the strength of the carriage - craftsmen make furniture from such blanks.
For beauty, we cover it with paper with a wooden texture.
Car in the form of a wooden tank
Well, now I suggest you familiarize yourself with the handmade work that I found in the Country of Craftsmen. Perhaps young craftsmen will want to invent such military equipment. I suggest using sketches and diagrams.
The sequence of actions is presented below in these screenshots. Unfortunately, I couldn't find better quality.
This is the article that came out today, if I find something else, I’ll be sure to add it. Well, for now I say goodbye to everyone and see you again.
Best regards, Ekaterina
Powerful DIY Gauss Cannon
Quite a powerful model of the famous Gauss cannon, which you can make with your own hands from available materials. This homemade Gauss gun is very simple to make, has a lightweight design, all the parts used can be found in every homemade hobbyist and radio amateur. Using the coil calculation program, you can get maximum power.
So, to make a Gauss Cannon we need:
Assembling the housing for the Gauss gun circuit
The body shape can be any, it is not necessary to adhere to the presented scheme. To give the body an aesthetic appearance, you can paint it with spray paint.
Installing parts into the housing for the Gauss Cannon
To begin with, we attach the capacitors, in this case they were attached to plastic ties, but you can come up with another fastening.
Then we place the battery compartment inside the case and fix it, for example, with wood screws or in another way.
Winding a Coil for a Gauss Gun
To calculate a Gaussian coil, you can use the FEMM program; you can download the FEMM program from this link https://code.google.com/archive/p/femm-coilgun
Using the program is very easy, you need to enter the necessary parameters in the template, load them into the program and at the output we get all the characteristics of the coil and the future gun as a whole, right down to the projectile speed.
So let's start winding! First you need to take the prepared tube and wrap paper on it using PVA glue so that the outer diameter of the tube is 6 mm.
Next, gently take the sheet of plastic and cut off two walls for a coil with a diameter of 20 mm.
Then we drill holes in the center of the segments and place them on the tube. Using hot glue we fix them. The distance between the walls should be 25 mm.
Next, we take the wire and wind 138 turns onto the coil. After winding, securely fasten the wire using hot glue or another method.
Tank using origami technique: step-by-step description of the process
The simplest version of paper crafts is an airplane and a boat. All children can make them since childhood, but making a paper tank with your own hands is a little more difficult. Consider the simplest option on how to make a paper tank.
Materials:
- Colored paper
- Pencil
- Ruler
- Glue
- Knife
- Scissors
Take a landscape sheet and fold it in half along the length of the sheet. Fold the top corner to the left, towards the bottom side and iron the workpiece. Unfold it. Fold the bottom left corner to the top.
Make flaps. To do this, position the workpiece vertically. Turn the right corner towards the bottom. Divide the figure below into 2 parts. We fold one of them to the lower corner on the right
Now you need to make the middle, bend its lower part to the middle of the leaf and turn it back towards the bottom. Repeat these steps on the other side.
Tower: Fold the corners of the bottom triangles up. Roll the workpiece into a cone. The folds will be at the top of the cone. Insert the arrow inside the square and bend two corners into the lower pockets.
For the barrel, you need to roll a small rectangular sheet into a tube.
Heat gun - operating principle, types
Household fan heaters are compact devices that can easily be installed in almost any suitable place. To operate the device, you need electricity: both for the fan and for the heating element. Such devices are often used in apartments, garages, and even for heating workshops, greenhouses and other premises. It all depends on the power of the device.
Any fan heater model has three components:
The fan drives a stream of air through the body, the spiral heats this air, and the warm air flows throughout the room.
If you add automatic control elements to the device, you can set an acceptable air temperature. The device will turn on and off without human intervention, which will save energy.
To make a homemade fan heater, a regular household fan, the dimensions of which correspond to the body of the device, is suitable. Sometimes the housing is made based on the size of the fan
When operating the fan heater, you must adhere to safety rules. Do not place any objects or materials directly on the fan heater body or too close to the protective grille.
If the device is equipped with an overheat protection system, it will simply turn off. But if this module was not installed during assembly, the device may overheat, break down, or even catch fire.
A self-made fan heater can be of almost any suitable size and power. As a housing, you can use a piece of asbestos-cement pipe, a metal pipe, a rolled sheet of metal, or even a housing from an old system unit.
Usually, a fan is first selected and a heating coil is made, and then the type of device housing is determined depending on its filling.
The most important point when creating this heating device is safety: fire and electrical.
The heating coil in homemade devices is most often of the open type; it is simply twisted from suitable wire. Direct contact with a heated coil can lead to fires, burns, etc.
To make a fan heater with your own hands, you will need the most common tools, as well as basic knowledge of installing household electrical equipment
Therefore, the spiral must be properly secured inside the case, and the outside of the device must be covered with a reliable grille. The installation of the device's power supply also requires attention.
All contacts must be insulated; the base below is usually made of materials that do not conduct current: rubber, plywood, etc.
As a basis for the construction of a fan heater, it is worth taking an industrial model, the design of which will serve as a template
To assemble a fan heater you will need a motor, a centrifugal or axial fan, wires and a housing; the components can be assembled from literal trash
At the stage of selecting suitable available means, you should immediately decide on the type of heating element and the method of its fastening
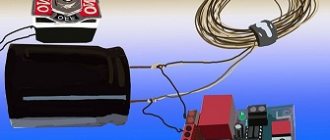
The photo shows a typical example of a homemade heat gun. An old fan from a dismantled ventilation system and a PEV 50 resistor are attached to a board base.
Osonov for the manufacture of a fan heater
Tools at hand in assembling the device
Tungsten Helix for Heater
Heater made from an old resistor and fan
Essentially, a heat gun is the same as a fan heater. A round-shaped case, open on both sides, contains a heat source and a fan that drives air through it.
As a result, a warm air flow is formed at the outlet, the temperature of which can reach several hundred degrees.
The operating principle of such a unit can be compared to the operation of a fan, however, the heat gun releases warm air into the room rather than cold.
The air operating inside the housing is heated by heating elements or burners operating on various types of fuel.
The name “gun” is due to both the external resemblance of the device to an artillery gun and the powerful jet of heated air that the unit “shoots”
Heat guns of various modifications find a wide range of applications.
They are successfully used:
There are other ways to use such devices, for example, gas units are widely used when installing suspended ceilings.
The name “gun” is due to the appearance of the device. It “shoots” a stream of warm air, which is pumped by a fan. The air is heated by an incandescent coil, which can be heated using different power sources.
If it is better to buy an infrared and “water” heat gun in a store, then you can make a heating device that runs on electricity, gas or diesel fuel with your own hands.
You can make a gas gun of indirect heating of the spiral and a version with open heating of the garage. A gas gun perfectly dries walls and is indispensable during construction work and in garages with high humidity.
Let's look at the stages of how to make the simplest gun with open heating, which is powered by a gas cylinder; it is easier to make it yourself:
It's important after that. As the gas gun is assembled, check the tightness of all fasteners and fastenings, especially the connection of the gas supply hose.
It’s easier and clearer to watch the manufacturing process of such a gun in detailed video instructions
The simplest do-it-yourself heat gun is an electric one, in which the coil is heated by electricity, and warm air is supplied into the room using a fan. Compared to gas and diesel guns, an electric heater does not produce a direct open flame, therefore it is the safest.
Read more: GSM socket: device, types, functions, principle of operation
The only negative is the high power consumption. Therefore, electric guns are convenient to use in the garage to quickly warm up the room, but not as constant heating in winter.
Assembly process for a simple electric garage heater:
Advice. It is better to make an old heating element from an electric stove or boiler shorter by half, this will help reduce the resistance and increase the power of the heater.
The downside of an electric heat gun is that it quickly burns oxygen and dries out the air. Such garage heating requires high-quality exhaust or natural ventilation of the room.
The video will tell you in detail how to make a simple heat gun without using heating elements.
For a garage without a connection to central power grids, an alternative heating option is a homemade heat gun running on diesel fuel. This kind of garage heating is best done with direct heating of the air flow, and for a remote construction site or warehouse, an indirect option for heating the air is suitable.
It is important to remember that such heaters must be used in a garage in compliance with safety measures, since diesel fuel is burned in the combustion chamber, and a fan supplies warm air to the room. It turns out that the air flow through the open flame enters the room and all the harmful combustion products of diesel fuel go directly into the garage.
How to make a cannon? Let's get started
In fact, a tractor or car cylinder will be a ready-made barrel for our homemade gun. Therefore, there is no need to perform any additional actions (welding, soldering, etc.) with it. It is better to make an additional cleaning rod. To do this, you need to take a wooden rod and cut it to the length of the barrel, exceeding it by 50 centimeters, precisely fitting it to the inner diameter of the gun.
The next step is to bend an L-shaped bracket from metal wire. As for the dimensions, the short part of this element at the outlet should be 2 times longer than the oil pipe and slightly sharpened to a cone. Ideally, the staple fits into the hole without any problems.
Getting ready to shoot
Before firing, the cylinder is placed at an angle of 45 degrees to the horizon in a direction that is safe for people. Do not forget that there should be no other flammable objects in the line of fire. The cannon itself is fixed on a wooden “slingshot”, driven into the ground in advance so that the device rests against the stake when fired.
The pointed end of the metal staple should be heated over a fire and quickly inserted into the hole of the pipe section
. If you are launching a cannon for the first time, then it is best to do it from cover - although the device is homemade, it shoots even better than its factory substitutes. Because of this, before making a dynamite cannon, always follow the safety rules. As soon as the shot occurs, inspect the barrel for cracks and other imperfections. If you don’t find any of these, you can safely start decorating the gun in a decorative style. In this case, the barrel must be cleaned and degreased in advance.
DIY heat gun - device and assembly
Advantages of a heat gun
Video review of heat guns Among the obvious advantages of a homemade electric heat gun is its mobility and the ability to be delivered to any place at no cost.
It is convenient to use and easy to repair. A heat gun, built or assembled with your own hands, has increased performance characteristics. A homemade heat gun is a special device whose main task is to heat large residential or warehouse premises. This heater runs on electricity, but alternative energy sources can also be used - kerosene, gasoline, diesel fuel, etc. Heat guns have different power levels. For domestic use, a unit with a power of 2 to 10 kW is sufficient. But simple models operate at such power, which are not enough to heat a large workroom or warehouse. If you need to heat a large room, then the power of the device must be at least 200 kW. You can order online and buy such a heater, but it’s easier and cheaper to assemble it yourself.
This heating source has its advantages and disadvantages. First, you don’t need a fuel tank. Secondly, electric devices are safer than those running on gasoline and kerosene. They are environmentally cleaner and do not emit harmful substances. There is only one drawback - the electric gun is only suitable for rooms with a central electrical supply.
Yes, you can make any device, even one running on gas and diesel fuel, but achieving the desired level of power is very difficult if you additionally take into account safety regulations.
And the process of manufacturing a gun that heats a flow by burning gas will require, at a minimum, quite serious skills in assembling such units.
In mains-powered guns, there is no open flame, no flammable fuel is used, and the risk of fire is minimal. If there is a possibility of problems, then they will all be related to the electrical part, so knowing everything about electrical engineering is a necessary condition for self-assembly.
Electric models are much easier to assemble, but this does not mean that you can do without specific skills and experience in assembling such structures. In addition to the fact that assembly requires the ability to handle many tools, you must have sufficient experience or work under the supervision of someone who has such skills.
If you do not have knowledge in the field of electrical engineering, then attempting to create such a device yourself is strictly prohibited!
Principle of operation
Any electric gun, even a homemade one, has the same operating principle: air is driven with the help of a powerful fan through a heating device - heating element, which warms up the air, which then goes out into the heated zone.
To have an idea of the operation of this unit, you should carefully study its elements.
There are only five of them in the design:
The quality and speed of heating the room depends on the quantity and power of the heating elements. The more heating elements, the more powerful and faster the air mass passing through the apparatus will warm up.
For some models, the fan rotation speed changes, and therefore the amount of air blown through the device.
There is a misconception that the rate of heating of a room depends on the speed of air passage through the heating elements. For our device, the power and number of heating elements are important.
The air blowing speed determines only the level of uniform heating of the room - the higher it is, the more uniform the heating. The heating element is responsible only for the amount of air heating.
How to assemble a heat gun with your own hands
Video about a homemade gas gun Assembly requires the assembler to have knowledge and skills in working with electrical equipment. If you are confident in your knowledge, you can start assembling.
Before the mechanical part, we deal with the electrical circuit. It is needed to take into account all safety regulations and perform correct installation.
The diagram will help you accurately calculate the number of elements of the device and the power level. And the main thing is to control the correct assembly.
A strong round pipe or box is suitable for the housing. It must be metal. Metal is the most heat-resistant and wear-resistant material that can withstand temperature changes and external loads. We choose a thick case with low thermal conductivity, since during operation the temperature of the device can be very high.
You can additionally cover the body with materials for thermal insulation. This will save you from burns if you suddenly touch the operating device.
Then we install the heating element. The quantity and power are determined by the master himself; it all depends on your requirements for the heating device. If you mount several heating elements together, this will help warm up the room faster and stronger, but will make the design of the device more complicated.
The temperature in the room depends on the power of the heater - the more powerful it is, the more heat will be released.
We fasten the heating elements in the center of the body and connect the power wiring to them. Make sure that the contacts and connections are insulated.
Next we install the fan. Let's decide on power again. The more powerful the model, the more evenly the room will warm up.
Everything connects to the switch, or make a control panel. We take the wiring from the heating elements and the fan and connect it, add switches and power wiring.
Before turning on for the first time, check all connections and circuits of the device for short circuits, all wires and contacts must be insulated, open contacts are prohibited.
If you have taken into account all the safety requirements, you can carry out the first start-up of the heat gun.
Assembling an electric heat gun with your own hands is very difficult. This requires experience with electrical equipment, knowledge and skills.
Without knowledge, you will not assemble a heating device, but will only triple the fire. We recommend that you simply purchase a factory model rather than risk your own safety.
It seems that assembling the heater yourself can save a lot of money. But homemade devices cannot be safe, especially if you make them for round-the-clock operation. The minimum that can happen is an electrical overload and a short circuit. A homemade device will quickly pump oxygen out of the room. For your own safety, we advise you to buy a heater in a company store.
(2 votes, average: 1 out of 5)
Share with your friends!
How to assemble a hot air gun for soldering with your own hands. Quick repair of chainsaws with your own hands.
How to make a paper cannon?
Before we make a cannon, we first need to make a carriage. To do this, you need to take several pieces of paper, and it is best to use thin cardboard. The layout of the carriage should be drawn on it. The resulting pattern is carefully cut out with scissors and glued together.
A match is placed under the elastic band. Since it will turn, secure it with pins. The second end of the rubber band is passed through the hole in the spool, and then through a wax ring. Then it is threaded into the side hole of the carriage. Before you make a paper cannon, think about the lever that will turn the reel. To do this, a wooden pin is placed under the elastic band, and a nail is installed at the end of the coil where the pins were inserted.
Master class for beginners Candy tank
And for those who love souvenirs and gifts, they can congratulate their beloved men on the holiday of February 23 in a rather original and non-trivial way. Or such a masterpiece can be made for a competition or exhibition in a kindergarten or school. In addition, you can use this idea for May 9th.
To begin, make a trapezoid-shaped tower from a cardboard box. Use a glue gun. I found this work on YouTube.
Here are some more ideas.