In the twenty-first century, which can rightly be called the digital age, a computer is one of the most popular gadgets in the home. Therefore, the location of this electronic accessory should be ergonomic and quite convenient. You can purchase a computer desk in one of thousands of online stores or make it yourself using only photos, diagrams and simple drawings with dimensions. Our article will tell you about the second option - which models are suitable for what and how to assemble them yourself.
DIY straight work surfaces for your computer
For the convenience of working with office equipment, there are many types of tables. They differ in design, type and size. Straight-shaped products are classics and occupy an important place in furniture production.
Stylish DIY accessory
Creating a fashionable work area for your desktop computer is not an easy task, but it is completely doable. The main difficulty lies in turning curved parts of the correct geometric shape. You can, of course, limit yourself to straight lines, but the effect will not be as expected.
First of all, you need to cut out the base and sides, and then adjust the radius of the transverse parts to fit them. If you do everything step by step, then there should be no difficulties. Pay special attention to the retractable keyboard stand. It is better to mount the runners under it, and not on the side, so it can withstand a significant load. At your choice, equip the product with additional rows of shelves for storing papers and other small items.
Gaming table for personal computer
The work surface, specially designed for gamers, allows you to spend time playing in comfort. With minimal effort, it provides the player with access to all the necessary tools. Most existing models are created by professionals, but if you really want to, you can make a gaming computer table with your own hands. A little skill and imagination will allow you to design a universal product that will satisfy exactly your needs. Use metal pipes as supports. Attach the wooden parts to them not directly, but using protrusions to which you mount the shelves. As a result, you should have a multifunctional piece of furniture.
Materials and tools for work
The master needs to prepare the following set:
- Electric jigsaw.
- Drill.
- Fasteners (screws, screws, nails, metal corners).
- Wood impregnation compositions.
- Stain, acrylic varnish for surface decoration.
- Construction pencil.
- Roulette, level.
For retractable systems and shelves, it is necessary to select additional fittings (grooves, rollers for the retractable panel).
For a miniature room
The option is designed specifically for use in limited areas. Depending on the type of room, it may have a different configuration. There are models with a retractable and stationary tabletop. Below is a diagram for creating the simplest table.
Large PC table with bureau
Such furniture will become indispensable for an office in which a lot of documentation is stored. Simple design, does not provide a pull-out shelf designed for a keyboard and other attributes. The photo shows the steps for making a bureau and other elements yourself.
Working studio
The product has impressive dimensions. But if your activity is closely related to computer technology, then a studio table will be the best option, since it has almost everything for work. Desire, as well as a minimum set of materials, will allow you to make such a piece of furniture yourself.
Height adjustable
An original idea for creating a work area for a computer. It is practically impossible to find such a model on the open market. The adjustable surface of the tabletop allows all family members to use the furniture comfortably. Creating such an item is not easy, you will need welding, metal, wood and other industrial style elements, but the effort will be fully justified.
Simple
The easiest PC table to make can be made with your own hands from scrap materials, for example, for the needs of a country house. The product will most likely be universal and can serve as a regular dining or writing desk. The bottom drawer can be used as storage for papers and stationery, or converted into a shelf for a keyboard.
A little about drawings and diagrams
Having taken all the necessary measurements, you can begin to create a drawing. It is the presence of a diagram indicating all dimensional parameters that will ensure the ability to accurately calculate the necessary materials and will help to finally decide on the appearance of future furniture. When creating a diagram, it is worth considering that there should be as much free space on the table as possible. This will ensure comfortable work on your PC.
Important! If the table is placed in a child’s room, then you should think about the fact that the child will do his homework, draw or read in the same place. So it is important to equip the table with a large work surface.
Schematic view of a computer desk
The keyboard can be placed directly on the table, or you can make a small pull-out shelf under it, which, if necessary, to use the table for other purposes, can simply slide under the table top. It is also important to pay attention to the installation location of the desktop computer itself. Ideally, the unit will be installed as high as possible from the floor - then it will absorb less dust and require cleaning less often. You definitely can’t just put the system unit on the floor. Also, if you already know what configuration its body will be, you should also take into account the location of the ventilation holes opposite the coolers - they should not be covered by furniture parts. This aspect will help you decide whether to organize the stand on the left or right side of the table.
Corner table - drawing
Advice! If it is not possible to decide on the installation location of a stationary stand in advance, then the easiest way is to make a small mobile stand on wheels, which, if necessary, can be moved directly under the table and position the computer in a way that is convenient for the user in accordance with the operating conditions of complex equipment.
Table equipped with an extension
This option is more suitable for people of average and tall height. It is comfortable to work at the monitor while sitting in a large chair. The system unit with wires is placed below in the legs, which are made from old book shelves. The LCD screen is placed on stainless steel supports, slightly above the tabletop. The product is additionally equipped with LED lighting, which gives it a futuristic look.
Simple accessory with shelf
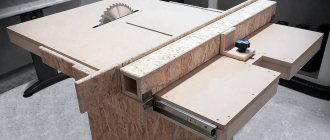
A simple, ergonomic option with sectors measuring 0.5 by 1 m. It is made from planed wood or improvised materials (old furniture, pallets). For manufacturing you will need a circular saw, a chisel, an angle grinder and other small tools.
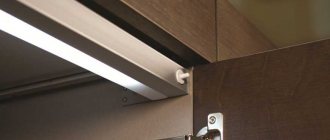
Backlit
High-quality lighting will be the highlight of any design. Furniture equipped with an LED strip appears to float in the air, creating a feeling of lightness. The accessory will fit perfectly and decorate a small room.
Simple keyboard backlight
To make such a backlight you will need:
- LED strip 64 cm long;
- power button (with fixation);
- connector for Krona battery;
- the battery itself;
- Matchbox.
You should not buy a Chinese-made battery, because the powered backlight on such a “Krona” will not work for even a day. The LED strip should have a density of 60 or 120 elements per meter.
The first step is to tin the ends of the wires and the button contacts. One of the connector wires must be soldered to the LED strip. The second through the gap with the button - to the other wire of the light strip.
The main thing in this work is not to confuse the polarity on the connector and the tape. The soldered contacts are naturally insulated, the resulting product is checked, and if everything is assembled correctly, the backlight should work. After that, “Krona” is hidden in a matchbox.
After all the work done, you need to remove the protective film from the LED strip and stick it along the edge of the table, with the elements facing down along the pull-out shelf for the keyboard. Also, a matchbox with a battery is attached to the bottom using superglue or double-sided tape. In this case, the button should be at hand.
Sketches of computer desks with the most popular sizes - photo gallery
Below you will see drawings of the most popular models of tables for personal computers. The diagrams visually show how to create an ergonomic and practical product from a minimum number of parts that will decorate any room.
Preparation of the drawing
When making a diagram yourself on paper, you should display the following parameters:
- Height and depth of the tabletop.
- Frame.
- Location of additional shelves, compartments for equipment, retractable systems for the keyboard.
- The diagram also marks the location of fasteners and metal corners.
An optimally drawn up drawing is the key to a master’s successful work without errors or difficulties.
Note!
- How to make a backlit mirror with your own hands: necessary materials, tools. Tips for choosing lamps and LED strips
- A simple and beautiful DIY bathroom shelf made of MDF, glass, plasterboard: straight and corner options. Photo instructions, tips, video master class
- Do-it-yourself folding table: description of types, calculations and selection of tools and materials. Video master class for beginners
Corner furniture for PC
This variety is designed to optimally fill the space in the corner of the room. Many existing models will create an ideal area for working with office equipment. Below we will look at the most interesting, in our opinion, projects of corner computer desks with drawings and dimensions.
What is it like?
The corner of the room will be a good place to place furniture for office equipment. Such accessories have a larger surface area. In terms of functionality, this product is much superior to its competitor with a straight tabletop. If you are looking for the most rational and optimal option for a miniature room, then making a corner piece of furniture yourself is a good solution. Just follow the instructions and you will be the owner of universal furniture that will satisfy all your needs.
Stand (niche) for the system unit - purpose, design, dimensions
The system unit is the heart of the computer, and therefore favorable conditions should be created for its long-term and uninterrupted operation.
The list of such conditions includes placing the “system unit” away from heating devices, sources of static electricity, and places of high humidity. And, of course, the system unit must stand on a special stand or in a niche on the computer desk. Many people think that there is nothing wrong with the system guy standing on the floor. You know, it all depends on the situation, and situations are different.
Table with high top in corner
Very often the corner space is the only place where you can put a computer accessory. Knowing the dimensions, it is possible to make it yourself. Use galvanized or water pipes as supports. This table is made high so that it is possible to work, so to speak, “on the go.”
Finding out goals and objectives
You set the parameters of your computer desk yourself.
Tables are different. Large, small, empty, filled with different shelf compartments. A successful choice will depend on how clear you are about your goals. For example, are you planning to use a laptop, desktop computer with all its components? What will you do at your workplace (write articles, program, do accounting, model, do video editing, etc.). There can be a lot of tasks. And based on your list of needs, you should make a thoughtful choice of computer desk. Let's say the choice falls on a desktop computer. Its components include a system unit, monitor, keyboard, mouse, speakers, modem, printer and various other additional devices. Based on this, calculate the required number of shelves. Another important point is the materials for making a computer desk. The most common inexpensive working material is chipboard. Of course, there are also expensive options.
- https://housechief.ru/kompyuternyj-stol-svoimi-rukami.html
- https://hozzi.ru/sovety/kak-sobrat-kompyuternyj-stol
- https://novinkimebeli.ru/kompyuternyj-stol-svoimi-rukami/
- https://berkem.ru/stoly/kak-sdelat-kompjuternyj-stol-svoimi-rukami/
- https://mblx.ru/samostoyatelno/578-sborka-kompyuternoj-mebeli.html
- https://mebelindesign.ru/sborka-stola/
- https://thewalls.ru/mebel/razbiraem-poetapno-sborku-kompyuternogo-stola-svoimi-rukami.html
Homemade corner table
When no store-bought model suits you, or you don’t have the necessary budget, then the best option would be to create an accessory yourself. You don’t need any special skills for this, just learn how to drill, grind, saw and have good patience. Photos with step-by-step instructions and drawings of computer desks with dimensions of parts will facilitate the manufacturing process.
Preparing parts
Based on the drawing, parts for the table are cut out of wood or chipboard. Each part is treated with an antipyretic, antiseptic and antifungal compound. Sharp edges are carefully sanded so that there are no nicks, cracks, or cutting surfaces.
Before assembling the furniture, a control measurement of each element is carried out so that they correspond to each other according to the diagram.
Sketches of corner products
Below are assembly diagrams for the most popular models. Making such interior items yourself will not be particularly difficult.
Choosing a place
The table can occupy a corner of the room or stand along the wall.
The comfort of the room will depend on the correct location of the table. If the room is small, of course, it would be unreasonable to place a large table here. If the room can accommodate large furniture, a small computer desk may not seem like the most functional furniture option. It is worth focusing on the following aspects before placing furniture in the room:
A computer desk serves as a carrier for computer equipment, which naturally requires power supply
This means that it is important to place the table next to an outlet. It is advisable to work at the table during the consecration. There is no better light for work than daylight. Therefore, it is worth organizing the location of the table in such a way that the light from the windows falls on the left side of the computer area. Computer equipment on the table already obliges you to get rid of unnecessary heating objects in advance, which can cause a short circuit or fire. It is extremely unwise to place a table near a radiator, fireplace, or electric heater. It is recommended to free the occupied space from other various objects (paintings, shelves and decorative elements).
You can choose a hanging table model, which, if necessary, can be raised and free up space.
Tables are divided into several types: straight, corner and combined. Let's look at each option in order.
Even a simple table can look elegant.
Shelves can be either above or below the table.
Work surfaces made from pallets
Building materials are excellent raw materials for creating home furniture. From pallets you can make benches, shelves for books and, in unusual shapes, tabletops.
A simple model of a pallet structure
An original solution to recycle unnecessary boxes and at the same time create something necessary for the home. The U-shape fits into limited space. You can place the system unit on the left side, and disks and documents on the right. The tabletop is covered with thick glass according to the size of the pallet.
Niche for the system unit (design and dimensions)
Compared to a stand, a niche has more disadvantages than advantages. However, what is more important here is not quantitative indicators, but qualitative ones. My point is that the existing advantage can cover all the shortcomings.
Design of a niche for the system unit.
Let's look at what a niche for a system unit looks like in the design of a computer desk. Attention to the picture:
So, in front of you is a computer desk. On the right you see a cabinet with three drawers, and on the left there is a niche for the system unit. Please note that there is no back wall inside the niche - this is necessary to improve air circulation and cool the electronic components of the system unit.
The overall width of the niche is 300 mm - this allows you to increase the distance between the side bulkhead of the table and the side of the system unit on which the cooling fans are installed. Naturally, the efficiency of the computer's cooling system improves.
The bottom of the niche is located at a height of 60 mm from the floor - this will ensure the safety of the system unit during a small flood, and will also protect it from accidental blows with a mop while washing the floor.
How to make a PC desk
If you want to have a good work area for your computer, but no store-bought option suits you, or you don’t have enough money to purchase the models you like, then make it yourself from pallets. Such building material can be easily obtained and given the desired shape. Use the best boards for arranging the tabletop, the rest as needed. Open the finished product with varnish.
A simple option from pallets
To implement the idea you will need three pallets. Two of them will have to be disassembled to make a solid tabletop. From the rest, depending on the project, legs, shelves and other elements are created. It is better to fasten all components with self-tapping screws. When the structure is ready, it is polished and covered with ship's varnish.
Large table made from wooden pallets
It is quite expensive to purchase such a product in a store. Many people resort to pallets to solve this issue. Creating a table with your own hands is not difficult, but you will have to work hard. Boards made from pallets are not always smooth, often chemically treated, and have elements of rust. However, after sanding them and varnishing them, the product comes out as if it came out of a factory assembly line.
Folding pallet model
If your room is small, your budget is limited, and a table is extremely necessary, then you can make it out of pallets and fold it out. One part of the accessory is fixed on the wall, and the other has legs. Using door hinges, a mechanism is created that, if necessary, folds and unfolds the table. This surface is convenient to use for working with a laptop and PC.
Materials for making a table
It is very important to choose high-quality material to create a computer desk. Ideal options include furniture panels, plywood, chipboard, MDF, and natural wood. Drawer bottoms can be made from fiberboard to make them lighter in weight.
Most often, MDF, fiberboard and chipboard are used to make furniture.
The ideal option is, of course, natural wood. An environmentally friendly material, strong and durable, it is best suited for creating a computer desk, especially for a children's room. But wood is not cheap, and therefore it is often replaced with the same plywood or furniture board - derivative materials from wood. They are not much worse in their performance characteristics, but they are easy to work with, and they are not expensive.
You can also purchase chipboard or MDF. But it is important to understand that these materials contain adhesive components and it is better to take them only if a person is not allergic to a number of substances. However, as far as durability is concerned, these are very high-quality materials, and a table made from them will last for many years without any complaints.
A computer desk should combine many functions
Don't forget about the accessories. You will need handles for drawers, as well as metal corners for attaching shelves. Self-tapping screws and small nails will come in handy. You should not fasten all the table parts with nails, as such connections are not reliable - the table may become loose over time. But it is quite possible to nail the same fiberboard to the bottom of the box using just small nails.
Sandpaper or a grinding machine, a screwdriver, a drill, a jigsaw, a mallet and other tools will also come in handy, without which you should not start making your own table. You may also need carpenter's glue or PVA glue to connect individual parts, and clamps to tie them together.
Cordless drill/driver
On a note! By the way, a computer desk can be made even without using self-tapping screws. Everything will depend on which option for connecting the elements the master chooses.
Photo selection of tables made from pallets
Below are photographs of the most popular DIY models.
What else is needed to assemble the table?
- Screwdriver. It is impractical to use nails and a hammer; screws are stronger and hold the structure longer.
- Construction ruler with levels. It will be needed when assembling the table parallel to the floor begins, in order to avoid objects sliding and falling from the surface. A ruler will help make the table as level as possible.
After the outside has dried, re-sign the parts and paint the inside.
Note: To mark the parts of the table, you will need chalk or a marker. They will also be needed during assembly. Ideally, use washable markers.
After this, you need to measure the space for the table, mark the necessary ones on the sketch: height, length of the table along the wall, width of the table inside the room.
After this, it is necessary to cut out all the parts as accurately as possible, place them side by side and sand them one by one until smooth.
Original solutions
A non-standard approach to creating a furniture accessory will help you create a truly unique piece of furniture. Below you can get some ideas.
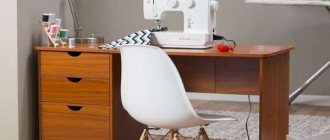
Dresser
A computer tabletop can be combined with such a necessary furniture accessory as a chest of drawers. It is safe for children and takes up no more space than a standard TV stand.
Unusual modding on a coffee table
In this option, an additional pull-out shelf is equipped under the tabletop in which you can store a laptop. It is very convenient and incredibly practical. If you want a similar accessory for yourself, read the detailed step-by-step instructions.
Furniture with built-in PC
An interesting idea on how to hide a computer. The equipment is placed inside the table, so it is not visible from the outside. Looks compact and versatile.
DIY home office
During sedentary work, blood stagnates and muscles atrophy. Uncomfortable furniture is the main provocateur of osteochondrosis. There is an opinion that working while standing is much safer. If you are a fan of this idea, you can create a special high computer table for standing work. The design looks solid and has everything you need.
Non-standard modding of the system unit made of natural wood
The universal covering of the device in a futuristic style will help decorate your room. Unusual shapes and dim lighting will make the equipment the highlight of the interior. I like the idea, try making something similar.
Variety of table models
Computer desks, commercially available or home-made, can have different configurations. Of course, it meets the basic requirements for the installation location of a personal computer, but despite this, there are a great many types of tables. In general, they can be divided into three main types, if we ignore the presence of additional elements and all kinds of add-ons.
Table. Types of computer desks.
| Type | Description |
| Straight | This is a classic, the simplest option. In appearance it resembles a standard desk and, by the way, sometimes it is desks that perfectly replace computer desks in everyday life. Typically, such tables are installed near a window or along a wall. The monitor is located on the tabletop, and the system unit itself can be installed under the table on a stationary or mobile stand. Such tables are popular, but do not always meet all requirements. They are usually installed in small rooms or offices, as they do not take up much space. |
| Angular | Also a popular option, but larger than a standard straight table. Convenient if there is a free corner in the room where you just want to install a computer. Suitable for those people who spend a lot of time in front of the monitor - working or playing. As a rule, such tables have a large number of shelves, drawers, convenient for storing various small items, books, etc. This model is not difficult to make, but it is still easier to make a simple straight table. The main advantage is the ability to use a corner that has not been used in the room before. These tables look best in a room with a minimum of furniture. |
| Combined | This option is the most difficult to manufacture and the most massive, taking up a lot of space. It is a combination of the first and second types. It has a lot of storage space, but is not suitable for installation in a small room, as it can “grab” the lion’s share of the free space. |
Wooden computer tables are a classic in workplace organization that will never go out of style.
Advice! Even before starting work and purchasing materials, it is worth deciding on the size and model of the future computer desk. It is important to take into account all the nuances, but first of all – the size of the room and the free area where the furniture is planned to be installed.
Depth of the table lid wing
The choice of place for the table is also of no small importance, and this is mainly due to the peculiarities of operating the computer. So, it is important that there are sockets next to it so that the equipment can be connected to the mains. It is also advisable that there be a window nearby - it will allow you to use natural light during the day, which is especially important for those who work at the computer.
Corner computer desk
There should be no heating radiators or massive household appliances that are constantly running near the table - these aspects can negatively affect the operation of the computer itself. It is best not to plan the placement of any decorative items or indoor plants above the table. In the first case, it will not be possible to build an extension over the table, and in the second, there is a risk of damage to the equipment due to accidentally spilled water for irrigation.
Table stand
Any desk or coffee table can be refined and reformatted into a computer table if you install such a stand. The design is height adjustable and adapts to the needs of the owner. This is an ideal budget option for creating a full-fledged work area.
If you decide to make furniture yourself, then follow these tips:
- • Study well the issue and drawings of the most popular office desks.
- • Properly calculate the amount of materials needed.
- • Before you begin, make a detailed project in which you indicate all the nuances.
- • Carry out the work step by step and slowly. Pay special attention to cutting curved parts - if you doubt your abilities, entrust the cutting to a professional carpenter.
- • Treat the finished product with durable varnish.
With a little effort and some patience, you can create an original sketch. In this article we told you how to make a computer desk with your own hands.
Compact stand for monitor and computer system unit
From the article below you will learn how to assemble a compact stand for a monitor and system unit from wood. The following description and instructions are taken from the YouTube channel “Matthias Wandel”.
In addition to laptops, there are “all-in-one” style computer solutions on sale. But the author of this homemade product does not like this solution, because if the computer or monitor breaks, it all becomes useless.
Required materials and tools:
- band-saw; - table saw; — belt grinding machine; - drilling machine; - clamps; - self-tapping screws; - ash block; — finished board from a folding table (used);
He recently upgraded to a faster computer, but couldn't find anything with a faster processor (i5 or i7 core) in a small package. Such systems could be made or ordered to order, but he didn't want to wait. So I had to settle on one of those big ugly boxes.
But since there was very little time to solve the problem of placing a computer system, the master settled on a much simpler design for this stand.
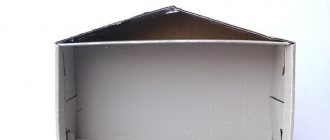
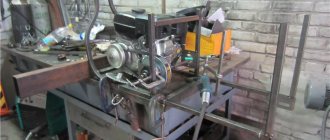
The craftsman began making the stand with solid ash wood, which was sawn in half and then cut on a machine with a band saw. The curved part was then sanded on a stationary belt sander.
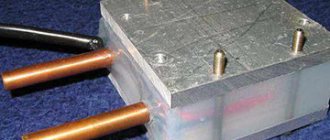
It is necessary to drill holes for self-tapping screws from the end of the wooden workpiece. The master did this on a drilling machine.
The resulting piece is attached to the base, which is a hardwood board that was taken from a small folding table.
Next, the master makes markings for fastening with self-tapping screws. The screws and holes must be lined up.
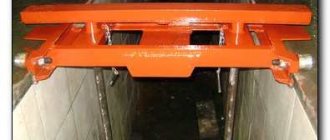
The stand is attached to the base using six self-tapping screws. The holes in the base are countersunk.
And here is the finished stand. Front view. The monitor will be connected to the front panel and the computer will sit at the back behind the monitor.
Next, the technician screwed a metal mounting flange to the stand and then screwed the monitor to that flange.
And here is the computer system unit, which is beautifully hidden behind the monitor.
The computer only has rubber feet on the front, so the back kept sliding dangerously off the stand. The craftsman added a wooden stop on the edge of the stand to prevent this from happening.
Shortly thereafter, the technician purchased a large 27-inch monitor from DELL (model U2711). He chose this option after taking a closer look at the monitor in question and seeing that it had the same mounting flange as the old Samsung. Another factor was the high resolution of 2560 x 1440.
The master places his computer with a monitor on a very low table on wheels, so that you can comfortably sit on the sofa and use the computer.
If you liked the author’s homemade product, then try to repeat it and make it.
Source
Dimensions
If we talk about sizes, then you will have to rely on the availability of free space in the place where the table will be installed. But do not forget that the furniture should be as comfortable as possible. So, as for the length of the table, it should not be excessively short. The permissible minimum that should be free for a person without taking into account the monitor and keyboard is 60-70 cm. The place where the system unit will stand must have dimensions of at least 25 cm wide, and much will depend on the size of the case.
Computer desk drawing
If we say that the table will have drawers and shelves, then more space will be needed. Of course, the shelves can be placed higher, above the table, in the superstructure, but in the case of small furniture it is simply not possible to equip the same drawers, otherwise there will be no room for legs. The depth of the table is usually about 45-60 cm. Moreover, the minimum option is acceptable if there is no superstructure above the table. If you plan to make it, then the minimum depth should be 60-70 cm. If you want to make drawers, you should make sure that the depth of the table is also at least 65 cm.
On a note! The depth of corner tables is greater; its minimum for models of this configuration is 85 cm.
As for height, the tabletop is usually located approximately 75 cm from the floor. Then the table will be convenient to use. If the person is small, then the table can be made smaller. The superstructure can be quite high, but it is advisable to make it such that at least the lower shelves can be reached without getting up from your chair.
The desk may or may not have a monitor stand. It can be in the center of the table or offset to the side. However, this is not always done. But if it is manufactured, then its height should be about 12 cm, length - about 50 cm, and depth - about 30 cm. Then you can safely put a monitor on it without worrying that it will fall.
Monitor stand may be present
The keyboard shelf may be slightly larger in size than the keyboard itself, but it is still better to make it such that you can freely place a mouse pad nearby. If this recommendation is ignored, then using the shelf in many cases will be inconvenient.