- Connection diagram for single-color LED strip 12/24V
- Connecting RGB LED strip
- 220 Volt tape connection diagram
- Ways to connect LED strip for home
- What is needed to connect an LED strip?
- How to solder wires to an LED strip?
- Basic rules and mistakes
- Results
- FAQ
Connecting the power supply Connecting the dimmer Connecting the amplifier Connecting multi-zone brightness control
Connecting an RGB controller Connecting a controller and amplifier Connecting multi-zone control of an RGB strip
Coil of LED strip Power supply Dimmer RGB controller Amplifier Control panel Cable products, wires
Connection of LED strips is carried out according to standard diagrams. In order for the backlight to work, it is necessary to calculate the power consumption, select controllers and power supplies (PSUs) in accordance with it, select the wire cross-section, and correctly connect all the elements of the circuit. Knowing the basic rules, this is not difficult to do.
An LED strip is a kind of construction kit, which includes various components, selected in accordance with the type and quantity of the strip. To create a lighting system, power supplies are required. If control is required - RGB controllers, dimmers, amplifiers. All equipment is connected into a single electrical circuit in a certain sequence. The electrical circuits are similar, but have differences and connection nuances.
We will look at the types of equipment required, show how it is connected and installed. You will see typical connection diagrams for one or several 5-meter reels of single-color and multi-color RGB tape, with one/several power supplies, dimming/control devices. At the end of the article, you will be able to get acquainted with the standard rules and errors of tape installation, as well as answers to popular user questions.
Instructions for assembling and connecting LED strip from batteries
Let's figure out how a battery-powered LED strip is powered. At the same time, we’ll learn how to calculate the expected work life and decide whether this method is suitable, taking into account the task at hand and the materials available.
LED strips are designed for an operating voltage of 12 or 24 V, the standard voltage in the network is 220 V. By default, the problem is solved by purchasing a power supply, but if desired, everything can be solved with ordinary batteries.
Selecting RGB strip
For this project we will need an RGB LED strip, the one with four contacts.
There are also RGB options with three, five and even six contacts, all of which will not be suitable for our project without modifications.
The option with three contacts is an address tape. To control such a tape, you need a different circuit and different program code, so we will consider this option in a separate article.
The option with five and six contacts is RGBW and RGBWW tapes. As you may have guessed, the letter W denotes an additional soldered white LED, and WW two white LEDs; such strips are used in cases where white lights need to shine much brighter than other colors.
A regular four-pin strip is capable of shining white without additional LEDs, simply by turning on all three of its colors in equal proportions.
When will it come in handy
If compactness and mobility are important for business, we neglect the power and area of lighting. The connection is convenient to use when you don’t want to occupy an outlet or there isn’t one nearby at all.
We work with batteries in the following situations:
- interior lighting without fussing with wires and wondering where to put the bulky block;
- lighting of the utility room, garage - any place where there is no electricity;
- illumination for something moving - a bicycle, scenery, a costume for performances;
- I don’t want to buy a power supply and calculate its power for our task;
- lighting is used one-time or for a short time (at outdoor events, holidays);
- I need the light urgently, but something has happened to the power supply.
Software part
Install the Arduino IDE on your computer if it is not already installed. Read more about getting started with Arduino in this article.
The code and libraries can be downloaded here.
SUP_v1.0
Unpack the archive, copy the libraries from the lib to the C:\Program Files (x86)\Arduino\libraries .
Then open the file SUP_V1.0.ino and see the settings:
Everything works, as they say, “out of the box,” but if you made any changes to the circuit or want to fix something, everything is spelled out in as much detail as possible in the comments to the code.
Next, connect the Arduino to the computer and upload the code. After the “download complete” message, you can check the functionality of the device.
Short clicks on the button change the color of the ribbon according to the prescribed array of colors, long clicks increase or decrease the brightness one by one.
The brightness is adjustable for two modes, when the motion sensor is triggered and without it being triggered. Adjustment for each mode is made in the state of the sensor in which you want to adjust the brightness.
This was the home version of the backlight, and now I’ll show you the car version:
When it's no use
If reliable lighting is important or a large area is covered, batteries will not be suitable. Power supplies are more convenient (or indispensable) when you want:
- carry out work on lighting a large room or many of them at the same time;
- design facades, cornices, outdoor advertising;
- leave the backlight on for a long time;
- use lighting effects (flickering, fading, overflow);
- highlight inaccessible or high-altitude areas of the room, where it is not possible to constantly solder and resolder batteries without the risk of going crazy.
The power supply becomes warm during operation. He will need a place isolated from other things, but easily accessible to humans. Block housings are either open or semi-sealed, depending on the intended location.
Ready-made RGB light bulbs for base with remote control
It is worth mentioning separately about ready-made RGB products for the E14 or E27 base.
These paws come in a variety of designs and designs. Inside the lamp contains a compact driver for power supply from a 220V network, a controller and three-color LEDs.
It is not suitable for complete lighting of the room, because... It will not be possible to synchronize several lamps into one system. Used as a night light or decor. Consumption 1-3 W/h. The cost starts from $3 for China.
Please rate the article. We tried our best:)
Did you like the article? Tell us about her! You will help us a lot :)
What can be used in connection
An RGB controller will add brightness control and lighting effects. In designs with such devices, a power supply is required. Controllers differ in type of control:
- push-button controllers are switched by hand;
- infrared ones are controlled by a remote control at a distance of up to 10 m, which must see the sensor;
- radio controllers have a long range and do not need a visible sensor;
- Wi-Fi controllers are controlled by a mobile phone or tablet;
- Audio controllers are equipped with a microphone that receives audio commands.
The controller power standard is 20% more than the tape. An amplifier is used with low-power devices. Its price is comparable to the cost of a cheap controller.
Any batteries can be used for connection, but it is more profitable to use rechargeable ones. The total battery voltage should be between 8 and 12 volts.
Arduino RGB backlight controller circuit
RGB strip controller circuit
As you can see, nothing particularly complicated.
Arduino is powered directly from 12 volts. It has a built-in converter that reduces the supply voltage to 5 volts, from which we will power the touch button module and motion sensor.
Arduino controls three transistor switches, which in turn control the colors of the tape.
The keys are controlled by a PWM signal; you can read more about this here.
Three Arduino PWM channels are used.
How long does it work
To calculate how many batteries we need and how long they will last, we look for the amount of current consumed by the LEDs. This value differs for different types of equipment and is indicated in the documentation. The quantity is indicated both per LED and per unit length.
Having calculated the total amount of current consumed, we select batteries of the required capacity. The 18650 lithium batteries have a capacity of 2600 mAh - with a consumption of 2600 mA (or 2.6 A), they can provide continuous light for an hour. Five meters of diode strip for 30 diodes, depending on the specification, can consume a current of 1-3 A; for an hour and a half of operation they will require two 18650 batteries.
The quality and operating time depend on the accuracy of soldering or the connectors used.
2nd method (without soldering)
To make a more universal device, instead of batteries twisted together with electrical tape, it is better to use a so-called cassette or container.
This is actually a ready-made replacement body. Sometimes even with wires.
All you have to do is solder the toggle switch to the positive output.
In such a device, you no longer have to unsolder and seal the batteries every time they run out.
You simply change them by pulling them out of their seats and installing others. Moreover, such a circuit can be assembled at several voltage levels.
If there are no wiring on the cassette, then buy special contacts.
This way you no longer have to deal with soldering wires to the batteries themselves. By the way, to connect wires to the LED strip, it is also not necessary to have a soldering iron.
Use connectors.
There are a variety of them. And not only for connecting the tape to the tape, but also for supplying power to it.
To solder or not to solder
The battery is attached using soldering. If there are several batteries, it is not necessary to solder each one separately - we use a battery box with 2-6 compartments.
When connecting using a power supply or box, as well as in designs with controllers and amplifiers, connectors can be used. Compared to soldering, this method is simpler, but:
- the connectors gradually begin to oxidize;
- plastic melts at high temperatures;
- diodes located at the connection points lose brightness.
Soldering is not necessary when using power supplies, and connecting with batteries will be safer and more reliable for long-term operation. But you will need certain tools and materials. Connectors are convenient to use in lighting of complex designs, especially high-rise ones.
How to connect - 1st method
To connect you will need the following materials:
- the batteries themselves
Their total voltage when connected in series should be from 8 to 12V. There are A23 models, they immediately go to 12V.
True, such a capacity is enough for very short, low-power pieces of tape up to 0.5 m. With continuous operation no more than 30-60 minutes.
- soldering iron
- flux
- solder
- stranded copper wires with a cross section of 0.5-0.75mm2
- toggle switch
- and of course the LED strip itself
The most problematic part of assembly and connection will be soldering the wires to the battery.
The soldering procedure is as follows:
- First you need to clean the contacts well
Take a piece of sandpaper or a small file and carefully remove the top layer of coating from the plus and minus on the battery.
- tin the ends of copper wires
- apply flux and solder the wires to the battery - red to positive, black to negative
If this is temporary and very low-power illumination, then some people do not bother with a soldering iron, but simply ensure contact on the battery using magnets.
Some battery models even have a hole where you can pre-insert the wires.
- do the same with a button or toggle switch
Just pass only one wire through it (positive) and solder it to the input of the toggle switch. The output is released onto the tape.
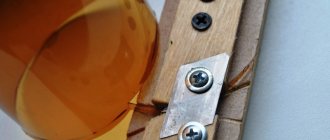
- soldering of wires on the LED strip must be carried out with obligatory observance of polarity
Plus on the LED strip is usually signed +12V or simply “+”. Minus – “GND”. On RGB lighting, all colors are negative contacts.
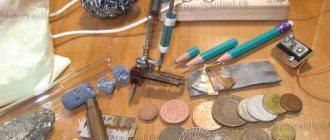
Assembly and connection
Let's make sure that we have everything we need for work:
- the tape lies nearby, the required piece with the required number of diodes has been selected, the specifications are known;
- batteries have been purchased, capacity, voltage, operating time have been calculated; if there are a lot of batteries, the box has been prepared;
- soldering iron with a power of 25-40 W, flux, solder;
- flexible wires (preferably with multi-colored insulation), the cross-section can be small, 0.5-0.75 mm2;
- knife-nippers for stripping insulation;
- a piece of sandpaper or something similar for cleaning contacts;
- optional toggle switch and connectors.
Remember that with a series connection, the total voltage is the sum of the voltages of all batteries. When parallel, it is equal to the voltage of each individual element.
Let's start connecting:
- We clean the contacts on the batteries - we process the plus and minus with sandpaper.
- We tin the ends of the wires.
- We solder one wire to the stripped plus of the battery, the other to the minus.
- If you connect a toggle switch, a wire from the battery is soldered to its input, the output goes to the minus of the tape.
- We make neat cuts in strictly marked areas of the LED strip (usually the cut line is between pairs of solder contacts).
- Plus, minus, as well as operating voltage are written directly next to the contacts. RGB contacts are always a disadvantage.
- The plus soldered to the battery (or the positive wire coming out of the box) is soldered to the plus on the tape, the minus (or the output of the toggle switch) is to the minus. A soldered “green” pin will make the strip glow green, and a red pin will glow red. Sometimes the minus is marked as GND.
- Connectors can connect either individual sections to each other or the entire strip to a power source or controller. Each type (RGB, RGBW) requires its own connector.
- If necessary, repeat the steps above with the remaining batteries and sections of tape.
- There should be no solder residue left on the contacts.
The soldering iron tip should not be held in one place for more than 5 seconds, ideally 1-2 seconds. If the LED strip is coated with silicone, it will need to be carefully removed from the contacts before soldering. The soldering iron should not smoke, and the flux (it should be non-acidic) should not boil.
On colored tapes the 4 pins are very close to each other. We make sure that when soldering, a tin track does not form that covers several contacts at once. If this happens, reheat them and use a toothpick to remove excess tin between the contacts. We ignore it, and at best the colors will be mixed up; at worst, either the tape, or the power supply, or all at once will burn out.
Basic errors in connecting tapes
Mistake No. 1 – the security level of the tape is not selected correctly. For example, the use of boards with an IP20 rating is unacceptable in rooms with high humidity and in open spaces. When used in baths and bathrooms, a short circuit and electric shock may occur to a person.
Error No. 2 – the power of the power supply is not calculated correctly. It is important to follow the rule of 30% power reserve. This will allow in the future to connect additional sections or replace them with more powerful ones.
Mistake #3 – sequential connection of new sections. As mentioned above, each new tape is connected in parallel to the power source.
Error No. 4 – lack of heat sink elements. Tapes with a power of over 14 W are installed only on an aluminum profile, SDL with a power of 6 to 14 W are installed on metal tape. They perform the function of transferring heat from heating the crystals to the external environment.
Incorrect connection
Diagram of incorrect serial connection of two LED sections:
Diagram of incorrect (serial) connection of two tapes
The connection in series leads to an uneven glow of the tracks and overheating of the beginning of the tape. Therefore, each section longer than 5 meters is connected in parallel :
Example of parallel connection with 1 block and two
When the power of the tape section is above 9.6 V, it is recommended to make a parallel connection on both sides of the section. This guarantees a stable, uniform light output.
Example of two-way connection of a section
Incorrect mounting (location)
When installing, pay attention to the external environment. There should be no devices or factors nearby (within at least 0.6 m) that cause additional heating of the elements (heating system, incandescent lamps, kitchen heating appliances, sunlight, etc.). Optimal operating temperature is +40 0C.
The path for laying the SDL must be cleared of unnecessary objects. During operation, the board should not touch additional objects or have unnatural corners or bends (unless they are made by soldering or a connector).
Why is this necessary?
At first glance, it may seem that there is no need for battery-powered LED strip lighting. But if you think about it, you can find a dozen places in an apartment alone, the lighting of which will increase the level of comfort and add originality. For example,
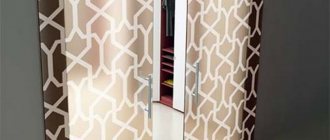
- inside the wardrobe and wall kitchen cabinets;
- along the contour of shelves and shelves;
- around paintings and mirrors;
- for decorating children's toys and bicycles;
- in the pantry, etc.
In addition, autonomous lighting from an LED strip will be useful in a garage, basement, country house, in general, where there is no stationary 220 V power supply. And in regions where there are frequent power outages, LED lighting can be used as emergency lighting.
Will the game be worth the candle?
If we consider everything from the point of view of the logic of an ordinary person who is not passionate about radio engineering, then, naturally, it will not be more expensive to purchase a cheap controller. In addition, no time will be lost creating with your own hands. But for a true radio amateur, and sometimes just a passionate person, assembling such a device yourself is much more pleasant than buying it somewhere in a store. But it’s still worth trying to make a controller yourself, because nothing can replace the pleasure of the work done (and a successful one at that).
Connection to a 12 V battery
Compared to batteries, this method of autonomous power supply for LED strip operation is the best for several reasons. The 12-volt battery maintains the rated voltage in the load for a long time, allows you to obtain a fairly high level of illumination and can withstand several hundred recharge cycles.
The most common 12V batteries are lead-acid. Most often they are used in UPS, security and fire alarms. Among them, batteries with a capacity of 4.5 Ah (up to 0.8 kg) have the smallest dimensions and weight. The connection and operation process looks like this:
- 2 wires of the required length are soldered to the contact pads of a pre-prepared piece of tape with LEDs (red wire to “+”, and black wire to “–”);
- similarly, on the reverse side, terminals for connecting to the battery are soldered to the wires;
- for convenience, a small toggle switch is soldered into the gap of one of the wires. If it is not there, then to turn off the backlight it is enough to disconnect one terminal.
The current consumption of an LED strip depends on its length.In addition to lead-acid batteries, 12 V Li-ion batteries have high performance data. With equal capacities, Li-ion batteries have 4 times less weight and size. And to charge them, a compact charger is used.
Important! The battery will work out its life (up to 500 full recharge cycles) only if the discharge current does not exceed 1/10 of the capacity. In practice, this means that a 12V-7A*h battery can be connected for a long time to a load with a current consumption of up to 0.7 A or 2 meters of LED strip type SMD 3528-60 pcs./m, which will shine continuously for 10 hours.
To make calculations easier, below is the current consumption of 1 meter of LED strip, which depends on the type of LEDs installed:
- SMD 3528-60 pcs/m – 0.4 A;
- SMD 5050-60 pcs/m – 1.2 A;
- SMD 5730-60 pcs/m – 3.0 A;
- SMD 3014-60 pcs/m – 0.6 A.
SMD 2835-60 pcs/m – 1.6 A;
What is needed for installation and installation of LED strip
To mount and install the LED strip, you need a working LED board with the correct technical characteristics:
- Length. The standard length of a board in a reel is 5 meters, but the maximum length of parallel connected sections is 15 meters. At the greatest length, distant sections have dimmer light and a high probability of conductor wear.
- The density indicator characterizes the number of diodes installed on 1 meter of the board. For example, 30, 60 or 120 diodes per 1 meter.
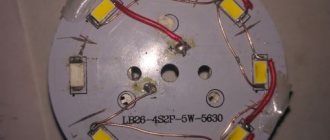
Density of diodes on the board
The power consumption, load current and supply voltage depend on the density of the crystals.
- Particle and moisture protection (IP) rating. The parameter ranges from 00 (no protection) to 68 (complete isolation). Thus, SDLs with IP20 are used indoors, for example, for interior lighting of furniture, and with IP67 - for external lighting of buildings, swimming pools and inside saunas/baths.
Particle and Moisture Protection Table
- Light flux color (monotonous/one-color or multi-color RGB strip).
Characteristics of RGB strip
- Supply voltage. The board consists of groups of series-connected crystals that are connected in parallel to each other. Each crystal receives a supply voltage of no more than 3.3 Volts. Thus, knowing the density of the crystals, a supply voltage of 12 or 24 Volts is supplied to the board.
A special transformer installed between the SDL and the AC voltage source is responsible for building the required voltage level in the board. It supplies the required amount of electric current.
power unit
- Length of the supply cable line. The main rule is that the voltage drop of the supply cable should not exceed 8%. To do this, you need to calculate the load level and select a cable with the appropriate cross-section.
Permissible continuous current for wires and cords with rubber and polyvinyl chloride insulation with copper conductors
LED strip power calculation
The power consumption indicator directly depends on the density of crystals on the board:
| Density, pcs | Power consumption per 1 meter, W | Total power, W |
| 30 | 2,4 | The product of power consumption per 1 meter and the length of the board. For example, for a 3-meter tape with a density of 60, the power will be: 4.8*3=14.4 W. |
| 60 | 4,8 | |
| 120 | 9,6 | |
| 240 | 19,2 |
To select a power supply, the power value is 20 - 30% more than the power consumed by the board. For example:
LED strip with a density of 120 crystals per 1 meter. The total length of the SDL is 11 meters. Power consumption will be:
Plen = 9.6 * 11 = 105.6 W.
Pblock = 105.6 * 1.25 = 132 W.
Thus, the block with the closest power value is selected, this is 135 W. If you select a block with a power lower than the value that the board consumes, the latter will not light up. And the absence of a power reserve of 20-30% will lead to failure of the unit .
Battery powered
If buying a battery is expensive, but there is nowhere to charge it, then you can make the LED strip glow using batteries. Let's look at the 3 most common connection options.
Option No. 1 involves the use of 6 1.5 V AA batteries connected in series. Why exactly 6 pieces? Because the LED strip, even when powered by 9V, will operate at approximately half its power. Firstly, this level of light from the tape is quite enough to illuminate something. Secondly, half the current will flow through the LEDs (nonlinearity of the current-voltage characteristic), which will significantly extend the battery life. But if desired, you can increase the number of batteries to 8.
There are two ways to assemble a battery-powered LED backlight circuit:
- using short wires, all batteries are soldered together in series, secured with electrical tape, and two wires are soldered to the extreme “+” and “–” to connect the LED strip;
- 6 batteries are inserted into the cassette (container), observing the indicated polarity. The wires coming out of the cassette are clamped together with the LED strip in the connector.
The capacity of an AA battery is approximately 2 times greater than that of an AAA battery from the same manufacturer.
Option No. 2 involves the use of power in the circuit from one 9 V Krona battery. The capacity of the alkaline crown is approximately 0.5-0.6 Ah. This means that, for example, a 30 cm long SMD 3528 tape will shine continuously for 5 hours. The crown is often used for LED tuning of a bicycle.
Option number 3 involves the joint use of a battery from a phone (smartphone) and a step-up converter up to 12 volts. In this configuration, LED backlighting has several significant advantages:
- reliability and durability;
- compactness (the size of the converter is comparable to a flash drive);
- reasonable cost (3.7 V-12 V converter – $2, battery – $10);
- the battery can be easily charged from a smartphone or charger, and its capacity reaches 2000 mAh;
- Light emitting diodes shine at full brightness.
You can connect batteries and accumulators of any type to the converter. The main thing is that their voltage matches the input voltage of the converter.
Legality of outdoor lighting and fines
In our country, laws are interpreted in favor of the interpreter. The wording is vague and can be interpreted in two ways. What you need to know.
There is no direct ban on installing underbody lighting . But there are a number of points that allow us to find fault with you and, unfortunately, there is nothing to oppose them with.
Making unforeseen changes to the vehicle design
Decree of the Government of the Russian Federation of October 23, 1993 N 1090 (as amended on August 27, 2018) “On the Rules of the Road.” Appendix: List of faults and conditions under which the operation of vehicles is prohibited. Clause 7.18.
Changes were made to the design of the vehicle without permission from the State Road Safety Inspectorate of the Ministry of Internal Affairs of the Russian Federation.
It is impossible to obtain official permission to install lighting (uncertified element). Punishment for violation: warning or fine of 500 rubles .
This is the most loyal point on which they can find fault with you. You will often get off with a warning.
Violation of the rules for installing lighting devices
You will fall under this clause if you install LED car lighting in prohibited colors.
According to the Russian Federation Traffic Regulations, section 3.6. External lighting devices. Installation is prohibited:
In front - lighting devices with lights of any color except white, yellow or orange; At the rear - reverse lights and license plate lights with lights of any color other than white, and other lighting devices with lights of any color other than red, yellow or orange.
In short, the following is allowed:
- The front is just white, yellow and orange;
- at the rear - the license plate is illuminated only in white, the rest - only in red, yellow or orange.
Violation of this clause of the traffic rules entails deprivation of a driver's license for a period of 6 months to a year .
Installation without permission of devices for supplying special light signals
Code of Administrative Offenses of the Russian Federation Article 12.5. Driving a vehicle in the presence of malfunctions... point 4.
Driving a vehicle on which, without appropriate permission, devices are installed to provide special light or sound signals (with the exception of a security alarm).
This is the most dangerous point and, if the evil inspector wishes, any additional lighting of the car can be adjusted to this wording. In practice, it is used very rarely (unless you put a red flashing tape in the radiator, this option will definitely be regarded as a special signal). It is difficult to challenge in court, but it is possible by replacing the punishment with a fine of 500 rubles.
Violation provides for deprivation of rights for a period of one to one and a half years , with confiscation of devices for signaling.
How to power an LED strip from batteries - 2 ways.
Most often, the LED strip is connected through special power supplies.
They reduce and rectify the 220V AC mains voltage to the required 12V or 24V, depending on the type and brand of the product. However, you can connect the whole thing using a simple battery or a bunch of several of them.
A traditional power supply has several disadvantages that are not obvious at first glance:
- firstly, you need to select it correctly and calculate the appropriate power
An error can lead to the fact that it will either burn out, or the tape will shine dimly without ever reaching full brightness.
- complex connection diagram
This especially applies to lighting with additional amplifiers, controllers, etc.
- a bunch of wires that need to be pulled from the power supply across the room to the connection point to the tape
Plus, do not forget about the 220V wires - from the distribution box or switch, which must be used to connect the power source itself.
- the need for nearby AC voltage 220V
- dimensions and dimensions
If this is ceiling lighting, then a constant headache becomes the question of where to hide this not at all miniature-sized box. Often you have to make a special niche.
What you need to know about soldering
The most important thing in working with LED strips is cutting them correctly into separate fragments and soldering them. In order for everything to go well, you should know the following nuances of carrying out this type of work:
- The product needs to be cut only in special places. Otherwise, the conductive contacts will be damaged and the device will be damaged;
Place for cutting tape
- you need to solder carefully, applying the soldering iron tip to the contacts and wires for just a few seconds;
- the wires must first be tinned;
- After soldering is completed, the contacts should be cleaned of solder residues.
By adhering to these recommendations, the process of soldering individual fragments of the product and connecting to a power source will be as easy and quick as possible.
LED sizes
On the marking, the diode sizes are indicated immediately after the abbreviation SMD with a four-digit number. For example, LED-B-SMD3528.
The most common sizes are 3528 with dimensions of 3.5 by 2.8 millimeters and 5050 with dimensions of 5 by 5 mm. There are also other standard sizes.
Size determines how much light energy an element emits per unit time.
The larger the crystal, the more energy they can emit. The numbers for monochrome elements are:
- chip size 3528 allows you to get a flow from 0.6 to 2.2 lumens;
- size 5050 - 2-8 8 lumens.
Indicators for universal LEDs are below:
- for 3528 - from 0.3 to 1.6 lumens;
- size 5050 - from 0.6 to 2.5 lumens.
Data are given for crystals without protective coating. Its presence reduces the intensity of the meaning.
The total brightness is obtained by multiplying these numbers by the number of elements in the segment.
What are controllers and power supplies for?
When making homemade lighting devices based on LEDs, it is necessary to install a special adapter (rectifier, power supply), which will convert 220 V alternating electricity into 12/24 V direct current in accordance with the power of the semiconductors used.
To make the right choice and buy a suitable power supply, count the number of diodes per linear meter, then first multiply it by the power of one LED diode, and then by the number of linear meters. At the end, you should definitely give a small margin - about 10-15%.
For example, if you use SMD 5050 type diodes, install approximately 60 pieces per linear meter and the length of the board is 5 m, then (based on the table above) the total load will be 15 * 5 = 75 W. Increase the value by 15% and get the required adapter power - 86–87 W. When assembling a flexible board with adjustable brightness levels and light switching, the electrical circuit must be supplemented with a controller and remote control.
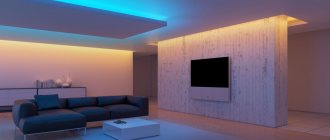
Living room with modern lighting
Living room lighting , both spacious and small, requires special attention.
- After all, there must be a sufficiently bright overhead light source to make it convenient to receive guests and celebrate various holidays;
- There should be a source of soft, dim light to create a cozy, homely atmosphere;
- There should be a source of directional light that will allow you to read a book, work on a laptop or do handicrafts without the need to turn on general lighting;
- It is important to create beautiful light accents that will highlight certain decorative items or delimit different functional areas;
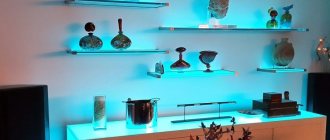
- The technique of light zoning can often be found in living rooms combined with a dining room or hallway. This method is good because it does not take up precious space and is very beautiful in itself. An LED strip, which can be mounted into the floor covering using a special profile, is perfect for these purposes. Above the light line on the floor, diode spotlights should be placed on the ceiling in the same direction. A light portal is formed that will clearly delimit the space.
Such zoning can be used not only in living rooms, but also in other combined rooms. Also in the living room, LED strip is actively used to highlight certain elements. For example:
- TV area lighting, namely the TV itself, began to be used not so long ago, but instantly won many fans. The diode strip is attached to the back surface of the TV screen as close to the edges as possible. Thanks to this, the glow covers a large area on the wall to which the TV is mounted. Such lighting looks especially impressive in cases where colored tape is used or when the wall has a textured pattern. Each unevenness instantly becomes more pronounced and noticeable;
- Using a warm yellow diode strip you can easily imitate the light from a fire in the fireplacemade with your own hands. Bio- or electric fireplaces are not a cheap pleasure. Therefore, more and more often you can find false fireplaces in the interior, which can only vaguely resemble the portal itself. Even such a small similarity is enough to bring a little warmth and comfort into the interior. Often candles are placed in the area where wood should be burned. This method is not entirely safe. Therefore, it is better to highlight the firebox with tape, but so that it is not visible. The effect will be what you need!;
- A favorite element of all loft-style or mixed-style interiors is a wall lined with artificial brick or another type of stone, which simply cannot do without additional lighting. After all, it is with its help that it will be possible to emphasize the contour of each individual pebble and make the wall “alive”. The tape can be placed either under the ceiling or on the floor in front of the wall. And it’s possible both here and there. The difference between a wall with and without lighting is colossal;
- If you love painting and prefer to use paintings to decorate your interior , be sure to take care to display them in the most advantageous light and draw attention to them. Special picture lights certainly look stylish and perform their function well, but the cost can sometimes put them off. You can get by with regular diode tape, gluing it along the contour on the back side of the picture, as is the case with a TV. The light will not be in your eyes when one of your guests wants to admire the work of art, but will be bright enough and noticeable;
- An interesting effect can be achieved by highlighting wall shelves. Moreover, the tape can be glued both to their lower plane and to the upper one, or along the perimeter. The main thing is to place the light source close to the wall so that the light is softly projected onto it. Such shelves themselves will act as decorative elements, so you should not pile them up with various vases, figurines and other small things. One or two items - no more. Better yet, put your favorite photos in glass frames;
- Many of us love books very much and can even boast of having our own, albeit small, home library . Most often, books are placed on an open shelf. This element itself is very rich, as it is replete with a variety of colorful bindings. In this regard, designers recommend using decorative items in rooms where there are such shelving to a minimum, or even abandoning them altogether. It is much better to add the finishing touch by adding lighting to the shelves with books. The tape can be used both monochrome and color. You can highlight sections in different colors in a certain order - checkerboard, diagonally, vertically, etc. In general, rely on your imagination;
- It is impossible not to mention the illumination of the window opening , namely the cornice. The tape is positioned so that the diodes point down. If you wish, you can glue the tape both in front and behind the curtains. Depending on this, you will get different glow intensities. When lighting in front of the curtains, you can further emphasize their beautiful texture; do not forget about this and do not miss the opportunity to add luxury with the help of expensive textiles;
- Illuminating a sofa or coffee table will create the effect that the furniture is floating above the floor. Especially if the pieces of furniture are low and down to earth. The lighting on the sofa can be placed either behind its back so that the light falls on the wall or on the bottom of the base. If you decide to illuminate a coffee table with a glass top, remember that by placing the strip with the diodes down, you will make its back part visible. This can ruin the aesthetic appearance of the countertop. Therefore, it is better to install the tape on opaque areas;
- Like the hallway, lighting the wall niches in the living room will be a very good idea. In addition, if the doorway in the room is made in the form of an arched portal, you can safely decorate it with ribbon, thereby drawing attention to its graceful curves;
- You can complement the columns with soft lighting, which are an integral element of a living room in a classic style. Just do not glue the tape along the column post under any circumstances. It is better to place it at the very top under the ceiling around the column;
- Various wall curves, decorative protrusions or geometric elements will look much more expressive and deeper with additional lighting;
- Multi-level apartments or living rooms in private houses have an element such as a staircase. And for you it should be a wonderful canvas for creativity. The staircase can be illuminated in a variety of ways. It is worth noting that this not only looks impressive, but also reduces the risk of injury. The main thing is to position the tape in such a way that when you look at the steps, its light does not blind you, but only creates a soft backlight and shows the way. Choose different colors, matching them with the color of the surrounding walls or the covering of the steps. Decorate the railings, the ends of the steps or lay tape in special skirting boards, in general - go for it!;
- The illumination of the ceiling vault cannot be ignored . In this case, there are a lot of options for placing the tape. The effect you get in the end depends on this. We'll talk about how to attach the tape to the ceiling a little later.
Do not use all methods at the same time. A maximum of two or three ideas within a spacious room, and no more than two in the interior of a small room.