Odors during cooking do not always cause discomfort. However, they can be quite persistent and unpleasant until they dissipate naturally. A special device called a “hood” will help quickly rid the kitchen of unnecessary odors.
During the installation process of existing models that can be purchased on the market, various problems may arise. The simplest thing that can cause discomfort and non-acceptance is bulkiness, dimensions inappropriate for the interior of the kitchen. Therefore, many do not dare to install such a unit for themselves.
Proper installation by third-party technicians can be expensive. Therefore, it is important to understand how to make a hood with your own hands and consider possible design options. Which can greatly help you save your money and avoid unnecessary purchases.
How a kitchen hood works
According to sanitary standards, in the kitchen the air exchange rate cannot be less than 10. For this purpose, the room has ventilation ducts with natural or forced movement of air masses. The efficiency of the first type is low, so a kitchen hood is installed above the stove.
The main purpose is as follows:
- purification and filtration of air masses;
- protection of all kitchen surfaces from the deposition of grease, condensation and soot;
- removal of odors and smoke generated during cooking;
- removal of moist used air from the room;
- the device prevents contaminated air masses from entering neighboring rooms.
The operating principle of a kitchen hood depends on its design. Varieties connected by pipeline to ventilation ducts simply remove contaminated air masses from the room through the ventilation system outside the house. They only have grease filters. Models that are not connected to the ventilation system are equipped with multi-stage filters. They purify the air masses circulating in the room.
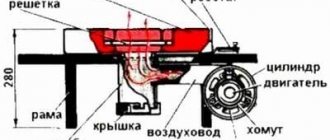
Kitchen hood design diagram
Before you make a hood in the kitchen, it is worth understanding its structure.
It consists of the following parts and mechanisms:
- all structural elements are located inside the case;
- a fan is needed for air circulation;
- gearbox;
- control system;
- air ducts of round or rectangular cross-section;
- filtration system;
- connecting elements;
- swivel elbow;
- wall plate for fixing in the kitchen.
The following parts are used in the electrical circuit:
- Exhaust fan with electric motor. This is the main part necessary for the movement of air flow through the filtration system. An electric motor is an asynchronous motor with several speeds. To change the rotation speed, different connections of the stator windings are used. Typically tangential or axial fans are installed.
- Speed switches in the form of sliders or buttons allow you to quickly change network parameters and apply voltage to the motor winding. Expensive models of hoods have backlit touch switches.
- Any type must have grease filters installed. Coarse filtration devices trap grease, and fine filtration devices are needed to eliminate odors. Carbon filters help further disinfect the air.
General information about kitchen hoods
Before moving on to considering the proposed options for manufacturing devices for removing “exhaust” air from the kitchen, it is necessary to understand the very principle of operation of the hood.
As the name implies, a kitchen hood forcefully “pulls” hot, polluted air from the kitchen—or rather, from the space above the stove—and then removes it from the room.
Hood operation diagram
As a rule, the air is removed into the ventilation ducts of the building - which is why, when buying or making a hood, you must first of all take care of the proper state of the ventilation of the house. If there is no draft in the system (and this happens when the ventilation has not been cleaned for a long time), then the efficiency of the hood will be extremely low.
In order for air to be removed as efficiently as possible, it is necessary, along with proper ventilation, to ensure sufficient air flow into the room.
Note! If you have metal-plastic windows with a high level of tightness installed, you may observe some problems in the operation of the hood - therefore experts recommend either using the micro-ventilation function or installing supply ventilation valves on the windows.
Ventilation valve
The modern market of household appliances offers us many models of hoods, but by and large they can be divided into two large groups:
- Passive - dome-type hoods that remove air solely due to upward draft. There are no electric motors or fans inside these devices, but such a hood will only work if the ventilation ducts of the building or a high ventilation pipe are in good condition.
- Active - hoods, the operation of which is ensured by an electric motor installed inside. Such devices operate more stably, but consume quite a lot of electricity.
You can make any type of kitchen hood with your own hands. At the same time, the final price of the new device will be much lower than that of one purchased in a store, and even more so than that of a custom-made one.
Below we will tell you how to properly make a kitchen hood if you want to create a truly individual model!
Electrical installation features
Wiring for the installed equipment is planned and laid in advance.
Depending on the method of connecting the hood to the electrical network and the comprehensive design of the kitchen, the solution to the issue may be as follows:
- The standard electric cord for range hoods is quite short. Therefore, when connecting a plug to a socket, the latter must be provided and installed in advance. Wiring or an extension cord with a socket can be carefully laid behind furniture or covered with a PVC box.
- The connection via a machine (permanent) is made in a phase break.
- Grounding is always connected first.
The second and third points are mandatory.
Do-it-yourself built-in quiet hood for 120 coolers
The cold weather is coming, and since I am a smoker, and it is getting colder on the balcony, it was decided to caulk the windows so as not to freeze, and since it is still necessary to get rid of the smoke, I decided to make a budget hood.
A lot of material was researched from the Internet, but all ideas rested on three pillars: fast, high-quality, cheap. With the first two, it was decided to do everything myself, with the third, Google again came to the rescue.
So we calculate: my balcony is 2.2 * 4.5 = 10 sq.m. (*2.5= 25 cubic meters of air space).
For normal convection, in accordance with SNiP 2.08.01-89 for kitchens with 2-burner gas stoves (calculated for 20 cubic meters) - at least 60 cubic meters per hour, respectively, I need to create an air outflow of at least 35-40 cubic meters per hour air (we will count on 80 cubic meters per hour, since we need to take into account the resistance of the air duct and the check valve.) So, having delved into the network, we find out that an exhaust fan with the necessary characteristics costs from 500 rubles (air flow 80 cubic meters per hour, noise 40+ dB - very loud, like a hair dryer), it was decided to use Chinese coolers.
Through a friend (since it was faster for me personally, but you can also find and order on Alik), the twelfth gamemax gmx-wfbk was purchased, with an air flow of 46.5 CFM (78 cubic meters per hour), and a volume of 24 dB (quite quiet). Since the air pressure created by the cooler due to low speeds is lower than that of a high-speed exhaust fan, physics and mathematics, scientific poker - to help))) So:
We purchased 4 coolers (90 rubles each), a pair of pipes with a cross-section of 125 mm (75 rubles each), a check valve (50 rubles), sealants - crap (100 rubles), and straight hands (priceless). total spent 660r.
First, we process the coolers to the shape we need.
While working, I used my wife’s slag machine)))
Coolers are installed as tightly as possible into the pipe to create the maximum possible air pressure.
At the end we will seal the gaps between the walls with sealant, but for now we are just testing the air flow we need.
So, let's prepare the coolers and prepare the pipes:
Since I planned to make one pipe an air intake, and the second a jet exhaust, we assemble the finished structure with a check valve, and add one cooler one at a time until the check valve opens from the air flow to the maximum position. Adding coolers to the same system does not increase airflow, but it does increase pressure. In this case, we will be sure that the system raises sufficient pressure to pump the stated 78-80 cubic meters of air. The calculation is approximately this: The resistance of 1 m of pipe is about 15%, and the resistance of a check valve is about 5%. Since we have 3m channels and 1 valve, we need to increase the pressure for nominal operation by 50%, but it was experimentally determined that the air pressure of gusts from the street abruptly closes the check valve, which leads to constant slapping, which did not suit me . It was decided to increase the pressure by 200% (in short, 1 additional cooler increases the pressure by about 70-75%).
After we are satisfied with the result, we assemble the reactive flow pipe.
Installation of forced ventilation with exhaust
Before you start installing a hood in the kitchen, you should read the manufacturer’s recommendations, they are in the instructions.
After this, view the equipment of the device and purchase:
- air duct;
- adapters;
- clamps;
- sealant;
- scotch;
- fasteners.
As for air ducts, they are made of heat-resistant plastic, metal, and corrugated foil. Corrugation is more convenient to install because it is flexible, but it is installed only for short lengths. This is due to the fact that the air flow encounters strong resistance, so the hood works longer.
Mounting the hood to the wall
When considering how to properly make a hood in the kitchen, the master needs to decide on the design features of the device. The simplest option is wall mounting.
The work is performed as follows:
- Mark the fastening points between the stove and the hood. The optimal height is considered to be 700 mm. Measure the fastener zones - there will be 4 points in total.
- Make holes using a drill. Screw in the screws and secure the device.
Almost all products have a similar design, so fixation will not cause problems. In the case when the natural exhaust hood in the kitchen is supplemented by a fan, the device is mounted in the outlet channel of the shaft and connected to the power supply. This is the simplest option for arranging an air exchange network.
Connecting the hood to the house ventilation duct
Installing a kitchen hood involves connecting an air duct to a ventilation duct.
A few rules will help you do everything yourself:
- The outlet fixed to the wall must be the same diameter as the outlet opening itself. Parts can be sealed with masking tape or sealant.
- To carry out the hood, plastic ready-made parts are used for ventilation in the bending areas. Using a corrugated air duct will eliminate the need for joining elements - this design bends in any direction.
Fixation with clamps and adapters. All parts are selected with the appropriate dimensions. It is forbidden to pinch the air ducts and leave free space in the fasteners. In the first case, the network itself is deformed; in the second, the risk of depressurization due to vibration increases.
Ensuring air flow
Supply ventilation can be natural or forced. Natural is the flow of air through a window, window, door. Forced – installation of blowers, valves or ventilators. The latter are available in wall and window versions and are structurally a lining with an external and internal part. Ventilators allow limited air flow and can be adjusted manually or automatically.
Install the devices in a wall or on a window. It is more convenient to install a window device; you do not have to drill into the wall. But you can do without installing complex models, for example, if there is an inlet valve in a sealed PVC window. Regular ventilation will help, both in the kitchen separately and in the entire apartment in general.
Features of the practical use of boxes
One of the most interesting solutions can be called a rotating elbow with a variable angle. Often, air flows in a ventilation system do not always have to be turned at right angles. Sometimes two plastic boxes need to be joined at an angle of 30o or 60o. It is almost impossible to make a docking station without “changes”.
You can buy boxes in three different sizes on the market - 35 cm, 50 cm and 100 cm. Each section of a plastic box is a finished product, at one end of which there is a landing belt, at the other - an extension. By inserting the belt of one section into the extension of the second, you can easily assemble an air duct for a ventilation system of any complexity.
The main thing here is not to get confused; when assembling a ventilation system, the receiving unit is first assembled, this could be the exit from the hood or the entrance window in the shower stall. There must be a seating collar on the receiving unit fitting. We put the first section of the box as an extension onto the girdle of the receiving unit. It turns out that all subsequent plastic sections will be placed in the direction of the flow. The joining with any shaped elements is carried out in a similar way.
Some manufacturers even put arrows on the surface of the box to make it easier to navigate during assembly. Why is this being done? Most ventilation systems are assembled without the use of rubber seals or gaskets at the joints. If the box is installed correctly, the air flow will suck air from the room through the leaks. The air pressure in the flow is always lower than outside the box.
If you assemble the ventilation system incorrectly, then due to dynamic pressure, polluted air will leak through the cracks at the joints of the ducts.
Often, craftsmen resort to an interesting way to check the correct assembly of the ventilation system. Instead of inspecting each plastic box, looking for marks and arrows, a stream of smoke is directed into the hood and an electric fan is turned on. If the ventilation system is assembled incorrectly, then wisps of smoke will be visible at the joints of the plastic boxes.
For long-distance ventilation systems, as a rule, plastic boxes with rubber gaskets at the joints are used. The most problematic places through which air siphons are located at the outlet of the rotary elbows. Leaks can be easily detected by dirty spots on the plastic surface around the joint line.
Why do you need ventilation in the kitchen?
The main function is to maintain normal air composition. It cannot be performed by other devices: humidifiers, air purifiers, etc. During operation, the air in the room undergoes changes:
- increasing the concentration of harmful substances emitted by decoration, furniture and any other objects;
- as a result of gas exchange in a person’s lungs, carbon dioxide accumulates in the room, and the percentage of oxygen decreases (the same thing happens when burners burn);
- heating devices also affect the quality of air;
- microscopic lint from textile and wool products, particles of the epithelium of pets constantly fly in the air, which is harmful to health;
- condensation formation.
These changes in the air do not mean that you should stop keeping pets, fabrics, etc. in the house. A negative effect is created only when the concentration of harmful substances is critically exceeded
Therefore, it is important to create an outflow of dirty air and an influx of clean air. This is the function of the air duct in the kitchen.
Plastic hood box: advantages and important installation points
Any kitchen is complete only when it is equipped with all the necessary appliances and systems.
A kitchen hood removes odors, drops of fat and oil from the air in the room. But the air duct is responsible for their further removal into the ventilation shaft. It would seem that this is an insignificant and unworthy detail, but in reality it is not so. It’s not for nothing that there are different types of such systems, for example, a plastic hood box is just as popular as, for example, a corrugated model or a metal one. And even somewhat superior to them in this matter. Today in the article we will find out how it compares favorably with its “relatives” and show what is included in its kit. We will also find out two important points that should be taken into account when installing it.
Ventilation features
When installing a hood, you need to choose the right air duct. In practice, the following types of ventilation systems are used:
- Corrugated sleeve made of aluminum. The main advantage of such a model is the ability to change the shape for acceptable parameters. The material bends well, which makes it possible to make a ventilation duct with turns in the right places. The disadvantage of the product is the creation of noise during the passage of air flows. In addition, grease, dust and dirt constantly settle on the surface of the corrugated sleeve. It needs periodic cleaning to remove dirt.
- A round plastic air duct is assembled from several parts (adapters, angles and couplings). The connection of all parts is carried out using shaped parts. To prevent tears, the joints are coated with special glue, then additionally secured with self-tapping screws. The main advantage of such a system is considered to be silent operation.
- Square plastic ventilation ducts are made of polyvinyl chloride. The product in question has the same characteristics as the previous type.
The plastic models of air ducts are supplied with additional parts that can be used to install the most complex engineering systems. Such products are characterized by high cost and complex design; their installation must be carried out by a professional.
Save
Plastic ventilation duct: design details
For installation among various angles, turns and other features of the kitchen, manufacturers have provided, in addition to the main air duct (pipe), many additional parts that allow maneuvering when installing the duct.
An important part of them is the rotation (they are also called an elbow), they are made at 45 degrees, less commonly at 90. Moreover, they can be angular or rounded, thanks to them you can change the direction of the structure in the right place.
Adapters. they allow you to connect round and square profiles. It often happens that you need to connect a square air duct to a round outlet funnel on the hood, in which case an adapter is used. It also allows you to connect air ducts of different diameters and cross-sectional sizes of square and rectangular models.
The dimensions of the plastic box for the hood (rectangular) are as follows: the smallest are 50 mm by 100 mm. The largest are 200 mm by 400 mm.
Connectors. When the length of one air duct to the ventilation shaft is not enough, an additional one(s) is used to put them together; this is what connectors are used for. They come, like adapters for connecting pipes, of different diameters and different profiles..
Tee. Used less often at home, since it is usually used to connect two or more hoods to the main air duct.
Non-return valve - allows you to prevent air from being drawn into the apartment from the ventilation shaft. It allows air to flow in only one direction. When the hood is turned off and the reverse draft is activated, it tightly blocks the exit to the shaft.
The ventilation duct is plastic, rectangular, square or round - they all also need a grille connector. It is attached over the hole into the shaft, onto which the rest of the box structure is subsequently fixed.
In addition, you will need fastening elements, their number depends on how many connections there will be in the entire output system.
Step-by-step execution of work
Hood location
Before starting installation work, it is necessary to carry out calculations. Each type of hood should be located at a different height. Above the electric stove, the device is located at a height of 65 to 75 cm. If the stove is gas, then the height of the hood must be increased to 75-85 cm. These standards must be taken into account in order to properly install the exhaust system.
The standards are aimed at providing comfortable conditions for cooking and preventing fire hazards.
Regardless of whether a dome hood or another is used, all work can be divided into three main stages:
- attaching the hood to the wall;
- connecting the device to the ventilation system;
- connecting to the electrical network.
Mounting the hood above the stove
Regardless of which hood was chosen, it should be mounted as securely as possible on the wall. To do this, you need to use dowels of a suitable length. Fastening must be carried out at the required height. If the hood is positioned too low, the appliance may be damaged by the hot air generated by the stove. If the distance is too large, then the fumes during cooking will disperse throughout the room, not reaching the hood.
Further work on installing the hood
Ventilation duct arrangement
After the hood is fixed to the wall, you can begin further work. If the hood involves exhausting air outside, then it is worth connecting it to the ventilation shaft. In this case, it is necessary to use special pipes. They can be made from various materials. Today, the most popular option is plastic products. They are very practical and have an attractive appearance. Such channels can be smooth or corrugated. It is worth giving preference to flat options, since they create less noise during operation and do not obstruct the passage of air.
All joints between plastic channels must be sealed with silicone sealant.
This will prevent exhaust air from entering the room. Attach the plastic channel to the wall using special clamps.
Electrical connection
It would be correct to make a separate outlet for connecting the kitchen hood. Its location should be foreseen at the stage of repair work. This will allow you to hide all the wires in the wall, and they will not spoil the appearance of the room. If the socket was not installed initially, it can be installed later. In this case, the wire can be hidden under the kitchen unit or simply covered using special plastic elements.
A separate power point allows you to use the hood no matter how many appliances are turned on in the kitchen at the same time
When performing all work, you should pay attention to the wires and auxiliary elements
Features of installing a built-in hood hood
Installation of a built-in hood has some differences that are important to know about. In order to correctly install such a device, you must first determine the height of its location. Unlike a dome hood, the built-in version is attached not to the wall, but to the kitchen furniture
In this way, the device is practically invisible and does not violate the integrity of the appearance of the kitchen unit. Thus, not only a flow-type hood can be attached, but also recirculation options
Unlike a dome hood, the built-in version is not attached to the wall, but to the kitchen furniture. In this way, the device is practically invisible and does not violate the integrity of the appearance of the kitchen unit. Thus, not only a flow-type hood can be attached, but also recirculation options.
Types of fastenings
According to the installation method, a homemade kitchen hood is divided into 4 types:
- Wall-mounted. Attach to the wall above the stove.
- Corner. Installed in the corner of the kitchen.
- Built-in. They are built into a wall cabinet above the hob or into a table located near it, and the product is also installed in a decorative fireplace dome.
- Ostrovnaya. Attached to the ceiling.
When attaching the product, take into account the following: the distance between the equipment and the electric stove must be at least 70 cm, gas - 80 cm.
Mistakes when installing a kitchen hood
1
Some people, of course, leave a grille for natural air movement, but still manage to block it with the air duct itself.
2
Recommended dimensions for round air ducts are d=125mm. For rectangular ones - 204*60mm.
3
In most cases, this is prohibited by the rules. Specific points will be given below in the text.
You can, of course, lay a separate box along the facade straight to the roof. But is it worth it? Although in restaurants and cafes located on the ground floors of high-rise buildings, this solution is widely used.
By the way, the ban on venting air to the street through a wall does not apply to private houses, but only to high-rise buildings.
4
First of all, this will affect the noise. Although, of course, the turns themselves are not the greatest evil. And sometimes you can’t do without them.
It is the turns that follow one after another, without acceleration sections, that are dangerous.
5
Remember that a productivity of 200-300 m3/h is quite enough to effectively remove all odors, with minimal load on the ventilation of the house.
6
The installation height directly depends on what kind of stove you have - gas or induction hob.
7
Believe me, sometimes this structure has to be disassembled.
8
Why this is a mistake, and when it is still possible to do this, is discussed below.
9
As a result, connecting it haphazardly, through carriers and extension cords. Do not forget that in the end this is not a portable device, such as a fan, heater or mobile air conditioner.
This means that the wiring for it needs to be done stationary and wisely.
10
It must be embedded and installed in compliance with the appropriate angles and inclinations. Otherwise it will work every other time.
In general, installation of a hood can be divided into two main stages. The first is its connection to electricity. The second is the air duct structure and everything connected with it.
Let's look at each of them separately.
Expert advice
Tips from experts on equipment selection and installation:
- If you choose a strong and durable hood, take a closer look at models made of stainless steel and aluminum.
- If you choose a fan with high power and too much air flow, this may lead to blockage of the air duct. This will cause all the smell and smoke to spread to other rooms.
- Ventilation ducts and air ducts should be cleaned periodically. Please consider this before choosing.
- If the kitchen is more than 15 square meters, two ventilation ducts are installed. One will serve to fill with fresh air, and the second will serve for exhaust.
- It is important to consider that the decorative grille and valve sometimes reduce the speed of air movement by 10 times. In this regard, do not opt for a device with minimal power.
- When choosing a hood, take into account the volume of air that needs to be purified within an hour. We take the volume of the kitchen, multiplying the area by the height, multiplying by the air exchange rate (12) and multiplying by 1.3 (minimum reserve coefficient). This way you will get the performance of the hood.
- When determining the dimensions of the hood, take into account that the area of the air intake should correspond to the area of the working surface of the stove, or better yet, exceed it.
- How to take into account a comfortable noise level? 20 decibels is like the rustling of pages, 25-35 is about like a loud whisper, 50 dB is the noise level like during a normal conversation, 89-90 is like the noise of a passing motorcycle or a hair dryer when drying, 110 is like how it works drill or hammer drill, 130 dB is already exceeding the pain limit.
- When choosing a hood, the question may arise: do you need lighting? They are automatic, touch-activated or with a button. Experts believe that the presence or absence of lighting does not in any way affect the main tasks of the hood, so when choosing, be guided solely by your budget and your own taste. Focus on how the hood design will fit with the interior design.
Hood manufacturing process
It can be divided into stages:
Scheme of the hood operation.
The first stage is the preparation of materials and equipment. If something from the above list is missing, you should visit a hardware store. Equipment can be rented. The second stage is applying markings. In order not to spoil the aesthetic appearance of the room, you should carefully take measurements. It will be necessary to arrange not only the hood. You should also place an air duct. It can be carefully disguised using drywall. The simplest marking option is obtained when the hole for ventilation is made from above the slab. When the hole is located elsewhere in the kitchen, you will need to place a box in which the air duct pipe will be laid. Advice! If you plan to finish the ceiling with plasterboard in your kitchen, you can partially hide the air duct under it.
The third stage is creating a frame for the air duct. This will require galvanized metal profiles. Using anchors, they are secured along the entire perimeter of the future air duct. It's good if the pipe runs in a straight line. In cases where this option is not possible, the profile should be fixed with bends in the required places. Markings for the air duct are applied on the ceiling. The first profile, which serves as a start, is laid down in several separate parts. They are attached using self-tapping screws. The fourth stage is the completion of work on arranging the plasterboard box. To complete the work, you will need to attach a second panel from the primary profile to the already completed hanging parts. You used it as a starting point for work. When the lower part is ready, transverse type strips are mounted on it. They should subsequently be covered with plasterboard. The fifth stage is the formation of the kitchen hood body. So, when all the rough work is done, you can begin arranging the hood itself. The lower part of the future appliance is fixed to the kitchen walls. It is also made from a profile. If your kitchen has a niche for the hood, this will make the task even easier. Otherwise, you will have to additionally attach the lower part to the main box from the sides. All parts of the hood are cut from a metal profile and connected to the lower part. To make the structure more rigid, you will need to strengthen the sides with jumpers. They are also made from a profile. Stage six - connecting the air duct to the ventilation system
To complete the procedure for finishing a kitchen hood, its body and the box in which the air duct is located are sheathed with plasterboard. Then putty is applied to the finished structure. With its help, fasteners and plasterboard seams are masked. After this, the hood can be painted. Some prefer other options for decorating this kitchen appliance.
Layout of sockets in the kitchen.
This type of design is perfect for both active and passive hoods. If you choose the first type, you will need to install an electric motor inside the housing. It will need to be connected to the network.
The second version of a homemade kitchen hood is made of plywood. This hood is used only for active type appliances.
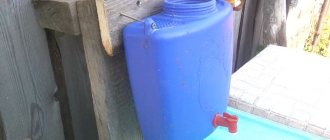
Vent Installation
This is a fairly simple but very important point. My husband watched how professionals did the installation and repeated their actions. To do this, it was necessary to make several holes around the perimeter of the metal cap. They will also help level the structure, and a wooden contour around the perimeter will protect it from impacts and dirty smudges.
“We are still friends”: Derevianko commented on the breakup with his wife
Why French children behave well: eight ways to raise them
If there is little snow, there will be no harvest: December 16 is Ivan the Silent Day
The ventilation pipe should extend a couple of centimeters from the wall. It is better to lay a gasket in this place to reduce the load on the wooden contour. Steam and odors from the stove will escape through the pipe; it is good if it is located directly above it. After placing it, you can continue to design the sides and top of the hood. The lower and front elements are mounted later.
Purpose of kitchen ventilation
During the cooking process, a whole bunch of dangerous chemicals are released into the air.
Among them are:
Carbon monoxide (CO), better known as carbon monoxide. An extremely toxic substance, even in small concentrations leading to severe poisoning of the entire body. And when the concentration of CO in a person’s blood reaches 5 ml per liter, almost instantaneous death occurs. The main danger of carbon monoxide is that it has neither color nor odor. Therefore, its dangerous concentration can be detected only by a sharply deteriorated state of health - a severe headache accompanied by vomiting. CO is released during any combustion, including when frying food on a stove fire.
- Natural gas (propane, butane, methane) is another dangerous chemical component present in the kitchen. It is commonly used as an energy carrier for gas cooktops. But in high concentrations it can not only cause human poisoning, but also cause fire and explosion. Every year, hundreds of people around the world become victims of gas leaks that could easily have been avoided with an effective ventilation system.
- Carcinogens are volatile substances released into the air when foods are fried or fats are burned in a frying pan. This is the same child that stands in the kitchen while preparing food, and then settles on the walls and ceilings of the room with a greasy coating. Carcinogenic substances, although they cannot lead to immediate death of a person, like CO or propane, are capable of accumulating in the human body. When these substances enter the liver, kidneys, and lungs, they ultimately cause severe pathologies, including cancer.
- Water vapor is released when cooking soups or boiling a kettle. By itself, it is absolutely harmless to humans. But in high concentrations it condenses on the walls and ceilings of interior spaces, causing the appearance of fungus and mold. The fungus significantly reduces the service life of finishing materials, and can also affect the load-bearing elements of the building structure. Microscopic spores released by mold into the air cause severe allergic diseases - dermatitis, asthma, chronic bronchitis.
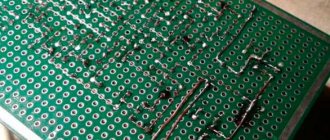
Examination
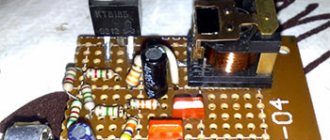
It turned out to be very difficult to remove smoke, especially with a practically smokeless flux:
And yet, it is noticeable that the smoke cannot even rise upward; it flows horizontally straight into the sleeve. And this is at a distance of several centimeters. My previous smoke extractor with a filter always had to be kept at maximum speed and placed closely, and even then it did not always cope.
As for the noise level, it is noticeable, but not annoying and uniform, like flowing water. Considering that I don’t do soldering eight hours a day, this is quite acceptable.
Air removal system parameters
To determine the most important dimensions of pipes and air intakes, you will need to perform a small calculation in the following order:
- We determine the amount of air flowing through the kitchen ventilation per unit of time;
- Knowing the cubic capacity of the kitchen air space and the recommended air speed values, we calculate the cross-sectional area and the recommended diameter of the air duct.
This is enough to build simple ventilation in the kitchen. As a rule, a kitchen ventilation system is assembled from two independent subsystems - natural and supply and exhaust. Both schemes are calculated based on the maximum air exchange rate in the isolated kitchen space. For a private home, according to SanPiN 2.1.2.2645-10, the air in the kitchen atmosphere should change from 3.5 to 5 times per hour, depending on the type of stoves and ovens used.
If the kitchen is planned in the form of one large studio or pavilion, or a semi-open veranda, the gas exchange rate can be reduced to 2.5-3 times.
Main characteristics of ventilation ducts
The main indicator by which a ventilation duct is selected is throughput.
Ventilation ducts are also characterized by:
- section shape;
- material;
- section diameter.
The dimensions of ventilation ducts are calculated using special tables that take into account the speed of air movement through the pipe and its throughput.
Form
rectangular boxes and a deflector with a round cross-section
The cross-sectional shape of the box can be:
- round;
- square or rectangular.
Round boxes have several advantages:
- The smooth inner walls of boxes with a round cross-section do not create obstacles to the passage of air flow;
- They are easy to clean as there is no place for dirt to linger;
- They create a little noise;
- Lower power fans can be used.
The main disadvantage of round air ducts is that they are difficult to hide in the interior.
With equal throughput, the cross-sectional area of a round box is 12% less than a rectangular one.
The largest and most powerful ventilation systems are equipped with rectangular steel ducts.
Disadvantages of boxes with a rectangular cross-section:
- Internal corners create air resistance;
- To cover pressure losses, it is necessary to install more powerful and energy-consuming equipment;
- More aerodynamic rumble.
Despite the disadvantages, the rectangular section is also popular in cottage construction. A flat ventilation duct is easier to hide behind a suspended ceiling.
Material
plastic ventilation ducts
Ventilation ducts are made from:
- steel (stainless or black galvanized);
- plastic.
You can build a ventilation duct in a garage or shed with your own hands from other available materials, such as boards or drywall. But the structure must be airtight!
Plastic boxes for ventilation do not deform over time and do not change color.
Other advantages of plastic ventilation ducts:
- easy to install;
- inexpensive;
- resistant to corrosion;
- if necessary, they can be further processed (for example, rolled);
- It is easy to select ready-made shaped parts.
Ventilation ducts are made from ABS plastic in various sizes, with round and rectangular cross-sections.
Section dimensions:
- plastic: 11x5.5 cm, 12x6 cm, 20.4x6 cm;
- round diameter: 10 cm, 12.5 cm, 15 cm.
Steel ventilation ducts are made from stainless steel sheet or black galvanized steel. Galvanized ventilation ducts are installed in residential and industrial buildings. Galvanized ventilation ducts are produced in standard sizes, and also made to order in especially large diameters. Shaped parts are also made to order.
Pros:
- do not rust;
- easy to install;
- easy to use;
- meet sanitary standards, since microorganisms do not take root on galvanized and stainless surfaces;
- any equipment can be installed directly on the network.
How do kitchen hoods differ from air conditioning systems?
There is a significant difference between kitchen hoods and air conditioners. As you know, air conditioning systems absorb air from a room and return it cold or warm. Such air is very dry and harmful to health, since various odors, microbes and carbon dioxide, which is formed when exhaling, are not removed from the apartment.
There is a significant difference between kitchen hoods and air conditioners.
And the illusion of fresh air appears due to the fact that its density increases as it cools. While the kitchen hood removes air containing harmful substances and bacteria, thereby maintaining a healthy and fresh atmosphere in the apartment.
And the illusion of fresh air appears due to the fact that its density increases as it cools.
Note! If an air conditioner is installed in the kitchen, then there must be a ventilation system to maintain natural air exchange
Finished product
This hood becomes the center of attention in the kitchen interior. The seams are filled with filler of a matching color. The top of the hood is impregnated with stain and varnished. It looks very beautiful and expensive. I’m glad that when cooking food, smoke doesn’t come into the house, and my husband is glad that he managed to make such beauty with his own hands and without any special financial expenses. You can leave it in its natural form, or you can add patterns in accordance with the design of the kitchen. Some people make shelves on the front or sides for spices or something small and light.
Found a violation? Report content
Homemade plasterboard hood
Tools and materials
The easiest way to make a hood is to build a corrugated pipe with an electric fan into a kitchen cabinet located directly above the stove or hob. But such a hood cannot be called beautiful - which means we will take a different, more complex, but more productive path!
Frame elements
To make a passive dome hood we will need:
- Moisture-resistant drywall - from this we will make a box to house the air duct and the dome of our hood itself.
- Galvanized metal profiles for the frame of the box and dome.
- Perforated metal corner for decorating the corners of our hood.
- Corrugated pipe - air duct.
- Fastening elements.
- Insulating material for wrapping corrugated pipes.
- Putty and paint for finishing the dome.
Corner overlay
The set of tools with which we will make our hood will be familiar to anyone who has ever worked with drywall:
- Hammer.
- Screwdriver.
- Metal scissors for cutting profiles.
- Tape measure and level (preferably laser).
- Spatulas and brushes.
When everything is ready, you can start working.
Manufacturing
We begin work on the manufacture of the hood by marking the room. We will need to place on the wall not only the hood itself, but also the air duct, which we will hide in a plasterboard box to ensure the aesthetic appearance of our kitchen.
The easiest way to mark is if the ventilation hole in the kitchen is located above the stove itself. If the hole is to the side, you need to mark on the wall the position of the box for laying the air duct.
Hood placement diagram
When we have decided on the placement of the air duct, we proceed to making a frame for it:
- We attach a starting profile made of galvanized metal to the wall at the level marking the lower surface of the air duct box. To fasten the profile we use anchors with a 6 mm plastic sleeve.
- We also attach the starting profile to the ceiling according to the markings we applied. If we plan to make the air duct box curved, we cut and bend the profile before fastening it.
- From the starting profile, we lower several vertical fragments of the main profile down, attaching them to the starting profile using self-tapping screws.
Drywall box
We complete the formation of the frame for the box by installing another panel of the starting profile on the resulting hangers. We install transverse strips on the lower part of the resulting profile, which will then be covered with plasterboard.
You can study in more detail the technique of working with drywall and the profile for it by watching video instructions on the Internet.
Making the hood body
The box is ready - it’s time to move on to making the hood itself:
- From the starting profile we make the lower frame of our hood, securing it to the kitchen walls. The easiest way to attach the frame is if we install the kitchen hood in a niche - otherwise the side parts of the frame will need to be additionally attached to the box.
- We cut out the frame elements of our future structure from the main profile, and use them to connect the box with the lower frame, as shown in the photo.
Hood frame
To add rigidity to the structure, we reinforce the side surfaces of the hood with transverse bridges from the profile.
The frame is ready. Now all that remains is to attach the air duct from the corrugated pipe to the ventilation hole - and you can cover the dome with plasterboard.
To prevent the air duct from making noise during operation, we wrap it with batting or other soundproofing material.
Hood finishing
We finish the hood as follows:
- We cover the air duct box and the hood body with plasterboard.
- We protect the corners with a metal perforated corner.
- We putty the resulting plasterboard structure, masking the joints of the plasterboard sheets and the locations of the fasteners.
- We paint the hood in the color of our choice or finish it in another way. Our homemade kitchen hood is ready.
Exhaust after putty
The advantage of this technology is that this instruction is suitable not only for the manufacture of a passive hood, but also for the manufacture of an active type hood. In this case, it is enough to install an electric motor inside the housing at the entrance to the air duct and connect it to the network.
Box finishing
A homemade kitchen hood can have a wide variety of shapes. Galvanized profiles and plasterboard allow you to create a wide variety of shapes. And, of course, the finishing will add even more uniqueness to your device.
The simplest and most effective way is:
- frame covered with plasterboard, reinforced with metal corners;
- putty, paying special attention to the joints of the sheets and the places where self-tapping screws are screwed in;
- paint, whitewash or decorate with tiles or decorative panels. Here only your imagination can come up with the design you need.
Standards and requirements for kitchen exhaust systems
The air duct of the kitchen hood ventilation system has a square or round cross-section with a width or diameter of 130 mm. If the exhaust equipment is installed away from the ventilation shaft, the air duct in the room is mounted using a corrugated pipe, which can be steel, aluminum or plastic. The most common choice is aluminum.
Aluminum corrugation has an aesthetic appearance. It is cheaper than the steel version and much stronger than its plastic counterpart.
Recommendations for choosing a hood:
Depending on the length of the ventilation duct, the required fan power is determined. An axial device mounted on hoods of a low price category is effective only when connected to a short ventilation duct through the wall. If the channel is long and has several turns, the power of such a fan will not be enough to remove polluted air outside. The type of exhaust unit - flow-through or recirculation - is selected depending on the distance from the stove to the ventilation duct (or its presence)
However, even if the ventilation duct is far away or absent, a flow-through type can be installed. The required power of the unit is calculated taking into account the cross-section of the corrugated pipe connecting the hood to the ventilation. Pay attention to the noise that the device will produce. The noise level of the exhaust system should not exceed 58 dB
The noise level of such equipment, which does not disturb comfort, is 44-46 dB.
The color, design and shape of the equipment, as well as the type of control, are chosen according to personal preferences.
If you do not take into account the rules for choosing the power of the unit, the device will consume a lot of resources, producing low efficiency. The power of the exhaust device is measured in m³/h. Many are sure that the more power the hood has, the better, but this opinion is wrong.
The purpose of the unit is to remove unnecessary odors and impurities from the air, and not to ventilate the room. Since the capacity of a pipe with a diameter of 130×130 mm is 400 m³/h, a hood with a higher power will be useless.
The height of the hood above the stove depends on the type of hob. SNiP standards for hoods: above gas stoves - 750-850 mm, above electric stoves - 650-750 mm, above combined stoves (where there are gas and electric burners) - 700-800 mm. The inclined hood is mounted at a distance of 550-650 mm from the working surface of the gas stove, 350-450 mm from the countertop with an electric stove and 400-500 mm from the combined hob.
To install a kitchen hood through a wall, you will need a device with certain characteristics. A hood that is too powerful makes a lot of noise, leaving some of the combustion products inside the room
When using any hood, the exhaust shaft must be anti-corrosion painted every three years.
Materials
Of course, when creating a hood with your own hands, the problem arises: what materials to use? Here, in addition to drywall, you can also use plywood or MDF. To prevent the air duct from making too much noise, the pipe is usually wrapped in soundproofing material, and a galvanized profile is ideal for the frame of the decorative box.
To save money and for finishing, you can use wooden baguettes, painting them with stain to the desired color. You can use polyurethane decorative skirting boards. And even fiberboard sheets are suitable for the box.
Thus, you can create a unique work of art in your kitchen, and if you have an ordinary standard device that works quite well, then you can build a new box for it.
A DIY kitchen hood will help you use your kitchen space more functionally, even if you have a compact filter-based device installed.
Such a compact device can be built into a homemade rectangular cabinet. For the cabinet, you can build a small external shelf with a ledge and decorate it with materials that match the overall interior. Thus, new useful space appears. And a disguised hood looks much more aesthetically pleasing than a separate device installed above the stove. With the appropriate approach and low costs, you can create a truly unique version of the exhaust device.
How to ensure air flow into the apartment
The supply of fresh outdoor air to the apartment for kitchen ventilation can be organized in two ways:
- window supply units;
- wall supply devices.
The installation of the window valve will have to be entrusted to specialists. And installation of a wall supply valve can be done by any home craftsman.
Window ventilation valve
These are simple and inexpensive devices that are now an essential element of kitchen ventilation systems in modern homes. The valve ensures normal air flow, blocking street noise.
Supply valves are installed on the window sash or frame. A window in the kitchen of an apartment, equipped with a ventilation supply valve. will never fog up. The neat and small valve is almost invisible, does not allow dust to pass through and does not cause air cooling.
You can not only make ventilation in the kitchen, but also equip it with such technical “bells and whistles” as hydroregulation of the inflow. There are supply valves with this function on sale. They open and begin airing precisely when soup is being cooked or pies are being baked in the kitchen, that is, the air humidity is increased. The sensor reacts to the humidity level and changes the flow area.
An additional acoustic visor can be purchased for the valve, which absorbs street noise.
A wide range of supply valves allows you to choose one suitable for any window profile: white, black, oak or teak.
But in order for the supply valve to perform its function efficiently, it is necessary to ensure the outflow of air from the kitchen.
Wall supply ventilation valve
supply valve device
Wall supply valves are also called “Finnish vents”. This is a small device that is not difficult to install, but without it, proper ventilation in the kitchen is impossible. The wall valve allows air into the room, trapping insects, dust and drafts.
The advantage of wall valves is that they are easy to install. There is no need to call a specialist and spoil the plastic window profile.
Other advantages of wall valves:
- does not use electricity;
- absorbs noise;
- has a small size and nice design;
- easy and quick to install.
There are wall valves with air filtration and automatic air supply based on hydroregulation. The intensity of the air supply can be adjusted manually by closing or opening the curtain.
Once every 6 – 12 months it is necessary to clean the filters by rinsing them with warm water.
Installation of a wall supply valve
Before installing a ventilation valve in an apartment, you need to choose a suitable place in the kitchen. It is better that the valve is not too conspicuous. Many people choose a place near heating radiators. The air coming from the valve will be preheated. The main criterion for choosing a location is the presence of access to the street for access to fresh air:
- A hole is made in the wall slightly larger in diameter than the valve pipe. A small margin is necessary for the correct placement of the pipe;
- The pipe is inserted into the ventilation hole in the kitchen. The cracks between it and the wall become foamy;
- The excess piece of pipe is cut off (usually it is sold in a standard length of 1 m). The outside of the pipe should be flush with the surface of the wall, and inside it should protrude no more than 1 cm;
- In pre-marked places, holes are made for fastening the housing;
- Filters are inserted (if they are provided for in the design), and an external grille is installed;
- A rain deflector is installed on the street side to prevent moisture from entering. If you drill a hole with a slope towards the street, a rain deflector is not needed.
Proper organization of passive supply ventilation in the kitchen is possible if air outflow is ensured.
Need ventilation in a wooden house
In a wooden house that is built using the latest technologies, a ventilation system must be installed. This is due to the high tightness of the building. Exhausting dirty air through windows and vents is not a sufficient condition.
A natural ventilation system is attractive due to its low cost, but it is not able to quickly remove odors from the kitchen or moist air from the bathroom. For effective air exchange in the kitchen in a wooden house, you need to install a special device of appropriate power.
A supply and exhaust ventilation system is only sufficient to ensure fresh air enters the house and eliminate excess carbon dioxide and unpleasant odors. For high-quality air purification in the kitchen, this, like a natural system, is not enough.
You can use a high-quality ventilation system for natural kitchens, provided that it was initially included when designing the house and carried out by specialists.
Design and principle of operation
A hood is a device that extracts polluted air. It is usually installed directly above the stove to capture harmful fumes immediately, preventing them from spreading throughout the kitchen and other rooms.
There are different types of devices. Some models simply connect to the general building ventilation and send polluted air there.
You can make such a system yourself. It is enough to assemble the housing and connect it to the general house ventilation. However, you need to ensure that there is always enough air in the room.
For example, plastic windows can be kept in micro-ventilation mode.
Before installing the device, you must check how the ventilation works. There is a simple test: apply a piece of notebook paper to the ventilation hole. Normally functioning ventilation will hold it in place due to its draft.
If the house is old and the ventilation ducts have not been cleaned for a long time, then the efficiency of the system will be minimal and the leaf will fall. Before installing a kitchen hood, you need to clean the visible part of the duct in your apartment.
If this does not help, contact the management company with a request to clean the general building ventilation.
Other, so-called recirculating hoods, capture harmful fumes, pass them through a filter system and return already purified air to the room. This is a more complex system, but you can also assemble it yourself.
In addition, there are 2 more types of devices based on their operating principle:
- active, equipped with an electric motor and providing forced air removal, regardless of the level of performance of general house ventilation;
- passive, without a built-in fan, operating only due to natural draft. Less effective and dependent on draft in the common house ventilation duct.
Electrical connection
This device consumes little electricity, so there will be no difficulties connecting it; you can do everything yourself. The hood can be connected to a regular outlet. If there is no power point nearby, then use a tee or splitter.
If desired, you can connect a separate line to the hood. To do this, a channel for the wire is cut into the wall. Then open the junction box, find zero and phase, connect a new cable to them using terminal blocks.
The wire is laid in a grooved channel. An overhead socket is installed on site. Cover all unsightly elements. Grounding for the hood is not required.
You can do without gating if you don’t want to damage the walls and there is no outlet nearby. It is enough to use a cable channel. It can be laid unnoticed.
Even if it runs somewhere in prominent places, the cable channel looks quite aesthetically pleasing and is unlikely to spoil the interior.
Attention! All work with electrical wiring is carried out with the electricity turned off in the apartment!