A bright, elegant star is a mandatory attribute of a Christmas nativity scene. In Ukraine, where living nativity scenes are still popular today, traditionally a man (or boy) carries a star behind the carolers. Attached to a long, strong pole, it can rotate and ring its bells.
Source: Instagram @bat.bat.girl
The symbolism of this item is quite obvious - the star is a reference to the same Bethlehem celestial body that first notified the world about the birth of Christ. Therefore, making a Christmas star has always been considered a very responsible and serious matter.
The basis for the traditional star was an ordinary wooden sieve, to which an even number of “horns” were attached - usually 6, 8 or 12. Carolers always competed with each other to see who had the biggest, brightest and most intricate star.
This tradition, by the way, is also still alive - for example, in Lvov, for Christmas, the festival “The Walk of the Stars” is held annually, at which all possible variations of nativity stars are presented as much as possible, as human imagination can conceive of them.
Source: Instagram @sophia_filipchuk
You can make such a star at home. It will be great to go caroling with her for your loved ones, and you can also limit yourself to a small Christmas star that will look beautiful on the tree. Making the Star of Bethlehem is a simple process, so your little one will take part in it with ease and pleasure. We offer your choice of two options for nativity stars - made of cardboard (paper) and plywood.
Stars using quilling technique
Using the quilling technique with your own hands, you can make not only postcards or decorative panels for interior decoration, but also individual exquisite non-standard pendant crafts.
In this case, strips of paper should be preferred in light shades:
- white;
- pastel;
- silver;
- mother-of-pearl.
How to make a small paper star
This type of star appears small, but in variety it looks beautiful and impressive. To make them you will need glossy or multi-colored paper, as well as scissors.
Initially, special blanks are made: using scissors, paper strips of the required size are cut. Their length and width are selected in accordance with the dimensions of the product being created.
A loop is made from the strip, and the short end should be bent. So, you get a figure with five corners, which needs to be pressed a little. You need to turn the product over, performing actions with a longer end.
Using a strip, we make a canvas, wrapping the figure in stages, pressing it as little as possible. There should be about 10 such wraps. The edge needs to be folded down.
The next stage: we make a star shape from the pentagon. We create rays.
Stars look great in interior decoration: they are good for filling small containers such as cans or vases. If you do this activity with kids, it will help in training their hand motor skills.
Origami for the Christmas tree
Origami is the ancient Japanese art of folding figures from a whole sheet of paper without using scissors. Since we will need a pentagon for the New Year's craft, scissors will still come in handy. Below is a detailed diagram of how to fold a piece of paper and get an elegant pendant that resembles a flower.
Read also: Relations between Tajikistan and Russia
Origami is a simple art only at first glance. It takes practice to succeed. Therefore, before making origami from expensive colored sheets, it is worth practicing on a regular office one. Drafts will also do. Having understood the principle, feel free to start creating beautiful origami stars and snowflakes.
Paper New Year stars
If for some reason you don’t like snowflakes, you should make stars for the New Year. This can be done using various techniques. We invite you to get acquainted with the main options.
Paper star - a beautiful decoration
Star made of colored paper
We will begin the series of master classes with making a multifaceted star that will decorate the house on the eve of the holiday.
Step-by-step instructions for the master:
- We prepare the modules for the star: we cut out circles approximately 7-9 cm in diameter from colored paper.
- We fold each circle in half three times in three different directions.
- We make cuts along the fold lines.
- We roll the resulting part into a cone and connect the edges with glue.
- Now you need to connect all the modules into one big star. The number of needles on our star may vary, depending on your choice.
- To assemble the structure, you can use a base (ball, ball, frame) or simply glue the cones together.
The resulting figures must be hung on a colored rain or ribbon. To do this, we make a hole in the upper edge of our product and insert the pendant into it.
Using origami technique
Origami is a very popular technique. It involves creating crafts without glue and practically without the use of scissors.
Below I will show you how to make a six-pointed star.
Take a compass and draw a circle of any diameter you need. Then save the radius and mark it along the entire line of the circle, fixing the segments with dots.
Connect these points through one line using a ruler. Cut out the workpiece and bend it along the indicated lines.
For the next star you need to take a pentagon and find all its diagonals and bisectors. Next, fold it as shown in the photo.
Since it is quite difficult to roll such a star, I am attaching a detailed video.
I liked the craft with congratulations to men on February 23rd. The frame is also made using this technique.
Ten blanks are needed. We put them according to the diagram.
Then we connect it into a circle, and glue a congratulation on the inside.
You can use absolutely any colors.
If you are familiar with the origami technique, you can make a star from modules. By choosing bright colored paper, you can become the owner of a colorful decoration. There are a lot of options, each of them deserves attention.
New Year star using quilling technique
Quilling is an ancient art of making three-dimensional compositions from rolled strips of paper, which has become incredibly popular over the past few years. Those familiar with this technique will assemble a stunning star in 20-30 minutes; beginners may take longer.
What you will need
- Thick colored paper
- Scissors, glue
- Ideally, a quilling rod, but you can get by with a ballpoint pen or a toothpick
- Narrow ribbon
How to make a quilling star
1. Cut the paper into long strips 1.5 - 2 cm wide.
2. Screw the strip of paper onto the rod, but not all the way.
3. Unravel the curl a little, take another strip and glue one end to the curled part and the other to the free part. You should end up with a loop like this (see photo).
4. Make the remaining loops in the same way (there should be 5 of them in total, equal in size).
5. Thread the ribbon through one beam and hang the star on the tree.
How to make a five-pointed three-dimensional star
The five-pointed star is one of the symbols of Victory Day. And it is still often used in creativity on the eve of this holiday. Therefore, I offer several options for creating it.
Idea 1. We will make a double-sided star. It can have different edge colors or the same ones. It's up to you. Below, the edges are shown in shades of yellow and blue so you don't get confused when putting it together.
You need two pieces cut from this template.
You will get something like this. Next, using a ruler and your finger, bend the lines from the center of the rays to the middle and short lines. They are highlighted in contrasting colors in the figure.
Glue the seam allowances and the craft is ready.
Idea 2. Now I will show you a detailed assembly diagram for such a craft. It can be made from A4 sheets.
You cut out a lot of blanks according to the diagram (it will be slightly lower). You need five pieces in this case. Fold the parts along the required lines and glue them together.
And here is the diagram itself.
Idea 3. Suggests that you need to recreate the shape of the star yourself.
To do this, use a protractor and paper. Take a sheet of paper and draw a circle with a compass. Find its diameter and mark it with a line.
Then take a protractor and, starting from the marked line, mark 72 degrees. And so repeat the procedure 4 more times.
Connect all the points with straight lines. you have a sketch of a five-pointed star.
Then you cut it in and bend it along the lines marked with a dotted line and along the lines of the center of the rays.
You can even create a postcard based on such a five-pointed symbol.
Making a star
1-4. Bend a strip of paper around your finger and thread the tip of the paper into the resulting loop. We carefully tighten the resulting knot so that we get a neat pentagon.
5. It is desirable that the tip does not extend beyond the pentagon at all, but if this happens, then simply bend it in the opposite direction (step 5). And it’s even easier - cut off the excess)))
6-8. With the free end of the strip we begin to wrap the pentagon in a circle, in total you should wrap it 10 times in this way.
9-11. If the tip remains, you need to bend it (or cut off the excess) and hide it.
12. Here we have a blank star.
13, 14. Holding the workpiece, press the edge of the star with your fingernail, pressing it inward.
We repeat similarly with the remaining faces. Here you need to act especially carefully so as not to spoil the star.
And now our star of happiness is ready!
It doesn’t matter if you don’t get a star the first time. Try again and everything will definitely work out! And when you get used to doing them, the process will go like clockwork.
Foamiran star
You will need: shiny and matte foamiran, a simple pencil, scissors, a glue gun, a decorative rope for hanging, cardboard, a ruler.
Master Class
- Draw an 8-pointed star of the desired size on the cardboard.
- Cut out the template.
- Trace the template on shiny foamiran 2 times, then cut out the blanks.
- Glue one star to the matte foam, then cut it out.
- Glue the second star on the other side.
- Cut out two identical winter figures from foamiran and glue them in the center of the star from different sides. It could be a Christmas tree or a snowman.
- Glue decorative string around the star and make a loop for hanging.
The foamiran star is ready! It also makes very beautiful flowers, click HERE to view.
I recommend watching this video!
Stars on the Christmas tree. DIY voluminous foamiran stars | Christmas tree stars
What can be used for wood crafts
Almost all known species can be used as a starting material for making cool wood crafts. The forms of wood material that are at hand in everyday life can also be different:
- Beautiful stumps in good condition, cut from garden plots and kept well in a dry place, can become the basis for the manufacture of a unique piece of country furniture.
- Solid wood in the form of bars, which are used to build houses or utility rooms on sites, can be suitable for carvings that decorate the facade of a building or the interior.
- Crafts made from wood cuts of various thicknesses and diameters are a material for solving many technical and decorative problems.
- Boards, as well as their small waste, can become a tempting basis for the imagination of a person endowed with artistic imagination.
- Scrap plywood often lies unused in many thrifty homeowners' pantries, and many useful items can be made from it.
- The whimsical natural shapes of branches and snags found during a walk in the forest or park will be good material for realizing creative ideas.
- Finishing veneer always remains in the form of scraps after working with furniture. Don’t rush to throw away the leftovers, as you can make interesting crafts out of them.
To make all kinds of wood products, various blanks can be useful, such as pallets, slats, cut pieces of bars or branches, beautiful tree roots.
Shiny Star
You will need: paper. scissors, ruler, glue.
Master Class
- Cut the paper into 10 thin strips of the same size.
- Lay out 5 strips on a flat surface, then lay out the remaining 5 in a checkerboard pattern.
- Glue together the ends of the strips located next to each other in the corners. Please note that the 4 “cross” stripes must remain.
- Make the second piece in the same way.
- Glue the blanks together to form a star.
- Glue loose strips to the parts of the star.
A shiny star made from strips of paper is ready!
Photo ideas for creating a star craft
Sources
- https://vplate.ru/ukrashenie-elki/verhushku/
- https://joy-pup.com/creative/zvezda-na-elku-svoimi-rukami-5-tvorchesk/
- https://dekormyhome.ru/rukodelie/novogodnie-igryshki-svoimi-rykami-vosmikonechnaia-zvezda-iz-bymagi.html
- https://HouseChief.ru/snezhinki-i-zvyozdochki-iz-bumagi-k-novomu-godu.html
- https://gidrukodeliya.ru/podelka-zvezda
- https://mognotak.ru/kak-sdelat-obemnuyu-zvezdu-iz-bumagi.html
- https://nacrestike.ru/publ/master_klassy/kak_sdelat_zvjozdochki_schastja_iz_bumagi/9-1-0-1249
New Year's three-dimensional star
made from thick paper, painted on both sides.
Squares of 4 sizes (8 squares each) need to be folded as in the picture, and then glued according to size. The very first will be a large square and then in descending order.
Assembly
The star consists of two halves. Fold each diamond in half along a long diagonal with the paper side inward, smooth the fold, and then straighten the diamond again. Fold the allowances onto the paper side. Mark the sharp corners of both pieces. This will be the center of the star. Glue the sides adjacent to these corners together with PVA glue or double-sided tape. Glue the third diamond, the fourth and the fifth. Assemble the other half in the same way. Glue the halves together by placing a tube between them with the flat side inside the star.
Hundred rays
This craft is very similar to a balloon, consisting of hundreds of small rays. Straight as a fan. The rays are strung on a thread one by one.
The tips of the star are connected and after that the product can be hung from the ceiling or used to decorate the top of the New Year tree.
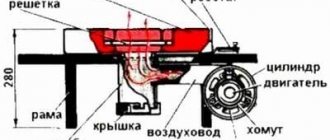
18 degree miter saw cutting method
First, we will make a guide for subsequent cutting. To do this, you need to take the prepared block and install it using a vice on a miter saw, which should be set at 45 degrees. Next, we saw off part of the block, and we get a workpiece with the appropriate cut. During subsequent work, our guide bar should still be in the vice.
Now the saw should be set to 27 degrees (to the left of o), and the 25 cm bar should be attached to the guide workpiece. Now, having sawed off part of the plank, you can get a cut at an angle of 18 degrees.
In this way, all 10 planks should be prepared.
Next you need to make cuts from the other end of the planks. To do this, the saw must be set at 36 degrees (to the right of the o). Then corresponding cuts are made on the opposite side of the cut planks.
Do you have frozen blueberries? You can grow fruit-bearing bushes from it
Who to call mom: Semyon Treskunov about relationships with his stepmother and natural mother
Food against depression: what to eat for mental health
The most difficult process is over. Next is a simpler and more exciting part of the work from the “Do it yourself” category.
DIY rocket
A rocket made from a plastic bottle is more complicated than the one we offered for kindergarten crafts, and is more suitable for younger schoolchildren.
You will need:
- plastic bottle;
- cardboard;
- glue;
- scissors;
- foil;
- double sided tape;
- 2 toilet paper rolls/yogurt jars or something similar in shape.
To decorate the rocket: electrical tape in three colors: white, blue and red.
Progress:
- Cut off the bottom of the bottle.
- Cut a circle out of cardboard and build a “nose” for the rocket: cut a triangle out of the circle, fold it into a cone and secure it with glue.
- Wrap the body of the bottle, the cone and the bushings (or jars) with foil - the future jet engines of the rocket (see the master class at the link below).
- Attach the cone to the neck of the bottle.
- Use double-sided tape to secure the rocket parts together.
- Stick 3 strips of electrical tape of different colors on the rocket body in the form of a Russian flag.
- Cut out circles from cardboard - portholes. If you wish, you can paste on them pre-printed images of the first cosmonaut dogs Belka and Strelka.
- Attach the windows to the rocket using double-sided tape.
small voluminous stars
Can be used for interior decoration, and for cards, gifts.
You will need colored paper (you can use glossy magazines). The strips of paper should be even and should be done carefully so as not to tear the workpiece.
How to make such an asterisk. You need to make a loop from the strip, then wrap the short tail, tying it into a knot. Carefully tighten the knot, press it and hide the remaining tail in the middle. You should get an even pentagon.
Then you need to wrap the long end of the strip around each side of this pentagon 12-15 times, that is, at least twice each side. The remaining tip of the paper needs to be hidden inside the star.
To give the star volume, you need to take the pentagon with two fingers and, with the tip of the finger of your other hand, lightly press on one edge (you need to get into its middle). A similar operation must be done with all the faces, then you will get a beautiful three-dimensional star.
Here are a few more video tutorials on how to make a three-dimensional New Year's star
There are a lot of different techniques for creating New Year's stars from paper. Stars can be voluminous and flat, cut out and glued, large and small.
I offer several techniques for creating stars.
It is quite possible that you will like some of them.
the simplest example of a beautiful paper star
But the technique is more complicated)
DIY New Year's star
Winter time is the time for crafts for kindergarten, schools, and home. If you want to make a paper star, then I offer you a couple of simple options.
Making a star out of paper is quite easy and, most importantly, low-cost, which is especially important in December, when you have to spend large sums on gifts.
To make such a star, you will need to cut out a square of paper with sides of 21 centimeters. The paper needs to be folded according to the pattern to form a star. Details of the process can be seen in the video.
A New Year or Christmas star made from paper with your own hands will decorate your home for the New Year and help create a festive mood in your home. You can make such stars in various ways.
For example, such voluminous two-color stars are made very quickly and simply, but they look very beautiful - especially if you hang them on a bow:
These homemade eight-pointed Christmas stars can be used as original wall decorations, or used to decorate a window or chandelier in a room.
Yulia Malashenko
Dear colleagues, before the New Year, I continue to share with you interesting ideas for making New Year’s toys using aluminum foil
.
I suggest you and your children make an original star
and decorate your green beauty Christmas tree.
Below are step-by-step instructions for completing the craft.
For work you will need: metal wire (3 mm in diameter, wide silver tinsel)
, narrow blue tinsel, five blue Christmas tree
decorations
, a wooden ring, 3 cm in diameter,
aluminum foil
, blue
candy foil
, universal glue or glue gun, wire (1 mm in diameter for beads, cardboard, porous material from packaging.
star from thick wire
.
Then we tightly wrap it around it with wide “silver” (I
used a purchased star shape )
.
We wrap the top with thin blue tinsel. Blank star
Let's put it aside and make the central decoration.
For this we need a wooden or plastic ring (3 cm in diameter)
and wires made of
foil
(see
Master
class for teachers
“Decorating Christmas tree
decorations with aluminum foil ”
dated 12/15/15).
We take the wire, bend it in half lengthwise, then weave it around the ring, threading the ends through the loop, and carefully tighten it. To braid the entire ring you will need 27 wires.
This is what should happen. Then, nearby wires need to be twisted together and trimmed so that the edges become even.
We cut out a circle with a diameter of 3.5 cm from cardboard and glue the decoration on one side. Made from blue foil
Roll 8 balls and glue them inside the ring using a glue gun.
Turn it over and stick a circle of blue foil
.
Decorate it with balls rolled from silver foil
.
Glue blue tinsel along the inner and outer edges of the circle.
We decorate the center with a silver wire twisted into a spiral.
We glue the same silver spirals with glue to the blue balls. Glue a small piece of blue tinsel into the center. Using a thin metal wire we attach the blue balls to the star
, attach the decoration in the center
of the star
.
stars from white packaging material
and glue them to the ends of the big
star
.
Glue a ball of
foil
into the middle of each small star .
At the end of the work, using a thin metal wire, firmly fasten the decoration located in the center. We twist the ends of the wires of the central decoration slightly. We tie a loop by which the toy
can be hung.
created such a collective work with the children of the preparatory group for school
for the competition - exhibition of
New Year's toys "Dressing up the city tree"
. I wish you all creative success. Happy New Year! Thank you for your attention!
Publications on the topic:
The Christmas and New Year holidays will pass, gifts will be removed from under the trees. They will remove all the toys from the Christmas trees. And then, here and there you can.
I offer you a master class “New Year's Beauty”. I needed: a piece of tulle fabric 1mx1m, small Christmas tree balls, beads, scissors.
Dear colleagues! The New Year is approaching and everyone is looking for new ideas for New Year's crafts, here's my little creativity for you.
Very soon the most long-awaited, cheerful New Year holiday. And what would a holiday be without gifts? And give a gift made with your own hands.
Master class “New Year's snowflake”. Dear colleagues, in anticipation of the New Year, I bring to your attention a master class on making snowflakes.
I like surprising children. You look with joy into these clear, open eyes and see joy, delight, surprise in them. And this time.
Hikikomori often become the heroes of my stories, I have written about them several times already. It seems to me that hikikomori is a disease of our generation.
As student movements intensified, the antagonism of the factions resulted in numerous violent clashes. This was largely caused by an exaggerated sense of justice and an overabundance of communication. Twenty years have passed since then, and, realizing their helplessness in the face of the fragility of human relationships and the fact that it is impossible to change the world, people, one after another, began to hide from society in their rooms, as if in solitary confinement.
During my student years, I myself suffered from a mild form of anthropophobia and almost became a hikikomori, so I understand their feelings well. Those who live in seclusion have a distorted perception of reality. It happens that people around you seem to be honest people, and the very next moment they seem extremely insincere. Hikikomori feel that the world is infinitely cruel and there is no place for them in it.
However, all this is nothing more than a game of their morbid imagination. We usually project our fears onto others. We look at people, we look at the world; and what we see is always ourselves, our own image. I would like you to be able to overcome your fear of society and see not only yourself in this world.
He stopped leaving his room in the shape of an irregular heptagon in the winter of his third year. The first thing he did was attach a night sky film he bought from a DIY store to the aluminum frame of his window. His room was located in the corner of a multi-story building, overlooking the avenue, and the sun shining from the south filled it with bright light all day.
He was pleased with the result: now it was always night outside the window. There was still a lot of time left before dinner, but he went to bed. From now on, if he wanted to sleep, he could sleep as much as he liked. He slept eighteen hours a day, and when he was awake, he looked absently at the window with a picture of the night sky. Thus began his seclusion.
For the first week, his parents didn’t pay much attention to the fact that he didn’t go out anywhere. He was an only child, from a very early age he loved solitude and immersed himself in his games. Studying was easy for him; Apparently, he was very intelligent, and common sense was not alien to him. The parents thought that he simply fell into a slight depression, which often happens during adolescence, and when it passed, the son himself would open the door. But contrary to their expectations, even after a month, the white door of his room still did not open.
The father was busy at work, and the first person who tried to reason with him was his mother. The mother, whose hair was already showing gray, placed a seat cushion in front of the thin door and started talking about the past, recounting in detail her memories of it. About how from birth he was an extremely beautiful child, attracting everyone's attention. About how in kindergarten he was weak and often caught colds. About how smart and smart he was in elementary school.
His mother remembered the name of his classmate, from whom he received his first chocolate bar for Valentine's Day when he was in high school; She also talked incessantly about his first girlfriend, who was the assistant captain of the high school gymnastics team.
He sat on the other side of the white door and listened. Two hours passed and she started talking about his future. Sitting like this, locked up, you can’t solve anything. Someday he will have to go out to people, work and live independently. His parents will die before him, and he needs to get a good education, which will ultimately lay a solid foundation for his future independent life.
He felt that she was saying this because she truly loved him and cared about him; he understood that she was right. If he continued to avoid contact with the outside world while sitting in this room, it would certainly alienate him from his university friends, who had already begun to look for work, and besides, he was sincerely grateful to his parents for everything... In his heart he was very worried, but he could not force move yourself. He couldn’t even reach out to the key that locked the white door from the inside. Then for a whole hour he listened to his mother’s voice, broken with tears. Tears began to well up in his eyes several times, but he never cried. When it got dark, the mother walked away from the door to prepare dinner. He felt completely exhausted, almost crawled to bed and slept dreamlessly for the next eighteen hours.
Almost three months passed in such semi-hibernation. He spent more and more time sleeping, and eventually could only stay awake two hours a day. At this time, at dawn, he, trying to step silently, left the room, quickly took a shower, had a snack and returned to his room. During his seclusion, he became unbearably afraid that his parents would see him. Every morning it was as if his life depended on it. Holding his breath, he ran to the room and locked the key. There he could feel safe. He found himself a little entertainment before bed - TV. He only liked those morning programs that showed nature. He also liked to look at the weather forecast and find out the highest and lowest temperatures for the day.
After periods of prolonged sleep, insomnia awaited him. It wasn’t that kind of insomnia when a person just can’t fall asleep, but he was simply suddenly overcome by a painful need to do something all the time. After reading several books on basic psychology, he realized that such painful conditions were not uncommon. And yet he could not bring himself to go out, to go somewhere. Apparently, something subconscious forced him to stay locked up.
To somehow brighten up such an existence, he began to put things in order in the room. I looked through several hundred books on the shelves. First, he arranged them in alphabetical order by the names of the authors, then by the names of the publishing houses. After that, he arranged the books by release date, then tried the same thing, but in reverse order; then he arranged it by price. It took thirteen hours, but he still couldn't stop. He sorted the books depending on the number of pages then - on whether the last page in the book was even or odd (this turned out to be simple and took about half an hour); arranged in alphabetical order according to the characters of the Japanese alphabet with which the text begins; then in alphabetical order by the last names of the authors, focusing on their spelling in Latin. He then proceeded to arrange the books by the sum of the digits included in the ISBN number, in order from highest to lowest, and then alphabetically by the names of the cover designers. There were an incredible number of ways to arrange books; So he found a new entertainment for himself. It was the twenty-seventh hour since the beginning of work, and when he rearranged half of the books by titles of works in reverse order, he fell asleep.
He had almost as many disks as books. It took a month to arrange the books in different ways, then came a month of sorting the disks. The next month he arranged books and CDs at random. It took three months straight to try different combinations.
Of course, his room was small - only nine square meters, but it was a student's room. There were both summer and winter clothes; there were writing instruments, electrical appliances, and toy cars that he collected. He spent the next six months arranging all these items in different ways. Almost all of his university friends had decided what they would do in the future, and now decided to enjoy the remaining time of their student life to the fullest. And at this time he began to redraw labels from clothes in a notebook and came up with an order - depending on the percentage of synthetic fiber indicated in them. He decided that it would be a good idea to slowly give up natural fabric so that his body could get used to polyester, and then he came up with a new way to arrange books.
That's right, he will arrange books from popular science to fiction, that is, starting with the most natural in style and content. This required re-reading all the books again, but there was plenty of time in the room. He had already noticed: time seemed to have stopped here. It is impossible to measure time that does not flow.
He wore 100 percent cotton pants and a matching T-shirt with a 100 percent wool sweater (forty percent mohair). Then he began to read a book that suited his current preferences - it was as close to nature as possible; it described the life of Siberian tigers. After reading three books, he fell asleep in the afternoon. Sleep, as always, knocked him off his feet. In this short and heavy oblivion, he dreamed: a star sparkled against a dark blue velvet background. The moment he saw this silver star, he was overcome with unimaginable melancholy.
He woke up crying and looked at the window covered with film. The stars scattered across the pale night sky shone differently than the star in his dream. They were amazingly beautiful, but that star was not in his room, where everything was arranged according to his taste. Woke up, he was breathing heavily, his heart was beating rapidly; he thought. He must find that star. It is she who will show him the way.
He was sentimental, as young people tend to be. Loved Jung much more than Freud. Not to say that he was particularly versed in psychoanalysis. His passions were spontaneous and had nothing to do with the adequacy or persuasiveness of scientific theories... From that day on, he began to look for that star.
The first thing he did was touch the window latch on the aluminum frame, which he had never opened all year. Finally plucking up courage, he turned the latch one hundred and eighty degrees... Naturally, the window had not yet opened. He held the latch in this position for only thirty seconds and then closed it. All this time he was not breathing, so his face turned red. His next goal was to keep the window unlocked for forty-five seconds. He noted the time on his wristwatch and again extended his hand to the window. After a week, he could leave the frame unlocked while he was awake.
The first time the window truly opened was on the third day of the following week. For the first two days he unsuccessfully struggled with the heavy frame and even began to doubt whether it was glued on. It was a cold day, drizzling in the morning. And then, from a three-centimeter gap, which he somehow managed to open, a wind blew, touched his nose and seemed to reach his heart.
It should have been a frosty, cold and wet December wind, but the wind was surprisingly mild and fresh. A wind he hadn't felt for a year. He looked through the crack at the gray sky, took a deep breath and closed the window tightly - as if this air was dangerous to life, like a poisonous gas.
Over the next week, he slowly increased the time the window remained open; no matter how cold it was outside, he didn’t care. When he was awake, he stood in front of the wide open window in his outerwear.
The sky of the big city, even on fine days, was cloudy, as if sprinkled with ash. Instead of a horizon, one could see the broken outline of roofs. From the window a covered shopping street was visible, and all the people walking along it seemed to be in a hurry to some specific goal. They moved quickly, without looking around, without noticing him, looking down at them from the window. A year later, he saw his peers again and felt his heart clench in his chest.
The following Monday, he heard that on the shopping street, instead of the previous music, a Christmas melody was being played. He put on a 100% polyester fleece sweater. Looking down, he saw a decorated Christmas tree near the bakery opposite. At the top of the tree, approximately at the height of a man, there was a star made of foil. It flickered dimly against the background of a dark blue poster, just like in a dream. He picked up the wallet, which he had not touched for a year, and headed towards the white door to examine the star up close.
Silver stars on the New Year tree are a tradition. They look magical and festive. The New Year's tree can be decorated with just stars - and it will be stylish.
Or you can hang stars in the house, attaching them to window cornices, shelves, or connecting them into a long wall garland. How to make a 3D, shiny star? Here is just one version, very simple to implement.
Star of Bethlehem
made from A-4 paper (you need about 50 sheets, you can take colored)
Cut sheets of paper in half lengthwise, twist each half into “balls”, coat the edges with glue and roll tightly. Using a stapler, staple 3 “rays” in the form of a fan, and then string the fans onto a thread, pulling them tightly and tying the ends. You should get a star, shaped like a ball. If the paper is white, you can spray paint it.
Preparatory work
The first step is to take measurements and cut blanks from wooden planks 25 cm long. For the star we will need 10 pieces.
The woman with whom Anatoly Kot hid for several years
The famous Michelin restaurant guide will inspect Moscow restaurants in 2022
Young people in Russia are thinking about giving up plastic tableware
Now you need to make cuts in order to connect all the parts in the shape of a star. This is done using a miter saw, but there is one caveat. The cuts must be at an angle of 18 degrees, and the circular saw cannot be set to this mode. Therefore, you should resort to a little trick.
Salt painting
Simple table salt is an unusual material for painting. You can offer this craft to both kids and primary schoolchildren.
You will need:
- cardboard;
- paints;
- sponge;
- pin;
- PVA glue;
- pipette;
- colored water;
- salt.
Progress:
- Use a sponge to paint a sheet of cardboard to your liking.
- Make splashes - constellations (using a brush or toothbrush).
- Use PVA glue to draw the outline of future cosmic figures (planets, rockets, etc.) and fill them inside with glue.
- Sprinkle the picture with salt. Let the glue dry.
- Shake off excess salt from the painting.
- Pour water into several glasses, paint it in each container a different color.
- Use a pipette to collect colorful water and use it to paint the shapes made of salt. Let dry.
More details in the video:
Which foil to choose?
Thin single-layer foil is not suitable for crafts in this case, just like food foil. This material wrinkles too easily. Paper-based foil, which can sometimes be found in office supply stores or where they sell artist supplies, is suitable. The paper layer prevents the foil from creasing, so this material holds its shape well. You will also need PVA glue or double-sided tape, scissors, a piece of paper or cardboard for a template, and a ruler. If you still can’t find paper-based foil in the store, you can buy thin foil, but then you’ll also need a piece of whatman paper or cardboard.
Tags
volumetric New Year's star foil with foil simple from foil and foil with your own Foil and foil with your own hands with your own hands with your own hands with your own hands with your own hands with your own hands Dictionary of handicrafts with your own hands Cardboard Furniture with your own hands Shoes with your own hands Clothes with your own hands Candles with your own hands Bags with your own hands Packaging with your own hands Share your option freely access.Do-it-yourself jewelryDo-it-yourself furniture
decorarticlestoyscommentssummerhousesplasticinewewillgiftscreatesitesimilarallviewreplycontent
Bench made from popsicle sticks
Cut a cardboard blank along the length of the sticks and the width equal to four ice cream sticks.
Apply glue to the blank and stick 4 ice cream sticks on it.
- For the back, do everything exactly the same, but using 3 sticks. Using hot glue, attach the pieces together at a slight angle.
- To make the legs, take 4 sticks. And cut off the semicircular ends of 2 cm. You will get 8 parts. Glue 2 together. You should get 4 legs.
- Using hot glue, glue the legs to the bench so that the semicircular part is on the bottom. Color it in different colors.
Foil card
No matter how far progress has progressed, beautiful cards made with love will forever remain a symbol of a holiday or significant date. Before making a craft from foil, you need to prepare the following materials:
- A piece of rough cloth;
- lemon-colored cardboard;
- foil;
- polymer glue;
- satin light ribbon;
- scissors.
Master Class:
- To obtain the base of the postcard, you need to bend the prepared sheet of cardboard in half;
- cut out a rectangle from foil, the sides of which are 2 cm smaller than the outside of the postcard;
- a rectangle slightly smaller in size than a foil figure is cut out of a rough, textured fabric;
- then alternately glue a rectangle made of foil onto the cardboard base, then a rectangle made of cardboard;
- It is recommended to place a light press on the elements glued to each other until completely dry;
- several flattened balls are formed from foil;
- glue them in the arrangement you like onto textured fabric;
- A beautiful bow is tied from a satin ribbon and glued to the bottom of the card.
The result will be a festive bouquet of shiny balls, which the recipient will appreciate.
Tips from craftswomen
When making fakes with your children, you shouldn’t take everything into your own hands. It may be a little uneven, crooked or askew, but the child did it HIMSELF, with his own hands.
- In the future, he will do better and better, and if you do a lot of the work yourself, the child will lose the desire to do it.
- Also let your child decorate and paint the crafts themselves. Any color, any decoration.
- Over time, he will begin to develop an aesthetic vision and will get better and better.
After you have eaten ice cream, do not rush to throw away the sticks, because it can be given a second life.
The above ideas can be done even by the smallest child, with the help of their parents, of course. From such simple things you can make a lot of useful and beautiful things, you just need to use your imagination.
Such fakes will bring pleasure not only to children, but also to adults.
Foil flowers
Flowers made with your own hands from foil will be a great gift. Fragile flowers made of silver or another shade of foil will look especially impressive in crystal vases. Even a beginner can create such beauty.
Roses
To create foil roses you will need:
- Floral wire;
- foil;
- polymer glue;
- wooden skewers;
- silk threads.
Manufacturing process:
- Cut 9 strips of foil measuring 28x10 cm.
- 8 strips are cut from floral wire.
- Spirals are made from three strips of wire by winding them around a pencil.
- To create buds, take 3 cut strips of 28x10 cm and fold them in half. Gather the lower parts of the parts into light folds.
- The floral wire is applied one by one to the foil elements and, with light movements of the finger, they are wrapped around the wire.
- To create rose leaves, cut 2 strips of 15x5 cm. Then each strip is cut into 3 squares.
- The upper lateral parts of the square are bent inward towards the middle, and the lower part is randomly crushed and twisted into a thin flagellum, imitating the stalk of a leaf shoot.
- The prepared leaves are attached to the stem by twisting around it.
- Wire springs are also wrapped around the stem.
- A bouquet of roses is formed by twisting the stems of the plant.
At this point the work is considered completed.
Lilies
You can weave a spectacular silver lily from foil and present it as a gift to colleagues or relatives. Also, such flowers will organically fit into the decor of your home interior.
Required materials and tools:
- Food foil;
- scissors;
- scotch;
- hard pencil;
- wooden skewers;
- ruler.
Step by step execution:
- On an unfolded roll of food foil, draw stripes 3 cm wide and then cut them out. You will need 1 strip for the leaves, 4 strips for the stem, 5 strips for the stamens, and 15 strips for the petals.
- Take one of the strips and twist it between your palms transversely along its length.
- The crumpled strips produced must be twisted into thin strands.
- To decorate the petals, you need to take three strands and cut them into two equal parts. This should make 6 small bundles. Next, the tails are connected, folded and bent in an arc, giving the shape of a real petal. You will need to make 5 petals.
- To create lily stamens, take a foil strip and divide it into two parts. One part is crumpled and twisted into a wire, the second is crumpled and formed into a small ball simulating a stamen, of which 5 pieces need to be made.
- At the next stage of creative work, you need to collect a flower. To do this, stamens and oblong petals are attached to the stick. Use your fingers to adjust the appearance of the petals, giving them a realistic look.
- To make a leaf, you need to take 1 rope, divide it into three identical segments and twist the tails using the same technology as when creating petals. Then tightly wrap the foil stem with a tourniquet and fix the leaf.
- The stem must be wrapped with foil flagella to the end. Then the buds and leaves are straightened.
The lily is ready and you can give it as a gift.
Foil figurines
A special property of metallized paper is its ductility when curled. Preschoolers and elementary school students can make little figures of men.
To make this craft you will need scissors, a sheet of silver foil and a great desire to bring the images of your favorite characters into reality.
Work progress:
- Cut strips of foil 10 cm wide and 40 cm long;
- twist each strip one by one, avoiding damage to the ornamental material;
- the formed tubes are bent in half;
- a man’s head is formed in the fold area;
- to create hands, bend the ends of the tube symmetrically;
- the free ends are twisted, forming a body 3-5 cm in size;
- twist the waist;
- on the last step, bend your feet.
An easy craft made from foil is ready. A young craftsman can make knights, trapeze artists, pedestrians and have fun playing.