Photo: podarokvtochku.ru With a key holder in the hallway, you will forever forget about the keys lost somewhere in the apartment. You will no longer have to urgently search for them in all the nooks and crannies 15 minutes before leaving. And your beloved pet will definitely not drive them under the refrigerator or behind the sofa. Finally, order will reign on the table with small change, cards and wallets. Moreover, you can make a beautiful wall-mounted key holder with your own hands!
Plywood key holder
From a sheet of plywood with a thickness of 0.5 cm you can make almost any wall-mounted key holder. You only need a stencil to cut out the desired shape, and a tool for this. By the way, the back wall of old chipboard furniture is perfect.
While you are cutting, the plywood may crack and the edges may break off, but all this can be fixed with a special wood putty. After this, be sure to prime the base so that the paint adheres better, and you can decorate it at your discretion.
Photo: tytpodelki.ru Photo: klyuchnitsa.rus
Advantages of making your own key holder
Having a housekeeper for the hallway with your own hands has the following advantages:
- Its size, shape and number of hooks - all these parameters fully correspond to your taste.
- Its creation requires a creative approach and the absence of restrictions in actions.
- Its production will cost much less than buying a store-bought product.
- Possibility of adjusting the accessory if you decide to change the style of the corridor.
- The ability to give the interior of a room an unusual and interesting look.
Slab key holder
Slabs, or simply cuts, are now very popular in all eco-interiors, Scandinavian style and lofts. To make an effective wall-mounted key holder, you will need a saw cut, a hard metal sponge, sandpaper, tinting or stain, acrylic varnish, as well as several hangers for fastening and the hooks for the keys themselves.
Work the slab along the grain first with a hard sponge and then with sandpaper so that the texture of the wood appears even better. Using a regular wide synthetic brush, apply alcohol or water stain in several passes. After drying, you can transfer the drawing from the printout onto the wood using the decoupage technique.
Cover everything with acrylic varnish on top to secure the result. The key holder will fit more tightly to the wall if you make several fastenings. Do not screw too many hooks onto one saw, otherwise you will constantly catch other ties while removing the one you need.
Photo: pinterest.de Photo: build-together.ru
Photo: pinterest.ru
Technology of weaving from newspaper tubes - tips
Each business has its own subtleties, much depends on what kind of paper you will use to weave the key holder.
Types and thickness of paper used in weaving:
- Newsprint and booklets - density from 35 to 60 g/m2.
- Colored paper (sold in sets) – 40-50 g/m2.
- Glossy (magazines, booklets) – 80-300 g/m2.
- Consumer (gray shade) – 40 g/m2.
- Cash register tape – 50-55 g/m2.
When weaving paper tubes, it is important to know what kind of paper is best to use, that is, the difficulties in working and the type of product itself depend entirely on the density of the paper.
How to choose paper
It is believed that the best paper for working with tubes has a density of 35 to 55 g/m2. For example, the tubes made from office paper are rigid and not easy to work with. Strips for weaving are cut in the direction of the grain! Only in this case will they curl well.
How to find out the direction of the fibers - you need to take a sheet of paper or newspaper and try to tear a long strip from it. If the strip comes off smoothly and not in a zigzag pattern, this will be the correct direction of the fibers.
What tools are needed to work with straws?
Don’t be alarmed, weaving from newspaper tubes is a type of needlework that does not require special tools. It is enough to have a metal knitting needle 1-1.5 mm thick, a stationery knife, several brushes, a sponge, PVA glue or a glue stick (many people use Moment Carpenter Super PVA glue), and something with which to paint and varnish the product. You can do without a varnish coating, but it is needed so that a product such as an owl key holder has a margin of safety. The varnished key holder is not afraid of moisture and has an attractive appearance.
How to make straws - master class
We recommend that you first try to weave a key holder from newspapers. This is a good opportunity to try your hand at this craft without spending extra money. And, besides, newspapers themselves are soft, pliable, weaving from them is convenient and not difficult. And the tubes themselves are of great length - the product will turn out neat. But there is one drawback - newspaper font, that is, printing ink, greatly stains your hands and the surface on which you are making tubes - lay oilcloth or polyethylene on the table.
So, we cut the newspaper into strips 8-9 cm wide, having previously learned the direction of the fibers. We place the knitting needle on the tip of the newspaper at a slight angle. The length of the tube depends on the angle at which you place the knitting needle. The larger the angle, the shorter the tube.
Next, with your right hand we begin to twist the tube away from you. We work with our right hand, and with our left we help to rotate. The main thing in the work is to twist evenly along the entire length.
We twist, helping ourselves with our fingers.
At the end, drop a drop of glue onto the “tail” of the strip and press this place with your finger to the tube.
That's all. The tube is ready. We take out the knitting needle and leave all the tubes overnight so that the glue dries. And only after that we begin painting.
On the video - how to make tubes from newspapers, 3 ways:
How to twist tubes from newspapers. Instructions for beginners!
How to paint tubes
There are many ways to color tubes. Here is the most popular one. We will need PVA glue and water-based stain. We take the tubes and cover them with a primer (mix ½ cup of PVA glue and ½ cup of water equally), leave to dry overnight. Then we take a water-based stain and cover the tubes with a brush and stain.
We send it to dry. If the color is too pale, repeat the painting. The disadvantage of stain is that the newspaper text is not completely painted over.
If you didn’t buy stain, it doesn’t matter, you can paint with what you have in the house: iodine, hair dye, gouache, car paint, green paint, coffee, food coloring. Don't forget to dry thoroughly after painting. After this, you can safely make key holders from newspapers.
The video shows how to paint paper tubes:
Weaving from newspapers: how to paint tubes with stain? (my experience)
KEY HOUSE “HOUSE WITH A BALCONY” made of paper tubes.
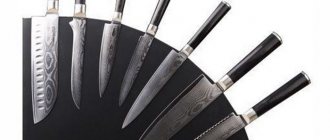
Key holders made from cutlery
Very impressive and unusual key holders are made from old forks and knives. In addition to these, you will need fasteners, pliers and, if desired, paint for decoration. You just need to beautifully bend the devices, like hooks, and fix them on the base or directly on the wall. Instead of a base, we offer a wooden kitchen board - a spectacular addition to Provence!
Photo: s3.amazonaws.com Photo: pinterest.fr
How to make an ottoman with your own hands: 8 stylish ideas
Key holder from a photo frame
A wide, beautiful photo frame can be turned into an equally impressive key holder with minimal effort. As a backing, use a sheet of plywood, which can be painted, decorated with decoupage, or covered with fabric. Screw spectacular decorative hooks randomly right in the center of the improvised panel.
Photo: samodelino.ru Photo: samodelino.ru
Variety of hooks
If the amount of construction accessories you see makes your eyes run in different directions, don’t limit yourself. Buy ready-made furniture hooks of different shapes and colors and screw them using small self-tapping screws onto one surface (optionally, onto a wooden cutting board).
In this case, you don’t need a strict checkerboard order; place the hooks randomly, but still take into account the length of the keychain so that they don’t get confused later.
Closed key holder
An old unnecessary box is an almost ready-made closed key holder with a door. If it already has a latch or fastening, then all that remains is to screw small hooks for keys inside and hang it on the wall. Aging the mini-wardrobe by hand, paint it, decorate it with decoupage or paste it with old wallpaper. Painting with a dry synthetic brush shows up interestingly on wood - it looks careless, but stylish, and emphasizes the texture of the material.
Photo: handhobby.ru Photo: asusfone.ru
Variant of their traffic jams
If you have wine corks lying around your kitchen, don’t rush to throw them away. They can serve as material for a key holder. Here are the instructions:
- Cut out the fiberboard base.
- Cut the corks in half and glue them to the plate, maintaining a minimum distance.
- Install hooks.
- Hang the accessory on the wall.
Note!
Corrugated paper flowers: TOP 100 photos of ready-made options + instructions on how to make them yourselfDIY family tree: instructions for creating a family tree + DIY design ideas
- Do-it-yourself sun lounger: photos with instructions for creating sun loungers + detailed diagrams of the stages of work
The key advantages of this type of cork decor are functionality, originality and environmental safety.
Key storage is a practical and useful thing. There is nothing complicated in creating it yourself, because the Internet is full of detailed master classes on making key holders with your own hands.
In addition, the design process will take very little time, and the end result will fully repay the invested effort and money. Therefore, if you are free, then it makes sense to organize a similar solution in your corridor.
Key holder organizer
Using the same principle, you can turn a drawer divider organizer into a spacious key holder with different sections and small shelves. Just choose a material that is dense enough so that it does not deform under the weight of the keys. And all that remains is to attach it to the wall and screw in a few hooks, or simply drive in nails with neat heads.
Photo: pinterest.ru
Photo: tlife.gr
10 best ideas on how to decorate a room for the New Year
Sticks and knots
Nature itself will give us ideas on how to make a key holder. An ordinary stick with wire wound around it, bent in the form of hooks - why not an option?
You can bring a stick from a walk; you can probably find some wire on the farm. You can leave the stick in its natural state or remove the bark and sand it down a bit.
If there are children in the house, you can invite them to paint different pieces of stick with gouache so that each family member knows which hook is for their keys.
If you wander through the forest, you will pick up a lot of sticks with a nose, like Pinocchio. By sawing off small sections from different branches with knots, you can assemble a whole panel by screwing them onto the finished board with self-tapping screws. Sand the sharp edges of the knots with sandpaper so that you don't get scratched when rushing to work.
Key holder made of tree branches
If you love eco-style, we have another option for you - a durable and fairly wide dry branch. Such a key holder will always be unique, because identical branches do not exist even on the same tree. You can save the bark by sanding only the damaged areas.
As with cutting, we recommend covering the branch with stain - it will emphasize the texture and give the tree additional protection. Also, be sure to varnish, even when saving the bark - use sprays for convenience. Screw the hooks in separately or use twigs and twigs instead.
Photo: moy-city.ru
Photo: berkem.ru
Magnetic key holder
Don’t want to drill into the walls, but double-sided tape doesn’t hold a heavy key holder with bundles well? There is an alternative option - glue a fairly strong magnet to it. And then you can attach the accessory to metal pieces of furniture. Or maybe you still have a refrigerator in the hallway from old memory? Then a practical magnet is definitely your option!
Photo: podarkionline.com.ua Photo: fastbox.su
Key holder with shelf
To combine useful things with useful things, combine the key holder with a shelf - and you can immediately put your wallet, business card holder or sunglasses on top. You will again need a sheet of plywood or chipboard, self-tapping screws and a screwdriver, the hooks themselves and, optionally, corners for mounting the shelf.
Photo: guardebem.com
Photo: loudounballet.org
How to make a dressing room with your own hands?
Lego key holder
An old construction set just as easily turns into a convenient, practical key holder - to the delight of children and all household members. If the parts hold tight enough without glue, make keychains out of them - and you won’t even need to screw in the hooks.
Photo: podelunchik.ru Photo: moy-city.ru
Picture frames for the key holder
You can also make a key holder from a picture frame. Using a stapler or glue, you need to attach a piece of hardboard to the back of the frame, which will be used as a base.
The inner surface of the frame can be treated as you please: paint it, glue one-color paper or a drawing. Depending on the type of keys, the hooks must be attached either to the frame itself or to its inner surface.
DIY key holder for the hallway - photo
You don't have to limit yourself to just these ideas! Use your imagination, experiment with materials and get inspired by our selection of photographs!
Photo: yastroyu.ru
Photo: severdv.ru Photo: anti-bankir.ru
Photo: mastersamodelok.ru
Photo: tytpodelki.ru Photo: severdv.ru
Photo: mebel-v-nsk.ru Photo: handhobby.ru Photo: pinterest.ru Photo: mykaleidoscope.ru Photo: livemaster.ru
Photo: liveinternet.ru
Photo: telegraph.co.uk
Photo: ideas.homechart.ru
Photo: livemaster.ru Photo: jamaster.ru
Photo: severdv.ru
Photo: urokirukodelie.ru Photo: vasyaznaet.ru
Photo: uniformatecolombia.com Photo: asusfone.ru Photo: pinterest.ru
Photo: mebel-v-nsk.ru
Photo: fb.ru Photo: pinterest.com