Drywall is a very popular material for interior decoration. Non-flammable, lightweight, waterproof, inexpensive, supplied with fasteners, it is used both for wall cladding and for leveling the ceiling. Moreover, in the latter quality it is much cheaper than tension.
There is only one problem - it is inconvenient to install drywall on the ceiling alone. But over a long period of using this material in the cladding of premises, a number of techniques have been developed that can be used by one person to install plasterboard on the ceiling. Thereby saving money and not hiring a whole team for such installation.
How to attach drywall to the ceiling without help
To work on attaching material to the ceiling without assistants, you can use:
- lifting mechanisms of varying degrees of complexity;
- spacer system;
- goats;
- suspensions, brackets;
- self-tapping screws;
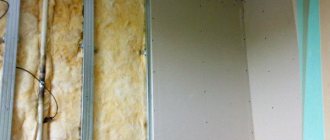
If the entire room, including the walls, will be covered with plasterboard, the ceiling is done first. Because many methods of fastening the material alone involve screwing sections of profiles, corners or wooden blocks 1-2 cm below the expected ceiling level as one of the stationary support points for the sheet. Inevitably, the holes made for this purpose in this way will later be hidden under sheets of drywall, which will be hung on the walls and will hide all temporary fasteners and traces of them.
Fig. 1 Homemade device for installing gypsum boards to the ceiling
The same plan may also include the development of a device for screwing sheets of drywall onto the ceiling alone (Fig. 1), or the inclusion in the plan of such a device taken somewhere on the side.
When deciding how to screw drywall to the ceiling alone, you need to choose the method of this fastening. That is, choose the drywall fastening:
- On a metal frame.
- On a wooden frame.
- Using glue.
Fig. 2
It is best to attach sheets of plasterboard to a metal frame In addition, in a room with such a ceiling, some significant fluctuations in relative humidity levels are allowed. In most cases, such ceilings are made of concrete floor slabs tightly joined to one another, and often these slabs do not lie in the same plane, forming ledges.
The use of a metal frame made of profiles allows you to level the supporting area by placing pieces of some material under the profile.
Method of fastening gypsum boards using
wooden lathing for fastening plasterboard sheets (GKL) when the ceiling itself is wooden. Thus, the difference in linear expansion from changes in temperature and humidity of the ceiling itself and the sheathing attached to it disappears. You just need to remember that these movements of 2-3 mm (and they are larger, the larger the area of the ceiling itself) will require an indentation from the walls of the plasterboard sheets attached to it. If there is no such indentation, the sheets may be squeezed out and deformed. In addition, it makes sense to upholster or cover the wooden surface of the ceiling with a membrane material before laying lathing on it to prevent condensation from settling on the wood.
GKL is attached to the ceiling with glue in cases where the ceiling is concrete, dry, located in a room where there will be no sharp fluctuations in temperature and humidity, and is level. And to press the sheet against such a concrete base, there are devices that resemble long mops with additional crossbars stuffed onto T-shaped crossbars. In addition to such “mops”, other devices are also used for installing drywall on the ceiling.
Installation of gypsum boards
Even if you cut the plasterboard sheets, it will still be inconvenient to lift and attach them to the profile. An excellent solution to this issue is to use a support or even not one, but two. Its task is precisely to press the sheet against the profile while you screw it. The simplest solution is to make such supports yourself. It is easier to do this from wooden slats.
The store also offers such supports, but if you don’t need them later, it’s easier to assemble them yourself. Usually they are knocked down from old door shutters, baseboards, platbands and other material that remains after repairs. The main requirement for them is stability. Do not use material that is too fragile, rotten or rotten.
Screwing gypsum boards to profiles
To make the process of installing plasterboard sheets as easy as possible, consider the following recommendations:
- use a special mounting belt to attach a screwdriver or drill;
- use attachments with a magnetic tip, this will simplify some tasks;
- When choosing a power tool, give preference to a battery-powered screwdriver rather than a corded one.
- There is a pocket for screws in the mounting belt, use it.
Method of fastening plasterboard boards with self-tapping screws
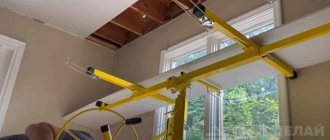
Fig. 3 Installation of gypsum boards alone from a trestle (scaffolding) using the head as a fulcrum.
This method of installing slabs requires reliable, stable trestles that will not wobble under the weight of the body and when the installer moves around the site of these trestles (Fig. 3). The dimensions of the platform should be comparable to the dimensions of a sheet of drywall minus half a step along the long and short sides - such a margin for raised and outstretched arms is quite enough. The height of the trestle with the platform for movement laid on them should be such that a sheet of drywall raised above the head is placed on half-bent arms, and the distance from the top of the head to the ceiling is 10-12 cm.
Carrying materials into multi-storey buildings
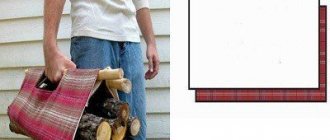
If you live on the upper floors of an apartment building, then the first thing you will encounter is the question of how to bring a sheet of plasterboard into the apartment. This material is 1.2 m wide and 2.5 m high. And regardless of its thickness, it does not fit into an elevator, even a freight one. If we talk about climbing staircases, this option is also inconvenient, since the material barely fits on the landing. Lifting will damage the corners of the drywall sheets, or leave marks on your neighbors' doors.
There is an option to hire people who would do this for you, but since we are talking about how to do it yourself, we offer the following solution: having bought a stationery knife at the store, cut the sheets of drywall in half with it. This size will no longer be a problem to transport material in an elevator. The main thing is not to overdo it with the quantity, otherwise you will overload the elevator and get stuck in it. It is easier to press half sheets of 1.25 m in size to the ceiling than whole ones.
Bringing plasterboard into an apartment on a high floor
Of course, such a decision will oblige you to perform additional work during installation and puttying. Additional profiles will have to be installed in the ceiling frame to stiffen the sheathing. And when performing putty, you will have to process the extra joints, pre-reinforcing them with serpyanka.
When dividing the sheets in half, make the cut efficiently and evenly. Otherwise, you will later encounter a lot of inconsistencies during the installation process. For a quality cut, use a straight edge. In its absence, a building level will do.
This type of solution will facilitate the installation of the ceiling, but will increase the cost. However, this will not affect the quality of the finish.
Using brackets and hangers
Attaching drywall to the ceiling alone using hangers and brackets also requires stable trestles with a level platform.
Take 2 pieces of a U-shaped profile from those that make up that part of the metal sheathing called the “guide profile”, which is attached along the perimeter of the room under the ceiling and has side dimensions of 60 x 27 mm. The length of such segments should be 120 - 123 cm, that is, slightly larger than the width of the gypsum board. But at one of the ends, at an angle of 90 degrees, a hook from a piece of the same profile is attached to self-tapping screws. And the other end is drilled out for two more screws, and the crossbars 27 mm wide are cut to a base 60 mm wide, for free bending. (Fig. 5)
Fig.4
Due to some flexibility of the metal at the end of the section of the profile opposite the profile hook, you can snap this hook onto the sheathing strip on which the opposite edge of the plasterboard sheet will be located. What does this give? Bent back from engagement with the bar, the segment will hang freely on two screwed-in screws at the other end. A sheet of drywall is slipped under the place where the profile is attached using two self-tapping screws, and the opposite end of the sheet is held in the meantime by the installer’s hand.
Three support points, two under the profile and one by hand, are quite enough for the stability of the structure being held. After lifting the two profiles hanging freely on the screws, they are snapped with a bent profile hook onto the opposite guide profile. The plane of the sheet hanging at some distance can move back and forth until it completely coincides with the markings or with the previously installed sheet. For precise fixation according to the drawing, you can secure this sheet with two clamps, and begin screwing it to the sheathing after that. Then it will not be difficult to screw this sheet, breaking through the gypsum plasterboard and the ceiling sheathing, and pulling them together.
There is another method, a similar method of fastening with self-tapping screws, only instead of their heads, scraps of a metal corner from the sheathing, a U-shaped profile, or even wooden blocks are used as support points. The length of all listed elements is 15-20 cm, quantity is 2-3 pcs.
They are screwed about 2 cm below the ceiling frame for installing drywall. The gypsum board is lifted and placed on one side on these supporting blocks or profile sections, leveled, and the opposite edge of the sheet, held by hand or supported by the head, is screwed with a metal screw (if the sheathing is made of metal profiles) or with an ordinary wood screw if the sheathing is made of wooden bars.
Performing markup
As for marking alone, the best solution is to use laser levels. With their help, you can mark the required plane without any problems. If you don't have one, use a long level. Preferably longer than 2 meters. With such a tool, marking accuracy will increase. When working with classic levels, the measurement error can reach 2-3 cm. Therefore, when using, turn the tool over and mark on its two sides. This will increase accuracy.
Performing markings for ceiling installation
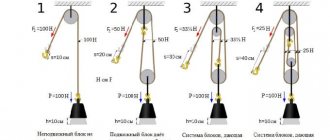
Telescopic lifts
Fig.5 The most technologically advanced option, but expensive.
There are several types of devices of this kind, but no matter what principle they work on, they have one thing in common - a very high price. The most expensive ones are with hydraulics, working on the principle of a hydraulic jack. Alternatively, a telescopic lift as a device for attaching drywall to the ceiling alone may not be hydraulic, but with a worm gear, the rotation of which moves the rack. It is unlikely that anyone can afford such a device when installing plasterboard on the ceiling, unless, of course, such a lift is rented for a limited time, for 1-2 days.
Subtleties and nuances of self-installation of a plasterboard ceiling
When working with drywall, everything turns out quite easily, even if you don’t have much experience in this matter yet. But there are several problems with this material - it is quite fragile, and when using large sheets it can break, in addition, the sheets themselves are heavy, which makes them difficult to install on high surfaces.
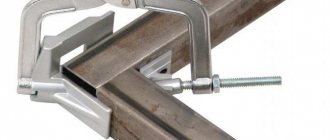
Small parts made of gypsum plasterboard can be screwed to the base using a couple of clamps.
The photo shows how everything needs to be secured.
The load-bearing parts of the base must be positioned taking into account the layout of the gypsum board. The joint of the sheets must be on the profile flange so that they can be secured. Leaving joints “in the air” is highly discouraged. If you intend to make an arch, then you can try to bend a sheet of standard thickness by making cuts on it, or moistening it with water, having previously treated the surface of the sheet with a needle roller.
But this method does not always give the desired effect - the sheet can easily break. To prevent the screws from going too deep when tightening, damaging parts, you can use a special screwdriver attachment that will prevent the screw from going too far into the material.
Glue mount
In order to install sheets of drywall with glue, the surface of the ceiling must be reliably cleaned of traces of plaster, whitewash, paint or wallpaper. That is, the base should be clean bare concrete. The suitability of the surface for pasting with sheets of plasterboard is checked simply by running over it with a clean, dry hand. If there is no dust on your fingers, you can glue.
The glue chosen is “liquid nails”, preferably quick-drying brands like “Moment”, or gypsum assembly adhesive. It is applied to the surface of the sheet in voluminous plaques with a diameter of 2-3 and a height of 1 cm. The glue is “snake” over the entire area of the sheet.
Then, one mop with additional crossbars at the T-shaped end is leaned against the wall from which the panels will be faced, and the gypsum board is placed on it. Then, holding the free end of the sheet with your hand, a similar T-shaped structure is placed under it. The lengths of the poles are selected in such a way that from floor to ceiling the pole, resting its T-shaped end on the sheet and the pole on the floor, stands almost vertically. But it’s “almost” - so that reliable wedging of the sheet between the support areas of the “mop” and the ceiling is achieved. However, even if you make a mistake and make the pole length insufficient. You can always place a wooden block or a wooden wedge under its end near the floor.
The structure is sometimes reinforced with a third element, especially if wide sheets are used for installation. And keep the sheet pressed until, according to the instructions for the glue, the gypsum board is reliably glued to the ceiling surface.
When attaching sheets of plasterboard to the ceiling with glue, it is important to have ceiling tiles that are even across the entire area. If there is a horizontal shift between them relative to each other, the difference must be leveled by applying a layer of putty. This is especially important if the light from the window sliding across the ceiling is directed perpendicular to such an uneven joint.
Defining features of gypsum board
Gypsum plasterboard includes gypsum filler with various binding additives and facing layers of cardboard. The weight of one sheet ranges from 12 to 35 kg depending on its thickness: 6 mm, 9 mm and 12.5 mm.
The widespread use of the presented material is due to a number of important advantages:
- the ceiling surface will be perfectly flat;
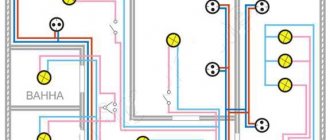
- providing opportunities for placement and subsequent hiding of communication systems;
- providing heat and sound insulation;
- use in different types of premises due to the variety of types: classic, fire-resistant, moisture-resistant and universal;
- ease of installation;
- implementation of complex design projects to create multi-level ceilings and unique lighting systems.