Good afternoon - today we continue the theme of autumn crafts made from natural materials. And today we will make A LOT OF APPLICATIONS from dry leaves, herbs and flowers. “Paintings from leaves” with you . And in this article I will show you different floral examples of flower paintings ... so that you will be INSPIRED and eager to make the same works of floral art. I will also tell you HOW TO DRY flowers , herbs and leaves CORRECTLY (three drying methods).
So let's get started.
Features of creating paintings
Creating compositions from dried flowers belongs to the decorative style of floristry. This does not require special skills or expensive materials. The raw materials will be gifts of nature that fit on a flat surface. These can be dried plants, seeds, flowers, petals, stabilized moss.
The panel assembly process is very simple. Dry plants are laid out on canvas or paper, forming a harmonious composition. For fixation, glue is used, in some cases double-sided tape. This picture is left to dry. After which it is placed in a frame under glass to extend its service life and prevent the accumulation of dust on the inflorescences. Despite the simplicity of working with dried flowers, the technique of creating oshibana panels has some secrets.
DIY wall Christmas tree
The simplest option for creating a Christmas tree product is a flat panel on the wall. To create the decor we will need:
- Branches of different sizes so that they gather into a kind of triangle. You can use rods covered with bark or smooth, water-sanded sticks, varnished while maintaining the natural texture, or whitened.
- The cord is 2 herringbones long, + 40-50 cm for forming a loop and fastening points.
- Christmas decorations, garlands, dried orange slices, cotton flowers, etc.
Twist the loop in the center of the cord and secure it with a knot.
We tie the shortest stick in the center - the top of the tree. Next, we direct the cord in two directions.
We tie each subsequent stick, retreating 2-3 cm from the edges. We keep the same distance between them.
After securing the last branch, cut off the remaining cord, if necessary, singe the ends.
We hang the Christmas tree on the wall, decorate it with toys and garlands at our discretion.
In the same way, you can assemble a flat Christmas tree on a leg to place it on the table. The base can be made from a piece of a thick branch 8 cm in diameter. This will balance the product.
We drill a hole in the improvised stump for a branch-trunk and glue it there. The twig rods can be glued with polyurethane glue or secured with a construction stapler.
Methods and rules for drying plants and flowers
Proper preparation of plant materials is one of the main points when collecting panels. Care must be taken to ensure that leaves, individual flowers, and bouquets retain their natural texture, color, and given shape for a long time. The duration of preservation of their color depends on the type of plant. Roses, dahlias, asters, and peonies will remain bright the longest. Pansies, nasturtiums, and succulents will quickly lose their natural color. It is better to store dried flowers in airtight containers made of glass or metal. Plants fade when exposed to sunlight, so they should be kept in a dark place. This rule also applies to finished panels.
Press drying
The easiest way to dry specimens is to place them under a press or in a special herbarium folder. If there are few decorative elements, they can be dried between the pages of a simple book. In addition, use office sheets, tracing paper or rice paper. The layers will protect the flowers from contact with printing ink. This method is only suitable for flat decorations.
First you need to prepare the sheets. Cut the A4 sheet in half and fold it into an envelope. We record the date of drying, location of discovery, and type of plant. We cut a leaf or flower, give it the desired shape (bend the stem, make slits). We put the raw materials in the pockets, straighten them and press them down a little. Place the envelope in the book and press down with a press.
If you need a lot of dried plants, you will have to use a special press. You can buy it in a store or make it yourself. We lay out flowers and leaves on a large piece of plywood or cardboard. Can be done in several layers. Then cover with a sheet of paper, cardboard and install the press. After 2-3 days, the layers need to be changed. Depending on the type of plant, it will take 5-20 days until it dries completely.
Hot express drying
To prevent the raw material for the panels from losing color and becoming dull during drying, it must be subjected to heat treatment. Young plants have the brightest colors. Before thorough drying, they must be ironed into the desired shape. The blanks are placed between two sheets and ironed with a hot surface until the moisture completely evaporates.
Several methods are used for quick drying. One of the simplest and most effective is moisture loss in the microwave. This method is suitable for flowers with a large number of petals (calendula, peony, dahlia). The plants are laid out on a plate, a container of water is placed next to it so that the floral decor does not fade, and the timer is set for 2 minutes. If the petals are not dry, you can roll them in a hot environment for another 1 minute. The degree of drying should be checked with a toothpick.
Drying in bouquets
Flowers or leaves are cut along with the stems and collected in bunches. It is better to tie with strips of thick fabric or twine. Such bouquets are turned upside down with buds and hung in a dark place. They should not touch any surfaces or each other. The same is done with single flowers on stems.
Bouquets of spikelets and fresh wildflowers can simply be laid out on paper in the open air. For bright and voluminous buds, a darkened room will be required to completely prevent them from fading. The drying process may take several days. During this time, the plants will lose moisture and decrease in size.
Volume drying
The main advantage of this method is the complete preservation of the appearance of the leaves or buds. In some types of plants, the natural color is perfectly preserved, and the green petals become more saturated and do not wrinkle. Volumetric drying takes place in several stages:
- We cut off the buds in dry weather. Carefully separate from the stem, maintaining 2 cm at the flower head. We insert a small piece of wire into the process;
- We prepare a container with a bulk substance that absorbs moisture. You can use semolina, salt, flour;
- Place the flowers, base down, on the bottom of the box. Carefully add desiccant, separating each petal. Close the lid and send to a dry, warm place;
- After 3-4 days, you need to check the degree of drying of the plants. To do this, lightly press the petals with the side of a toothpick;
- If the edges of the flower heads become hard to the touch, they can be removed. Using tweezers, we take out the buds one by one, blowing off the remaining bulk substance;
- We connect the buds to the stems using wire.
If the volumetric drying container is large and does not have a lid, it must be placed in a well-ventilated area.
Option No. 7. Decorating an old screen with branches
To give a second life to an old screen, follow the simple step-by-step instructions below.
Original screen decor with branches
To work you will need:
- the screen itself;
- white acrylic paint;
- lace fabric;
- varnish;
- stapler;
- tassels;
- branches;
- scissors;
- heat gun.
Photo of the screen before work
Tools and materials
Step 1. First of all, remove the fabric from the screen. Wooden elements are coated with two layers of acrylic paint, after which you need to wait for it to dry completely.
Painting wood
Step 2. Next, apply a layer of matte varnish.
Application of matte varnish
Step 3. A piece of fabric is attached to the screen using a mounting stapler. The fabric should be taut so that it doesn’t end up sagging.
Fixing fabric with a stapler
The fabric is fixed on the screen
Step 4. The branches are attached to the frame using a heat gun.
Attaching branches to the frame
Step 5. If desired, you can additionally use cones of various sizes and thin twigs.
If desired, you can use thinner branches and cones of different sizes
Another photo of the process
Step 6. The finished screen will decorate any room and will definitely attract the attention of your guests!
This screen will decorate any room
Types of flower panels
With the help of wall compositions made of dried flowers, you can decorate not only the interior of the house, but also an office space, a store's sales area, or a gazebo on a personal plot. An art object using the oshibana technique can be three-dimensional or flat. The shapes and colors of plants are as close as possible to the natural varieties growing in nature. Some plant material can be replaced with artificial raw materials.
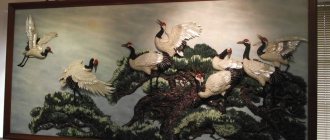
Volumetric
Dried buds and bouquets of plants that retain their shape are suitable for creating such paintings. Flowers and leaves can be secured on cardboard or burlap. Such works look original and unusual on a flat wall. Volumetric compositions are unique because they are always done by hand.
A flower panel can be safely placed in any room of an apartment or country house without fear that the craft will be harmful to health or release harmful substances. All components are natural and environmentally friendly. A creative three-dimensional panel is a great gift. The painting will create a certain image in any room.
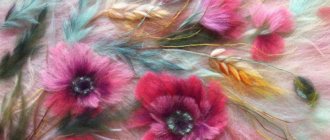
From pressed dried flowers
Flat appliqués are the easiest way to create a panel of dried flowers. In addition to inflorescences, seeds, leaves, and curved shoots are suitable for paintings. You can lay out absolutely any composition on thick paper. Sometimes plants are laid out on a prepared base, painted with watercolors and covered with fabric.
Plant painting can be very difficult to do. Some master classes describe creating panels using cut-out images from leaves. This requires special patterns, a sharp stationery knife and absolute precision. Such a fragile pattern is laid out on the surface with tweezers and covered with a special film.
How to zone space using branches?
As mentioned earlier, ideas for crafts made from branches are not just about small decorations. If desired, you can make tall compositions, with which you can divide the room into several functional zones.
Such crafts can also be used for zoning
To separate the living room from the bedroom, thick and tall branches of bushes are often used, fixing them in holes on a wooden stand. The result is an openwork partition that allows light to pass through and takes part in zoning.
Photos of crafts made from branches
Choosing a base for the panel
Compositions made from dried flowers are very light and small in size. They will be located on the wall in a vertical position, so they must be securely attached to the base. For small applications, choose thick cardboard. It has excellent adhesion to all adhesives and is easy to process with paints of any composition.
If the panel will be covered with glass, use plastic or wooden frames. Dense bases will easily withstand elements that weigh down the composition. Influenced by the eco-trend, many craftsmen use burlap to create wall decorations from dried flowers. The texture of the material allows you to use not only glue, but also thread and wire to attach flowers.
Various materials are used as backgrounds. It could be a sect, fabric, paper, leather, a piece of wallpaper. They can be left in natural color or painted with paints. Dried leaves can also be used as a base. They are laid out on the surface, overlapping each other.
Frame for photo or picture
For the product we will need:
- White cardboard 2 sheets
- Polyurethane adhesive such as Strongman or Dragon
- Branches along the width of the future frame
- Photograph or drawing.
You should show your child how to measure the same distance from each edge of the cardboard sheet so that he can outline the frame.
The next step is best done by an adult. Use a utility knife to cut out the resulting window. We get the basis for attaching the twigs.
It is better for an adult to adjust the branches to the intended size. The frame can be made of short or long sticks, alternating them in a certain order. You can trust your baby to pick up and arrange twigs - an excellent exercise for fine motor skills.
We apply glue to the first rod from the bottom side and secure it to the cardboard base. Apply glue to subsequent sticks from the bottom and sides, which will be in contact with the previous rod. We cover the entire surface of the cardboard base.
We attach a photo or drawing to a single sheet of cardboard, and glue the finished frame on top.
Examples of decorative panels made of dried flowers
Paintings of dried flowers and leaves occupy a special place in floral art. A wide variety of natural materials allows you to create original paintings on any theme. Creating unusual panels will not be a hassle. Even novice craftsmen can make decorative wall crafts if they strictly follow the tips and rules of the master classes.
Required materials and tools
To create a floral collage, first of all, choose the base. If this is a simple miniature craft for school or kindergarten, a cardboard sheet of the desired color will be enough. For large and complex panels, it is better to use a wooden or plastic base covered with fabric or burlap.
Only natural dried plants are used as materials. All plant components must be prepared for display and processed according to plan. To work you will need the following tools:
- A simple pencil and a sheet of paper to create a sketch;
- Scissors or a sharp stationery knife;
- Tweezers for ease of laying out dry material;
- Transparent glue that will not leave marks after drying;
- Brushes for paints and adhesive mixtures.
Green leaf paintings
You can create stylish decor from the simplest green leaves. There are many ideas and master classes for making such apartment decor. For the panel you will need a large beautiful sheet of paper, an A4 photo frame, scissors, and double glass.
Parts of the shoot with pronounced protrusions can be used as the main material. It is better if the indoor plant is mature and large, then the leaf will be well formed. We find and cut off a suitable specimen. Bend each leaf at an angle of 45 degrees. We intertwine them one by one, starting from the bottom. You can use the standard weaving technique or come up with your own style for the future painting. We place the composition between two glasses, remove the stem and fix it in a frame.
Another original phyto-idea for a green picture is also related to weaving. To do this you will need several large leaves. We cut wide strips of them and lay them overlapping on paper, trying to alternate the type of plant, texture, back and front sides.
Panel in autumn style
An excellent decoration would be a panel with an autumn theme. The bright, rich colors of the golden age will create a stunning mood at any time of the year. The main raw materials will be dried yellow leaves of different shades, several small twigs. You will also need a wooden board for the base, stain, black felt-tip pen, glue and brushes.
First we prepare the base. We treat the board with stain and leave to dry for several hours. Draw a large maple leaf on paper, cut out the template and transfer its outline to a wooden surface. Let's start creating the composition.
We lay out even leaves in a fan pattern with a slight overlap on the neighboring ones and glue them. Press down with a press for several minutes to achieve the desired position. At the bottom of the picture we glue a thin twig.
Apply glue to the leaves strictly in the central part. This way the tops will remain free, and the picture will take on a three-dimensional appearance.
Panel of corn leaves and autumn flowers
The leaves of the corn cob have a striped and grooved structure. This feature makes them ideal for creating stunning flowers. The natural material tolerates staining well, which allows you to create multi-colored compositions on a plane.
All the leaves on a corncob have different sizes, densities, and colors. To create a panel, soft leaves that are located under the top rough coating are suitable. We cut the fresh workpiece into longitudinal strips, moisten each element with water and place it on a napkin. Cover the top with a piece of cloth. The width of the strip should be chosen based on the size of the future flower.
In addition to the main raw materials, you will need wire, thread and floral tape. First of all, you need to make a sufficient number of flowers. Fold the strip in half and attach one end of the wire with a loop to it. We twist the corn leaf and secure it with thread. Spread the petals with your fingers.
On the prepared base we glue flowers from corn leaves in a random order, complement them with autumn flowers, dried while maintaining the volume. If necessary, nondescript petals can be tinted.
Panel – autumn bouquet
There are a lot of options for creating a painting on the theme of an autumn bouquet. We take dried flowers as a basis. Plants dried in the open air in bunches or individually with the stems intact are suitable. We will mount the composition on thick cardboard covered with yellow knitted fabric.
Any plant can be present in an autumn bouquet. It is better to choose not very voluminous specimens, since they will be inconvenient to place on a plane in a vase. Spikelets, coniferous branches, pinnate celosia, lavender-colored Echinops, physalis, and haretail are suitable. It would be appropriate to decorate the corners of the frame with beads or bows.
We collect a loose bouquet of selected plants and tie it with floral tape. We make two holes in the cardboard base, thread a piece of wire through them and wrap the composition around it. We cut out a vase or basket from cardboard or colored paper and glue it onto the free stems.
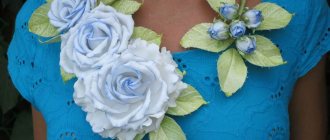
Dried rose panel
To work you will need rose buds. These can be just wild flowers picked or open heads cut from a wilted bouquet. Separate the flowers from the stems, leaving 3-4 cm. Then cut off the leaves. Now all the flowers need to be disassembled into individual elements and the petals arranged.
We draw a sketch of the future composition onto the prepared cardboard base and mark the places where the new buds will be located. Apply double-sided tape to the markings. We place rose petals in a circle against the adhesive strip. We glue each element with an overlap and form an open bud.
The arrangement of volumetric dried flowers can be any. Alternating large and small buds or angular placement in ascending order will look good. After all the roses are glued, you can start decorating with sheets. We also glue green leaves in random order onto double-sided tape.
Dry composition in the interior
Paintings can be made to decorate the interior; the surfaces of furniture or walls covered with leaves look beautiful. Autumn material can be used in bouquets and placed in vases. Wreaths formed from leaves on the door look beautiful. Interesting compositions are those combined from dried leaves, dried flowers, cones, to which you can add pumpkins and other long-storable products. These include apples and pears.
Autumn bouquet
The easiest way to preserve the colorful magic of autumn for a long time is to collect a bouquet of leaves and place them in a vase of the appropriate size. To keep the leaves longer, you can spray them with hairspray.
Bright autumn bouquet
Bouquet of roses
Anyone who has formed paper roses at least once and knows the order of their assembly can easily apply this knowledge to leaves. To do this, roll the leaf crosswise. The result is a very elastic material that holds its shape well. Roll it into a tube, holding it by the stem. This will be the inside of the rose. Wrap all other parts around the middle, lifting each one slightly. The petals should overlap each other.
Making roses from dry leaves
Secure the resulting roses; you can use thread. After you have made several roses, at least three, combine them into one composition. Place several large sheets on the bottom. The decorative element is ready. Can be used for interior decoration. Retains its shape well when dried.
Ready-made bouquet of dry leaves
Autumn wreaths
Christmas wreaths have come into use and beautifully decorate the holiday. A wreath of leaves that can be used to decorate a door leaf will look no less delightful.
Autumn wreath made of dry leaves
To make the composition you will need a vine. You can use willow branches. If they are out of reach, make a regular circle of wire.
Wire wreath base
Collect beautiful leaves. Dry. You can use fresh ones. The easiest way is to glue the leaves with a gun. If you don't have it, use regular strong glue. After the glue has completely dried, decorate the door with a wreath. This technique will emphasize how much the owners love their home, value it, and are ready to maintain coziness and create comfort.
Glue the leaves with hot glue
To add more color and to emphasize the ethnic orientation of the composition, place pine cones, brownies, beautiful branches of a bush or tree, and dried autumn flowers among the details. The herbarium is beautifully decorated with bows.
Autumn wreath is an excellent decoration option made from dry leaves
Vase
After simple compositions, creating a vase will not be difficult.
Vase of autumn leaves
Carry out the work in the following sequence:
- Turn a vase in your house over so the inside surface is facing down.
- Cover it with a layer of cling film.
- Place a layer of leaves on its outer surface.
- Connect the leaves together with glue.
- Cover the structure with acrylic varnish.
- Turn it over.
Step-by-step production of a vase from leaves
The vase is ready. Use it to store small items.
Topiary
These trees of happiness are unusually popular.
Leaf topiary for home decor
In order to make them, you will need the following parts:
- small pot,
- a thick branch on which the entire composition will be fixed,
- leaves, you can add the following material: reeds, cones, bunches of rowan.
Using glue, secure it all into one composition.
Making topiary from dried flowers
Making topiary from dried herbs and flowers is very simple. You will need to prepare the material itself, a foam base, a dense and even stick for the barrel. We will place the decor in a pot filled with plaster. Feathers, sisal, and lace can be used as additional decoration.
First, we attach the trunk to the ball to minimize the pressure on the finished topiary. We sharpen the stick a little and stick it into the foam. Since the crown will be very light, it is not necessary to drive the trunk deep. Pour gypsum into the pot and place the other end of the trunk, let it dry. The container can be decorated with feathers, sisal, or any fabric.
When the base of the composition is assembled, you can begin making decorative elements. You can make flowers from dried leaves, use dry voluminous buds, pliable spikelets, haretail and other plants. We cover the entire ball with blanks and add secondary decor.
Option #3. Christmas wreath
In Western countries, houses are often decorated with such wreaths. They look really beautiful, and therefore you should definitely consider the original option of making a wreath from branches.
Christmas wreath made of branches
To begin, prepare:
- willow branches;
- decorative tape;
- cones;
- scissors;
- special wire (it is called floral wire);
- garden shears;
- lotus seed pods;
- twine;
- St. John's wort branches.
Preparing everything you need
Step 1. First, cut a piece of wire and wrap it around several branches (you need to make it in a dense layer).
Branches are wrapped with wire
Step 2. The second beam is created in a similar way.
Formation of the second beam
Step 3. One longer bundle is made from two blanks.
The workpieces are connected
Step 4. To make the fixation more reliable, you can cut another piece of wire.
Another piece of wire is wound
Step 5. The workpiece is bent and given the shape of a wreath (look at the photo below).
The blank is given the shape of a wreath
Step 6. Fix the workpiece with wire. You need to act carefully so that the wire does not stand out against the background of the branches.
The wreath is fixed with wire
Step 7. The cones prepared in advance are attached to the workpiece using the same wire.
Preparing and attaching pine cones
Step 8. The composition is decorated with seed pods and St. John's wort branches. To make the fixation more reliable, use a heat gun.
Additional decor is added
Step 9. A couple of branches of St. John's wort are attached to where the willow branches join.
Attaching St. John's wort branches
Step 10. Take the tape and cut a piece of it to the required length. The wreath is wrapped with ribbon, a knot is tied, and the ends are trimmed (but so that they hang down a little).
The wreath is wrapped with ribbon
Step 11. Another piece of tape is cut off and wrapped around the same area. If you want, you can additionally make a large bow. That's it, the wreath is ready, now it will become a great decoration for your home!
Additionally, you can make a small bow
Video - Original crafts from dry branches
How to care for herbarium products
A supply of dried flowers that is waiting for its time must be stored correctly. If placed correctly and in ideal conditions, dried plants can last for decades. The following storage recommendations must be followed:
- Keep the box, folder, book with herbs and flowers only in a ventilated, dry room;
- Samples must be prepared according to their drying method. Flat ones are stored in a folder, voluminous ones in a box, bouquets - suspended in the open air;
- During long-term storage, each specimen must be treated once a year with insecticides against insects and other pests;
- Do not allow moisture to come into contact with dry samples;
- The storage area or container must be protected from direct sunlight.
Dried flower arranging
Dried flower arranging is a floristic art direction associated with the creation of dry compositions, including for giving and decorating premises.
Dry bouquets differ from live bouquets in that they are more fragile, but do not require water and can be stored for a long time.
To create dry compositions in dried flower arranging, craftsmen adhere to the following steps:
- The collection of material is carried out during maximum stability of the culture. The harvesting schedule for creating dried flowers is different for each plant;
- The collected plant material is subjected to a drying process. There are several drying methods that are applied to different compositions;
- They choose the type of composition and select a combination of plants with each other, based on the catalog;
- Dried plants are painted to give them greater brightness;
- They create a composition according to the conceived idea.
Of these actions, one of the most important is the proper drying of the plants, because if the plants are not dried well, the composition will soon lose stability and either crumble or begin to rot.
Headboard
The most important thing in the execution of such decor is to treat the branches well so that they do not fall off on the heads of the sleeping person in the future. You also need to secure them well so that they do not move when the mattress moves.
Boho style for the bedroom
Raw branches for the head of the bed
Birch is ideal for the bedroom
Cornices
Non-standard and very interesting window cornices can be made from thicker branches or a thin tree base. Curtains with large hooks or loops to match the curtains will look very nice on such curtain rods. This decor will bring creativity to the interior and create a certain homeliness.
Cornice for pots
Wooden curtain rod
Aging wood
To achieve the effect of aged wood, you need to choose branches of pine, oak, larch or walnut. Other types of wood cannot be treated in this way.
Treatment:
- You need to clean the surface of the branches with a stiff wire brush or a drill with a wire brush.
- Apply an ammonia solution, which darkens the wood and gives it an antique effect.
- You need to apply 2-3 layers of varnish.
- To give the product a finished look and add even more shine, you need to rub the wood with a cloth.
Staircase made from tree branches Source homeli.ru
Shelves for storing small items
Very cute and quite practical shelves for storing books, souvenirs, jewelry and other small items can be easily made from dry branches. Such decor only needs to be well fixed on the wall and supplemented with decorative finishing materials. Also, a wooden trunk can become the basis for several shelves in the form of a partition.
Shelves for small items
Untreated birch shelf