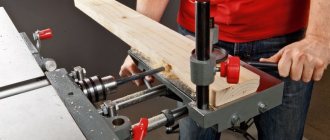
After we have decided on the type of belt and calculated the configuration of both pulleys, we begin to develop drawings.
We will use our own blanks as blanks. More information about this can be found in the Foundry section. Two blanks were specially cast for this task. Waste aluminum was used as a raw material and everything was at least a little similar to it. In this regard, there are flaws in the material, but they will not in any way affect the subsequent operation of the machine. So let's get to work.
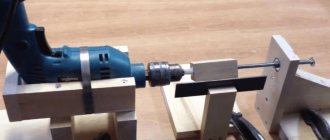
We begin processing the first workpiece. It was cast into a tin of auto enamel. The dimensions turned out to be critical, and we miraculously fixed it at the very tips of the reverse cams. First, we need to machine the workpiece so that it can be safely installed in the lathe chuck. We set the spindle rotation speed to five hundred revolutions per minute and turn on the machine. We slowly trim and adjust the diameter of the workpiece until it is firmly clamped with the jaws of the lathe chuck.
As practice has shown, it is quite possible to perform such a procedure, but it is not safe.
Now you can safely process the workpiece using high speeds and feeds. As the metal was being removed, pores were discovered in the center of the workpiece. We were ready for them. They are a consequence of the fact that when casting the workpiece, anything that at least vaguely resembled a metal from the aluminum family was used.
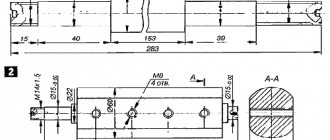
It turned out that the core of the workpiece has a large number of pores, therefore, there is a possibility that the seat for the shaft may break over time. To eliminate this possibility, we will install a steel cylinder with a diameter of 30 millimeters in the center of the pulley using a hydraulic press. As a material for the central inserts, we use rollers from the ZIL 130 brake mechanism. This point is indicated in the design sketch above.
Let's start processing the videos. These parts are quite specific; they consist of two elements, a large hardened ring and a shaft. Since there is rust and scale on the parts, before processing we first grind the base on one side. This is necessary for good fixation of the roller in the cartridge, since in the future we plan to process the diseased hardened cylinder.
The shafts are machined on one side and cut off on the other.
Next we grind the outer diameter and end.
Now, just like on the opposite side, we cut off the small shafts. Then we grind the end.
All material for the manufacture of pulleys has been prepared.
We place the first workpiece in the lathe and begin to bore the center.
The hole for the cylinder is ready. The next step is to press the metal cylinder into the workpiece.
After pressing, we place the workpiece again in the lathe chuck and begin to bore the hole for the electric motor shaft. From this point on, all turning work that could affect the alignment and runout of the pulley must be completed in one installation.
That is, you need to grind the grooves for the pulleys and bore the hole for the shaft without dismantling the workpiece from the lathe chuck. Otherwise, axial runout of the pulley cannot be avoided. First, let's drill a hole.
Finishing will be done using a boring cutter.
The hole for mounting the electric motor shaft is ready.
Now let's create the pulley shape.
We will grind the grooves, or streams as they are also called, using a thread cutter LW1215R-06. He is perfectly suited for this operation.
The first half of the pulley is ready. By analogy with it, we grind the streams of the second half of the pulley.
Only after both parts of the pulley have been completely machined and the hole for the shaft has been bored out can the workpiece be removed from the lathe chuck. Next, we carefully clamp it by the small pulley and process the reverse side.
The outlines of a full-fledged pulley are already emerging.
The pulley is completely ready.
The only problem that emerged was that the hole was machined for the electric motor shaft, and the outer diameters of the pulleys were for the headstock. You will have to repeat the same thing only keeping the diameter of the pulley and the mounting hole consistent.
They turned one and a half pulleys, and there are already a whole mountain of shavings.
Both pulley stages are completely ready. Let's start the cutting operation.
Just as in the previous case, on the reverse side we bring the pulley to perfection.
The first correct pulley is made.
By this time, we had calculated and purchased the required drive belt. We will write about this in the next article. In the meantime, let's prepare another blank for the second pulley.
We carry out similar operations described above. I would like to draw your attention to the preparation. It was cast to make a spacer for a hydraulic press. When casting it, aluminum profiles and similar parts were mainly used. There was also silumin there. In this connection, an interesting effect emerged. I called it “Starry Sky”. It consists in dispersing relatively small pores throughout the entire volume of the workpiece. This effect will also in no way affect the operation of the mechanism.
The profile of the second pulley has been made and can now be cut off.
Work on the second pulley has also been completed.
Due to the configuration of the LW1215R-06 cutter, the grooves for the belt on this pulley had to be made using another threaded cutter with an 8x8 millimeter holder. The reach from the edge of the tool holder to the cutting tip was twenty millimeters; therefore, some ribbing can be observed in the streams. It is a consequence of insufficient rigidity of small incisors.
Upon completion of the second pulley, the electric motor was assembled.
Read more about the assembly of the power unit in the article: New electric motor of the STD 120 machine - reassembly, painting.
Additional information on pulleys:
We have started our first experiments and have already prepared the first part of the material: Belt drive test. Poly V-belt. They also released an educational short video film.
For the New Year I ordered a Larsen Kids 14 bicycle for my son. It was cheap, about 2000-2500 rubles. I received it, assembled it, held it in my hands: after the Kokua jumper balance bike... it felt like the frame was filled with lead.
Before the start of the season there was time to redo everything.
In Cheboksary on Kheveshskaya I bought a broken aluminum frame for 100 rubles. (And I couldn’t resist - I bought myself a Cyfag carbon road frame for a ridiculous 5 thousand rubles, but previously it was only 3.5 thousand rubles)
Read also: Diameter of glue gun rods
The first thing I did was draw the new frame on the computer. I tried to copy the geometry of the Islabikes Cnoc 14 bicycle.
I cut, adjusted the blanks and sent them to the welders, where we managed to weld a fairly even frame without a jig.
The result pleased me. The frame turned out to be light and durable.
The frame was painted by Arthur Grishagin. The photos don't do justice to the real gloss - it looks very cool.
It seemed to me that the new frame alone was not enough and I decided to make a belt drive. I bought VAZ timing pulleys with 40 and 20 teeth. The gear ratio was too large for a 3 year old child. But I was “lucky”: the front pulley burst after turning, welding and two blows with a hammer.
Then I drew and made a new front pulley 36 teeth + new connecting rods for a square made of duralumin using waterjet cutting.
Well, the result is 6.5 kg, of which 2 kg is the rear wheel, 2 kg is the front wheel with a fork.
After 2 trips of 15 minutes each, there are no complaints about the belt drive. My son immediately learned to ride 5 meters without support (thanks to the three-wheeler and balance bike)
Kazan: Argon welding 239 17 99, Hydro cutting Renat Askhatovich &9l7Z97&75O Painting vk.com/xatagarage
If anyone has light 14″ wheels for a children’s bike, please sell them
The belt drive in question is distinguished by a minimum of parts: it has only one pulley, made by hand, and works without a rubber belt, instead of which a piece of a dog leash is fitted.
The handmade pulley is very different from the usual shape (with sides): it does not have a recess for the belt, and moreover, its edges are rounded. In general, the entire pulley should be slightly convex. Thanks to this shape, the flat belt self-centers, and sometimes it is enough for only one pulley to have a convex shape. By the way, in mechanical engineering for flat belts the pulleys are convex. A flat belt cannot be held by a pulley with a side - it will either climb onto this side or begin to jam at the side. Pulleys with sides are used for V-belts, toothed and round (in cross-section) belts.
If you doubt that a convex pulley can hold a belt, you can conduct a simple experiment with a real model. You will need simple parts: rods, a straight cylinder, some part with a smoothly changing diameter, a wide elastic band and the base of the structure.
This model demonstrates how, when rotated, the elastic moves along a wooden "pulley" from the narrowest part on the left to the largest diameter, where it remains. If the elastic is placed in the concave part, it will again quickly move to the place with the largest diameter.
The pulley is made of fiberboard. Instead of a second (small) pulley, a bolt is fitted. Due to the large difference in diameter between the large pulley and the bolt that replaces the small pulley, this transmission has a large gear ratio. However, this contributes to greater slipping of the belt on the bolt, which, even without this, almost does not adhere to it. Therefore, for example, abrasive paper should be glued to the bolt. Of course, it will not last long, but over time you can pick up something else.
The belt, as mentioned above, is made from a piece of a dog leash, which is made of nylon. To connect the two ends of a segment, some piece of iron is heated by fire, then the ends of the segment are applied to it, they are melted and immediately pressed against each other.
In order to select a pulley for a walk-behind tractor in a store or online, you need to know several parameters of this product. The driven pulley is designed to transmit the rotational motion of the engine to the attachments of the walk-behind tractor via a belt. Using this part, you can increase or decrease the number of revolutions of the walk-behind tractor mechanisms.
They come in different sizes, are mounted on the main shaft of electric motors, and are made of different materials. When purchasing a pulley, you need to pay attention to the size of the seat. It would also be a good idea to buy a new belt and select a part in accordance with its parameters.
The diameters of the pulleys used for electric motors are standardized.
Making pulleys without a lathe or making pulleys on a knee
The standards establish 3 types of structures:
- monolithic (up to 100 mm);
- disk (from 80 to 400 mm);
- with spokes (from 180 to 1000 mm).
The mounting holes come in conical and cylindrical shapes. The standard number of grooves does not exceed 8. In order to reduce wear of rubber belts, the working surface of the grooves is ground.
The main material used for manufacturing is aluminum or duralumin. They are considered the most optimal, as they have a good level of strength and are the least subject to wear on the belt. You can find pulleys made of textolite, plastic, and plywood on sale.
Posts 1 page 12 of 12
ShareFebruary 111, 2015 16:31:19
Many people have faced the problem of “where to get a large diameter pulley”? The turner is expensive or does not have the required material. And often you can’t even find a turner. I suggest making a pulley of the required diameter yourself.
We take a sheet of metal 2 mm. We drill holes and draw a circle of the required diameter from them. Mine is R 100 mm.
We cut out two round blanks with a grinder. (cut carefully from the top of the sheet).
We make a plate like this, 8-10 mm thick. R-80 mm. And also with a hole in the center. Let's put it all together...
Carefully bend the edges of the thin plates on an anvil. We knock in the place where the thick plate is located. Slowly turn the thick plate in a circle and bend the entire edge. There is no need to rush, bend it 2-3 mm at a time. This way, bringing the bend to what you need.
We twist the resulting “plates” as expected. It turns out something similar to a pulley...
We make a hole of the diameter you need. For me this is the VAZ driven disk hub.
You can weld the hub. But I have it screwed on. You can always change it.
Here is the finished pulley. It's not that difficult.
Any belt will do. Since there is no shelf inside the pulley.
Making a product at home
There are several ways to make a pulley with your own hands, and we will tell you some of them.
The easiest way to make it at home is using a lathe. You need to select a suitable workpiece and simply turn the part to size.
For the second manufacturing method, you will need plywood with a thickness of at least 20 mm, a hand router and jigsaw, and a drill.
First you need to make a disk of the required diameter from plywood. Using a compass, draw a circle and make a hole in the center of it. Next, using a jigsaw, we cut out the disk with a margin of 2-3 mm from the line.
In order for the disc to have a perfect round shape, we clamp it into the drill through the central hole using a bolt and nut and sand it with sandpaper, processing all the irregularities.
The next step will be to form a seat for the belt. To do this we use a hand router. We fix the disk on the workbench using self-tapping screws and, having selected a suitable cutter, select a groove for the belt. So, the pulley is ready. You will need to measure the seat diameter of the pulley on the motor axle and drill the required hole.
A homemade pulley is attached to the engine axis using a flange.
If you do not have a lathe at hand, you can order this part from a familiar turner, but the driven pulley for a walk-behind tractor is of impressive size, and most often it is very difficult to find a workpiece of this diameter for turning. Therefore, we recommend making it yourself and ordering a flange.
Make your own puck
Good health to everyone. I apologize that I'm talking about cars again :))
I came across this kind of garbage... It was necessary to remove the rack, it turned out that the lock washer for the control rod was completely missing. Others are able to take it off and throw it away. Everything is arranged there simply.
The washer rests against the slots of the rack with 2 antennae. After tightening the nut on the rod, its edges are bent onto the nut to lock it so that the rod does not turn out along the way and the wheels do not move in different directions.
It looks like this on a Honda. In fact, almost the same as on all cars.
But the new one takes at least 2 weeks to move and costs $6 apiece)) and this is not funny. I realized that no one buys them and there is no demand for them) There is not a single replacement for the chord... only the original...
I walked around the central Kiev car market... all the traders (including VAZ, GAZ, IZH and ZAZ) just shrugged their shoulders))
I thought for a couple of days about how and what to make it from. Well, I don’t have time to wait 2 weeks for her. The shape is a grommet, the middle part of which can simply be ground off. But I couldn’t find any strong eyelets... I stopped using this technology. The original thickness is approximately 1.2-1.3 mm. In the garage I found a piece of soft Russian steel 1.15mm.
the size of the original is almost 1 in 1 one Ukrainian hryvnia)
we cut it with a grinder, you can do it right on a coin)
There is still a thick washer between the washer and the rack and we mark the workpiece on it.
Then we draw the honda logo, the letter H in the center.
We draw it with something sharp.
We sharpen a screwdriver or a small chisel and carefully cut out the letter H. First on one side, then on the other.
Place the washer and cut it)
Then we find in the garage some kind of heration with a diameter of 12 mm or whatever is needed for the diameter of the thrust, preferably a cone shape. And we break through.
In fact, the lock washer is ready))
My antennae are 6mm wide, it is better to “cut out” the antennae with an extra width of + 1 mm, later it is better to sharpen them with a ratfile/grinder. In the center hand made on the right honda original second hand)
Let's try it on the rail.
Everything can be put on a typewriter unsurpassedly.
I decided to create the next one more precisely.
You literally need to draw a circle with a compass and mark it with a ruler, then it works out perfectly and literally cut through it.
Keeping parts in proper condition
For long-term service of pulleys on a walk-behind tractor, you must follow some simple rules:
- promptly check the strength of the seat fastening on the engine axis to prevent the part from becoming loose and failing;
- do not forget to check the protective covers that protect the part from dirt and large objects;
- check the belt tension to avoid slipping;
- visually inspect this unit to identify chips, cracks, etc.;
- observe the necessary safety precautions.
Read also: Machine for the production of gloves China price
A homemade product will serve you for a very long time without needing repair. As the service life expires, the part can be remanufactured.
The idea arose to make it out of plywood. I thought it was temporary, I’ll find a real one and replace it. But then it became clear that there was no need for this. It has been working flawlessly for me for 7 years now, no worse than any metal one.
The machine turned out great.
General recommendations
Purchased pulleys made in factories are most often cast or machined from metal alloys. Plastic products are produced for low-power engines.
At home, without foundry equipment or precision lathes, it is difficult to make a drive wheel from these materials.
Many experts believe that a pulley made of wood, plywood or plastic, which was made in a home workshop, is unreliable, short-lived, will immediately overheat and fall apart.
It's not like that at all. If you do not try to replace the wheel of a forge hammer with a force of 6000 tons, but use it on a tabletop machine with limited power and speed, then a carefully made part will be able to replace the standard one for quite a long time.
If you make a part from aluminum, it will be much stronger, will be able to transmit more torque, and rotate at a higher speed. You will have to master the foundry process, even in its simplest form. Manufacturing a pulley by casting will require fire safety and the use of personal protective equipment.
The wheel can be turned on a lathe if you have one in your home workshop.
Large diameter disc pulley.
I use it to cut wood up to 50 mm thick and of any linear dimensions. The pulley behaves perfectly.
Usually I make all my homemade products from start to finish with my own hands, without welding, without metalworking machines. I use what I have on my farm, what I can find. Once, from a faulty, out-of-date sewing machine, I was making a machine for sawing wood, and I could not find a suitable metal pulley. The idea arose to make it out of plywood.
What other types of machines can be made?
Before creating your own lathe, you should study those varieties that were invented by many interested people. Among the machines, both home-made and factory-made, the following types are distinguished.
Turning and milling
Such a machine is already a powerful modification of previous versions of machines. Most often, a turning and milling machine is equipped with a CNC, because it is extremely difficult to manually control the milling machine with high precision. However, such a machine has a right to exist and is widely used for domestic needs. Its design consists of:
- Beds.
- Electric motor for rotating the headstock.
- A manual milling cutter placed on guides that ensure its movement along the axis of rotation of the workpiece.
With a copier
A lathe and copying machine is necessary when creating a large number of identical products; most often you hear about dishes and balusters for stairs.
There are several options for making a copy lathe: with a router, with a circular saw and with a chisel. All these methods involve the use of patterns. A pattern is a profile of a future product, which is cut from thin plywood.
A handrail is attached along the lathe along the entire length of the workpiece. The pattern is mounted behind the lathe. A cutter or cutter is attached to the handrail, the movements of which are regulated thanks to a stop running from the cutter, cutter or saw to the pattern.
Thus, during the rotation of the block, the cutting tool completely repeats the silhouette of the plywood profile with sufficient accuracy.
Mini
For many household needs, it is not necessary to create a unit of impressive size, capable of rotating a log with a radius of 300 mm. Sometimes a machine with an extremely simple design is sufficient, in which the engine can be a drive from an old tape recorder, powered through a power supply. For the bed of such a machine, you can use a board 150 * 20 and long, which depends only on the needs of the craftsman.
For such a mini-machine, a belt drive would be superfluous, so most often the headstock is mounted directly on the motor shaft. And the head from a drill or a homemade chuck with three clamping screws serves as a faceplate.
The tailstock is made of a block, in the center of which a hole for the shaft is drilled exactly at the height of the motor axis, which can be a dowel-nail. If you provide the machine with a power supply with adjustable output voltage, you can get the unit with a speed controller.
From an electric drill
An electric drill can be found in almost every home. The advantage of a machine driven by an electric drill is that there is no need to buy a separate motor. Drill-powered designs range from the most basic, where the drill is clamped to the table.
On the contrary, the tailstock is mounted using a pair of angles and a nail or a sharpened screw, to a more advanced one, in which the drill serves as a source of rotating force, but is not directly involved in the process of rotating the workpiece. The second method protects the motor from overheating and stalling under overload.
From a washing machine motor
It is a standard layout of a lathe with a motor, direct or belt drive, bed and two headstocks.
When constructing a lathe from a washing machine motor, it is necessary to remember that the motor of a household appliance is designed to circulate with an unbalanced load, but this does not mean that the tailstock can be abandoned. Its presence is mandatory especially when working with long and heavy workpieces. The design of such a lathe is easy to implement at home. To do this you need:
Weld or bolt two steel pipes and attach a motor from a household appliance to one end. Fix a block between the pipes with the ability to move it along the frame; the corner of the tool rest will be attached to it. On the opposite side, the tailstock is installed in accordance with the instructions outlined above.
Pulley making
I thought it was temporary, I’ll find a real one and replace it. But then it became clear that there was no need for this. It has been working flawlessly for me for 7 years now, no worse than any metal one. I calculated the diameter of the pulley, and took the remaining dimensions from the drive pulley on an existing 600 W electric motor. I cut out a round disk from plywood of the required thickness - medium. Then the two outer ones are made of 10 mm plywood. I drilled holes with a diameter of 3 mm in the center of each disk. On a grinding wheel I processed the outer edge of the small disk, and chamfered one of the sides of the large ones. Then I glued all three disks together by inserting a 3 mm diameter rod into the central holes. Additionally, I tightened it with four screws on each side, as shown in Fig. In the finished pulley, I drilled a hole in the center to the required diameter. The finished disk was mounted on a drill with the appropriate equipment. I cleaned it with a file and sandpaper while rotating. And, of course, pro-oil. At this point I finished the work and installed the pulley on the machine. I secured the pulley with a clamping nut and a lock washer. The machine turned out great. I use it to cut wood up to 50 mm thick and of any linear dimensions. The pulley behaves perfectly.
Dear visitor, you have read the article “Plywood pulley”, which was published in the “Miscellaneous” category. If you liked or found this article useful, please share it with your friends and acquaintances. Earn money from your knowledge. Answer questions and get paid for it!
Societies › Do It Yourself › Blog › Thrust control lock washer. With my own hands :)
Good health to everyone.
I apologize that I’m talking about cars again :)) I came across this kind of garbage... It was necessary to remove the rack, it turned out that the lock washer for the control rod was completely missing. Others are able to take it off and throw it away. Everything is arranged there simply.
The washer rests against the slots of the rack with 2 antennae. After tightening the nut on the rod, its edges are bent onto the nut to lock it so that the rod does not turn out along the way and the wheels do not move in different directions.
It looks like this on a Honda. In fact, almost the same as on all cars.
But the new one takes at least 2 weeks to move and costs $6 apiece)) and this is not funny. I realized that no one buys them and there is no demand for them) There is not a single replacement for the chord... only the original...
I walked around the central Kiev car market... all the traders (including VAZ, GAZ, IZH and ZAZ) just shrugged their shoulders))
I thought for a couple of days about how and what to make it from. Well, I don’t have time to wait 2 weeks for her. The shape is a grommet, the middle part of which can simply be ground off. But I couldn’t find any strong eyelets... I stopped using this technology. The original thickness is approximately 1.2-1.3 mm. In the garage I found a piece of soft Russian steel 1.15mm.
the size of the original is almost 1 in 1 one Ukrainian hryvnia)
we cut it with a grinder, you can do it right on a coin)
There is still a thick washer between the washer and the rack and we mark the workpiece on it.
Then we draw the honda logo, the letter H in the center.
We draw it with something sharp.
We sharpen a screwdriver or a small chisel and carefully cut out the letter H. First on one side, then on the other.
Place the washer and cut it)
Then we find in the garage some kind of heration with a diameter of 12 mm or whatever is needed for the diameter of the thrust, preferably a cone shape. And we break through.
In fact, the lock washer is ready))
My antennae are 6mm wide, it is better to “cut out” the antennae with an extra width of + 1 mm, later it is better to sharpen them with a ratfile/grinder. In the center hand made on the right honda original second hand)
Let's try it on the rail.
Everything can be put on a typewriter unsurpassedly.
I decided to create the next one more precisely.
You literally need to draw a circle with a compass and mark it with a ruler, then it works out perfectly and literally cut through it.
Maybe someone understands a method to create such a puck more elegantly? Please share. Production time for one puck is 20-30 minutes. The cost is virtually zero. Otherwise, 6$ and two weeks... the yakozunas scoff))
What metal is the pulley made of?
To understand what material a pulley should be made of, you need to understand its purpose.
A pulley is a friction wheel designed to transmit torque from a motor to a rotating shaft through a rope or belt. The transmission of motion can be either long or short. And also - with different efforts. The load can be constant, or it can be dynamically changing.
It follows from this that pulleys should be made of cast iron or steel. As a rule, ordinary 40 steel is suitable. These metals have high wear resistance and increased strength.
The manufacture of pulleys according to drawings is carried out according to the following scheme:
- cutting a workpiece on a lathe
- end processing (trimming)
- cutting a hole in the center of the workpiece
- boring the central hole to the required diameter
- grooving
- thread cutting
MICRON LLC performs turning work on the manufacture of custom-made pulleys. For more complete information or to place an order, you can contact the company’s specialists.
For the bicycle suspension system, I needed to make several blocks. I didn’t have blanks of a suitable diameter lying around anywhere, so I turned my attention to plywood.
We cut out several approximately identical squares - in pairs for each block (but it is better to use thicker plywood).
We drill holes in the center of each of them (again, approximately) for the axle.
We glue the squares in pairs to make two blocks, which we tighten with a screw through the central holes. Tightened nuts with washers will act as a clamp, tightening the workpiece until the glue dries.
We clamp the resulting column in a vice. And grind the corners, turning the square into an octagon. I used a sander for this, but just a file or even coarse sandpaper stretched over a block will do.
We clamp the resulting part into the drill chuck and, placing it on rough sandpaper, give it the shape of a cylinder.
After this, the plywood block should be put aside for a day so that the glue sets, because... further manipulations will take place at the adhesive joint.
For further work we will need both hands, so it is advisable to firmly secure the drill to the workbench (I pulled it to the stool)). The workpiece is clamped into the chuck, the drill is turned on..
First, mark the middle of the workpiece with a pencil (to differentiate the two blocks). Then, using a round file, simply applying it to the part, we cut through the pulley groove to the required depth. The file is applied directly to the glue seam (the middle of the workpiece of one block), so you should wait for the glue to dry.
Having finished grinding the second groove, with a flat, or better yet, diamond-shaped file, we narrow the side parts of the pulleys, making them diamond-shaped - when viewed from the side - this reduces friction against the block body during rotation.
Since the blocks were not glued together in the middle, when we unscrew the screw, we will have two neat identical pulleys in our hands.
The pulley is one of the most important spare parts for both drilling and lathe machines. It is a part whose purpose is to regulate the speed and power of the engine. Of course, factory pulleys have a high degree of reliability and are designed for your machine, to which they fit perfectly.
But over time, the pulley, like many other parts, fails and requires replacement. In this article we will tell you how to make a pulley with your own hands. A high-quality hand-made part may not be inferior in reliability to factory-made analogues.
Read also: Carbon dioxide cylinder dimensions
There are several views on making pulleys for machine tools at home. Most of the debate is about the material from which this part should be made. Experts say that making a pulley out of wood is a bad idea. The fact is that during operation of the machine, the pulley is subjected to quite serious thermal and physical stress. A wooden part in such conditions will not work for too long.
Pulleys made of metal perform best in the harsh conditions of everyday work, but their manufacture requires special equipment and high lathe skills. Average in quality and complexity of creation (compared to metal and wood) is a homemade product made from plywood. This part can be used both when repairing a factory machine and in the process of creating your own machine.
see also
Comments 38
It’s more elegant - you can drill holes at either end and in the corners of the letter “H”, before cutting, with a small drill. Is it not allowed to use thread locker there?
This is not a bad idea! Because The main problem is that the tendrils bend differently after cutting, because cutting identically is not possible. In case of drilling it must be identical))
The latch is unsafe, who understands how it will behave. After all, there are constantly shock-pulling overloads and not small ones.
It turned out fine. It is more elegant only on the press with a mandrel.
... and it’s better not to cut your hair...
These lock washers come complete with control rods, but the original Honda ones are enough for a couple of replacements, especially if the rack was removed, it is more convenient to bend the washer on the removed one than when it is on the car
They happen, but occasionally, sometimes even with unique ones...
Today, almost all brands of cars do not need this washer. Everything came from the “French”... Just tighten it with the required tightening torque, and that’s it...
A friend from the dromoforum once wrote from the news. The dude, after the service, (on a Honda), went somewhere. There was an accident along the way, apparently with fatalities, the car lost control at speed and flew into a ditch. With all the consequences. Later it turned out that at the service center the rod was tightened with a torque without installing the lock washer; on the way, the rod was unscrewed and the wheel turned against the direction of travel.
I had the option of the finger sticking out at the ball tip. Thank God at low speed. The feelings are still the same)))
A friend from the dromoforum once wrote from the news. The dude, after the service, (on a Honda), went somewhere. There was an accident along the way, apparently with fatalities, the car lost control at speed and flew into a ditch. With all the consequences. Later it turned out that at the service center the rod was tightened with a torque without installing the lock washer; on the way, the rod was unscrewed and the wheel turned against the direction of travel.
The wheel cannot turn against the movement when rotating. It tends to rotate along the axis of motion of the car. In addition, the process of self-unscrewing the control rod does not occur simultaneously. But, if the process has begun, then this inevitably affects the alignment of the wheels. That any driver will obviously see. The maneuverability of the car, extraneous knocks, etc. will change. In the end, the steering wheel spoke will deviate from the horizontal position at an angle noticeable to any driver. So, it looks like a fairy tale...
Source: www.drive2.ru
Homemade plywood pulley
A pulley for any machine can be made without the involvement of a turner. To do this, we recommend taking a plywood sheet with a thickness of about 10 millimeters and following the following instructions:
- We mark the surface of the plywood in accordance with the planned dimensions of our part. It is worth noting that these parameters must be taken into account when choosing a sheet of plywood.
- We cut circles from our material. We recommend using a jigsaw for this. During the work, pay special attention to the quality of the cuts and the integrity of the workpieces.
- Considering the thickness of our plywood (1 cm), we cut out 6 circles from it.
- Take three cut circles and use a drill to drill holes in their center. Their dimensions must be compared with the diameter of the motor shaft of our machine. The holes should be drilled so that their diameter is 1-2 millimeters less than its diameter.
- We connect three circles with holes using glue and self-tapping screws, which we drill along the edges of the blanks.
- We expand the hole of the part we created using a round file to such an extent that the workpiece fits tightly onto the motor shaft.
- We also put three plywood circles without holes on glue and connect them using self-tapping screws. After these circles are securely fastened to each other, we attach them to the main shaft using longer screws.
- Six fastened plywood circles need to be turned. This is best done with a chisel or file. When performing this work, you must remember that the quality of turning will directly affect the functioning of the homemade pulley.
It is worth noting that in the same way you can make not only a drive pulley, but a flange for sandpaper and other types of attachments. In addition, when making a pulley yourself, it is necessary to take into account the type of belt drive that will be used on the machine. If the transmission is geared, then the pulley should also be made geared. Forming such a part will take much more time, because you will also have to make teeth on the workpiece.
Video: how to make a pulley?
General design and structure of a homemade unit
When designing a homemade lathe for turning, you can consider two design options: with an electric drive and without an electric motor. Despite the antiquity of the method of processing wood using human muscles, this option has the right to exist in conditions where it is necessary to process wood, but there is no possibility of using electricity.
The main structural elements of a lathe are listed below.
bed
The bed is the frame of the entire mechanism. The safety of the craftsman and the quality of the future product depend on the reliability of the frame.
Drive: motor rotor or pedal for foot drive.
Headstock
The headstock is a chuck for clamping the product and its subsequent rotation. Rotation from the engine is transmitted to it through a gear transmission, pulleys or a belt. At the end of the headstock there is a spindle with a faceplate for fixing the product.
Tailstock
The tailstock is needed for additional fixation of the workpiece, which will help improve the accuracy of the rotation axis and avoid unnecessary vibrations. It is a freely rotating blade that can be moved along the axis of rotation of the product to adjust the distance between the headstocks.
Podruchnik
A tool rest is necessary to support the chisel while processing wood. Without a stand for a hand tool, it is impossible to maintain high accuracy of the blade tip hitting the sketch lines and it is extremely difficult to regulate the pressing force of the cutter.
Making an aluminum part
Making a metal pulley is more difficult than its plywood counterpart, but the reliability of such a part will be much higher. We provide detailed step-by-step instructions for making an aluminum pulley. To produce this part, we need a piece of aluminum and a device for melting it down.
- We prepare a mold from polystyrene foam. Before you do this, decide on the required dimensions for your pulley.
- We insert the mold into the sand so that the top piece is not covered with it.
- We smelt aluminum. It is best to do this in a special melting furnace.
- Molten aluminum is poured into the mold.
- We mount the faceplate and the smelted part. To do this, you need to drill holes in the workpiece and fasten the elements using self-tapping screws.
- We grind our detail. This can be done using a grinder.
- We make a hole in our pulley with a drill.
It should be noted that making a metal pulley requires certain skills and resources. To produce it yourself, you will have to spend a lot more time and energy, but such costs will be recouped by the long service life of such a part. Before smelting, you must also make sure that your aluminum has sufficient strength and is suitable for its intended function.
When making any homemade device using a belt drive, you often encounter the problem of a missing pulley of the required diameter. Finding it on the market or through friends takes a lot of time, and it is not yet a fact that it will be found. And not everyone has a familiar turner. In most cases, I solve this problem on my own.
Interesting facts about aluminum
Aluminum can bend like paper or be as hard as steel. Aluminum is everywhere, even inside us.
Every adult gets about 50 mg of aluminum every day through food, this is not some kind of diet, it just cannot be avoided.
Aluminum is the most common metal on the planet. Its content in the earth's crust is 8%, but it is not easy to extract, at least in its pure form.
Unlike gold and silver, aluminum is not found in nuggets or whole veins. Aluminum is 3 times lighter than iron or copper.
Aluminum in its original form does not look like metal at all, this is all because of aluminum’s special “love” for oxygen.
In fact, the first use of aluminum in history occurred when Eastern potters added aluminum-rich clay to their wares to make them stronger..
Sufficient for the production of beer cans, strong for racing cars, flexible for the skin of airplanes, capable of being turned into anything, aluminum is an indispensable material for the modern world.
And these are not all the features that this useful metal stores.
Source
What can you make a homemade pulley from?
Of course, made of plywood. If you don’t have a lathe, you have to choose from available materials. Wood is not a reliable assistant in this matter - it can easily split. But dense plywood copes with this task quite adequately.
Depending on the size of the pulley, I select plywood of the optimal thickness. I cut out three circles from it, two of the same size, and the third a little smaller (the thickness of the V-belt). Also, I immediately drill a hole in each of them - strictly, in the future they will be very useful.
I clean them as much as possible, first each one separately. Moreover, on two identical circles, I chamfer one side at approximately 45 degrees. Cleaning is easier and better if you put a circle on a large nail.
I assemble sanded plywood circles onto a bolt with a wide washer placed on the head. I try to select the bolt itself with a diameter so that it fits tightly into the drilled hole. I collect circles in the sequence large - small - large. Large ones are chamfered inward.
I smear PVA on both sides of the smaller circle, assemble the future pulley and tighten the bolt with a nut and a wide washer. And I leave the whole thing to dry well.
Although PVA glue holds the parts perfectly, for reliability they can be fastened together with self-tapping screws. Just screw them into pre-drilled thin holes.
Now the pulley just needs to be modified a little. If it is of small diameter, I insert it into a drill mounted on the table and first process it with a large file, remove the unevenness of the circle and smooth out the chamfers. And I finish the treatment with sandpaper. If the pulley is large, I put it on the electric motor and carry out the processing directly on site.
Hockey puck bottle opener
Dedicated to all hockey fans! There are a huge number of bottle openers in stores, reflecting any of the hobbies. How do you like the idea of making your own hockey opener? The base of the opener will be a real hockey puck!
So, to make a bottle opener from a hockey puck, in addition to the puck itself, prepare:
- a piece of solid wood larger than a washer;
an ordinary opener with a diameter of 3 inches;
ring drills of various diameters (3, 3.4 and 1.8 inches);
wood drills;
hex bolt;
hexagon socket wrench;
alloy hacksaw;
- tools for wood and alloy processing.
Step 1. Making the washer holder
You will need to drill several holes in the washer. For accuracy, this will need to be done on a professional drilling machine. In such a situation, you will not be able to hold the puck firmly with your hands. It is for this reason that before starting production of the opener, it is necessary to create a washer holder. To do this, take a solid piece of wood. Use a 3.4-inch hole saw to cut a hole in it. Its depth must be the same as the height of the washer.
You need to drill two holes along the edges of the wood holder so that they go into the sawn circle. Insert hex bolts into these holes. Next, by inserting a washer into the wood holder, you can fix it by adjusting the bolts.
Step 2. Marking the washer
Remove the washer from the package. Take a ruler and a pencil and draw a few lines to find the center of the washer. Set the washer aside.
Step 3. Trimming the handle of the opener
In this case, the opener had a handle and needed to be cut off. To do this, you need to take an alloy hacksaw and a file. After sawing off the handle, file the edges of the opener.
Step 4. Making holes in the washer
First, you need to create a hole 3 inches in diameter in the washer. To do this, insert the washer into a wooden holder and secure it firmly with bolts. Make the depth of the huge hole according to the size of the iron opener. After the hole is cut, make another one with a ring drill of the smallest diameter. The depth of the second hole also does not have to be large.
Step 5. Gluing the opener
Take glue for iron surfaces. Squeeze it out of the tube into the syringe. Degrease the surface of the washer and opener for the best adhesion. Squeeze out the glue from the syringe around the circumference of a huge circle. Press the iron opener firmly and leave it under pressure for another half hour or the time specified by the manufacturer. After this you can remove excess glue.
Your washer opener is ready. And this is how it looks in action.
Source: rukikryki.ru
Pulley from a walk-behind tractor: purpose and types
Walk-behind pulleys differ in:
- material performance;
- size;
- number of streams;
- type of mounting holes.
The pulley for the walk-behind tractor is most often made from:
Lighter options made of plastic or pressed sawdust are possible. For this spare part, the diameter is both external and internal. Pulley sizes are standardized to eliminate confusion in this matter. According to current standards, pulleys for walk-behind tractors are:
- monolithic - diameter up to 10 cm;
- disc - 4-8 cm;
- equipped with knitting needles - 18-100 cm in diameter.
For pulleys of different sizes, the landing grooves, although present in approximately the same number (about 8), are different in shape:
Their number usually does not exceed 8
Based on the fact that the maneuverability of a walk-behind tractor is determined by the transfer of the belt between streams, the subtypes of pulleys are:
Also, depending on which shaft it belongs to, the pulley is classified into:
For example, the driven pulley on a walk-behind tractor is designed to communicate with the motor and bring auxiliary equipment into working condition. The driven one is installed directly on the crankshaft.