DIY “Cabbage Hare” craft. Master Class.
Many people have probably noticed that some vegetables are shaped like one or another animal. Apparently, this observation was the reason that in the old days, when there were no “store-bought” toys, peasants delighted their children with crafts made from carrots, potatoes, pumpkins or other vegetables. They were especially often created in late autumn, after the harvest.
And today some craftsmen, endowed with imagination, create real masterpieces from what grows in the beds of any garden. You can also try making fall crafts using cabbage. A hare made from this vegetable, if you try, will turn out funny and for several days will become a decoration for your country terrace or part of the decoration for a matinee in a kindergarten.
Hare head
For an exhibition for a kindergarten, you can make not the whole animal, but only its head. To work, you will need any round vegetable. You can use a plain watermelon, a round melon, a pumpkin without ribbed edges, a large zucchini (the excess part is simply cut off with a knife), etc. The ears can be cut out in any shape - just straight and long, with curved edges, as in the photo below. Make them flat, using only the thick skins of the vegetables.
How to make a bunny's face? Here you need to choose a sharp knife with a medium-sized blade. It is better, of course, to buy a special knife for carving. The lower part of the vegetable needs to be trimmed so that the hare's head does not roll away, like Kolobok in the fairy tale. To insert the ears, make rectangular deep holes of the desired size. First, insert them tightly, and then secure them on the back side with toothpicks.
The remaining parts are cut to a depth of 1 cm with a knife. You can first draw a face with a marker on the peel of the vegetable, and only then cut thin slices along the lines with a knife. The nose is made from carrots, giving it a rounded shape. And eyes can be cut from beets, tomatoes, eggplants, radishes. Choose what you have on hand that is suitable in size and color. This vegetable bunny craft for kindergarten will look great at an exhibition.
Cheerful motorist
Everyone knows how difficult it is to persuade a child to eat vegetables that are so healthy for the body. Many parents use coercion, thereby further discouraging their child from eating such foods. It’s best to approach the issue creatively and make a small bunny for your child’s breakfast. How to make a figurine can be clearly seen in the photo below. It won’t take much time to prepare such a nutritious and original breakfast.
When a child sees such a bunny craft made from vegetables, he will definitely eat everything without a trace.
You will need to boil 2 hard-boiled chicken eggs, peel large carrots, cut cucumber into slices for wheels and olives for discs. All that remains is to cut out a carrot tail from the skin of a cucumber, which represents a flame escaping from a fast car. To seat the bunny, you need to cut a round hole in the center of the carrot. First you need to insert a couple of toothpicks into the hole, and only then plant the bunny’s body, hooking half of the egg directly onto the rods. The head of the beast is a whole egg, and the remaining parts are cut out from the white of another. Also boil a slice of sausage to decorate small details. Draw a mouth with ketchup. The figurine on the plate looks very cute and is sure to please any child.
Simple crafts from vegetables for kindergarten
A child of 4-6 years old can independently or with minimal participation of an adult be able to recreate the following works:
Caterpillar
You will need any “balls” - tomatoes, potatoes, round onions, radishes or apples, tangerines. The elements are connected to each other with skewers, forming a caterpillar.
They make it with matches, eyes - with rowan and currant berries. The caterpillar is laid on fresh greens.
ladybugs
The tomato is cut in half and placed on a lettuce leaf. The olives are cut in half and used to make spots on the wings and a head. All elements are secured with toothpicks. The legs are made from olives or plasticine and placed next to the abdomen.
What's for dessert?
What do you think the dolls eat for dessert? They prefer to enjoy ice cream, sweets, and fragrant fresh baked goods. However, like all girls.
Making a bunny from cotton pads
This very original and cute rabbit craft made from cotton pads will please your child and won’t take much effort! Prepare the base for the craft. This can be either colored cardboard, or even more conveniently – a box of chocolates. It should be covered with colored paper, or better yet, with bright multi-colored fabric, it will be more beautiful.
Take cotton pads. The circles are the body and head of the bunny. Glue them onto the cardboard background. From other cotton pads we cut out ears, paws and a tail, as well as cheeks - two small circles.
Glue all the parts and we have a bunny! All that remains is to add details and decor. Color the face with a pen and paints, glue on beads for eyes. Cut out another part from the cotton pad - a carrot, color it. Dry the painting and it's ready!
Carrot craft
Even a small child can make such a vegetable craft with his own hands. Only carrots are used in this work. The remaining small details are cut out of paper, and the nose and eyes are added from black olives. You can also use berries. It is better not to take currants, as they are very juicy, but blueberries or blueberries are quite suitable.
Before you start making a bunny craft from vegetables, you need to peel the carrots, wash them and dry them with a napkin. The lower part of the product should be even and smooth, so you need to trim the edge with a knife. The pointed part of the vegetable is divided in half by the length of the ears. Using your hands, move them slightly apart in different directions. Then thin circles are cut from the remains of the vegetable. For the bunny's hands, it is enough to remove the side sections on both sides. And for the legs, use the tip of a knife to make beautiful triangular cuts representing fingers. The arms and legs are attached with toothpicks.
Then you need to make small parts from colored and white cardboard. First, let the child draw a template, trace its outlines on cardboard, and only then cut out the elements with scissors. This way all the parts will be the same and the work will be neat. Cardboard elements can be glued to dry carrots with PVA glue. All that remains is to pick the berries or cut out the eyes and nose from the olives and attach them with toothpicks. Do not use whole sticks; a piece with a pointed edge will be enough; the rest can be torn off directly with your hands. The finished figurine can be placed on a saucer or placed on a sheet of green cardboard, making a clearing using greenery.
Ship or whale from zucchini
To make a whale or a zucchini boat with your own hands, you will need several things: zucchini, cardboard, lettuce, long skewers, plasticine and shells (optional). Although the result is a surprisingly beautiful product, it does not require a long time investment. The work must be done in stages:
- First of all, the zucchini must be thoroughly washed and dried. It is very difficult to work with a wet surface; small decorative fragments of plasticine will not be able to stick.
- The steps in the second stage depend on what will be manufactured. If you and your child have decided to create a beautiful ship, then you need to cut a hole in the middle of the eggplant, which should not exceed 1/3 of the total surface area. Additionally, it is worth cutting recesses on both sides of the sides of the future model. For the whale, no cuts are required, but you will have to tinker with the tail. You can make it from colored cardboard (dark blue) and attach it using plasticine.
- In order for the ship to be as similar as possible to the original, it is worth starting to decorate. Using small toothpicks, you can secure small pieces of zucchini around the entire perimeter, depicting wood carvings. The whale can be covered with a dense layer of small shells. You can attach them to the smooth surface of the zucchini using plasticine. This element is not necessary, since finding shells is not so easy.
- If there is no shortage of time, then you can additionally cover the entire hull of the ship with colored paper, having previously cut many small square holes in it. When making a whale, you can begin to design the mouth. The base should be blue plasticine, onto which a similar red material is glued as a second layer.
- The final stage will make the appearance of both crafts complete. You can vertically insert 2 long skewers into the hole of the ship cut at the second stage, onto which you can first place lettuce leaves. The length of the skewers can be different, so the sails will be as close to real as possible. In the case of the whale, all that remains is to glue on the eyes. A base made of white plasticine, on which additional blue or red material is attached for contrast, looks best.
If there are doubts about qualifications, it is better to make a squash whale first. This craft is very simple to do. There is no need to use sharp objects to cut holes.
DIY crafts from vegetables and fruits for an exhibition (pictures inside)
As always, first let’s see what can be made from these gifts of nature. Of course, everything depends on your imagination. To be honest, I have a hard time with her). Therefore, I always look at the options of those people who put their creations on display. And then I just supplement the work with something of my own.
For example, you can make such a fancy rhinoceros. You will need a small watermelon, squash, zucchini, peppers, apples, a couple of berries and cucumbers. You can connect the parts using toothpicks, sticks or wire.
For a girl, you can suggest making an elegant swan from a twisted zucchini. But glue or sew beautiful wings from cotton pads.
Look what a bright parrot you can create. The technology is still the same: find suitable fruits and vegetables and combine them with each other. To make this craft you will only need an orange, carrot, pepper and zucchini.
I really liked the idea of bell pepper frogs. Beauty, and that's all!
But what can happen if you use a thread. Of course, the work requires certain skills and abilities, but you can try to do this with older children.
Here's a very simple option. Find small fruits, make faces out of plasticine and place them on a zucchini wheelbarrow. That's it, the craft is ready.
For any composition you can make such a small mouse from a lemon. I think you can see from the photo how it should be done.
An excellent composition is obtained from pumpkin and natural materials. Take it into service.
For variety and to stand out, you can work hard and do work on the topic of the inhabitants of the seabed. Cool idea!
You can also make different animals. Look, aren't these cute pets adorable?!
As you can see, creative work is not a dime a dozen. So let's move on.
Little bunnies
How to make bunnies from apples so that they are small and identical? You need to follow the step-by-step instructions given below in the article. To work, first cut the apple in half, then cut off the rounded sides from each half. Only the middle strip remains, which has a relatively flat upper surface.
The ears are made only from the peel, making a longitudinal cut. The knife begins to move from the back side of the cut piece, but not from the very end, but after retreating a couple of centimeters from the bottom edge of the workpiece. The cut is made carefully by moving the sharp part of the knife along the back of the bunny at a depth of approximately 5 mm. Having reached the required length of the ears, the knife is carefully removed, without cutting off the skin, but by lightly lifting the cut part up. An incision is made in the center of the strip, forming two ears, sharpening the ends with a knife. You can leave the figure in this form, or you can make the eyes and nose of a bunny by drawing droplets of tomato sauce or mayonnaise.
The article describes in detail how to properly make rabbit or bunny figurines from vegetables or fruits. You don't need to have any special artistic abilities to complete the task yourself. It is enough to read the step-by-step explanation of the work and look at the photographs presented in the article.
If the work needs to be done for a school exhibition, then discuss with your child a possible version of the craft, purchase the necessary products with him, but there is no need to do the work for the student. Help him with advice, tell him how to fasten parts, explain the rules for handling a sharp knife. In the future, try not to interfere with the work process. If the child offers his own option, then give him freedom of choice. This is his school assignment after all. Happy endeavors!
Baskets of emotions and moods made from vegetables
You can make a “basket of emotions” from various vegetables. Children love such crafts very much, because they help them experience and understand various emotions and feelings.
“Basket of emotions” of vegetables 1
“Basket of emotions” from vegetables 2
Turtle made from small and large zucchini.
Squash turtle
From zucchini and autumn leaves you get the head of the hero of children's fairy tales, the Scarecrow.
Scarecrow made from zucchini and leaves
You can use zucchini to make a charming vase containing flowers, fruits and leaves.
From zucchini, cucumber and carrots you can make wonderful crafts for boys: a tank and a racing car.
Tank and racing car made of cucumber and zucchini
You can make an amazing dinosaur from zucchini, squash, peppers, cucumbers, apples and rose hips.
Dinosaur made from vegetables and fruits
Here is another version of our version of the dinosaur. Watch the step-by-step master class here.
Dinosaur made from vegetables
The turtle is very easy to make. We will need a flat pepper and a broccoli floret.
Using a knife, cut holes in the pepper.
Making holes
We insert the head and legs of broccoli into the holes. We make eyes from berries or greens.
Pepper turtle
We glue eyes and horns from vegetables and herbs to the giraffe. We give the zebra eyes and ears. Our zoo of vegetables and fruits is ready!
Crafts from vegetables for children
Cabbage and pumpkin hare
If you don’t know what to do with your children in the fall at the dacha, when other adults are busy harvesting, then try making crafts from vegetables with them.
The cabbage hare will turn out even more original if you use a small pumpkin as its head. The operating procedure is as follows:
- Using a very sharp knife, cut out the face of a bunny on a pumpkin (places for eyes, cheeks and antennae);
- use a toothpick to connect the head and head of cabbage;
- if you don’t have ready-made “eyes” at hand, which are sold in specialized stores, then you can make them from colored paper by gluing blue and black circles onto a white oval;
- half a cherry tomato is secured to the face using a toothpick as a spout;
- a long zucchini is cut lengthwise;
- holes are made in the pumpkin in the places where the ears should be;
- insert zucchini halves into them and secure with toothpicks;
- several circles are cut from a carrot and secured to a head of cabbage as buttons;
- 2 zucchini squash, halved;
- fasten 2 halves under the head of cabbage as lower limbs, and two at the junction with the pumpkin so as to form legs;
- tie a bow made of satin ribbon around the bunny’s neck;
- “fingers” are cut out on the lower paws;
- “put” a carrot into one of the legs and secure with a toothpick.
So that the “Cabbage Hare” craft can be used as a decoration for a hall in a kindergarten where a matinee is taking place, or a children’s room, a stand is made for it. To do this, fallen multi-colored leaves are fixed using a furniture stapler on a sheet of plywood or, better yet, on chipboard 2-3 cm thick so that it is not visible.
You can do it even simpler: put the craft on a tray, lay out autumn leaves on it, and put vegetables and fruits on top.
The “Cabbage Hare” craft can be installed under the New Year tree either in a single copy or together with “family members”. To do this, you will need to make several more bunnies of different sizes. In order to give them individuality, you can use an old hat, glasses without glasses, a headband and other accessories. This way you will get a grandmother bunny, a bunny and other figures with different “roles”.
Now you know how to make the “Cabbage Hare with Carrots” craft, and you will be able to please your children, as well as instill in them a love of joint creativity.
Which cabbage is suitable
For the Cabbage Hare craft to be successful, the vegetables must be fresh, not wilted and without wormholes, otherwise the “life” of your creation will be too short.
Although you can use any type of cabbage (cauliflower, broccoli, Peking cabbage, Brussels sprouts, etc.) to create animal figurines, white cabbage with tightly fitting leaves is more suitable for making bunny cabbage. Depending on the craft, you may also need two or more cabbage leaves, which are best removed from another head of cabbage.
Tips for making crafts with your child
Step-by-step instructions for making vegetable crafts with your child are provided below.
First of all, before moving directly to the production of crafts from vegetables with your own hands, you need the following:
- Stock up on natural materials - cabbage, tomatoes, potatoes, onions.
- Buy colorful paper, toothpicks, paints, glue, colored pens or markers.
And only after this, start creating a hare from cabbage. The kids love to create, and when the craft gradually takes on the appearance of their favorite hero, it delights them. Activities like these with their children will help parents become more familiar with their perspective. And also develop fine motor skills in children. What follows is a master class on how to create a cabbage hare with your own hands. Don't be afraid of difficulties, everything is shown simply and clearly.
Straight from the branch
It’s good that the dolls understand that eating only “tasty” food can be far from healthy. Therefore, their refrigerator always has a supply of fresh fruits, vegetables, and berries.
Quick crafts
Sometimes children report homework at the last minute, when it is no longer possible to purchase all the necessary parts. In such circumstances, you can make crafts from any available materials. Potatoes, apples, onions, toothpicks and plasticine are almost always at hand. This set is enough for several interesting blanks:
Hedgehog. A large and as even piece of potato as possible is used as a base. You will need a large number of toothpicks, which must be evenly placed over the entire surface. From any vegetables (carrots, apples, cucumbers, zucchini, eggplants) you can make very small pieces that should be placed on the sharp ends of toothpicks. Eyes can be made from any available materials or carefully cut out with a knife. Pigs. Pink potatoes will look best. All that remains to be done is to sculpt ears, a tail and a snout from plasticine. Eyes can be drawn with a felt-tip pen or sculpted from black plasticine. Kitty. The simplest option of all
To make it, you will need 1 onion, which must be carefully peeled, leaving the tendrils. The eyes and mouth can be carefully cut with a knife.
You can use 1 onion ring as legs. The cat will be curled up into a ball. The tail can be made from any available materials. Caterpillar. Several small apples connected to each other with long toothpicks form the base. You can additionally make antennae and eyes on the head.
Whatever model you choose, the main thing is not the result, but the process. The child must take an active part and be truly interested in everything that happens.
Since young children cannot maintain concentration for a long period of time, you should choose crafts that can be made as quickly as possible. If the process is delayed, then it is worth taking short breaks.
Cabbage hare: DIY craft.
In autumn, crafts made from vegetables become very popular. What amazing ideas come into the heads of our masters. One of these ideas is a cabbage bunny.
Let's see the step-by-step instructions on how to make a do-it-yourself cabbage hare.
cabbage hare
How to make a hare from cabbage? Making a cabbage hare begins with preparing the materials.
- two medium heads of cabbage
- two medium zucchini
- carrot
- knife
- toothpicks or thin wooden sticks for attaching craft parts
Wash all vegetables and wipe dry.
Craft materials
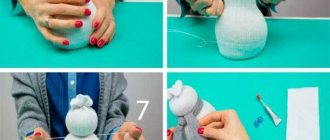
Take the first zucchini. We will make legs from it. The zucchini can be peeled, but it is better to leave it in the peel, then the legs will hold on more firmly. Cut the zucchini into two parts. Prepare two toothpicks.
Insert toothpicks into the two halves of the zucchini.
Insert toothpicks into zucchini
Insert the zucchini on a toothpick into the cabbage. We got bunny legs.
Using two toothpicks, we connect the head and body of the bunny together.
Connecting the head and body
To prevent the workpiece from falling, we place it against the wall. This is a rather voluminous and fragile craft, so it’s worth considering how it will hold up.
Blank against the wall
Cut two unpeeled zucchini and insert them into the top cabbage using a toothpick. These are bunny ears.
Insert the zucchini halves
We insert both ears. The ears will look more natural if the zucchini is slightly curved.
Cut out handles from peeled zucchini. We insert them into the cabbage using toothpicks.
Zucchini handles
Draw the bunny's eyes
Glue the bunny a triangular nose made of carrots. We fix the carrot as in the photo. The cabbage hare craft is almost ready.
Attach the nose and carrot
We decorate our bunny with a flower. Our bunny is ready to take prizes at the autumn crafts competition!
DIY cabbage hare
Stay with us and see how to make a luxurious frigate from zucchini and cabbage.
What crafts can you make from cabbage and other vegetables with your own hands?
It is customary to celebrate the Autumn Festival in kindergartens and schools in October or November. One of the traditional events of this celebration is an exhibition of children's crafts. On it you can see a variety of works, from decorated pumpkins to fabulous collages of leaves.
Exhibition in kindergarten
In this article we will tell you what beautiful crafts you can quickly make from cabbage, cucumbers, carrots and zucchini.
Big rabbit at the exhibition
The rabbit in the photo below is made from several different vegetables and is quite impressive in size. For its base, it is best to take a round tray. The body and head of the animal are made of a round and smooth pumpkin. You can use melon or watermelon with white rind. We’ll tell you later in the article how to make a hare from vegetables with your own hands.
The legs are assembled in two parts, so the eggplants are divided in half. The upper part of the paws remains unchanged, and the lower part is cut in half lengthwise. The corners are cut out with a knife to form the fingers. Thin zucchini were chosen to depict the hands. You will have to work especially hard to cut out the elbow bend, the angle of which is 45°. All parts are connected with toothpicks. The head is placed on the body with wooden skewers. 3 pieces will be enough to keep it firmly on the base.
The bunny's palms are cut out of lemon. On the head of the figure, eyes and a mouth with two front teeth are cut out with a carving knife. You need to work carefully, as any mistake will lead to the need to completely replace the head. The design of the treat for the animal also looks interesting. The role of the plate is played by a grapefruit with a cut top, and cherry tomatoes are located on top of each other. One of them serves as the nose. The eyes, in knife-cut indentations, are made from thin slices of radishes and blueberries.
Craft from carrots and zucchini “Hares on a car”
Hello, dear friends! Every year at the school where my youngest son studies, at the end of September there is a “Gifts of Autumn” craft competition. Children need to come up with and make something interesting from any natural material, vegetables, fruits, berries, in general, from everything that autumn brings to us. The idea did not arise by chance. One day we brought carrots from my sister’s garden, and while sorting them out, I came across interesting specimens that resembled the heads of bunnies with long ears.
Everything was clear with this, but at first I didn’t know where these bunnies should be placed or planted. The idea came somehow unexpectedly when I saw small zucchini. We decided to make a car out of this vegetable for the bunnies.
Sequence of making crafts from carrots and zucchini Hares by car.
1. Take carrots with ears and make them faces: eyes, nose, antennae (optional)
We fastened all the parts, even the smallest ones, with toothpicks.
We cut off the toothpicks that secure the nose and pupils, and paint over the tip with a black marker so that it is not noticeable.
We also make antennae from toothpicks: insert them, and then cut them off or break them off.
Insert a toothpick into the neck area.
2. Take a zucchini, cut off a thin layer along the fruit so that our machine is stable. (we use the cut layer with peel for the eyes and cheeks)
We make wheels from a small part of another zucchini: just cut it into circles, 4 pieces in total.
We attach the wheels to the car with toothpicks. To make them hold better, we secure each wheel with a small carrot circle.
We attach carrot headlights.
3. “Putting” the bunnies into the car: just insert the bunnies into the zucchini.
To make them hold better, we insert a small carrot circle between the head and the car.
So our carrot and zucchini craft “Hares on a Car” is ready.
I would be glad if our idea is useful to someone for playing games and making crafts with their child.
And if you want to find out what benefits the “gifts of autumn” watermelons bring to us, and how to choose them correctly, read here.
Source
Bunny in the meadow
The craft where the bunny sits in a flower meadow looks interesting. To do this, select a large tray and place colorful vegetables on it. The best choice for this purpose is cauliflower and broccoli, between which are inserted pieces of orange or red bell pepper, cut out strips of carrots and cucumber. It turns out a multi-colored motley bedding on which the rabbit lies. To place it, a small depression is made in the center.
The rabbit craft itself made from vegetables is assembled in the center of the clearing. Cauliflower serves as both the body and the head of the beast. Ears made from cucumber halves cut lengthwise are inserted between the inflorescences. The eyes and nose are made from round black berries. You can use pitted olives. The parts are fastened, as usual, with toothpicks. The structure of cauliflower conveys the fluffiness of the animal.
Hares from a cut tree!
What can you do for your dacha with your own hands? This question is probably asked by every owner of a dacha plot. And this is not without reason, because a dacha is not only a house and several acres of land that are surrounded by a fence. For many of us, including me, this is a vacation spot where we spend a lot of time and where we even move for the whole summer. Therefore, we often want to decorate our corner to enjoy peace and tranquility away from the bustle of the city. It seems to me that every summer resident has logs on hand from which to make such beautiful bunnies! They will definitely decorate your dacha and cheer you and your loved ones up. And the most important thing is that any of you can do them! It's very fast and very easy! This work left my family and I with a lot of positive emotions! We received a boost of energy and a lot of fun! Enjoy watching our family master class. Go…)
These are the cute and beautiful bunnies you will get at the end of the work
Tools and materials
- logs of different diameters (for the head, body, paws and ears), sizes to suit your taste and eye;
- saw;
- a hammer and a couple of nails;
- paint with a thin brush;
- bow decoration (you can use anything);
- and of course - a good mood, desire and a little patience.
Progress
We find logs of suitable size and, using a saw, we cut circles of different diameters! You will need 4 small logs, approximately as in the photo
We cut 4 small circles (these are our future paws) about 3-4 cm wide. Next, we cut 2 circles with the largest diameter (these are our bunny bodies), so that they are more stable, we make them about 9-10 cm.
Next, we cut 2 circles (for the head), using a diameter slightly smaller than the body, but slightly larger than the legs. Width approximately 3-4 cm
And finally, 4 oval cuts (for the ears). We try to cut at the same angle to get elongated ears.
You should end up with something like this:
Now we can start assembling our bunnies!
Take a hammer and find a couple of nails
We nail our paws to the body. The main thing is that the nail does not go through, so we select the desired width
We do the same with the head
We nail the ears on the back of the head
This is what the hare should look like. There is very little left... Now let's turn on our imagination! You can paint, change the color, whatever you want, to your taste.
We drew him this funny face
And we drew his paws. Now we decorate it the way your heart desires!
We made this bow for one of our bunnies. Let it be a girl!
We also attach it to a nail
Now we have a great bunny girl. So that she doesn’t feel sad alone, we’ll make her a partner with another hare. We do the same work, only without the bow.
Just look what we have achieved...
Two wonderful bunnies!
This work is another reason to get together with family or loved ones. We have no doubt at all that if you want to decorate your dacha with these hares, they will definitely turn out very beautiful! We hope that this work will be interesting and useful for you!
Thank you for watching our master class to the end.
Hedgehog
A small forest animal with thorns will end up right on your table. Even a small child can make a cute rodent. Modeling from plasticine for children is incredibly exciting fun.
How to make:
- Prepare the materials necessary for work. Make a small ball from a brown base.
- Now you need to stretch the resulting workpiece a little; the ball should turn into a drop-shaped figure.
- Next, we sculpt a nose and eyes for the hedgehog from plasticine with the children. Attach everything to the body.
- You will need to place the seeds on the surface of the sculpted figure with the pointed part facing up. Attach the “needles” in the same way as shown in the photo.
- When the empty spaces on the body of the forest animal are filled with seeds, place the plasticine figurine on the cardboard. All is ready!
Crafts based on the fairy tale “Cipollino”
As you know, this story involves various vegetables, fruits and berries. Show your favorite child how to create crafts of this kind. Cippolino is created from onions. Take this vegetable and use plasticine to make it more realistic.
This plastic mass will help you modify the lemon so that it turns into a characteristic character. You will make 2 cherry sisters from these berries, but decorate their faces with plasticine. From it you will make a body and arms, and turn corrugated paper into beautiful dresses.
Various fruits and vegetables from the garden will be used. Make radishes and the corresponding fruit, and pears and apples will become different characters. Facial features can be drawn with paints or felt-tip pens, and you can also use plasticine for this.
Make a pumpkin costume. Create a house from planks or strips of cardboard.
Here's how to turn vegetables, fruits and berries into heroes of magical stories. Look at the crafts on the theme of a fairy tale grown in a garden bed, so that together with your children you can make plots for magical stories from vegetables and fruits.
See what crafts you can also make from vegetables and fruits.
Article on the topic: What crafts to make for the autumn holiday
Plasticine cake
Well, what holiday could be complete without a magnificent cake? And the dolls keep up with the people! Young chefs are capable of creating true masterpieces! Each celebration has its own special cake.
Making a hare from cabbage
It is important to take into account the interests of modern children. The process of creating a regular rabbit may seem boring
But making your favorite cartoon character yourself will be incredibly exciting. One of these heroes is the hare Krosh. For the product you will need a medium-sized head of cabbage, several lettuce leaves (you can use the top leaves of cabbage from the head), zucchini (or potatoes), a felt-tip pen, a toothpick and plasticine. This DIY cabbage craft will not take much time:
- The first step is to tear off the top leaves of the head of cabbage. It is necessary to give the base as smooth a shape as possible.
- The two lettuce leaves should be as similar in size and shape as possible. They need to be firmly secured to the top of the head of cabbage using several toothpicks. This is how the ears are made.
- After this, you can move on to the legs. For the future hare, they will be made from eggplant, which should first be cut in half. Each half can be further divided (not completely) into three equal slices to form claws. It is better to attach the legs to the body with the help of several toothpicks.
- The arms for Krosh are created and attached in the same way. In this case, the eggplant halves should be completely symmetrical; no additional cuts need to be made.
- You can make the most realistic eyes from paper and colored cardboard. It is best to attach them to the main body using glue.
- The last step is to draw a smile. This is where red and white markers will come to the rescue. Using the first one, you can give an outline and use white to depict the teeth.
You can complement the composition with a beautiful, bright bow. The material can be absolutely anything. During the creation process, it is necessary for the child to do the most interesting work. You should not force your child to cut out complex elements, as he will quickly lose interest. But the child can easily fix the basic elements, draw eyes or a smile.
Basic ideas and materials used
You can always show imagination and creativity. In conditions of limited time, you will have to start implementing the task based on the means at hand. If you have the opportunity to think through the project, search for information on the Internet, consult with friends, then you can purchase everything you need in the store. When choosing vegetables, you should follow several rules:
- It is recommended to choose specimens of the most correct shape. It is easier to work with such samples and you can create more accurate products.
- It is strictly forbidden to purchase overripe vegetables, as the soft surface will be difficult to process further. Some varieties can be purchased slightly unripe.
- The size must correspond to the intended project, so you can go to the store only after deciding on the type of craft.
In addition to the simplest recommendations for choosing vegetables, there is a minimum set of necessary materials and tools. Of course, the complete exact list will depend on the type of craft, but in most cases craftsmen will need:
- Scissors. It is advisable to have several options available that differ in size and shape. Most often they are used for working with paper or thin sheets of cabbage. But sometimes you have to use such a tool for small holes inside a vegetable.
- Paints. You won’t have to eat your future masterpieces, so regular watercolor paints will do. With their help, you can draw cute smiles, eyes, or paint your future craft in any color other than the main material.
- Plasticine. High-quality material adheres perfectly to any surface. With its help, you can not only choose the desired color, but also make the craft more voluminous. The use of an elastic object is especially important when creating figurines depicting various cartoon characters.
- Colored paper and cardboard. Such items are always at hand. You can attach the cut out elements to the vegetable figurine using glue or toothpicks.
- Toothpicks or matches are essential items when creating most figures. The surface of some vegetables does not hold glue or plasticine well, so the only way to secure the necessary items is to pierce them.
- Various natural materials: cones, moss, leaves. Natural ingredients look most natural on vegetables. Of course, replenishing supplies in winter is not easy, so you should take this fact into account when choosing the type of future craft.
Most of the items listed are available in the house, so you don’t have to purchase them specially. Sometimes the easiest way is to build on the available vegetables and tools when choosing a craft. For a child to be in a good mood, it is absolutely not necessary to receive a real masterpiece as a result. It is very important that the little craftsman is really interested in the process itself.
Original crafts from vegetables for school
A child 7-10 years old can independently work on compositions like this:
Peacock
A pumpkin with a diameter of 15-20 cm is used as a basis. A “tail” of dried leaves is attached to the back side like a fan. A cardboard head is attached to the top of the pumpkin. Beautiful wings will be made from apple slices or plasticine, decorated with “feather” seeds. For paws, take ordinary twigs or stems of greenery.
Note!
- How to make flowers from cold porcelain: chic floristry and DIY crafts for the New Year step by step
- How to make cold porcelain from potato, corn starch, liquid, without soda. Recipes and cooking methods
- How to properly make a birdhouse with your own hands from scrap materials: we create an original birdhouse according to sketches
Ship
The zucchini is cut into two parts. One is placed on a blue background (“sea”) with the cut side up. Tall wooden skewers (“masts”) are fixed in the pulp. Sails are cut out of paper, fabric or laid out with large leaves.
You can put figures of people made of acorns on the ship, cut out square holes on the sides of the ship for loopholes, and insert cannon barrels made from onion rings inside.
Procedure
Its execution proceeds as follows:
- The potato must be cut in half.
- Cherry tomato also in two halves.
- Using toothpicks, combine the resulting potato halves with the bottom of the cabbage.
- Peel the onion and cut into two parts.
- On both halves of the onion, draw the eyes of our rabbit in a dark color.
- Using toothpicks, fix one part of the cherry in a head of cabbage - you get a bunny's nose.
- Also, use toothpicks to secure two raisins on the future nose of the hare - the opening of the nose.
- We clean the second head of cabbage from two cabbage leaves and cut out the ears from them.
- We cut out the cuttings of the leaves in advance and secure them with toothpicks on the top of the cabbage head.
- Cut the beets in half and cut out an ellipse.
- Attach it to the head of cabbage with toothpicks - this is the hare's mouth.
- Use a pen or felt-tip pen to draw eyebrows.
Corrugated paper rose cabbage
The second option for making crafts is to create an open head of cabbage, resembling a flower bud in appearance. To make the progress of the work clearer, you can take a look at the step-by-step master class. Corrugated paper cabbage is collected from 10-12 leaves.
First you need to take a piece of crepe paper and crumple it well. Then cut out leaves from it in the shape of an egg. On each workpiece, on the side of the narrowed edge, you need to make an incision, approximately 1/3 of the leaf long. Next, we overlap the right half with the left one so that the sheet turns out to be convex. When all the elements are ready, you can start assembling the cabbage. We twist the first leaf into a narrow cone and gradually grow the head of cabbage, gluing new parts to it in a circle.
Funny figurine
This funny cartoon character is made from melon and pineapple. The body is represented by simply cutting off the top of the fruit so that the bunny sits straight. First, rectangular corners for the eyes and mouth are cut out on the melon, then, after cutting off a layer of peel, a fringe of fur is made on the cheeks. This is how a bunny is often depicted in fairy tales and cartoons.
Bow ties are made from eggplants by cutting off the thin, dark skin. Place it on a board and shape it into the desired shape with the tip of a knife. There are many small details on the character's head. The ears are made from zucchini. It needs to be carefully selected from the market. The edges should be pointed, but if you don’t find such a fruit, you can cut out the ears with a knife. The nose is a radish, and the eyes are made up of several layers. The first of them is a circle of zucchini, then a slice of radish, in the center there are small pieces of radish at the spine. Attach toothpicks in place of the mustache. The two front teeth can be cut from the peel of a zucchini or white radish.
Tips for making crafts with your child
Step-by-step instructions for making vegetable crafts with your child are provided below.
First of all, before moving directly to the production of crafts from vegetables with your own hands, you need the following:
- Stock up on natural materials - cabbage, tomatoes, potatoes, onions.
- Buy colorful paper, toothpicks, paints, glue, colored pens or markers.
And only after this, start creating a hare from cabbage. The kids love to create, and when the craft gradually takes on the appearance of their favorite hero, it delights them. Activities like these with their children will help parents become more familiar with their perspective. And also develop fine motor skills in children. What follows is a master class on how to create a cabbage hare with your own hands. Don't be afraid of difficulties, everything is shown simply and clearly.
Required Ingredients
To create a “Hare” craft with your own hands from cabbage, you need to thoroughly prepare: stock up on materials for work.
Now let’s look at a way to create a figure from the following components: vegetables, fruits, berries and leaves. To make a “Hare” craft from cabbage, the photo and description below will help.
Ordinary white cabbage will be an excellent material for the production of a funny rabbit. In order to make the figurine more similar to the living original, you will need:
- dark red and scarlet paint;
- 1 small tomato;
- head of cabbage;
- 2 oblong leaves of multi-colored cabbage;
- large potatoes;
- toothpicks;
- brush.