It’s very easy to make a craft in the form of a letter yourself, both for adults and kids. Almost any material is suitable for this, such as paper, plastic, metal and other available means.
You just need to show your imagination and have a goal aimed at a specific situation for which this craft is intended.
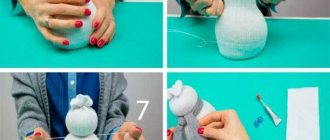
Volumetric version made of cardboard and napkins
To create such a stylish accessory, you should stock up on:
- cardboard;
- glue;
- with a simple pencil;
- napkins 24*24 cm;
- scissors;
- patience.
Sequencing:
- Make a stencil from a cardboard sheet.
- Cut napkins into strips. The number of flower petals with which the product will be decorated depends on their length.
- Take one strip, twist its edge into a tube and bend it at an angle of 45 degrees with the free end down.
- Wrap the cylinder with the tip turned up. You should now have a petal.
- Fold the free section of the strip at the same angle, creating petals, until the workpiece is finished.
- After the number of roses required to finish the letter has been made, cut off 10 mm from the bottom of the cone and “plant” it on a previously cut cardboard figure coated with glue.
- Make a mount on the back of the craft so that it can be attached to the wall.
Protection of wood from external factors
Such a wooden sign, if it will stand/hang outside, must be properly impregnated to protect it from environmental influences.
The homemade design must be resistant to moisture, wind, sunlight and fading.
- A protective wood varnish is suitable for this.
- It is better to use one that protects the wood outdoors from high temperatures (this can also be a yacht varnish).
- You can use matte varnish and paint everything - the background, letters, edges and back.
- This procedure is repeated three times.
- Afterwards you need to wait a few days until everything dries.
- It is also worth remembering that even colorless varnish darkens the color of the wood.
This gives it a warmer, more expressive tone. This is clearly visible in the photo of the wooden letter craft.
Letter pillow
Nowadays, an expensive gift toy will not surprise anyone. But when giving a gift, you always want to surprise. Only handcrafted products can make a smile appear on your face. The best example is the personalized pillow letter. Necessary materials:
- cardboard;
- fleece in two different colors;
- padding polyester
This pillow is easy to sew. First you need to make a template from cardboard. Then transfer it to the fabric. Next, the material should be cut out, not forgetting to make allowances for the seams, stitched on a machine, filled with padding polyester, and sewn by hand.
Blooming alphabet
From materials:
- Natural flowers
- cardboard
- artistic knife
- scissors
- ruler
- paper towels
- plastic bag
- container with water (for example, a small bucket)
- sponge for floral work
- pencil pen)
- spray paint
Stages:
- 1. A cardboard base is made. The top remains free.
- 2. The oasis sponge should be cut into pieces, and then distributed inside the letter blank.
- 3. Pieces of oasis must be taken out and soaked for an hour and a half in cold water.
- 4. The inside of the sponge should be lined with polyethylene.
- 5. After watering, parts of the floral sponge are laid out on a paper towel to dry. There is no need to squeeze or dry it in any way.
- 6. Redistribute the oasis and fill the cardboard base with it.
- 7. Trim the buds of flowers, leaving 3 cm of stem.
- 8. Fill the surface of the craft by sticking flowers into the sponge.
Foam letter
If you have foam plastic lying around, we suggest you make a letter-shaped craft from it. First of all, you need to decide on the dimensions and configuration of the future accessory.
The second step is to create a paper pattern. You then need to outline it with a felt-tip pen on a piece of foam plastic and carefully cut it out with a knife. Each face of the resulting letter must be sanded with sandpaper.
Baby book “Funny ABC”
Lyudmila Maykova
Baby book “Funny ABC”
Creating a baby book “ FUNNY ABC ” with your own hands.
“Fun ABC ” is a wonderful game that will allow your child to easily learn letters.
Goal: to introduce children to the book “ ABC ”; teach children to name letters in order.
Objectives: to develop in children the ability to independently name, show and write the desired letter.
I want to share my little book that I created with my own hands. The simplest thing is, of course, to print it, laminate it, and stitch it, but this costs a lot of money. Here's my simple, little idea.
To do this we need:
1. Landscape sheets (in my case, 33 sheets, a separate sheet for each letter)
.
2. Wallpaper (a small piece for a book )
.
3. Simple pencil, eraser.
4. Paints (gouache or simple pencils, depending on the brightness of your book ).
5. Knitting threads (any color)
.
8. Printed riddles.
Cardboard craft
The simplest way to make a letter craft is to make a three-dimensional composition from cardboard sheets. This solution is suitable even for kids. Its implementation requires minimal time and physical investment, and the basic material is available to everyone.
Progress:
- Sketch the outline of the letter on the cardboard, mark the allowance along the straight edges to the desired thickness.
- Cut out the workpiece. Attach it to the next sheet and make a 2nd copy.
- Make strips from the remaining material and glue them into narrow compact cylinders.
- Glue them onto one of the templates.
- Glue the second template on top.
Home decor in eco style
You will need:
- glue gun
- moss for floristic work
- green ribbons
- blanks
Process:
- 1. Make a cardboard blank or use an existing one.
- 2. Apply glue to one of the small areas of the surface of the base, apply moss to it and press.
- 3. Process the entire figure in this way. Allow to dry completely.
- 4. Attach green tape to the back side with glue.
- 5. If there is a sufficient amount of remaining moss, you can paste over the back of the craft.
What can three-dimensional figures be made from?
To make three-dimensional figures of letters and numbers, the use of various materials is allowed. The simplest option is paper and cardboard. Products made from them are distinguished by their extraordinary lightness. You can hang them on walls and arrange holiday photo shoots.
The paper can be any - regular or corrugated. Napkins will also be appropriate. A number of other materials are also suitable for making three-dimensional letters.
Facing technique
Numbers and letters made from napkins made using the cutting technique for a birthday or anniversary look very voluminous. They turn out fluffy and weightless. Corrugated paper is best suited for these purposes. If you don’t have it, you can use plain napkins.
The joyful emotions of your loved ones and guests more than pay for all the time and effort.
The process consists of several stages.
- Cut paper or napkins into equal squares.
- Place a pencil in the center of the sheet and press it with paper.
- Apply glue to the surface.
- Place a pencil, crimped with paper, on the glued base.
- Fill the entire area in the same way.
- After this, smooth out the entire decor with your fingers and carefully cut off the excess parts with scissors.
It is quite difficult to predict in advance how many napkins you will need. But when purchasing, consider the size of the finished product.
Flowers can also be made using the trimming technique.
To do this you will need:
- rectangular sheets of paper;
- stick or pencil for trimming;
- plasticine.
The larger the figure, the more material will be needed for it.
Manufacturing instructions.
- Stretch the plasticine with your hands.
- Wrap the paper around the pencil so that most of it remains free.
- Insert it into the prepared plasticine.
- Do the same procedure for 3 more petals.
- Fill the voids between them with petals of other shades.
- Cut out the center from corrugated paper and attach it to the center of the flower.
The more magnificent the decor, the better the numbers made from napkins look.
The best option for trimming is polystyrene foam. Using it, no glue is required, the stick easily enters the soft material, leaving a trim in it. In this way, you can make decorative lines and patterns on the figure.
It costs from 3 to 7 packs of napkins to prepare.
Threads
Such items will already be decorative details. Threads are wrapped around a cardboard or foam base. Next, the products are decorated to the master’s taste.
On the topic: methodological developments, presentations and notes
Description of testing methodological development in mathematics as part of research work at school.
VI International Scientific and Practical Conference of the Russian Association of Dyslexia CHILD WITH DYSLEXIA IN THE REALITIES OF THE XXI CENTURY.
Development of sound-letter analysis and synthesis in speech therapy classes at school.
1. Features of dysgraphia, causes, forms. 2. Correction of dysgraphia: exercises for use in writing lessons.
Source
Corrugated paper option
Corrugated paper is an amazing material that allows you to get stylish looking three-dimensional shapes. Instructions:
- Prepare a cardboard template.
- Cut strips of paper measuring 3.5*50 cm.
- Wrap one end of each piece.
- Form a flower, securing the bottom with a thread of the appropriate tone.
- Cover the cardboard template with paper of a similar color and decorate with the resulting flowers.
Volumetric paper letters
Lightness and tenderness - these qualities are inherent in paper figures. This is a good solution for decorating a wedding celebration. They are created quite simply. First you need to make a pattern of the required letter. Next, it should be transferred to colored cardboard and carefully cut out with sharp scissors.
You only need one piece. Here are the next steps:
- Cut colored paper into squares of various sizes. Round the corners.
- Cut each element in a spiral. There should be a circle in the middle. You need to put a little glue on it.
- Wrap the workpiece in a spiral, forming a flower. Press firmly into the center to seal.
- After the required number of such elements has been made, decorate the letter stencil with them.
Changing capital letters to lowercase letters using the Microsoft Word toolbar
Microsoft Word 2003
- Select with your mouse the piece of text you want to modify.
Select with the mouse a piece of text that will need to be changed - On the word processor toolbar, find the Format tab, located between Insert and Tools.
Click on it. Find the “Format” tab, click on it - In the window that opens, select “Register”.
Click on it. In the window that opens, select “Register” and click on it - In the interface that appears, select the phrase “all lowercase.”
Check the box for “all lowercase” - Click OK and the dialog box will close.
Click "OK"
Microsoft Word 2007
- Use your mouse to highlight the word or sentence you want to edit.
Select with the mouse the word or sentence that will need to be edited - On the toolbar, find the “Home” button.
Click on it. Go to the “Home” tab - In the “Font” group, located after the “Clipboard”, left-click on “Register”.
In the “Font” section, click on the “Aa” icon, which is called “Register” - In the dialog box that opens, select the phrase “all lowercase.”
Click on it. Click on “all lowercase”
So the user can choose the following letter spellings:
- “As in sentences” - the first character in the statement will be capitalized, the remaining letters will be small;
Example text with “As in sentences” included - “ALL CAPITAL” - all characters selected by the mouse will become large after pressing the button);
By selecting “ALL CAPITAL” all selected text will be in capital letters - “Start With Capitals”—the first characters of each individual text element selected in the document will be large;
subsequent characters will become small; Example of text with the “Start in Capitals” option enabled - CHANGE CASE - the text will be converted as follows: small letters will become large, large letters, respectively, will be small.
Example of text with the “CHANGE CASE” option enabled
Letter shape and options for its decoration
If you decide to make a “Letter” craft with your own hands for school or for the interior of an apartment, pay attention to some of the nuances of its implementation.
In addition to the standard method, there are others. Mothers and daughters can create figures from leftover material. Letters are cut out from soft, pleasant-to-touch fabrics and embroidered with beads and seed beads.
There is also a method of making coarse textured textiles. Such crafts are also sheathed around the perimeter. However, paper products look the most beautiful because here you can play with colors and designs.
As for the options for decorating letters, there are a lot of them. Here are just a few of them:
- painting with paints;
- decoration with live or artificial flowering plants;
- trim with lace, braid;
- decoration with beads, beads, rhinestones, sequins, bugles;
- satin stitch or cross stitch embroidery;
- scrapbooking;
- decoupage
The choice of decoration method depends on your taste, the style of the interior, where the letter will hang, and the reason for its production. An original decorated pillow will be the highlight of any room. The unusual design will certainly attract the attention of guests.
The principle of selecting materials for work
Materials for the book are an important component of the project. They are selected individually for the child. To work on the alphabet and when selecting paper for the book itself, you need to consider:
Child's age
This determines how dense the sheets will be needed to make the alphabet. If you know that it is still difficult for a child to leaf through books with thin sheets, then there is no point in taking standard thin paper for a copier. It is better to use thick sheets like those found in drawing folders.
Amount of time
The amount of time you are willing to spend working. Surprisingly, the question “how long will it take to make an alphabet book yourself” is rarely asked by anyone. The answer to it depends on how creative you are in creating and designing your own alphabet book.
When answering this question, you must consider which paper to choose:
1. already cut sheets for drawing A4 (A3) format in folders. They come in standard sizes, and you won’t have to cut anything;
2. Whatman paper, A1 format. You can cut it into the required number of sheets, and choose the book format yourself to assemble the alphabet. You can also come up with a shape (not just a rectangle), for example, a mushroom or a butterfly. In this case, all individuality and creative ideas are reflected to the maximum. The ABC book becomes a kind of author's masterpiece, and can also serve as an original gift for a child;
3. unnecessary posters or wallpaper. This option allows you to make sheets that are not as thick as those from whatman paper or paper from a drawing folder. At the same time, space for creativity is preserved. This option is suitable for children 3-4 years old, when the child has more developed fine motor skills.
Paper type
This point is directly related to the previous question about time, because The choice of glue for work depends on the chosen paper.
1. If you have chosen thick, rough paper (for example, a state mark) to create the base of the book, then you can use any glue of your choice: PVA glue or Moment Crystal. In the first case, the product will take longer to dry and will have to be placed under a press, in the second - everything is much faster, the downside is the strong smell of glue during operation.
Making letters for children
By creating figurines of letters, a child learns several things at once. He is learning the alphabet. Acquires skills in working with various materials and tools. Study the formation of syllables from letters. The latter is especially important. Laying out syllables from such crafts makes them much easier to memorize.
Such creativity develops fine motor skills, stimulates the imagination, and teaches accuracy and patience. It also has a beneficial effect on discipline, which is important for schoolchildren.
Creating letters from scrap materials is a useful skill. Having such skills, you can easily distract your child if necessary. Such a pastime will bring joy to both him and you. In addition, you don’t have to rack your brains over choosing a gift for a friend or colleague.
Stylish pillows in the shape of letters are sure to please everyone. It is also worth noting that, if necessary, this hobby can be turned into a source of additional income by selling handmade products via the Internet.
Preview:
Using the split alphabet for the development of sound-letter analysis and synthesis in the prevention and correction of dysgraphia and dyslexia.
Working with the split alphabet in speech therapy classes is one of the effective means of preventing and correcting dysgraphia and dyslexia. An indispensable condition for ensuring the relationship between reading and writing is analytical and synthetic work. The implementation of the relationship between these processes on the basis of sound analysis gives positive results in working with the split alphabet. Thus, by composing syllables and words from letters, dividing words, changing them by changing individual letters, the student practically divides a whole complex material into its component parts and again obtains this whole from them.
Working with the split alphabet is associated with the active activity of students. This ensures their steady and focused attention. Students search and find the necessary letters, put them in a certain order, and move them when adding or replacing them in accordance with the assignments. Children hear a word, perform a sound analysis of it, present the sound composition in the form of written signs, and what is heard becomes visible. Then the reverse process occurs: children read, translate the letter composition into sound, the visible becomes audible, the students prepare to read, write words and sentences. They master and determine the method of work, learn to first effectively and then mentally compose words. Abstract grammatical concepts - a syllable, a word, a sentence - when working with a split alphabet, are concretized, become visible and even tangible. The listed advantages of working with a split alphabet should include the gradual mastery of the ability to independently analyze, reason, correlate rules and actions, and organize your work in a certain sequence.
The inclusion of this method in the main work of a speech therapist leads to positive results in the development of analytical and synthetic activity of students. Each child independently completes the task given by the speech therapist teacher, mentally reproduces the entire process of analysis and synthesis of a word: divides it into syllables, correlates the sound with a specific letter, finds the necessary letters, connects them into syllables, and syllables into words, or composes a sentence from given words or on a given topic.
Some games with split alphabet that can be included in the work of a speech therapist at different stages of the formation and correction of written speech and reading in children:
Target. Learn to distinguish a sound from a number of other sounds and correlate this sound with a letter.
Children need to hold up a card with a picture of the sound they will hear.
Next, different sounds are offered: A, P, U, K, A, etc.; only vowel sounds, only consonant sounds.
Target. Learn to determine the location of sounds in a word.
Children are orally offered a word in which they must identify the 1st sound (last) and raise the corresponding letter, come up with words for this sound; lay out from the split alphabet words in the name of which the given sound is at the beginning of the word, in the middle of the word, at the end.
Target. Practice determining the sequence of sounds in a word.
Target. Develop the ability to compose words from the proposed cut-out alphabet cards.
Children are asked to guess which word will come out of the letter cards (cards are given in random order, words are selected as the structure of the word becomes more complex: monosyllabic words without a cluster of consonants: moss, whale, poppy; disyllabic words without a cluster of consonants, consisting of two open syllables: hand, leg, vase; one-syllable words with a consonant cluster: bridge, mole, tank; two-syllable words without a consonant cluster: lemon, wind; two-syllable words with a consonant cluster: pen, watermelon, etc.)