On a wild peninsula there is a magic sign. He is alone. His name is Mayak. And from the sea everyone can see our beautiful Lighthouse. Seeing him, the sailor always hurries to the shore. (V. Presnensky)
We propose to make a wonderful three-dimensional applique - a lighthouse on a steep cliff by the sea.
Did you know that in ancient times lighthouses were not very similar to modern ones. On top of them were large metal baskets in which fires were lit. Modern lighthouses are equipped with powerful searchlights and can illuminate the path of ships with a power of 20 million candles!
Hurry up, prepare everything you need for work, and we will tell you how to make your own personal lighthouse!
Wipe clay pots with a damp cloth
For this project you will need four clay pots, which can be any size you like, as long as they come in four progressively smaller sizes: large, medium, small and extra small. Start by removing any possible dust and small debris from the pots with a damp cloth. Paint clay pots.
For the project, it is better to use outdoor acrylic, which is weather-resistant. Paint the rim of the pots one color and the body another. I decided to paint the headbands white. Apply the paint in several layers with preliminary drying of each layer. For now, paint only the large, medium and small pots.
Overview of a beacon for tracking a person
People are increasingly using tracking equipment for a variety of purposes. Such devices can monitor people's movements around the clock. The smallest devices are called GPS bugs; they are so invisible that they can be attached to a person’s clothing. Currently, a device such as a beacon for tracking a person is gaining increasing popularity. It is used by parents to control their children, entrepreneurs to control the movement of their employees: couriers, sales managers, sales representatives.
Please note => How to check a room before purchasing to ensure the deal is clean
Making a decorative lighthouse
A master class for those who love experiments, are not afraid of a hammer, and creative but painstaking work!
1. Materials you will need:
- wooden panel 15-20 mm thick
- pencil, ruler, piece of thick paper (for making a lighthouse stencil)
- acrylic paints of two colors, brushes, water
- hammer, black nails 10-12mm, several nails with decorative heads
- artificial thread and sisal
- lighter, scissors
- 2. We cover the wooden base with paint on both sides and let it dry for about 1-1.5 hours; you need to cover it with a thin layer, applying the paint across the structure of the wood to preserve the texture.
- 3. We cut out the shape of a lighthouse from thick paper, apply it so that the middle of the stencil and the wooden blank coincide, trace the outline and mark the stripes. We paint the stripes in a contrasting color, applying the paint with light strokes, leaving it uneven so that the color of the base appears, let the paint dry for 30-40 minutes.
- 4. We take nails and nail them along the contour of the unpainted stripes; we nail the platform on the upper tier of the lighthouse with a rectangle. You can add several decorative carnations with an unusual carved head to those sections that will not be filled with weaving. It is important to try to nail the nails as evenly as possible relative to each other with the same distance between them. You need to drive in 2-4 mm.
- 5. We take a synthetic thread, tie one end of the thread to the outer stud (top or bottom of the section) into 2-4 knots, cut it at a distance of 1 cm and carefully set the edge on fire, the synthetic thread will melt and fix the knot. We create a cross-shaped weave and fasten the second end of the thread in the same way.
- 6. We take a thicker, textured rope - sisal and fasten it along the contour of the lighthouse with 4 nails, tie and trim the edges, additionally create a simple weave on sections where there is already weaving with thread. You can attach such a decorative beacon to a metal loop by screwing it on the reverse side. Anyone skilled in the art of using a drill can drill a small, blind hole on the reverse side!
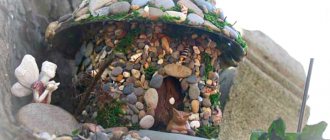
Making a lighthouse from pots, “not fading in darkness and fog”
This is an amazing solution for the garden. With such a magnificent design, the landscape design of your personal plot will take on a luxurious look. There will be no limit to the admiration of friends, children and ordinary passers-by.
They create a miniature lighthouse from pots according to the following scheme:
- choose from 3 to 5 pots of different diameters;
- paint them red or white;
- the side/rim of the products is made in a contrasting shade;
- openings of windows and doors of a unique design are painted on the containers with black paint;
- form a pyramid by applying permanent glue to the edges of the bottoms;
- a saucer is glued to the topmost part;
- construct a cover for the lamp from the remaining stands;
- A miniature pot is attached to the top of the resulting pyramid.
An artificial lamp (with LED candles) from a saucer is placed on the stand and covered with a lid. At the same time, you should not glue such a flashlight so that it can be easily replaced later. Some people use solar-powered garden lights as a light source. The designs are often decorated with other crafts or shells.
On the facade of the miniature lighthouse there are all kinds of accessories with a marine theme:
- fishing nets;
- anchors;
- sea stars;
- shells.
Install luxurious crafts from flower pots on durable supports. Some people make real stone foundations. They turn over massive stands or pallets. Then the entire perimeter of the rim is decorated with polished stones.
A simplified version of the base for a lighthouse is often used. Wide round pallets are filled with crushed stone or pebbles and the constructed structures are attached to them.
The proposed options for garden crafts will become a real asset to a family, an entire street or even a neighborhood. In addition to enthusiastic exclamations and smiles, these exhibits will evoke a lot of positive emotions among passers-by.
Master Class
each of us is a Master
Lighthouse . Decor in a marine style made from waste materials.
WE WANT TO THROW AWAY: coffee cans, newspaper (or paper egg cartons)
WE WILL MAKE:
decorative figurine “Lighthouse”
The sea season seems to be over, but the ideas remain. And I suggest you save tin cans in order to build a guiding lighthouse for the new season. The photo shows a small structure made from coffee cans for the home, but you can build a similar one from larger cans for the garden.
Craft on a “marine” theme. And, of course, we use everything unnecessary. This craft can be simply a decorative element at home or in the garden. Or maybe a toy for children. But if you wish, you can turn it into a lamp: only carefully, with the participation of an electrician and using a special “non-heating” light bulb. Well, or use an LED candle.
"Lighthouse" with your own hands.
WE WILL NEED:
1. Acrylic paints + varnish. 2. “Liquid nails” for joining cans. 3. Brushes. 4. Wire from "Champagne" - for handrails.
PROGRESS:
1-2. Clean the jars with sandpaper. We customize the design: cut holes where necessary. 3. We mold the missing parts - the roof, lifebuoys, stones - from paper dough (papier-mâché). Let's dry it. 4. We paint. 5.Assemble and decorate. Don't forget about varnish, and for use in the garden - yacht varnish.
Note: the “weather vane” can be cut from a tin can.
FOR THOSE WHO LIKE SIMPLE:
But, in general, you can get by with just tin cans: connect them using liquid nails or glue. All “decor” (stones, windows, etc.) should be drawn or pasted on (decoupage). And instead of the roof, insert a suitable (!) solar-powered garden lantern.
Source
Crafts from improvised materials
The most popular among available materials for crafts are bottles, various plastic jars and boxes. Before starting work, you should definitely think through the details so that the result is truly beautiful and does not resemble a pile of plastic waste.
Plastic bottles are easy to cut and can be easily shaped into the desired shape. And if you cover the result of the work with suitable paints, you get bright, unique decorations for your dacha. For example, you can make figures of animals (pigs, cows, bees) or fairy-tale characters. By making such decorations, you can unleash your creative potential, and each time the crafts will become more and more perfect. With a large amount of unnecessary plastic, not only crafts, but also furniture are made from it.
If you have a glass cutter among your tools, you can make original pots from glass bottles. Such crafts look very stylish and easily fit into any design. Candle stands can be made in the same way.
Bottle caps can also be useful for decorating furniture, decorative fences, creating compositions and even curtains. You can also use containers from chocolate egg toys.
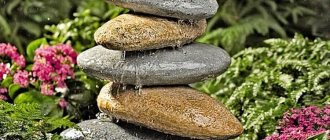
The remains of natural stone are perfect for decorating a pond in the country. A small pond will add unique comfort to the atmosphere of the dacha. Flower beds, crafts or a recreation area will look good around. If the pond turns out to be large enough, then it can be decorated with an interesting bridge.
Every motorist always has old tires. You can simply paint them and make bright bases for a flower bed, or you can show your imagination and cut out various shapes.
Children's bracelets with GPS tracker
GPS bracelets for children are a more specific gadget, it is designed specifically for children. In fact, this is an ordinary tracker, only physically made in a children's version, in the form of a bright bracelet. The functions and capabilities of such a device are the same as those of a simple tracker. GPS bracelets for children are cheaper than their older brothers - smart children's watches, and accordingly have fewer capabilities.
Lineable
A device against the loss of a child, for control at close range or within the range of other users of the same device. An interesting solution to the problem of constantly recharging the battery of GPS devices was proposed by the Lineable brand. They made a bracelet that transmits information about the child’s location via Bluetooth 4 (in range), and in case of loss of this signal through surrounding other people’s cell phones. This technology is called crowdsourcing GPS. Accordingly, for correct operation, the device must be within the range of Bluetooth 4. The program implies network distribution of the technology, which the child will always find if there is at least one other lineable user nearby. Therefore, the device is relevant in cities; it will not function in sparsely populated areas or deserts. But the device works without recharging for a whole year, sending its coordinates to the parent’s smartphone. The phone, in turn, must have a special Lineable application installed. Now the system operates in 66 countries, including Russia. The device can be purchased on the official website for 1,290 rubles.
Tinitell
Tinitell, a Swedish development, is a bracelet phone with a tracking function. The device does not have a screen and works with the parents’ phone through a special application. During initial synchronization via Bluetooth, the numbers allowed for mutual calls are recorded in the device from the parent’s smartphone. The number of such numbers is not limited. Children can make calls using certain gestures or voices. On the application screen you can see the child's location. The price of the device on the official website of tinitell is $129.
My Buddy Tag
Another model for monitoring a child at close range, which is positioned as a device for preventing accidents on the water. The bracelet works through the Baddy Tag app. Communication with the smartphone is supported via BLE, which ensures long-term battery life - about a year. When moving away from the parent at a certain distance (several tens of meters), the bracelet sends a signal to the phone. The same thing happens when a bracelet falls into water. The gadget will be useful for parents of little fidgets, for example, during a picnic or walks in the park. The price from official representatives in Russia is 2990 rubles.
Processing the results
The results are presented as a text file:
Next, we will enter the obtained data into Excel:
Set the column separator to comma:
Ready:
Next, you can load the whole thing into Google Earth Pro software using the File -> Open
, open our file and select the columns responsible for latitude and longitude and get a similar track (since I was in one place, I got a scattering of points):
You can select a point and display the entire number of points that correspond to it:
Bottom line
In general, the logger works, you can write a track, followed by editing on the map.
Also in software from Google, the track can be saved in a more popular format that other maps support. I more than satisfied my curiosity.
The downside is that it is a small antenna; sometimes a cold start can take up to 10 minutes (depending on how cloudy it is and the time of day). The antenna, of course, can be replaced with a homemade one, or purchased in addition; there are quite a few active antennas on the market.
Thanks for your time.
Models of the "Tracker" brand
Beacons of this brand vary quite a lot in parameters. The company produces models for both cars and people. The most popular in our time are considered to be modifications with open-type rectifiers. Photoresistors in devices are most often installed at low frequencies. It should also be noted that the sensitivity parameter for most modifications fluctuates around 8 microns. If we consider automotive devices, then such models are powered by batteries with a voltage of 20 V. A high-quality beacon from the presented brand will cost around 4,500 rubles.
How to choose a model?
First of all, when buying a beacon, it is important to evaluate the power of the model. For an automotive device, this parameter is 20 V. Chips in many models are installed in the MT series. Some devices have a function. Data processing takes an average of 20 seconds. It should also be taken into account that photoresistors differ quite greatly in frequency. Most often you can find models with a parameter of 12 Hz. But it is worth remembering the storage conditions of the device. As a rule, beacons do not like low temperatures. A good model these days will cost about 5 thousand rubles.
Update from 05/22/18
1. Replaced the housing and made an antenna from the link I provided.
(Reduced the cold start time, finds satellites faster, much faster.) 2. Moved the debug connector outside (after playing around, I’ll write more interesting firmware, I’ll post it here)
3. To reduce the space taken up, I disassembled the display and soldered it to it.
So far this is the view.