If you need to create an even and neat hole in a glass surface, it is not necessary to contact experienced and qualified specialists, whose services are quite expensive. This procedure can be performed with your own hands in a home workshop, but, of course, to do this you need to know how to drill glass, what tools, consumables and equipment to use.
To drill glass, use one of the methods discussed in this article
We understand the features of the material
Before asking yourself the question of how to drill glass at home, you should at least get acquainted in general terms with the characteristics and features of this material.
The glass production process is quite complex. It is performed at industrial enterprises equipped with special equipment. The main stage of this process is the preparation of a melt, which includes several components. Such a melt for glass is subjected to sudden supercooling, and the crystallization process is not completely completed.
To prepare the melt, the mixture of components that make up the future glass is subjected to significant heating - up to 2500°. Depending on the chemical basis of the melt, glasses are distinguished:
- oxide category;
- sulfide;
- fluoride type.
Oxide glass (aka silicate) is used to make bottles.
Glass, which can also be opaque, is divided into various types depending on the main characteristics of the material. So, glass is distinguished:
- quartz, which is obtained by melting quartzite, also known as “rock crystal” (this material can be of natural origin and is found mainly in places where quartz deposits have been exposed to lightning);
- optical type, used for the manufacture of basic elements of optical instruments (lenses, prisms, etc.);
- highly resistant to aggressive chemicals and elevated temperatures;
- industrial use (the most extensive category of glass, also used in everyday life).
The question of how to drill a hole in glass most often arises when using the latter type of product. Industrial products, in turn, are also divided into several categories:
- potassium-sodium type (such glasses, characterized by a clean and light internal structure, have a relatively low melting point, so they are often used for the manufacture of glass products of complex shapes);
- potassium-calcium type (glass of this type has a surface without a pronounced shine, is highly hard and difficult to melt);
- lead type (such glasses have a pronounced shine, which makes them very similar to crystal, high fragility with a fairly high plasticity of the internal structure, significant specific gravity and a higher price when compared with the cost of products of other types);
- borosilicate (they are highly resistant to temperature changes and mechanical stress and are quite expensive).
In most cases, drilling of window or display glass is required
There is also a classification of glass according to purpose. Thus, various types of glass are used for:
- glazing of windows and other translucent structures;
- manufacturing of containers;
- reducing radiation levels;
- fiberglass production;
- protecting smartphone screens;
- making dishes;
- production of thermometers capable of measuring temperature in the range from –200° to +650°;
- manufacturing laboratory glassware (such glasses are characterized by high thermal stability);
- production of medical products (ampoules, tubes, containers for medicines);
- fireplace screens and ovens (in such cases, heat-resistant glass is used);
- manufacturing of electric lamps (in this case, so-called electric bulb glasses are used);
- production of incandescent lamps, X-ray tubes, ignitrons (this requires vacuum glass);
- creation of elements of optical instruments - cameras, microscopes, telescopes, etc.;
- manufacturing thin-walled chemical containers and other products that require high resistance to chemical and thermal effects (for this, quartzoid glasses, also known as Vicor, are used).
Drilling thick glass is best done on a machine
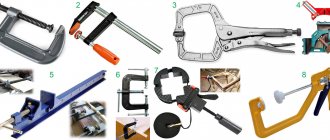
What tools are used to drill glass?
To prevent glass drilling from ending in cracking and complete destruction, it is very important to know not only how, but also how to drill glass correctly. There are many tools on the market today, some types of which can be used to create holes in glass.
- A drill, the working part of which is made of hard alloy and has the shape of a feather or spear, allows you to make a hole in glass with a diameter of 3–12 mm. Using such a drill requires certain skills. However, even their presence and maximum care when performing work will not help to drill glass with this tool without small chips.
- A diamond glass drill, the working part of which also has the shape of a spear, allows you to drill holes better. Such a tool, the cutting part of which is coated with diamond, provides softer drilling.
- Glass drills, made in the form of a tube, are used in cases where it is necessary to make a large diameter hole in the glass. It is more convenient to use a tubular drill complete with a drilling machine.
- When using brass drills, the cutting part of which is coated with diamond, it is necessary to take care of their high-quality cooling, for which water or turpentine is supplied to the processing zone.
- Tubular glass crowns, made with diamond coating on the cutting part, also require high-quality cooling. If you don't know how to cut a large hole in glass, this tubular drill bit will help you solve the problem.
Main types of glass drills
Product preparation
When wondering how to cut a hole in glass so that the hole formed in it is as neat as possible, and the glass itself does not crack, it is important to know how to properly prepare it for processing. To drill glass with your own hands, you need to perform the following preparatory steps:
- The surface of the glass that needs to be drilled is degreased with alcohol or turpentine. After this, it must be wiped with a dry cloth.
- The glass sheet or mirror must be placed on a surface that will prevent the product from sliding during processing.
- The surface on which the glass sheet or mirror will be placed must be larger than the product itself. The edges of the sheet should not be allowed to protrude beyond its limits.
- It is advisable to stick masking tape or a piece of plaster on the place that needs to be drilled to prevent the tool from slipping.
- The center of the future hole is indicated using a regular marker.
- If you are familiar with drilling glass at home only from videos, then to gain practical skills it is better to first practice on unnecessary glass shards. This training will allow you to subsequently drill glass efficiently.
- Drilling holes in glass should be done as carefully as possible, without unnecessary haste. In this case, minimal pressure should be applied to the tool used.
- The glass and ceramic drill that will be used for processing should be positioned strictly perpendicular to the surface of the product.
- You should not drill holes in glass in one pass; you must periodically stop the process to allow the tool to cool completely.
- When the glass sheet or mirror is drilled almost completely, you should stop the process, turn the workpiece over and continue on the other side of the product. This approach will allow you to drill a hole in a mirror or glass sheet with the highest quality possible and minimize the risk of chips and cracks.
- To make the edges of the hole you drilled even neater, you can further sand them with fine sandpaper.
: From PEV resistor
For such a soldering iron, you will need an old ceramic insulated resistor, which will be used as a heating element. You can use a resistor from old electrical equipment; the required parameters are calculated using the formula: P = U 2 /R,
Where P is the power of the soldering iron;
U – supply voltage;
R is the ohmic resistance of the resistor.
This homemade soldering iron is designed to operate on low voltage of 12 or 24 V, which should be taken into account when calculating the power of the device. Thanks to this, it can be powered both from a step-down power supply and from a car battery. If necessary, you can select a resistor for a 220 V supply voltage, but in this example we will consider a low-voltage option.
In addition to the PEV resistor, for manufacturing you will need pieces of textolite, getinax or dry wood for the insulating handle, the main thing is that they can withstand high temperatures. Two copper rods of different diameters for making a heat sink and a soldering tip. Connecting wires or factory 12V power supply. You will also need elements for fixing, a file, a jigsaw, a drill, a tap, a drill.
The soldering iron manufacturing process consists of the following steps:
- A copper rod is selected for the current collector, which should fit tightly into the internal hole of the resistor. The quality of heat transfer from the heater to the soldering iron tip will depend on the density.
Rice. 1: fits tightly into the hole - For the sting, a copper rod or wire of smaller diameter is selected. Sharpen the edge of the rod to obtain the desired shape; the shape of a flat-head screwdriver is considered the most convenient for beginners.
- Drill holes on both sides and cut threads into them with a tap - one for the fixing bolt with a washer, the second for the copper tip.
- Insert the heat sink into the resistor and measure the depth of the location, make a mark on the surface. At the mark, make a radial groove using a file - a retaining ring will be inserted into it, which can be made from a spring or washer.
- At one end of the copper wire for the soldering iron tip, cut a thread and screw it into the heat sink.
Rice. 2: screw into the heat sink - Assemble the entire structure together, secure both copper rods with threaded connections and a retaining ring.
- Strip the ends of the power supply from insulation, if necessary, remove it and the plug will no longer be needed.
- Secure the ends of the copper wires from the power supply to the contacts of the resistor. To do this, use a bolted connection, be sure to tighten the nuts tightly to get good contact.
- Using a jigsaw, cut out a handle from the old board; in this example, it will consist of two halves, between which there is an electrical cord. You can also cut a groove for wires in it.
Rice. 3: Place the power cord into the handle - Assemble the handle - secure the halves with bolts or rivets.
The cordless soldering iron is ready, it can be used for soldering microcircuits, electrical contacts of automotive wiring, etc. If you don't have a ceramic resistor at hand, you can make a soldering iron from nichrome wire.
Drilling glass using a regular drill
Many home craftsmen are interested in the question of how to drill glass or a mirror, using not a tubular or other special drill, but a regular tool. In order to perform this procedure, you will need the following tools and supplies:
- a drill, which is usually used to drill metal, ceramic and tile materials;
- low-speed drill, instead of which you can use a screwdriver;
- a piece of ordinary plasticine;
- turpentine;
- alcohol solution.
The edge on the plasticine glass is needed to hold the coolant in the drilling area
The drilling itself is performed in the following sequence:
- The glass sheet or mirror must be laid on an absolutely flat surface, and the edges of the workpiece must not protrude beyond its limits.
- The area of glass that needs to be drilled must be degreased using cotton wool soaked in an alcohol solution.
- After fixing the drill bit for tiles and glass in the chuck, the minimum number of revolutions is set on the drill. Before starting work, you need to check the degree of runout of the drill: if it is too large, then the tool should be replaced with another one.
- On the surface of the glass that needs to be drilled (in the place of direct processing), it is necessary to fix a piece of plasticine, in the middle of which a small depression is made in the form of a funnel. Turpentine is poured into such a recess, through which holes are drilled in the glass.
- To avoid throwing away the cracked object after drilling, this process should be carried out as carefully as possible, without exerting much effort. The minimum rotation speed of the drill chuck should be 250 rpm, and the maximum cannot exceed 1000 rpm.
Adviсe
- In order to prevent the appearance of splits and cracks on the surface, it is necessary to apply a little turpentine or honey to the place that needs to be drilled.
- The drill or screwdriver should not be pressed too hard from above.
- It is necessary to take breaks during the drilling process. Intervals should be between 5 and 10 seconds. Also, during a break, it is advisable to lower the drill into a container of water to cool it down. This is necessary in order to avoid melting.
- Do not rock the screwdriver or drill from side to side.
- If possible, it is better to use a screwdriver, because... it will work in a more gentle mode with its low speed.
- In order to treat the surface, you can use not only alcohol, but also acetone.
- When working with a drill, you should take care of safety precautions: use gloves and goggles.
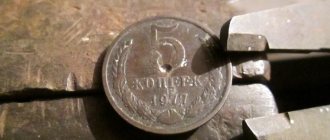
- The drilling point for fragile glass should be no less than 1.5 mm from the edge of the sheet, and for ordinary glass no less than 2.5 cm.
- It is best to work with the material on a wooden surface.
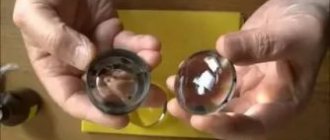
How to make a hole in glass using sand
Few people know how to make a hole in glass using ordinary sand. You will need:
- the sand itself;
- petrol;
- a small amount of tin, which can be replaced with lead;
- gas-burner;
- a metal vessel, which can be used as an ordinary mug.
The surface of the glass that needs to be drilled is degreased, as in all previous cases. A mound of wet sand is poured into the area where the center of the future hole should be located, in which, using a sharp object, a recess is made with a diameter corresponding to the cross section of the hole being created.
Making a hole with molten solder
Molten tin (or lead) is poured into a depression formed in a pile of wet sand, after which it is necessary to wait a few minutes. Then the sand is removed from the surface of the product, and a piece of metal alloy with glass, the dimensions of which fully correspond to the geometric parameters of the hole being formed, is easily removed from the material being processed. A gas torch and a metal mug are used to bring the tin or lead to a molten state.
The cut made using the method described above is of high quality and does not require additional modification.
Lubricating the area to be drilled
In order to successfully drill through any material made of metal (stainless steel, steel, cast iron) in a short period of time, it is recommended to use special lubricants. The area in which drilling will be carried out is treated with lubricant before performing work. Thanks to this, the drill used glides better and does not heat up too much. For example, to process stainless steel, you can make your own special lubricant from machine oil and colloidal sulfur. To do this, you need to take pieces of sulfur, grind them and mix them with oil. In this case, during material processing, lubricant must be supplied to the drilling area on a constant basis.
There are many different ways to use fine drill bits to make large holes in thick, strong materials. During their use, it is recommended to set low speed on the electric drill. Also, when using power tools, when carrying out such work, safety precautions should be observed. It is necessary to use safety glasses or a mask, and wear gloves to avoid accidental injury.
Using a homemade drill
You can drill glass by making your own tool, the design of which includes a diamond roller from a glass cutter and a metal rod. The diamond roller, which will act as the cutting part, is tightly fixed in a slot made on the end part of the metal rod. By fixing such a tool in the drill chuck, you can drill any glass product, and the result will be of sufficient quality.
Homemade drill from a glass cutter
By hardening a regular drill, you can give it the ability to drill through glass. To do this, the working part of the drill must be heated white-hot using a gas burner, and then cooled by dipping it into sealing wax.
Practical recommendations
How to drill glass correctly to get a high-quality result? To solve this problem, it is enough to adhere to the following recommendations:
- To minimize the risk of cracks and splits at the drilling site, the glass can be treated with honey and turpentine.
- The pressure exerted on the drill from above should be minimal.
- The drilling process itself must be performed for 5–10 seconds, after which it is necessary to cool the tool in a vessel with water.
- The drill should not be moved from side to side.
- The distance between the center of the hole and the edge of the workpiece must be at least 1.5 cm.
Naturally, before drilling the glass, you must degrease it and lay it on a flat surface, which is best used as a wooden base.
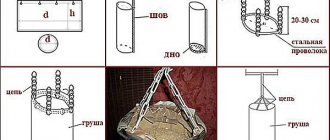
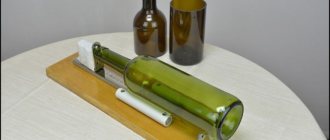
: Drilling a Growler bottle
The process for drilling a Growler bottle is the same as shown on YouTube. The only difference is that you and I water the drilling site with water every 20 seconds, rather than using a “pool” as in the video. The drilling process takes no more than 2 minutes. Use a file to file the edges of the hole.
Application of glass cutter
You can drill through a glass sheet not only with a tubular drill or a tool for processing ceramic tiles. A regular glass cutter is also used to create holes in this material. How to drill (cut) glass using such a tool? Simple rules should be followed: you cannot make sudden movements with the glass cutter, while gentle pressure is applied to it, and during the processing process, the cut being formed is tapped with the handle of the tool.
A compass is used to cut round holes of large diameter with a glass cutter.
: Failures
The first attempts to drill a hole in the bottle will most likely fail. Don't try to drill through the bottom. The glass bottom has too much internal stress, which can lead to cracking. Also, do not try to drill through the bottle - this is a bad idea, because... it will most likely crack. A low-quality or worn drill can also lead to an accident.
When working with a drill with a carbide tip for tiles and glass, you should not press the drill too hard, otherwise the bottle will immediately crack. For drilling, it is preferable to use a diamond tubular drill.
These drills can be purchased on Amazon.
Non-standard glass drilling methods
Non-standard methods for making a hole in glass include the following:
- using copper wire as a cutting tool, a solution consisting of one part camphor and two parts turpentine, to which abrasive powder is added;
- using a metal tube as a cutting tool, which is also used together with a special solution and abrasive powder;
- drilling using a piece of tube made of aluminum, copper or duralumin, on which cutting teeth are previously made (drilling using this method is also carried out using a special solution and abrasive powder).
Drilling glass with a copper tube
We have discussed many ways to drill glass, and in conclusion we offer you to watch a detailed master class on making a hole using a diamond crown.