It has long been known that well-chosen, good light for video shooting can make even a budget video camera or smartphone shoot much better.
And this does not always require buying expensive equipment.
Let's look at the basic rules and methods of video shooting at home, which will allow you to get a very high-quality picture.
Method number 1 - natural light
The first option is the most famous and free - light from the window. It is best for it to fall on the subject at an angle of 45 degrees.
In this case, a certain volume appears on your face. If you sit directly towards the window, your face will look flat.
However, on the other hand, this can remove wrinkles.
For female vloggers, this can be a significant point.
Also, never sit at a 90-degree angle to a window. Otherwise, you will get a deep and unsightly shadow on the second half of your face.
If you move closer to the window, you will also create color contrast. That is, the background will be a little darker than you. This draws the viewer's attention to the face well.
In general, every time you shoot, try to position yourself as far as possible from the background (wall, closet, etc.). Otherwise, the result is a flat and boring shot.
In addition, your shadow will fall on this surface and distract the viewer.
This manifests itself not only in sunlight, but also under artificial lighting.
However, despite the simplicity of such lighting, there are problems and difficulties here. The light outside the window changes frequently and you are unable to control these changes.
The sun can hide behind a cloud at any moment, and then look out again. It is impossible to instantly rearrange the frame to accommodate these changes.
beauty plate
Transform your portraits with foil, toothpicks and an external flash.
Use a foil bowl as a starting point for your homemade beauty plate. Photo: Claire Gillo
A beauty dish is a curved, shallow bowl that sits on top of a light source. A smaller plate is fixed in the middle at a certain distance, the purpose of which is to cover the lamp, causing the light to spread in a circle. The result is semi-hard lighting that reflects onto the model without much scattering. It is softer than directional, but sharper than a softbox.
To assemble our beauty plate, you will need a container made of aluminum foil, some foil itself, toothpicks and a light source on which we will mount it all. Place the flash head on the center of the plate and circle it. Cut out the middle and stick the flash through it. If the hole is too large, secure the edges with tape. Then make a small rectangle of foil slightly larger than the head and use toothpicks to secure everything.
For best results, place the plate slightly above the model and point downwards, creating emphasis on the cheekbones.
Method number 2 - natural light + lamp
To make the picture a little more interesting and professional, play with your light sources that are present in the apartment (floor lamp or table lamp).
Add them in combination with sunlight.
In this case, on one side you will have a glare, and on the other there will be light from the window. This gives a completely different picture.
You can also collect all the portable lighting devices that are in the house and illuminate yourself only with them. But this is the worst option, and it rarely ends in success.
Firstly, such light is hard and not diffused.
If anyone doesn’t know, the light for shooting can be soft and hard. For girls, the soft option is more suitable.
For guys, you can use both. Hard light emphasizes the texture of the skin more strongly and creates sharp, deep shadows.
This creates a great artistic effect when needed. Soft light fills all the holes in the skin and it looks more beautiful and smoother.
Don't forget that softness and hardness also depend on the size of the light source. The larger it is, the softer light you will get.
But at the same time, the farther you place it, the more rigid it will become.
The second negative aspect of illumination from portable home lamps is the heterogeneity of the lamps.
If the light bulbs in them are different (power, color temperature), then the whole picture will look very bad and amateurish.
LED panels
Quite often LED panels are used for video shooting. Depending on the size, they can be mounted on a stand or on a camera shoe. Such panels can be used as the main light, or can be used for shooting video on the go.
On-camera LED panels are a compact alternative to large studio lights. Source: videomaker.com
LED panels provide constant illumination and usually allow you to adjust the color temperature. Many models allow you to mount additional modifiers and accessories, including filters and softboxes.
Standard backlight scheme
In general, most novice video bloggers use a standard lighting scheme. It consists of 3 sources:
- painting light
- filling
- back
The painter is the main source that illuminates the entire scene. In the original version, it could be light from a window.
At the same time, it doesn’t always have to be clear and sunny outside. On the contrary, in relatively cloudy weather, you can get very soft and cold light.
In this case, the difference between light and shadow will be leveled. And the transition between the illuminated part of the face and the unlit one is not pronounced.
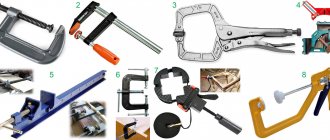
As for fill light, with a budget option, you can again use natural lighting. How to do it?
Very simple. Use a standard reflector or reflective surface.
They are much cheaper than softboxes. By experimenting with distance and angle, you can easily highlight the shadow side of your subject.
If you don't have a factory reflector, make your own using foam and foil.
Next, to separate the object from the background, we move on to a backlight source. An ordinary portable standard lamp will do here.
It is better to take a model on a clothespin. It can be easily adapted to a variety of places.
Screw an LED or energy-saving light bulb with a temperature of 5000-6500K into it, and hook it behind the subject to any tall object (hanger, closet shelf). Just so that she doesn't get into the frame.
This backlight should be located behind the “actor,” approximately opposite the key light from the window. It will help separate it from the general background.
A visual three-point diagram when combining natural and artificial lighting will look like this.
Torch
One of the primitive means of providing light is, of course, a torch. A certain handle and a flammable element, a composition on the knob. The torch handle must be made of wood. The metal will become hot and it will be impossible to hold it, even through a rag potholder. The plastic will float and melt. So, just wood. Affordable and practical.
The simplest torch is a piece of coniferous tree root. The root is dug up and cut to the required length. The end is split into sectors with a knife. They set it on fire. Due to the porous structure and abundance of resin, such a primitive torch burns well and for quite a long time.
A slightly more complex torch is a taiga candle. All sorts of dry kindling and pieces of pine resin are pushed into the split at the end of the branch. The other end of the stick is sharpened. The candle is lit from the flame of the fire. The sharp end is stuck into the ground. It can burn and give light for a long time while you add pieces of resin.
A more civilized torch has a wooden base and a natural fabric or rag wound around the end. The fabric is impregnated with some kind of flammable composition:
- petrol
- kerosene
- alcohol
- fuel oil
- machine oil
- resin
- vegetable oils
Video Lights
What lamps are best to choose for illumination when shooting photos and videos? The ideal option is energy-saving with a temperature of 5500 Kelvin.
But they are sold mainly in special stores with photographic equipment. In addition, they are large, expensive, not very comfortable and unsafe.
They are very easy to break. However, do not forget that there is mercury inside such products.
Therefore, professionals advise choosing LED lamps from well-known companies Philips and Osram.
They have more consistent quality in terms of color rendering and stated color temperature than many other companies. They are sold in regular supermarkets.
Choose the most powerful 12-14W models with a color rendering index CRI of 85% and higher. The bigger, the better.
The difference between a CRI greater than 90 and much smaller values is quite significant and visible even to the naked eye. Not to mention the camera.
Try never to use cheap Chinese lighting products for photography and video shooting. Even the LED panels with which Ali Express is littered are treated with caution.
They often give a greenish tint. Therefore, it is better to take proven brands.
The color temperature of home video lamps should be at least 4100K. These same light bulbs can be used in softboxes.
They are quite suitable for highlighting human skin. 5500K is more expensive and harder to find.
Many experts also advise buying an on-camera light. These are rectangular or round ice panels with 160 or 216 LEDs.
However, such light is more operational than stationary. Even with a diffuser, it gives a harsh and not particularly good result. If you, as a cameraman, go out at 1 am to film an accident, then this option is perfect for you.
It is mobile and bright. But this is not a vlogging light that should be used to constantly illuminate your face. It can only be used to highlight the background.
When directed at a person, such an ice panel will also blind, forcing you to squint.
By the way, enlarged versions of such panels with 600 LEDs are also sold, with the ability to adjust the brightness.
This is already a more acceptable option, with the exception of one BUT. They are expensive. And this does not fall into the category of budget light.
Also be careful when adjusting brightness using dimmers.
Because of them, even good light bulbs can produce a strobe effect.
LED lamps begin to flicker and pulsate when the brightness decreases. Moreover, this may not be noticeable to the naked eye.
There are generally models of lamps that can operate for a long time on compact batteries.
With them you will not depend on the distance of sockets and get tangled in the wires of your carriers. But here again the question of price arises.
Best for Vlogging: Rotolight LED Ring Light Kit for Content Creators
Small and lightweight, the Rotolight LED ring light kit is battery operated and great for mobile vloggers . It can be attached to any camera or smartphone using a bracket, or mounted above a shotgun microphone like the Rode Videomic Pro. A travel-friendly small tripod allows you to level and stabilize your shots outside the home. You can also use it as a handle for shooting on the go.
The lighting is easy to set up and use, and the batteries can be changed quickly. It's not the brightest option in this article and lacks a brightness control. Still, this is an excellent model for videos for social networks.
Daylight white light is balanced for natural light shooting. The kit includes a set of filters if you need to shoot under artificial light. Two diffusion filters are also available for more flattering facial lighting.
- Brightness : 1000 lumens
- Adjustable brightness : no
- Color temperature : 3200, 4100, 5600K
- CRI: 91
- Power supply : 3xAA
Softbox lighting
Now let's talk about the best option. These are, of course, softboxes.
They are usually purchased in sets of 2 pieces. From the same Chinese you can find really good and not very expensive options.
More details
If you don’t have enough funds yet, make them yourself from scrap materials. There is nothing complicated about making them.
The only disadvantage of softboxes is that they take up a lot of space.
Gels
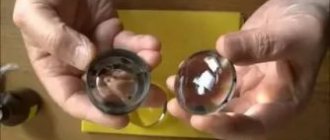
Turn a flashlight and external flash into colored light sources using regular cellophane.
The combination of colored gels will create the effect of a combined shade. Photo: Claire Gillo
Color gel, also called a color filter or simply gel, is a transparent material that gives light a specific hue. Gels are often used to correct white balance problems. However, in recent years it has become popular to combine different gels with strong colors to achieve a distinctive look. Check out the work of artists like Nadav Kander if you're looking for inspiration.
When working with gel, at first it is better to limit yourself to two colors. As you develop your skills and gain a better understanding of colors, you can add as many gels as you like. For our photo we used cool blue and warm yellow.
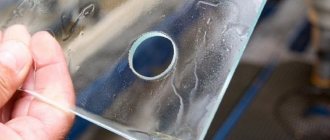
To attach the cellophane (gel) to the flash, we simply cut a piece of blue clear material and wrapped it around the front of the head. Since we only had one flash, the second light source was a flashlight wrapped in yellow cellophane. To prevent extraneous light sources from affecting the result, we photographed against a dark background in a dark room. The shutter speed was 8 s. The flash (blue light) caught the water droplets in the air, and the flashlight (yellow) helped create a warm hue at the base of the glass.
Tablet tricks
Use your tablet to create a bright and colorful bokeh background.
The bokeh effect works great with photos of flowers. Photo: Claire Gillo
When photographing small subjects such as flowers, a quick and easy solution for an interesting background is to have a picture on your tablet screen. In our case, we found an image with bokeh. To keep your tablet from turning off while you're shooting, be sure to turn on the always-on screen mode.
Since the light from the tablet screen is quite bright, we pointed a flashlight wrapped in greaseproof paper at the flower. The shooting was carried out in a dark room, and the camera shutter speed was set to 1.3 seconds. As a final touch, we lightly sprinkled the flower with decorative glitter.
Author: Claire Gillo